These darling wooden peg sorting and matching dolls are fun to play with and educational, too! Each doll is painted a color of the rainbow with a matching pot to sit inside. Match each doll with her pot! This post contains affiliate links to the products used in the project.
If you like our wooden peg sorting dolls you'll love these salt dough trucks for imaginative play.

I love simple toys like this. Ones that are easy to make and adored by my little girl.

I found this wooden doll and cups set at Joann's, but I've seen them at Michael's, Hobby Lobby, and on Amazon as well. There are so many cute ways to decorate these dolls. Check out these Super Hero peg dolls from Views from a Step Stool.
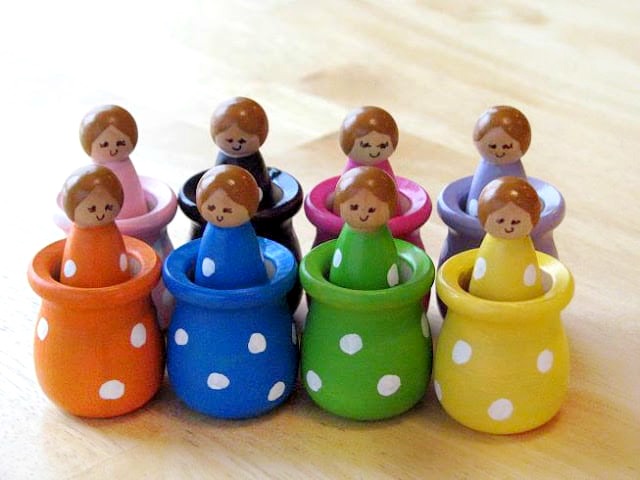
I painted each doll and matching cup with acrylic paint and then applied a clear coat of spray paint. After they were dry, I used a thin sharpie pen to add the faces.
Wooden Peg Sorting and Matching Dolls

Wooden Peg Sorting and Matching Dolls
These darling wooden peg sorting and matching dolls are fun to play with and educational, too! Each doll is painted a color of the rainbow with a matching pot to sit inside. Match each doll with her pot!
Pin Recipe
Yield: 1 set
Cost: $15
Equipment
- blow dryer, optional
Materials
Instructions
- Paint each doll and cup 1 color.
- Let paint dry completely. Optional: use blow dryer to speed up drying process.
- Spray dolls and cups with clear spray paint.
- Let dry completely.
- Add facial details using ultra fine point permanent marker.
Notes
DO NOT add facial details before spraying the dolls with clear spray paint. The clear coating will make the pen ink run.
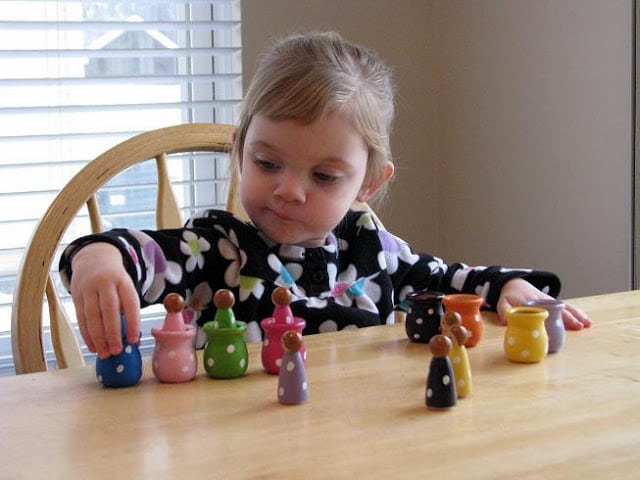
Kaylee loves her "babies". She has had so much fun matching them and it drives her CRAZY if she sees one in the wrong colored cup. Aaron likes to switch them on purpose 🙂 The boys like playing with them too.
5 More Creative Activities for Kids
This post is a quick refresh of a post originally shared in 2011.


[email protected] says
These are so cute! Love them! Thanks for sharing ... I'll be linking. And please come join my link party anytime!
http://childmade.com/index.php?name=Shared%20links
-Sam says
So cute! I featured you on my blog today, have a great weekend!
http://samanthamcnesby.blogspot.com/2011/02/valentines-day-crafts-round-up-2.html
Jennifer says
Such a cute idea, and I love your little polka dots! I featured you today on my favorite things 🙂
http://sunshineandchaucer.blogspot.com/2011/02/my-favorite-things.html
Bella says
Oh your blog is just AWESOME,,, NEVER been here before, and I"M SO excited to have found it. THANKS to you finding your way to mine first, YAYY.
I am TOTALLY your newest HAPPY GLUESTICK follower!!!
That little peg doll project is so cute. I love it, love the colors you picked, and LOVE your pretty little girl, with her concentration face on, and her SHORT little bangs. I simply adore little girls, with short bangs, I think it's just the CUTEST thing ever.
Keep your eye out to see if you'll be FEATURED next week, in my new sidebar feature section. 🙂
Did you see my post about making a card for our soldiers??? You should really see if you can help out with this, I bet you could come up with something really special!!! Read about it HERE.
THANKS so much for linking up to **AMAZE ME AUGUST**I love having you, and thanks to you, I'm getting close to my goal of having 100 link ups, YAYYY.
Oh and PLEASE don't forget to come enter the giveaway from LUXE BLVD, she is now offering a $20.00 store CREDIT, so you can pick ANYTHING you want, how AWESOME right?? I would be so very thankful for the support, and so would STEPH !!!!
Hugs, Bella 🙂
Mama Peck says
Adorable! I know just the little girl to make these for too. Thanks for posting this cute idea!
Mary Ellen says
What a darling idea!! Wish I had some little ones to make these for!
Eva Marie Harp says
My little gril would love these. Very nicely done.
http://www.couturiermommy.com
Christine says
What a cute and fun idea! Definitely something to add to my 'one day' pile!
Coffee@3 says
These are adorable!!! Love the bright colors you chose.
Brook says
Great idea! My two year old daughter would love these! So cute.
Jensamom23 says
What a great idea! These are adorable and so clever. Great job!
MMB Creations says
This is just too cute. I love it. Bookmarked.
The $500 Wedding says
I love these! I made something similar to these but I like this idea better because it encourages critical thinking and matching which is good for my little toddlers. Thank you for sharing!
Nikki says
I love how simple and cute they are. I can handle that!
marie says
This is such a wonderful toy! Perfect for my three grandchildren. I guess I better get busy because these would be a great addition to their Easter baskets!
Thanks for sharing!