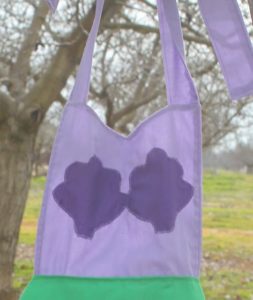
8 in 1 Princess Apron Pattern and Tutorial (3T-8Y)
Use our 8 in 1 princess apron pattern and tutorial to create any number of Disney princesses! Anna, Elsa, Ariel, Cinderella (2 versions!), Snow White, Belle, and Aurora. This easy to follow pattern and tutorial is free and the perfect gift for your little girl!
Yield: 1 apron
Cost: Under $10
Equipment
- sewing machine
- iron
- scissors
- pins
- measuring tape
Materials
- fabric
- thread
- velcro
- elastic (Belle)
- lace (Aurora)
- trimmings (Elsa and Anna)
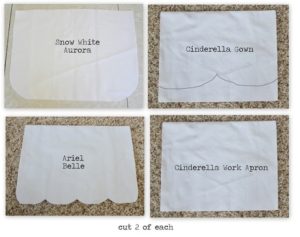
- Cutting Guide Set 1 print this out
- Cutting Guide Set 2 print this out
Instructions
- Pre-wash all of your fabrics. A sturdy cotton or broadcloth is ideal. If your selection is limited and you can only find a thin fabric that is ok. Most sections of the apron are doubled (which is why you are cutting 2 pieces for the skirt and 2 pieces for the apron front) and should hold up well through many washings. You will need about 1 1/2 yards (in varying colors) of fabric for each apron. It is better to have more than you will need than not enough, so I would suggest purchasing 1 yard for the skirt and 3/4 yard for each color after that.
- Print out cutting guide for the princess apron you'd like to make. I labeled each piece with the color of fabric to use. Feel free to swap those out as you see fit. Sometimes I used a white band for the apron, other times I thought I would like it better with a colored one. It is totally up to you.
- To make the bodice pattern, fold a piece of 8 1/2" x 11" paper in half. Starting at the outer corner, create a slight curve downward and cut to the fold.
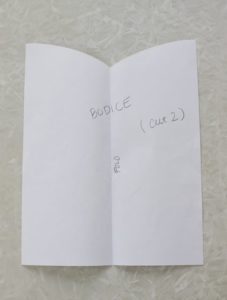
- Open up and you should have a curved V shape.

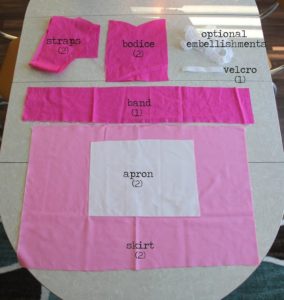
- Take a look to make sure you have all of the needed pieces: 2 skirt pieces, 2 apron pieces, 2 straps, 1 band, 2 bodice pieces, 1 Velcro strip, optional embellishments.
Bodice
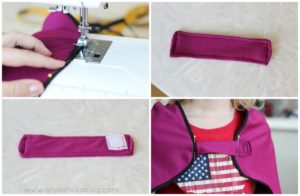
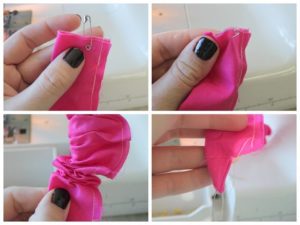
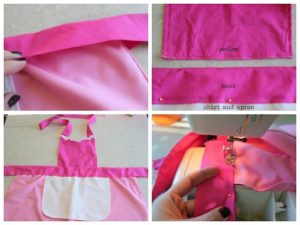
- All princess bodices (except for Elsa and Anna) are made as follows. Refer to the bottom of the post for the Elsa and Anna modifications. Fold each strap (4" x 24") in half and sew up the long sides, leaving the top and bottom open.Trim seams. Turn right side out by attaching a safety pin to the top and slipping it inside. Feed it through while scrunching the fabric as you go. When it comes out the bottom, pull and the rest will follow.Press.
- Stitch sides of bodice, leaving top and bottom open. Fold over one end of each strap, creating a finished edge and press. Top stitch around each strap (you don't need to sew the bottom). Slide the straps inside the bodice, lining the edges up with the edges of the bodice. The unfinished edge of the strap will peak out of the top. Pin strap in place.
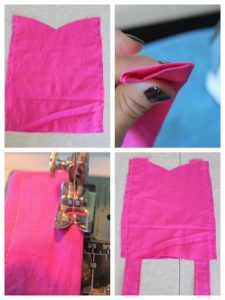
- Sew bodice top (V neck}, catching the straps in the seams as you go. Clip center of the V so that it lays flat when turned right-side out. Turn right side out and top stitch around sides and top. Press. I added some lace to the V for the Aurora apron, but that is optional.
Apron Front
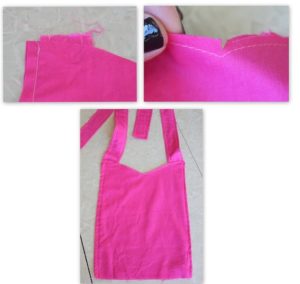
- The way you cut your apron will depend on which princess apron you are making. For directions on cutting scallops for Belle and Ariel, the Cinderella Ball apron front, as well as creating the "tear" for the Cinderella apron, scroll to bottom of the post. Snow White and Aurora are simply cut by curving the edges, slightly. To sew the apron front, stitch sides and bottoms together, leaving top open. Turn right-side out and press. Top stitch around sides and bottom. Note: I did not create an apron front for Elsa and Anna, but you can add one if you'd like.
Skirt
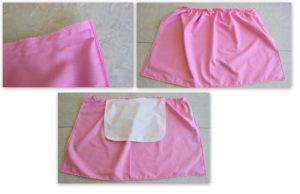
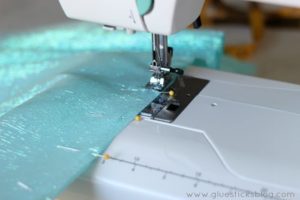
- For the Belle and Ariel Skirt, scroll to the bottom. Elsa's is made with one piece of organza (sparkly fabric) and one piece of cotton. All others are sewn as follows: Sew sides and bottom of skirt together (leaving top open). Trim seams. Turn right-side-out and press. Top stitch around.To create the gathering, sew 5/8" across the top, leaving long strings and setting your stitch length as long as it will go (mine goes to a 4). Sew another row of gathering stitches 3/8" away from the first one. Your skirt should be about 38" wide. Pull the gathering strings and gather until skirt is 28" wide. Lay your apron front on top, centering it, and you are ready to make the waist band!
Band
- Fold and press your band 3/8" all the way around. Fold in half and press so that you have a nice center line to line up your skirt with. Center the skirt and apron front along the center line. The band is 30" wide. The skirt is about 28" wide. You will have about an inch of space on each end of the band.
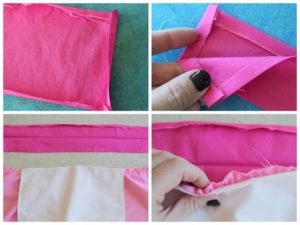
- Fold over your band, making a sandwich over your skirt. Pin, making sure the top and bottom layers of the band match up. Pin across the bottom. Zig zag or serge the bottom of the bodice to keep from fraying. Place your pinned band/skirt section on top of the bodice, lining it up about 3/8" from the bottom of the bodice and pin together. (see 3rd photo above). Now sew your band together. Starting on the side, stitch 1/4" ALL THE WAY AROUND, catching the bodice in as you go. You will sew through the bodice twice. Once when you sew the bottom of the band and once as you go across the top. Sew slowly, making sure that your edges all line up through all fabric thicknesses.
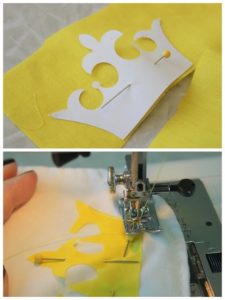
Applique
- The apron front appliques are fun, but not necessary. And my zig zag skills are not all that great, but I am still happy with how they turned out. Pin your cut out to the apron front and zig zag around to secure into place. Pattern pieces are in the cutting guide that you printed out. For the Cinderella Work Apron, I added details to the mop and bucket by zig zagging on top of the fabric for the mop bands as well as bucket lines. Elsa and Anna do not have appliques.
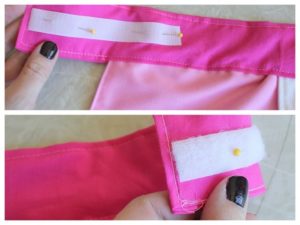
Velcro
- Now for the Velcro. You are ALMOST done! Center the scratchy side with the top left of the apron band. Pin in place and stitch. Center the soft side with the under right side and stitch into place.
Princess Customizations
Ariel
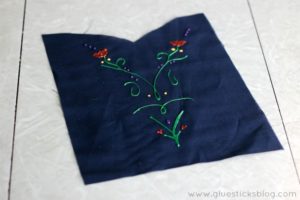
- Ariel: The Ariel apron is the only one with a bodice appliqué. Center it on the bodice and pin. Zig zag around to sew it in place.
Cinderella's Work Apron
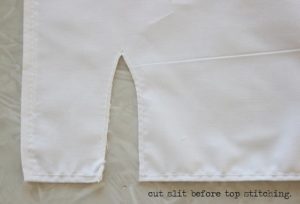
- After sewing the apron, turn it right-side out and press. Before top stitching around apron, cut a slit for the "tear" in Cinderella's apron. Then top stitch around entire apron front and continue on with the basic princess tutorial. I didn't worry about the raw edge here. It's supposed to look torn!
Cinderella's Ball Gown
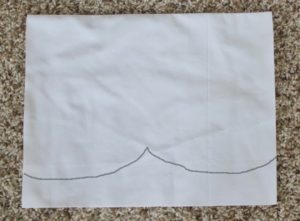
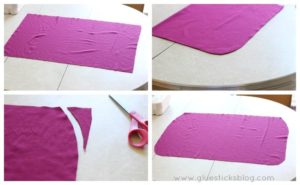
- Please excuse my poor digital editing skills, but hopefully you will get the idea. And actually it isn't really to scale, so hopefully I can explain it well enough. Fold your apron front sections in half. Starting close to the bottom (closer to the bottom than what the picture shows), cut a curve up towards the center fold, ending about 3-4" high. Open your fold and you should have the curved apron front.
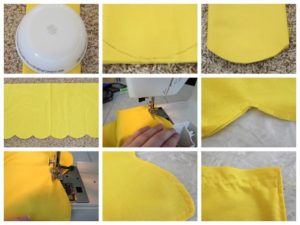
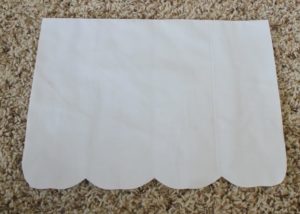
Scalloped Skirt for Ariel and Belle
- Fold the skirt in half, then in half again, and then again. For a total of 3 times. Lay a bowl or something round close to the edge and trace rounded corners. Cut and open skirt. You should have 8 scallops. Sew sides and bottom of skirt (leaving top open). Clip curves and centers of scallops close to the edge, but not cutting through seam. Turn right-side-out and press. Top stitch around. To create the gathering, sew 5/8" across the top, leaving long strings and setting your stitch length as long as it will go (mine goes to a 4). Sew another row of gathering stitched 3/8" away from the first one.If you are making a Belle apron, scroll down below to see how to make the billowed skirt.
Belle and Ariel Apron Front
- Use the same technique as above to create the scallops for the white skirt front for both Belle and Ariel, but only folding the apron front twice, creating 4 scallops instead of 8 scallops. To sew the apron front, sew sides and bottom (leaving top open). Clip curves and centers of scallops close to the edge, but not cutting through seam. Turn right-side-out and press. Top stitch around.
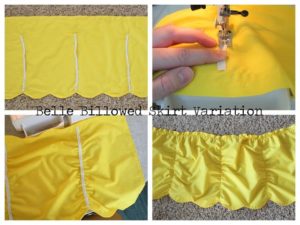
Belle's Billowed Skirt
- Belle's skirt is just plain fun to make! You will need 3 (11") pieces of elastic. About 1/4" or slightly wider. Pin onto skirt. One in the center and one 2 scallops away to the right and also to the left. Starting at the bottom, sew elastic to skirt, pulling and stretching it as you go, ending at the base of the first row of gathering stitches. The skirt is 16" long and the elastic is only 11" long. The difference is what makes the skirt scrunch up and billow.
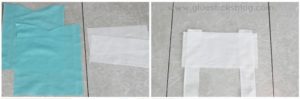
Elsa and Anna Bodice
- The bodice for Elsa and Anna is in two sections. The main piece (similar to the other variations) and the underlay (this section sticks out from the too and the straps attach to it). Here is how to assemble the underlay: Stitch your underlay pieces at the sides, leaving top and bottom open. Slide in your finished straps, lining them up with the side seams and leaving a small over hang (1/2"). Stitch across the top, catching the straps in your seam. Turn right side out.
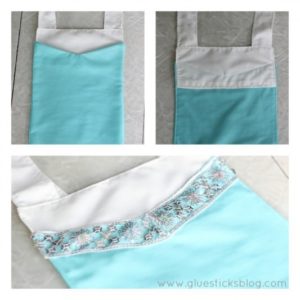
- Fold bottom edges inside 1/2" , press. Top stitch around entire underlay, catching the bottom seam to close it off.

- Now that the underlay and straps are done it is time to make your bodice. I don't have step by step photos here, so you can reference the bodice section for the Aurora apron (omitting the straps since you already added those to the underlay section). Stitch the sides and top (right sides together). Make a small cut to the seam on the "V" of the bodice so that it lays flat when turned right side out. Turn right side out and press bodice. Fold up bottom of the bodice 1/2" and press. Pin bottom to keep closed. Pin underlay underneath bodice. It should stick out about an inch or so from the top (see photo above). Top stitch around bodice. This will attach the udnerlay to the bodice and also close off the bottom of the bodice.
- To create Anna's bodice front I used fabric paint. Let dry over night before sewing bodice. Bodice Embellishments for Elsa and Anna: Elsa has snowflake ribbon sewn across the front. Anna has gold bias tape sewn around bodice. Gold ribbon or ric rac would work well too. As a reference, my ribbon was purchased at Walmart.
Elsa Skirt
- Elsa's skirt is made exactly like the other skirts, with the exception of using sparkly organza for the front piece. So instead of cutting two rectangles from cotton you will cut 1 from cotton and one from your sparkly fabric.
Anna Cape
- You will need: 16"x26" piece of cotton or knit fabric2"x6" piece of cotton or knit fabric1 package black bias tape 1" piece of Velcro Slightly round the bottom corners by trimming them. You can use a bowl as a guide. For the top corners, begin 5" down and angle the corner a bit sharper to create a curved slant.
- Sew bias tape around entire perimeter to finish the edge. Fold your smaller piece of fabric (2"x6") in half, creating a 1"x6" piece. Stitch side seam. Turn right side out. Fold in the ends and top stitch all the way around. Sew one side of Velcro to the end. Decide where you'd like your strap to go on the cape. Having a little model helps with this. If you don't have a model to try it on, just stitch it about 1" from the side on the top corner. Stitch in place. Stitch the other side of the Velcro to the cape.