
DIY Photo Collage Clock
Create a photo collage clock in just a few steps. A beautiful keepsake, and it's functional too!
Yield: 1 clock
Cost: $15
Equipment
- drill
Materials
- 1 thin wood plaque
- photo collage
- scissors
- mod podge
- sponge brush
- clock kit
Instructions
- Drill a hole in the center of your wood plaque the same width as the fitting from the clock kit.
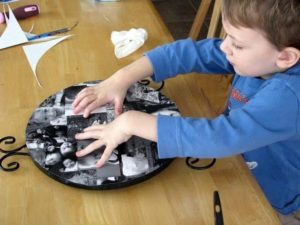
- Using a photo editing program, create a photo collage and print it out.
- Trim the collage to fit the base using scissors.

- Apply a layer of mod podge over the face of the wood plaque. Lay the collage on top and press to smooth.
- Poke a hole through the center of the collage where the clock kit will fit through.
- Attach clock kit according to package instructions.

Notes
I used a clock for my project that already had the hardware attached to the back. If you use a wood plaque, drill a hole in the center and attach a clock kit. A clock kit comes with two hands, a battery compartment and a motor. You can find them at most craft stores.