Nostalgic Sugar Eggs
Make nostalgic panoramic sugar eggs for Easter with this tutorial! Sugar eggs last for years on display and are loaded with cuteness.
Yield: 1 egg
Equipment
- baking sheet
- 5" egg mold
- small cookie cutter for the egg opening
Materials
Eggs
- 3 cups sugar
- 2 Tbsp. water
- food coloring
- cardboard
Royal Icing
- 1/4 cup meringue powder
- 1/3 cup warm water
- 1 pound powdered sugar
- food coloring
Decoration Items
- grass frosting tip
- star frosting tip
- frosting bags
- icing decorations
- Easter sprinkles
- mini jelly beans
Instructions
- Before starting this project make sure to watch my step-by-step videos as well as the youtube videos that I embedded within the post.
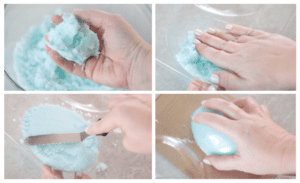
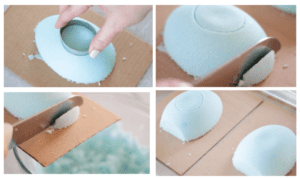
- FILL THE EGG MOLDSCombine water and food coloring together in a small bowl. The color will fade when mixed with sugar so use a little more food coloring than you think you'll need. Pour the colored water over 3 cups of white sugar in a mixing bowl. Mix with a whisk or wooden spoon until evenly distributed. The mixture should look and feel like wet sand.Pack the sugar into the egg mold. Fill all the way to the top, packing tight.Smooth the top of the mold with a spatula, scraping off excess sugar.Lay cardboard over the top of the mold, press down with one hand while holding the mold with the other, and flip. Gently remove mold. If the egg crumbles when you remove the mold, simply pack it again even tighter and try again.
- Gently press a small cookie cutter 1/8" - 1/4" into the top of one of the egg halves. You are not cutting all the way through, just making an indentation that will pop out later. Remove the cookie cutter. This will be where the window will be.Carefully slice a small piece off of the bottom of each egg so that the egg has a flat place to stand once put together. Discard the excess sugar back into the bowl.BAKE THE EGGSYou should now have two egg halves on pieces of cardboard. You can place them both onto a baking sheet or simply bake the cardboard directly on the oven rack (it will not burn). Bake the eggs at 200 degrees for 10 minutes. Cool for 10 minutes.
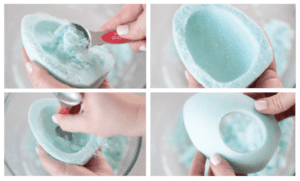
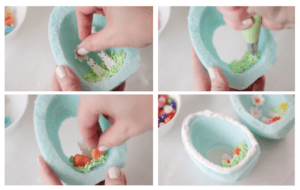
- Hollow out each egg half using a spoon, discarding excess sugar back into the bowl (you can reuse this to make more eggs by adding a little water to rehydrate it). Continue to carefully scoop until you have a shell with a 3/8"-1/2" rim.When you get to the egg half with the window, gently tap against it with your spoon and it should fall right out. Smooth out the opening with the spoon. Place the eggs back into the oven and bake for an additional 5 minutes. Let cool for 5 minutes.
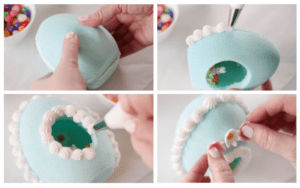
- MAKE THE ROYAL ICINGBeat meringue powder and warm water in a stand mixer until mixed. Add powdered sugar, and beat on low until it comes together. Increase speed to medium speed for 5-8 minutes. It should have stiff peaks and make a "flapping noise" as it hits the side of the bowl. DECORATE THE EGGSTint the royal icing, if desired, then transfer to disposable icing bags that have been fitted with icing tips. Decorate your eggs from the back to the front, meaning: work on the back half of the egg first then work your way to the front half of the egg. Use the royal icing to adhere the decorations to the sugar eggs. Add jelly beans, etc. Let dry for 5-10 minutes.Pipe a line of icing around the rim of one of the eggs.
- FINISHING TOUCHESPress the other egg half on top and hold it in place, smoothing the edges and making sure that the flat spots on the bottom of the egg halves line up.Cover the side seam with royal icing. I did a shell border, but you can do stars or any design you'd like.Cover the opening edge with royal icing as well.Add any finishing touches and let dry!