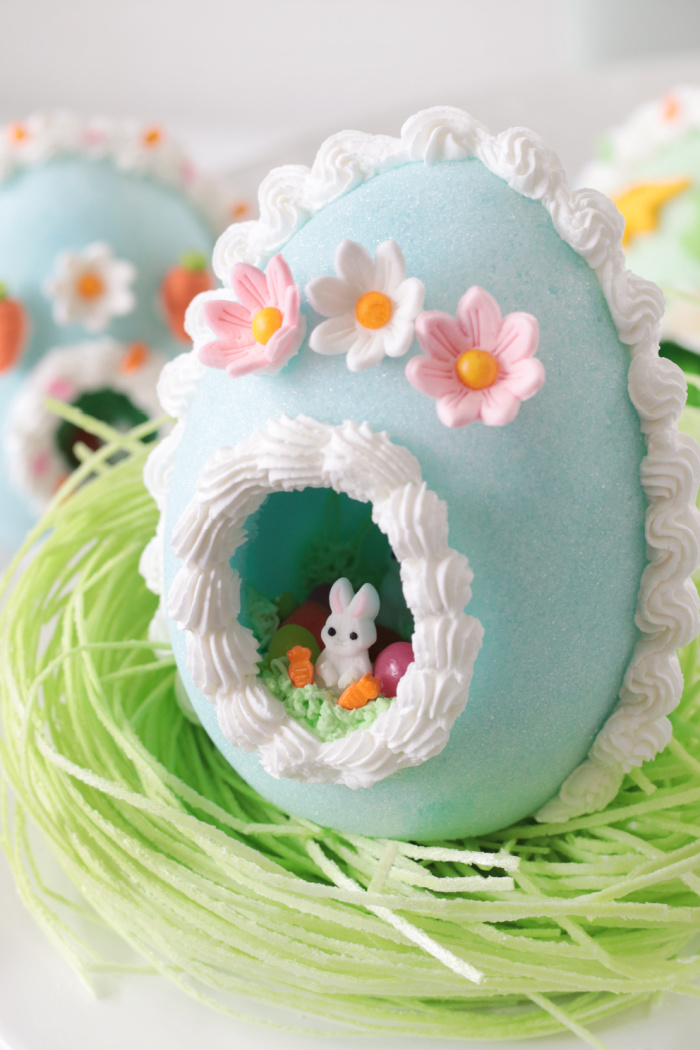
Make nostalgic panoramic sugar eggs for Easter with this tutorial! Sugar eggs last for years on display and are loaded with cuteness.
You might also like our peeps bunny sugar cookies, pop tart bunny house, or our bunny butt sugar cookies!
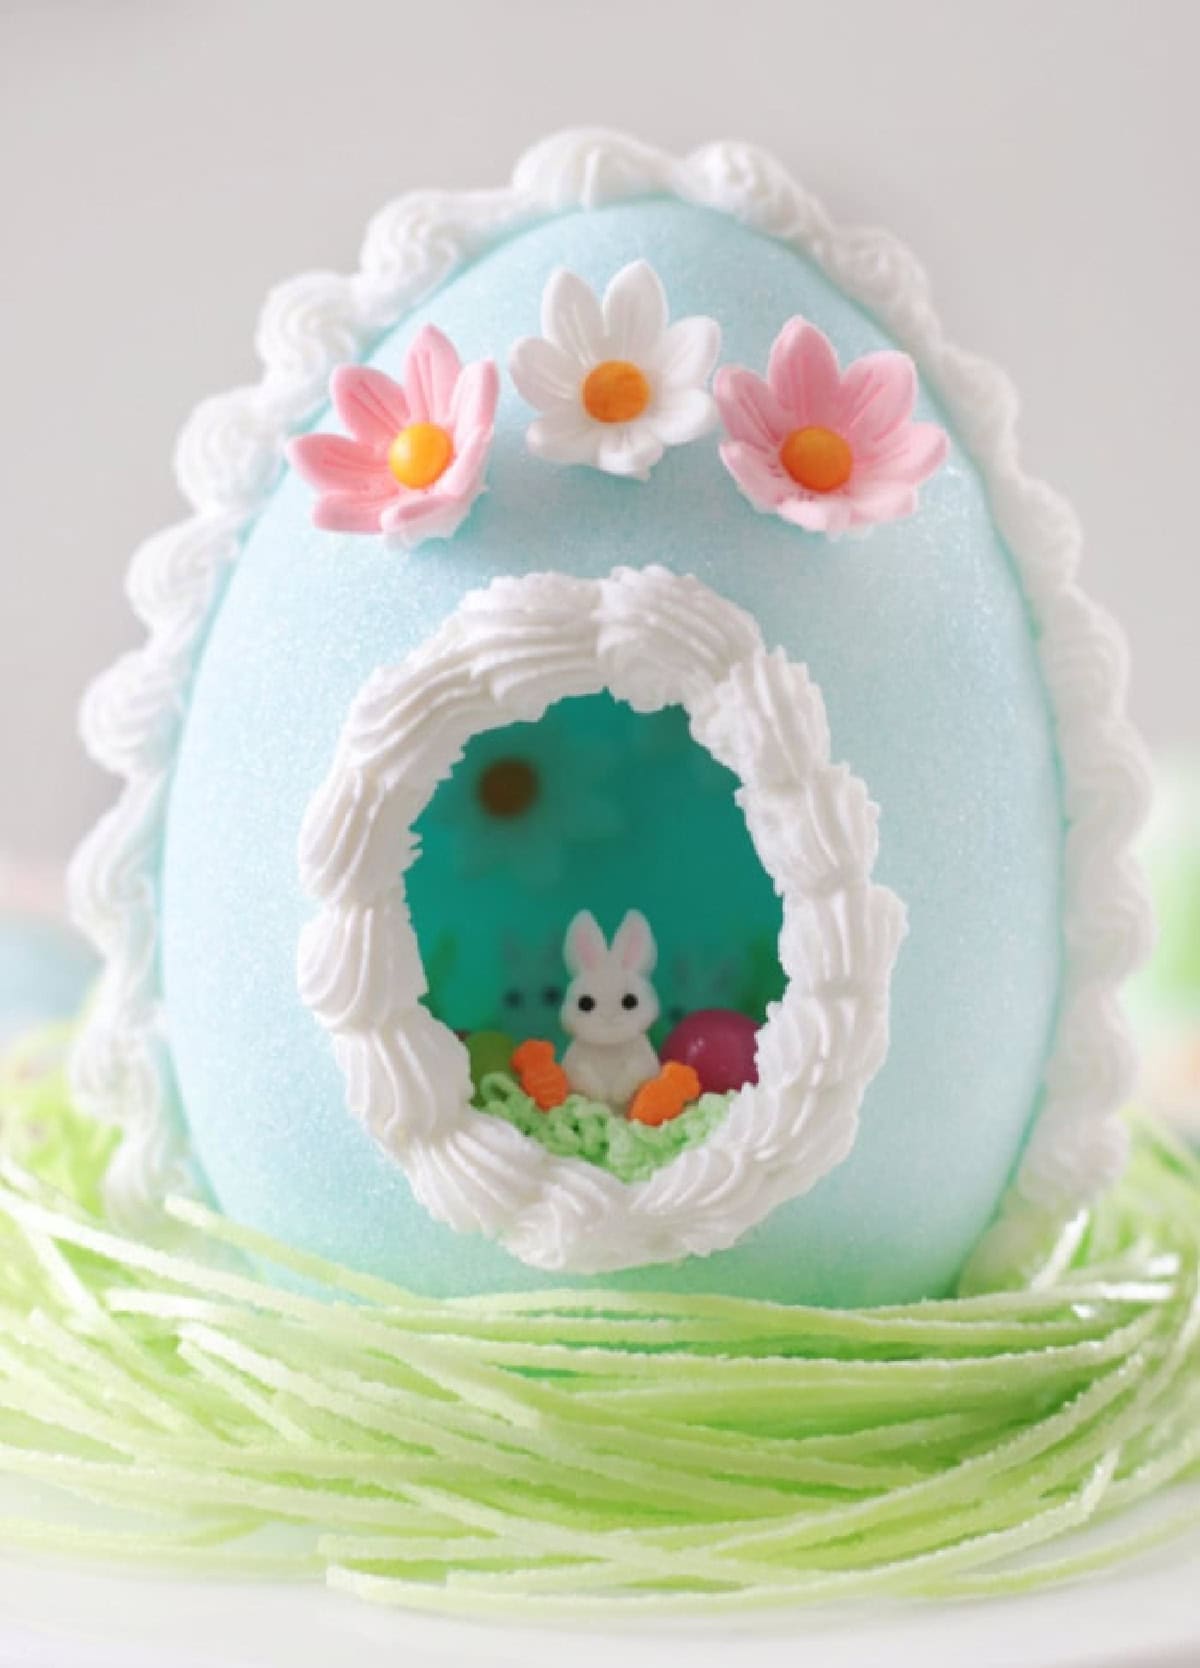
My Grandma had a beautiful egg on display in her china cabinet. It was made of sugar, and when you looked inside, you could see all sorts of flowers and decorations made of icing. The outside was decorated too. I knew it was a work of art, but silently wanted to eat it (as I'm sure most kids would). That sugar egg stayed on display for over 15 years. I'm not sure what happened to the beautiful egg when she moved out of her home, but I decided this year that it was time to learn how to make them with my kids. Our vintage-inspired sugar eggs are less intricate but a lot of fun to make and easy to assemble, and they give the same nostalgic feel.
Why I Like This Craft
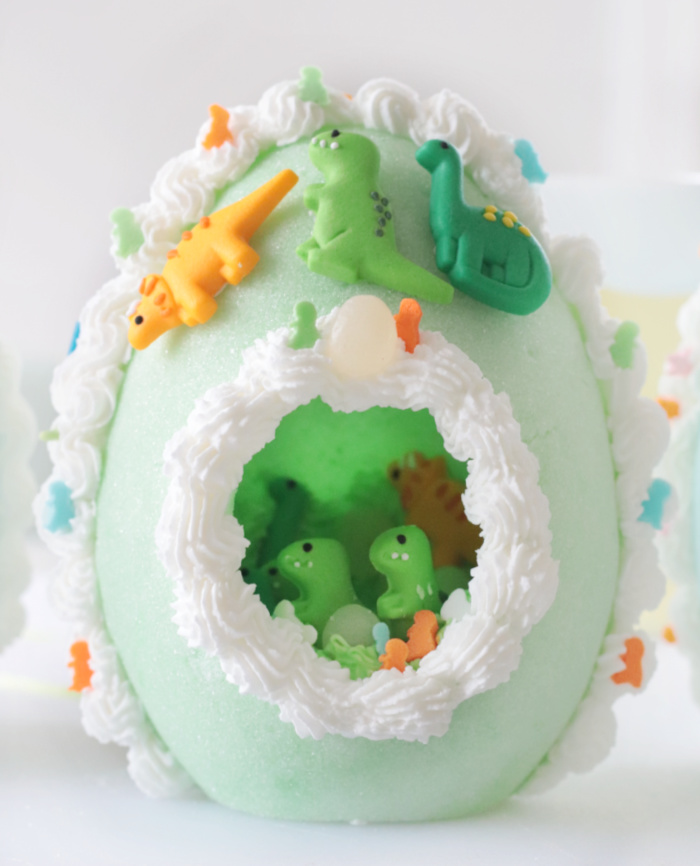
- Simple decorations. Many of the eggs that you see are made with 100% handmade icing flowers and intricate characters. We used pre-made icing decorations to make assembly easier, and I love how they turned out. We even have a dinosaur version, which definitely sets that one apart.
- Step-by-step video. I've now made 6+ eggs using this technique with great success! I highly recommend watching the step-by-step video that I made (it plays under the first image in this post) as well as in the instruction card at the end of the post.
- The sugar can be reused! That's right. If your egg crumbles, mash the sugar up and use it again. After you hollow out the eggs you can reuse the sugar that you removed to make more sugar eggs.
What Others Are Saying
This recipe and instructions have worked wonderfully for me. Just made my second egg in two days.---B on Pinterest
I made one using a large plastic egg from Walmart!---Christina on FB
These are so nostalgic from my childhood.---Stacy on FB
Jump to:
Tips and Tricks
- Vertical panoramic eggs vs. horizontal. Panoramic sugar eggs can be made vertically or horizontally. I prefer the look of vertical eggs, so my eggs are standing tall. You can make whatever you'd like; you'll just need to adjust the location of the look-through hole. If making a horizontal egg, you'll cut off the tip of each molded sugar egg to create a hole to peer through. With vertical eggs, you'll create a hole in the front of each egg with a cookie cutter.
- Baking vs. air drying. I tried several techniques to make the molded sugar eggs. My first attempt was from a tutorial that I found on Taste of Home. It took HOURS to dry, and my eggs immediately crumbled, probably because it was a rainy day and they couldn't dry completely due to the humidity. Then I went over to YouTube and watched probably a dozen videos with varying techniques and measurements. The trick is to bake the eggs in the oven for a few minutes instead of air-drying. Once I did that, it was smooth sailing.
- Different-sized molds require different amounts of sugar. My 5.5" egg mold uses 3 cups of sugar and 2 tablespoons of water. If the mold that you use is bigger or smaller you'll need to adjust.
- When you bake the egg, you are ONLY drying out the outside of the egg. DO NOT bake longer than my recommended time because you want the inside of the egg to still be slightly soft, making it easy to scoop the excess sugar out.
- Use royal icing to assemble the egg. Do not use store-bought frosting in a tub (buttercream). Royal icing sets up like cement and can stand the test of time.
- Humidity and climate can affect drying times for the molded sugar eggs. This is why I recommend baking the eggs instead of allowing them to air dry. It's quicker and yields better results for me.
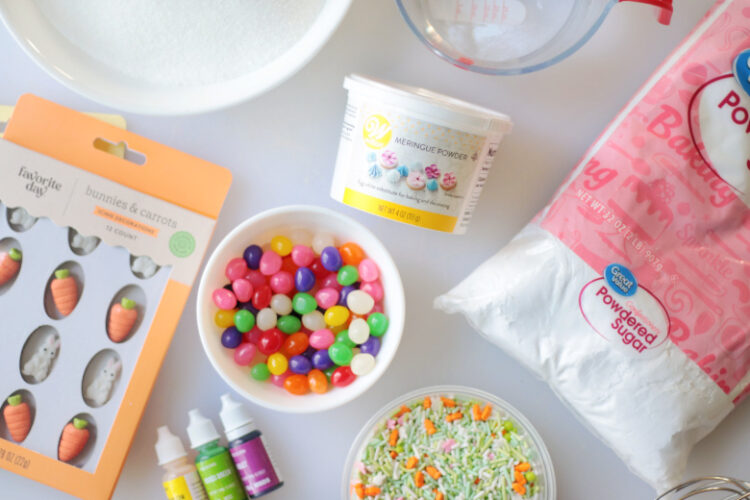
Supplies
Sugar Egg
- egg mold: I found this egg mold on Amazon and it worked great. It comes with two cavities, but I found it easier to just fill one side of the mold at a time, transferring the egg half to a piece of cardboard and then making the other half of the egg.
- water: a small amount of water mixed with the sugar creates a sand-like texture for molding the eggs.
- food coloring: this is optional, but if you'd like a pretty pastel egg you'll need about 6 drops of food coloring added to your water.
- sugar: white granulated sugar works great for sugar eggs. Some recipes call for caster sugar or pulsing the granulated sugar in a food processor. This isn't necessary. Plain white sugar works great.
- cookie cutter: you'll need some sort of cookie cutter to create the opening for the panoramic egg. I used a small oval (egg-shaped) cutter that I already had.
- cardboard: you'll need a couple of pieces of cardboard that are slightly larger than your mold (just cut off the flaps from an Amazon box). You'll place the molded eggs onto the cardboard to bake in the oven. Don't worry, the oven temp is low and won't burn the cardboard.
Royal Icing
- powdered sugar (confectioners' sugar)
- meringue powder: when I make my pop tart houses I simply use powdered sugar and water to make my royal icing and it works great. For sugar eggs you want an extremely sturdy icing that you can pipe so I added meringue powder. You can also use a royal icing recipe that calls for egg whites.
- warm water: room temperature water or warm water works best when mixed with meringue powder.
- food coloring: we only colored the royal icing that we used for the grass, but you can divide the icing and make a variety of colors.
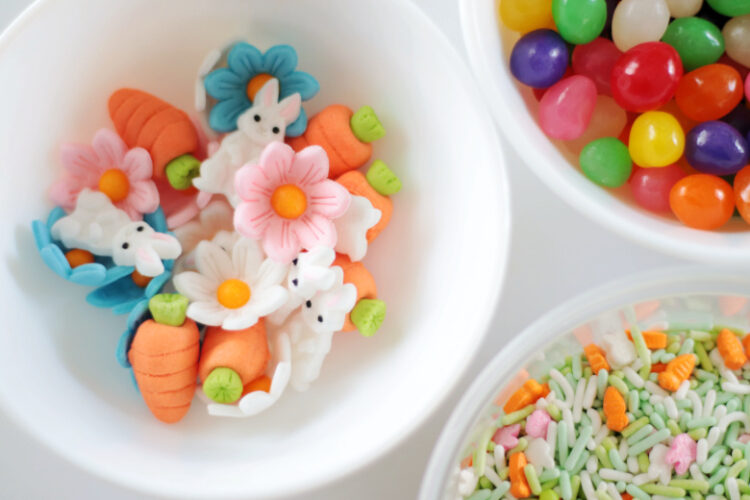
Decorations
- jelly beans: Mini jelly beans worked perfectly as Easter eggs and dinosaur eggs.
- icing decorations: you can find these on Amazon or at Target, Walmart, or Michaels. The dinosaur ones are from Walmart.
- icing tip for grass: you can use a star tip if you don't have a grass tip to create a grassy patch of frosting.
- icing tip (Wilton #32 star): this tip is used for hiding the seam on the egg with icing.
- sprinkles: optional, but Easter sprinkles are fun to add. My kids added a few to the white shell border on the outside of their eggs.
- disposable icing bags: these disposable icing bags make cleanup a breeze. I recommend double bagging the royal icing.
See the how-to card at the end of the post for full information on supplies and quantities.
How To Make Panoramic Sugar Eggs
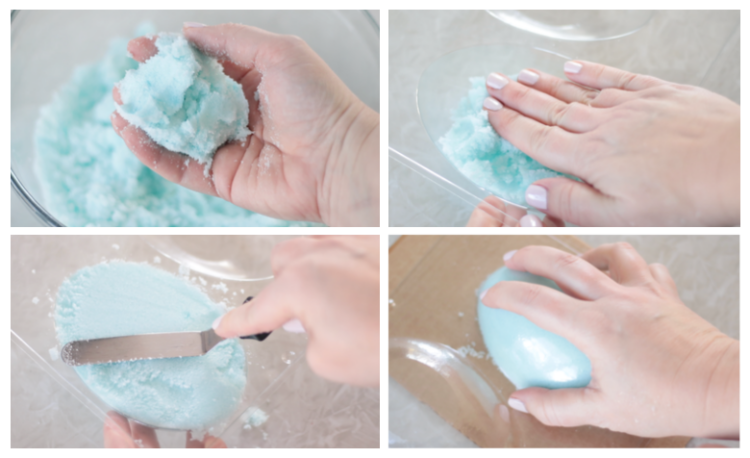
Step 1: Combine water and food coloring together in a small bowl. The color will fade when mixed with sugar so use a little more food coloring than you think you'll need. Pour the colored water over 3 cups of white sugar in a mixing bowl. Mix with a whisk or wooden spoon until evenly distributed. The mixture should look and feel like wet sand.
Step 2: Pack the sugar into the egg mold. Fill all the way to the top, packing tight.
Step 3: Smooth the top of the mold with a spatula, scraping off excess sugar.
Step 4: Lay cardboard over the top of the mold, press down with one hand while holding the mold with the other, and flip. Gently remove mold. If the egg crumbles when you remove the mold, simply pack it again even tighter and try again.
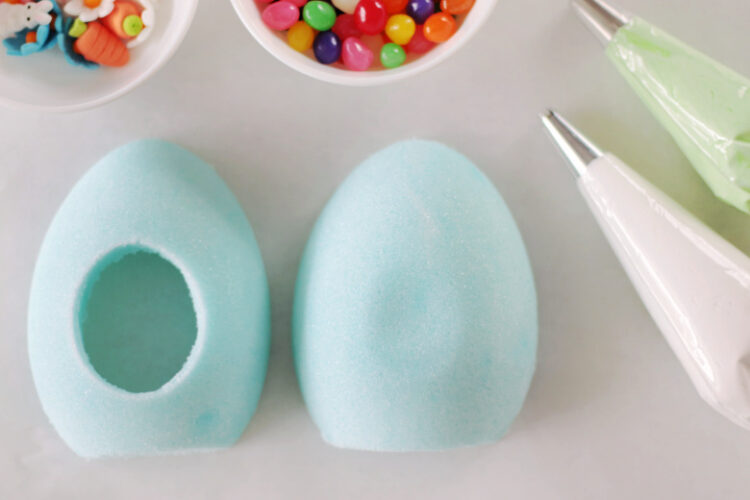
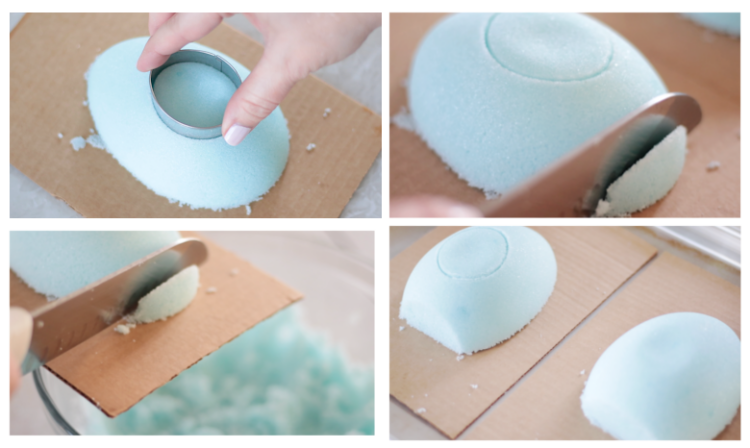
Step 5: Gently press a small cookie cutter ⅛" - ¼" into the top of one of the egg halves. Remove the cookie cutter. This will be where the window will be. Note: you are not cutting all the way through, just making an indentation that will fall out later.
Step 6: Carefully slice a small piece off of the bottom of each egg so that the egg has a flat place to stand once put together.
Step 7: Discard the excess sugar back into the bowl.
Step 8: You should now have two egg halves on pieces of cardboard. You can place them both onto a baking sheet or simply bake the cardboard directly on the oven rack (it will not burn). Bake the eggs at 200 degrees for 10 minutes. Cool for 10 minutes.
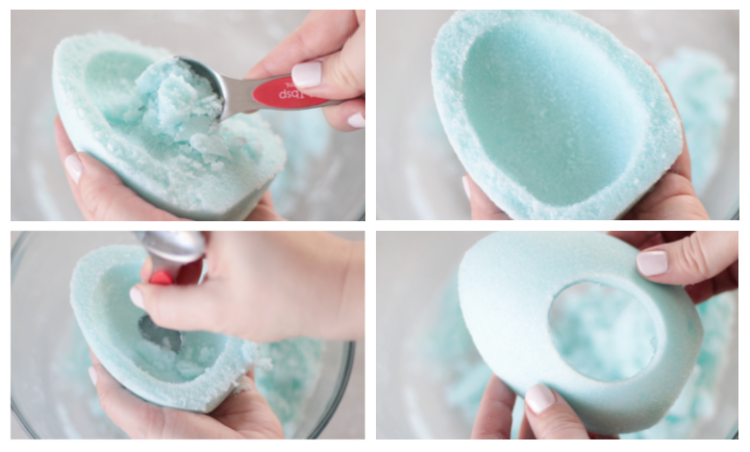
Step 9: Hollow out each egg half using a spoon, discarding excess sugar back into the bowl (you can reuse this to make more eggs by adding a little water to rehydrate it).
Step 10: Continue to carefully scoop until you have a shell with a ⅜"-½" rim.
Step 11: When you get to the shell with the window, gently tap against it with your spoon and it should fall right out as you dig around it.
Step 12: Smooth out the opening with the spoon. Place the eggs back into the oven and bake for an additional 5 minutes. Let cool for 5 minutes.

Step 13: Beat meringue powder and warm water in a stand mixer until mixed. Add powdered sugar, and beat on low until it comes together. Increase speed to medium speed for 5-8 minutes. Note: According to YummyArts it should have stiff peaks and make a "flapping noise" as it hits the side of the bowl.
Step 14: Tint the royal icing, if desired, then transfer to disposable icing bags that have been fitted with icing tips.
Tip: if you notice that the icing tips are getting clogged from the royal icing (which dries out quickly), fill a cup of water ½" with water and keep the frosting bags in the cup with the tips barely submerged. This will keep the icing soft and it won't harden in the icing tips.
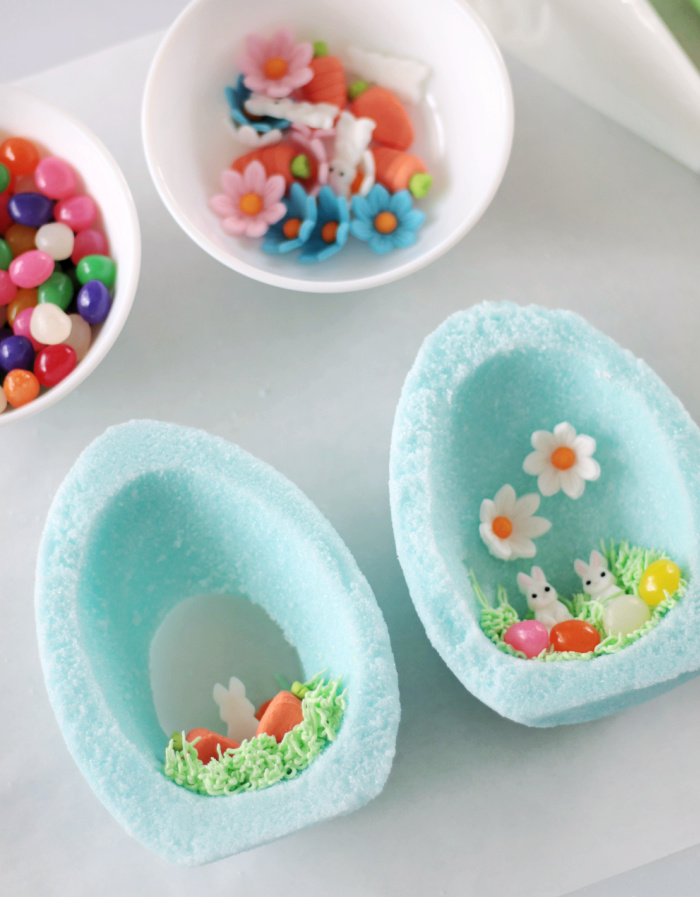
Step 15: Decorate your eggs from the back to the front, meaning: work on the back half of the egg first then work your way to the front half of the egg. Use the royal icing to adhere the decorations to the sugar eggs. Add jelly beans, etc. Let dry for 5-10 minutes.
Step 16: Pipe a line of icing around the rim of one of the eggs.
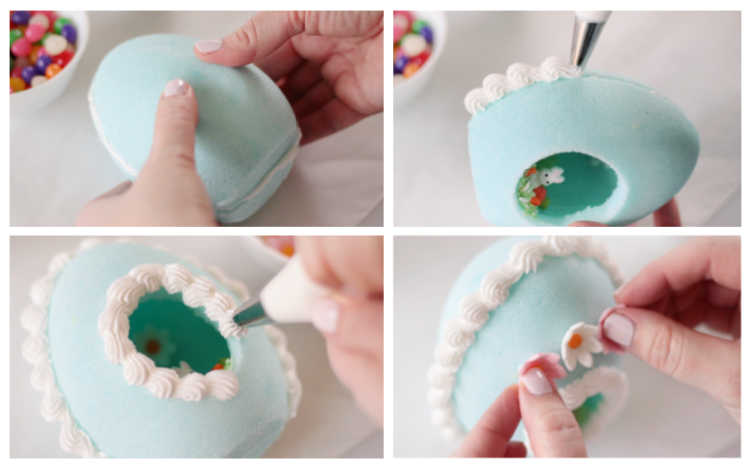
Step 17: Press the other egg half on top and hold it in place, smoothing the edges and making sure that the flat spots on the bottom of the egg halves line up.
Step 18: Cover the side seam with royal icing. I did a shell border, but you can do stars or any design you'd like.
Step 19: Cover the opening edge with royal icing as well.
Step 20: Add any finishing touches and let dry!
Vintage Panoramic Sugar Eggs FAQs
Panoramic sugar eggs will last indefinitely if kept in a dry place. The royal icing decorations and the sugar will not mold or spoil.
A plastic mold works well. You can find large plastic eggs at Dollar Tree or Walmart or purchase a two sided egg mold on Amazon.
I tried several techniques to make the molded sugar eggs. The trick is to bake the eggs in the oven for a few minutes instead of air-drying. The sugar hardens quickly, but the center stays soft enough to scoop out.
Panoramic sugar eggs can be made vertically or horizontally. I prefer the look of vertical eggs, so my eggs are standing tall. You can make whatever you'd like; you'll just need to adjust the location of the look-through hole. If making a horizontal egg, you'll cut off the tip of each molded sugar egg to create a hole to peer through. With vertical eggs, you'll create a hole in the front of each egg with a cookie cutter.
The sugar can be reused! If your egg crumbles, mash the sugar up and use it again. After you hollow out the eggs, you can reuse the sugar that you removed to make more sugar eggs.
Technically, yes. Everything I used is edible, but I can't imagine eating straight granulated sugar or the stale icing decorations. However, if your child takes a lick or a bite, they'll be just fine.
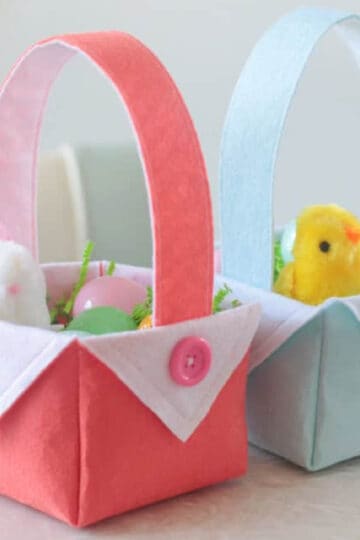
More Easter Crafts To Make


MADE THIS CRAFT AND LOVED IT? 💛 Please leave a STAR rating and COMMENT below! Post it to Facebook or Pinterest to easily share with friends!

Nostalgic Sugar Eggs
Equipment
- baking sheet
- 5" egg mold
- small cookie cutter for the egg opening
Materials
Eggs
- 3 cups sugar
- 2 Tbsp. water
- food coloring
- cardboard
Royal Icing
- ¼ cup meringue powder
- ⅓ cup warm water
- 1 pound powdered sugar
- food coloring
Decoration Items
- grass frosting tip
- star frosting tip
- frosting bags
- icing decorations
- Easter sprinkles
- mini jelly beans
Instructions
- Before starting this project make sure to watch my step-by-step videos as well as the youtube videos that I embedded within the post.
- FILL THE EGG MOLDSCombine water and food coloring together in a small bowl. The color will fade when mixed with sugar so use a little more food coloring than you think you'll need. Pour the colored water over 3 cups of white sugar in a mixing bowl. Mix with a whisk or wooden spoon until evenly distributed. The mixture should look and feel like wet sand.Pack the sugar into the egg mold. Fill all the way to the top, packing tight.Smooth the top of the mold with a spatula, scraping off excess sugar.Lay cardboard over the top of the mold, press down with one hand while holding the mold with the other, and flip. Gently remove mold. If the egg crumbles when you remove the mold, simply pack it again even tighter and try again.
- Gently press a small cookie cutter ⅛" - ¼" into the top of one of the egg halves. You are not cutting all the way through, just making an indentation that will pop out later. Remove the cookie cutter. This will be where the window will be.Carefully slice a small piece off of the bottom of each egg so that the egg has a flat place to stand once put together. Discard the excess sugar back into the bowl.BAKE THE EGGSYou should now have two egg halves on pieces of cardboard. You can place them both onto a baking sheet or simply bake the cardboard directly on the oven rack (it will not burn). Bake the eggs at 200 degrees for 10 minutes. Cool for 10 minutes.
- Hollow out each egg half using a spoon, discarding excess sugar back into the bowl (you can reuse this to make more eggs by adding a little water to rehydrate it). Continue to carefully scoop until you have a shell with a ⅜"-½" rim.When you get to the egg half with the window, gently tap against it with your spoon and it should fall right out. Smooth out the opening with the spoon. Place the eggs back into the oven and bake for an additional 5 minutes. Let cool for 5 minutes.
- MAKE THE ROYAL ICINGBeat meringue powder and warm water in a stand mixer until mixed. Add powdered sugar, and beat on low until it comes together. Increase speed to medium speed for 5-8 minutes. It should have stiff peaks and make a "flapping noise" as it hits the side of the bowl. DECORATE THE EGGSTint the royal icing, if desired, then transfer to disposable icing bags that have been fitted with icing tips. Decorate your eggs from the back to the front, meaning: work on the back half of the egg first then work your way to the front half of the egg. Use the royal icing to adhere the decorations to the sugar eggs. Add jelly beans, etc. Let dry for 5-10 minutes.Pipe a line of icing around the rim of one of the eggs.
- FINISHING TOUCHESPress the other egg half on top and hold it in place, smoothing the edges and making sure that the flat spots on the bottom of the egg halves line up.Cover the side seam with royal icing. I did a shell border, but you can do stars or any design you'd like.Cover the opening edge with royal icing as well.Add any finishing touches and let dry!
Video
Notes


Summer Glazier says
I’m so glad I found this recipe and tutorial. I’ve made these in the past, but this is my first year finding this recipe and it was SO much easier! We can make these every year now.
(instead of once every few years with the last recipe I used to use)
Brandy says
Summer, I’m so glad you found this method easier! They are so fun!
Wendy says
Hi Brandy! Where did you get the 3D flowers you used on this egg? I've searched all over Amazon to no avail!
Brandy says
I’m pretty sure I found them at Target! Their selection changes every year. The carrots and bunnies were from there too.