These edible fondant light sabers are perfect for cupcakes and cakes! A fun activity to make with any young Jedi.
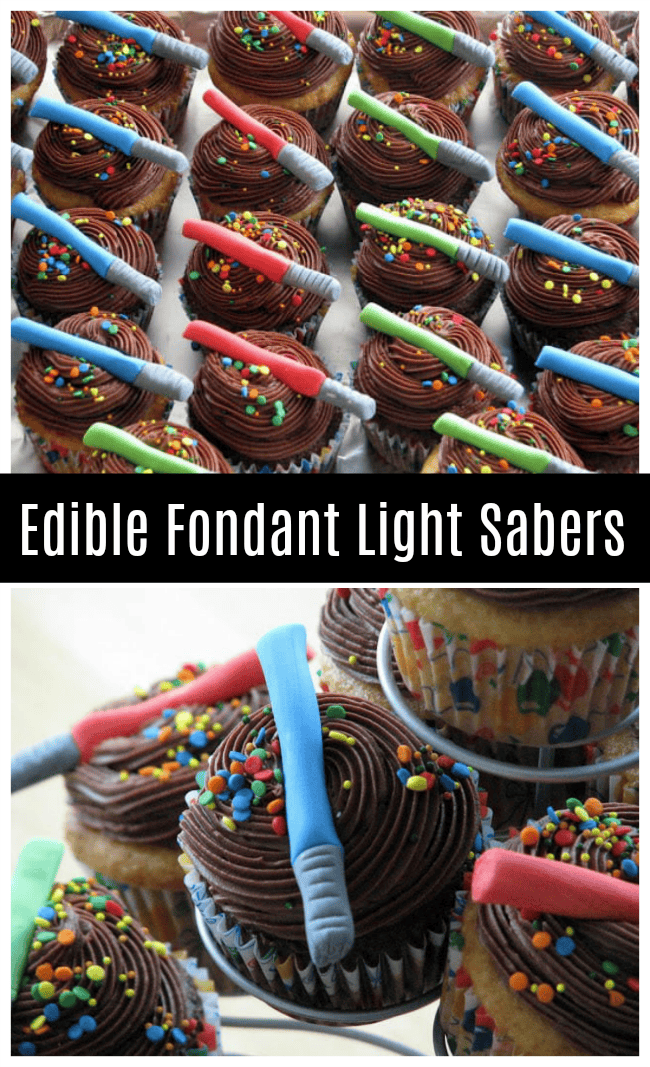
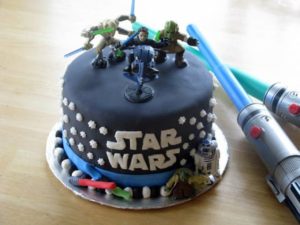
Dallin is turning 7 and asked for a Star Wars themed cake. There were so many ideas going through my mind with such a fun theme. I knew that, no matter what, light sabers needed to be involved somehow. That is how these little edible fondant light sabers were born. They were ridiculously easy to make and the kids had a great time helping me! We made a giant batch and used some on cupcakes to bring to his class and saved the rest for his birthday cake.

Wouldn't these make a fun activity for kids to make at a Star Wars themed party? I let mine dry for a couple of days so that they'd be stiff enough to decorate cupcakes, but kids honestly wouldn't care about that. They could make one and eat it right there.
Dallin said that these cupcakes were awesome and his classmates apparently thought so, too.

Edible Fondant Light Sabers

You'll need some fondant in a variety of colors. I like this recipe for marshmallow fondant. Inexpensive, easy, and it tastes a lot better than store bought fondant.

Kids can make and eat their light sabers right away, but if you plan on using them for cakes and cupcakes you'll want to let them dry for a couple of days first. That way they'll hold their shape and be nice and firm. Like light sabers!


Edible Fondant Light Sabers
These edible light sabers are perfect for cupcakes and cakes! A fun activity to make with any young Jedi.
Pin Recipe
Cost: $5
Equipment
- knife
- Rolling Pin
- baking sheet
- wax paper
Materials
- fondant
- corn starch
- clear vanilla
Instructions
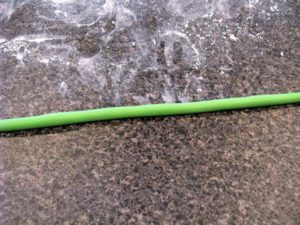
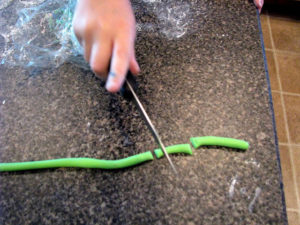
- Cover your surface with some corn starch or powdered sugar. Roll out your fondant into a long rope. This one is about ½″ thick.

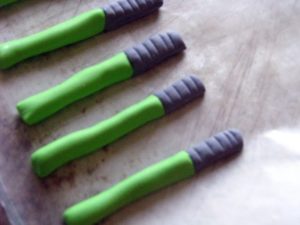
- Cut into desired light saber lengths. Ours were 2″ in length and the handles were ¾ “.
- Do the same with the fondant that you are going to use for the handles. We attached them to the lights with some clear vanilla extract. Just dab some on the end of the green section with a paintbrush and add the handle. Push together gently and set on a sheet with waxed paper.
- To form the grooves, simply score with a knife.
- Let dry for 2 days or until hard.
- Add them to your cupcakes shortly before serving.
Notes
Add light sabers to your cupcakes shortly before serving. They shouldn’t be on the cupcakes more than 8-12 hours ahead of serving or they will start to get soft again by soaking in some of the moisture from the frosting.
3 More Star Wars Projects You'll Love
Star Wars Chewbacca Valentines (CHEWY)
Star Wars Cereal and Pajama Party
This post was originally shared in 2010.

Jo says
Hey there
Just making these now for my little star wars fanatics 5th birthday. Its my first time attempting anything like this so I'm a bit nervous!
Where did you leave them to dry? In the fridge or outside? And I'm worried they are going to stick to my parchment paper - did you grease the paper beforehand?
Thanks!
Jo
Brandy says
Hi Jo! No need to grease the paper, they will dry and come right off! I just let them dry on a baking sheet on my counter. You will do great!!
Jo says
Thanks Brandy.
So far so good! I bought some silver food paint and just painted the handles - they look awesome! Next fear is that they don't flop on the cupcakes.
Brandy says
I'm sure they will be great! Silver food paint, what a GREAT idea!