Homemade raspberry soap in 3 steps using the melt and pour method! This raspberry soap is perfect for gift giving or displaying in a guest bath!

Today I am sharing another simple soap combination for making homemade raspberry soap. 3 simple steps and you have a wonderfully scented homemade gift. I made these bars for the kids to give to their teachers for Valentine's day last year.
I will be using the same method I've shared with you in the past. The melt & pour method. It is so fun to come up with different combinations, colors, shapes, and scents. You can see the other varieties we've made here, here, and here!
Let's get started!

Homemade Raspberry Soap
Ingredients you will need: ( I will list where I found all of my supplies at the bottom of the post)
- White Soap Base-- They usually come in 2 lb. blocks and you can find them in a variety of bases. Goat's milk, shea butter, glycerin, aloe, oatmeal, cocoa butter, etc. You can also find it in clear or white.
- Soap Coloring
- Soap Scent.
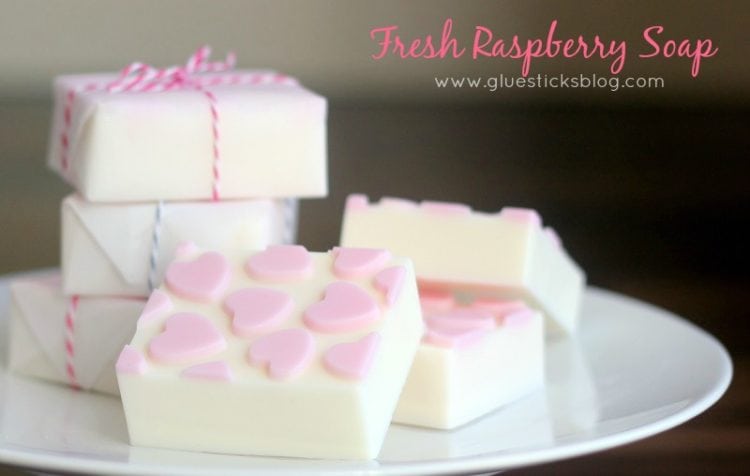
I went with a white goat's milk soap base, a fresh raspberry soap scent, and pink coloring.

Supplies You Will Need:
- Cutting board
- Soap mold --silicone is my favorite type to use, but plastic works too.
- Glass measuring cups (or microwave save bowls. Measuring cups make it easy to pour). 1 for each color you plan to use.
- Spoons
- Optional:
- Condiment bottle or medicine syringe. This is only if you plan to use a mold like mind with small crevasses to fill.
- Rubbing alcohol (not pictured) Again, this is only if you plan to use a mold like mine or want to make layers of different colors in your soap bars.

Steps for Making Raspberry Soap
Step 1: Cut you base into 1" cubes. Melt for 15 seconds at a time, stirring in between each session, in the microwave until completely melted. If you are using two colors, just separate into two containers and melt separately. I had one for white and one for pink.
Step 2: Add your coloring and scents. One drop at a time, stirring in between drops to check for the right color and scent.

Step 3: Pour into molds.
If you are using a sectioned mold like mine, fill your condiment bottle with your melted soap base (pink). Fill first layer first (the hearts) and let set until firm. Spray lightly with rubbing alcohol before adding your white base on top. This helps the two layers stick together.
Rubbing alcohol also removes any bubbles in your soap.
Pour your white base on top. Spray with alcohol if you see bubbles forming. Allow to sit until it begins to firm up. Move to refrigerator and let chill until completely set, about 30 minutes.
Leftover soap in your measuring cups and condiment bottle will harden quickly. Simply put it back in the microwave when ready to fill your next soap mold (in 15 second increments).
{As a reference, I used the entire 2 lb. block of soap base and made 8 bars of 3"x2.5"x1" bars of soap.}

Wrap in parchment paper and a little twine or wrap in a small piece of fabric! Add them to a fun spa themed gift, or with a homemade Valentine.

Where I ordered Supplies. Many of these items can also be found at craft stores like Michaels.
Heart Soap Mold from Wholeport.com (no longer in business 🙁
If you enjoy making your own beauty products, you may enjoy this collection of homemade beauty gifts that I put together below!


Leah says
Hello friend, can I skip the rubbing alcohol? Will it still stick?
Brandy says
You can try it without. I always spritz it with rubbing alcohol since it helps with air bubbles too.
angie says
I love homemade soup I can only imagine how great this must smell. Perfect for a gift of any kind or to simply make the bathroom smell great
come see us at http://shopannies.blogspot.com
Trisha says
So pretty! I love handmade anything, but soaps are a favorite!
Rebecca D. Dillon says
Manufacturer recommendations for fragrance oils in most melt and pour soaps is a max of 3%. It'd be helpful to use a digital scale to weigh the soap and figure 3% to get the amount of fragrance needed to avoid over use. (Essential oils are typically up to 1-2% depending on the eo.) To find how much soap is needed for a mold I typically start by melting a larger amount of melt and pour soap - leaving it unscented and uncolored - and pouring it into the mold. When it hardens, I pop it out and weigh it. Then you'll know exactly how much soap you need for each bar you want to make. Hope this helps!
Brandy says
Awesome, thanks for sharing these tips. VERY helpful!
Shauna Graham says
I am trying to order the mold you used for your raspberry soap and I cannot find it on the wholeport.com website. I cant seem to access that site at all. Is there something I am missing?
Brandy says
Hi Shauna, unfortunately the site went out of business! Another reader recently informed me of this and I am going through posts and updating them. Thank you for the reminder about the raspberry soap. Such a shame, it was a great mold!
pmoppins says
So cute! I bet the teachers will love it!
Amy says
Thanks for posting such a great tutorial! I have thought about trying to make my own fun soap and this would be a great project to start with. My kids would love it too!
Jenny says
Those are beautiful Valentine's Day soaps! They'll make great gifts. And I love your packaging!
Brandy says
Thank you Jenny! I just checked out your blog, amazing! You are the soap queen. Such fun combinations. I only do the melt and mold variety, but it would be interesting to check out the other methods. Actually making it!