Mark all the places you've traveled within the country with this USA magnetic memo board. As a bonus, it's reversible with a memo board on the other side!
If you like this darling wall art you'll love our FREE wall art printables, "I Wish I Met You Sooner So That I Could Love You Longer".

3 More Home Decor Projects You'll Love From The Homes I Have Made:
- Budget Friendly Bedding Trick
- Clever Curtain Hacks Anyone Can Do
- How To Sew a Pillow With An Invisible Zipper
What Inspired The Idea For This Magnetic Memo Board
I have been seeing a lot of these adorable USA prints and canvases all over the blog-o-sphere. I love the idea of them as gifts, with the heart marking where the recipient lives or is from. However, every time I think to give one of these to a friend, I run into a little problem. Being a military spouse, living in a military community, many if not most of us are living far away from where we are from...AND...in a few short years, we will be living somewhere new. So...where to place the heart so that the print can be enjoyed for years to come? Then it occurred to me, I could magnetize it, and the recipients could move the magnets around the map as they themselves move around the country! And...while I was at it, I figured I'd make the back of the board cute too, so it can be used as a magnetic memo board!

USA Magnetic Memo Board
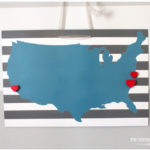
USA Magnetic Memo Board
Equipment
- Ruler
- Drill and drill bit
Materials
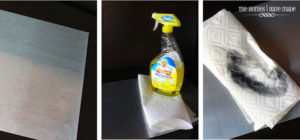
- Sheet metal from the hardware store mine measured 12x18" and cost about $4
- Household cleaner and paper towel
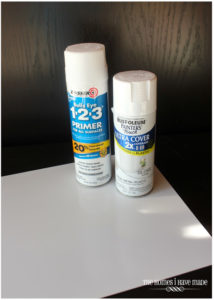
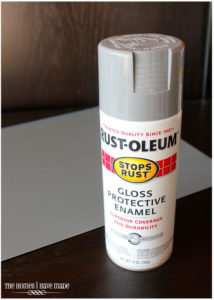
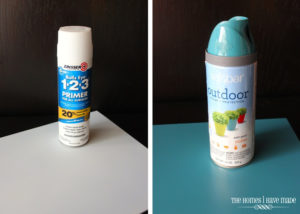
- Spray all-bonding primer I used Zinsser 123 Primer
- Three colors of spray paint
- blue painter's tape
- Pencil
- Vinyl
- Scissors
- USA image - find one online
- Mini magnets I bought an 8 pack at the hardware store for about $2
- Small wooden hearts
- Ribbon
Instructions
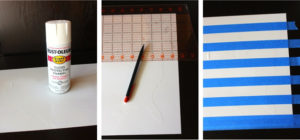
- The first step is to clean, clean, clean that sheet metal. I am not sure why it is so dirty, but you'll have to give it a good scrubbing with some household cleaner. You may even have to repeat several times to really get all the grime off!

- Start with the backside memo board (if you don't want to make it reversible, you can skip this part!). Even though allowing ample drying time shouldn't affect the durability of the final product, I always like to start with the unseen side so that the nice front side never has to be placed down on the ground.

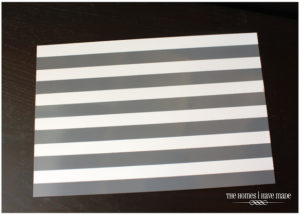
- Start by giving your sheet metal a nice even coat of primer, followed by two even coats of one of your stripe colors (in my case, white). Let dry for several hours.
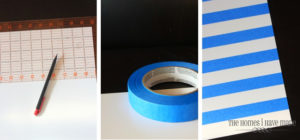
- Using a ruler and a pencil, measure out 1" intervals up both sides of your painted surface. You don't need to draw lines straight across, just mark hash marks on each side. Stretch the blue tape from hash mark to hash mark, creating nice even lines of tape all the way up your board.
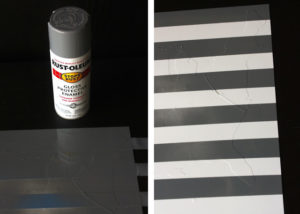
- With the tape all measured and secured, spray your board (over the tape) with your second stripe color (in my case, gray).
- If you've read it once, you've read it a million times - to get nice, crisp, clean lines, pull off your tape while the paint is WET! Let this side of your board dry (at least) overnight.
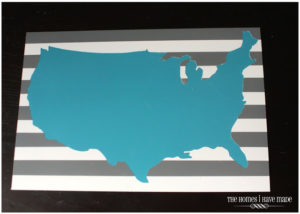
- Now it's time to flip to board over and make the USA image side! Start by priming your metal sheet again. Once dry, apply a nice even layer of your USA color (in my case, turquoise). Let dry completely.

- While your base paint is drying, you can prepare your USA image, which is the most meticulous and time-consuming part of this whole project. If you have an e-cutter, you can whip out a USA image pretty quickly. Since I use a cricut and had no cartridge with a USA on it, I had to do it the old fashioned way!
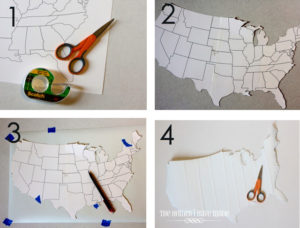
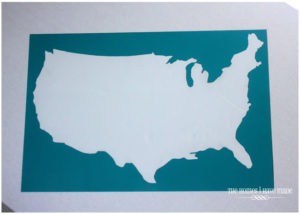
- Start out by printing an image of the USA onto card stock. (I found the image online and printed it large across three sheets of paper).

- Next, cut out the entire USA and tape it together at the appropriate seems to make one large template.
- Secure the template to some plain white vinyl with painter's tape and trace around it with a pencil.
- Cut out the USA with some small sharp scissors.
- With the USA all cut out, carefully center it and adhere it to the painted metal sheet. Really press down all the edges to ensure good contact.
- Next, repeat the stripe process you did on the backside of the board (only this time, it's all on top of that USA cutout).
- Spray the entire board with one of your stripe colors. Let dry.
- Measure and mark off 1" intervals down the entire board.
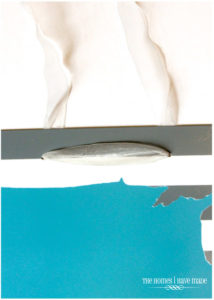
- Stretch painter's tape across the board and press down on all edges.
- Apply one (or two, depending on coverage) last coat(s) over the blue tape (bottom left). Again, remove the tape while the paint is wet to reveal sharp lines (bottom right).
- Next, very carefully, peel off the vinyl cut out of the USA to reveal your original color popping through!
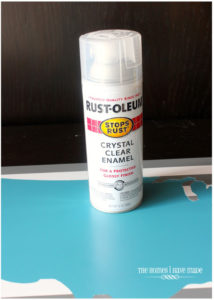
- The last spraying step is to give the entire thing a nice light coat of clear polyurethane or other protective spray.
- Once it's dry, drill two evenly spaced holes at the top of the magnetic board...
- String a ribbon through so it can be easily displayed!
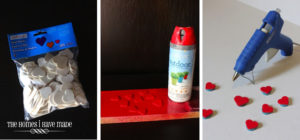
- The last step is to make the mini heart magnets. I bought these (bottom left) at Michaels, and then gave them two coats of red spray paint. I then attached each one to a magnet with a glue gun (bottom right).


Chelsea Richards says
Thanks for sharing this idea!