Make homemade chocolate peanut butter eggs that taste just like Reese’s! This easy peanut butter eggs recipe is no-bake, creamy, and perfect for Easter!
You might also like my scotcheroo peanut butter eggs, chocolate coconut cream eggs, or bunny brownie pops!

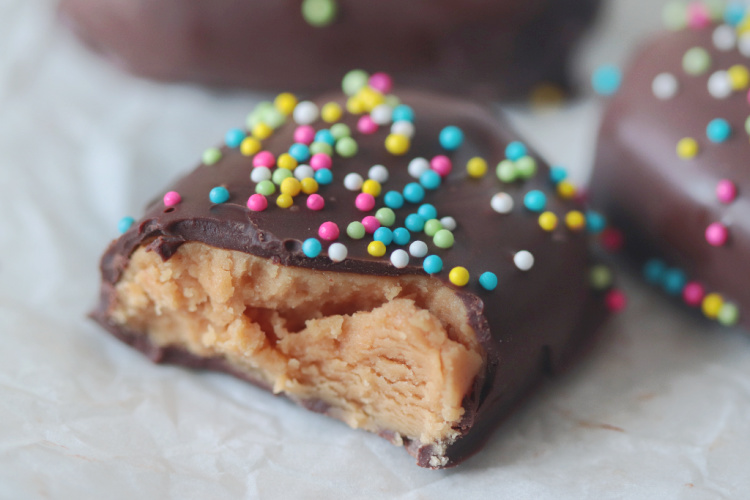
Chocolate peanut butter eggs are an Easter tradition. Whether purchased or homemade, they are always a part of our Easter baskets! These homemade peanut butter eggs are rich, creamy, and totally give Reese's a run for their money.
Why I Like This Recipe
- Tried and true peanut butter filling. I use the same filling (minus Rice Krispies cereal) as I do for my white chocolate peanut butter truffles. It's SO good!
- Can be made without a candy mold. You can use a mold to form each ball of peanut butter filling into an egg shape, or form them yourself. We've made them both ways, and I actually prefer just forming them by hand.
What Others Are Saying
Made a batch last year and came back to get the recipe again. The filling is to die for. ---Marie on Pinterest
I like making these all year long in different shapes for different holidays! ---Anne on FB.
Jump to:
Tips and Tricks
- Chocolate for dipping. I like using Ghirardelli melting wafers for these chocolate Easter eggs. You can find them at most grocery stores. You can also use chocolate chips melted down with a tablespoon or two of oil. Candy melts are another option.
- Add sprinkles quickly. Because the eggs are frozen, they will harden quickly once dipped, so if adding sprinkles, add them immediately. I add sprinkles after dipping each one.
- Rewarming chocolate. If you find that your chocolate is beginning to cool towards the end (because you've been dipping cold peanut butter eggs into it), add some warm chocolate or gently warm the bowl until the chocolate reaches the correct working temperature.
Ingredients
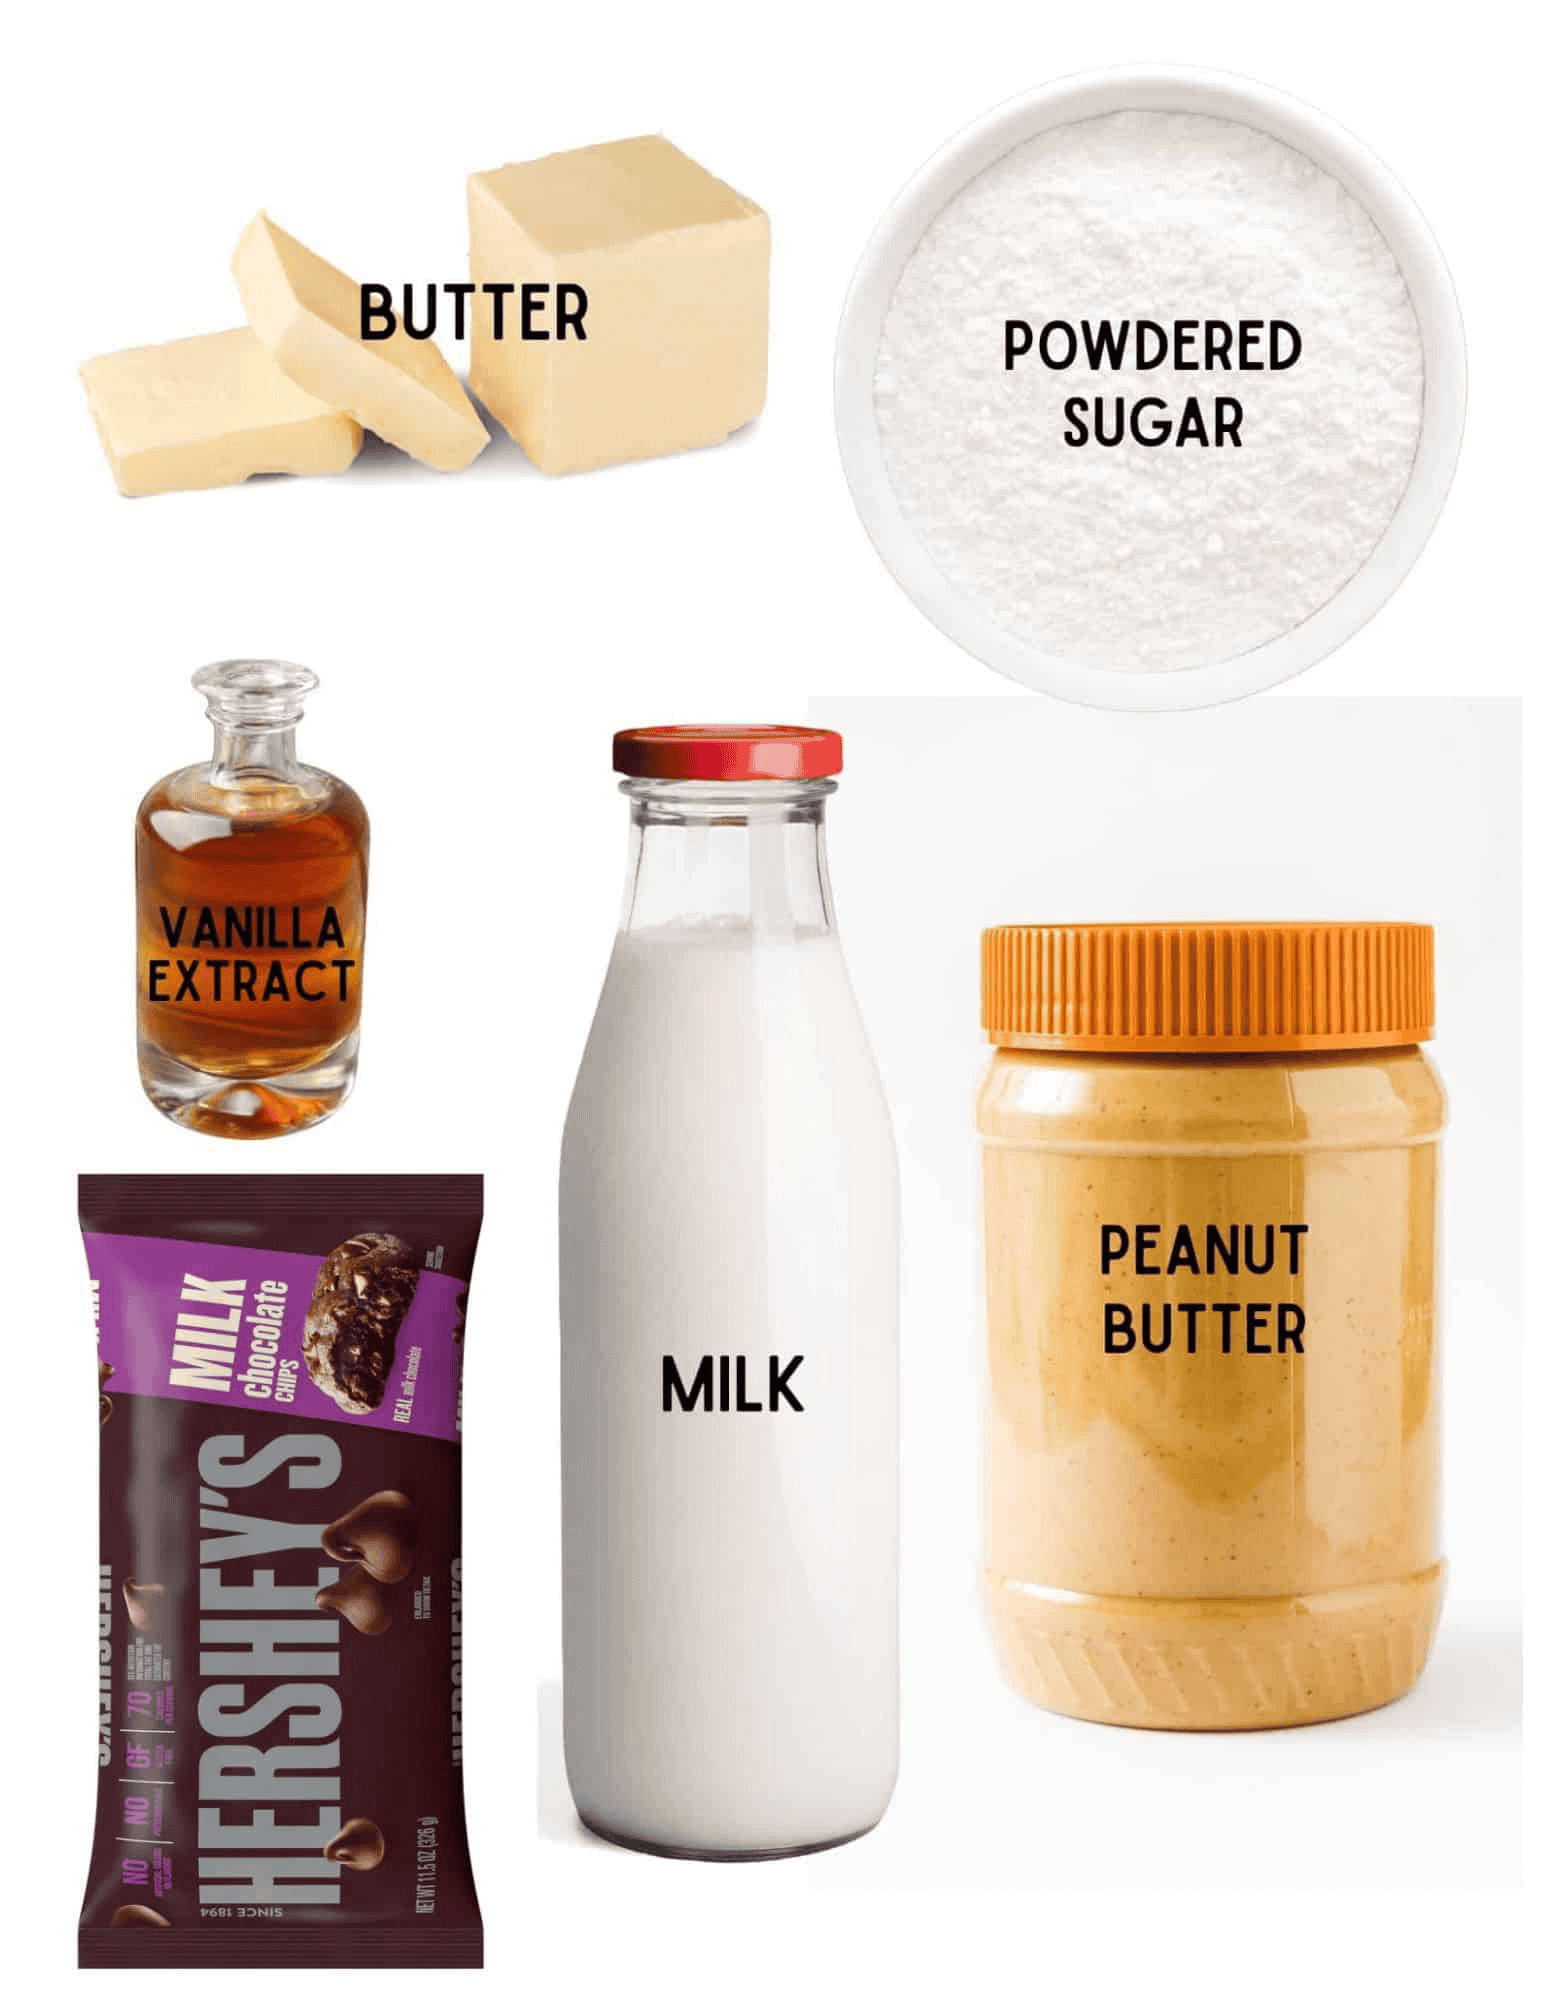
- Peanut butter: You can use either creamy or crunchy, depending on your preference.
- Butter: Butter is added to the filling for a smooth consistency. I always use salted butter, but you can use unsalted butter if you'd like.
- Vanilla extract: For flavoring.
- Milk: Milk gives the filling a smooth texture. Use any kind you'd like.
- Powdered sugar (confectioners' sugar): Gives the filling structure so that it can be formed into shapes.
- Chocolate: I like using Ghirardelli melting wafers for these chocolate Easter eggs. You can find them at most grocery stores. You can also use chocolate chips melted down with a tablespoon or two of oil. Candy melts are another option.
- Sprinkles: optional.
See the recipe card for full information on ingredients and quantities.
How To Make Copycat Reese's Peanut Butter Eggs
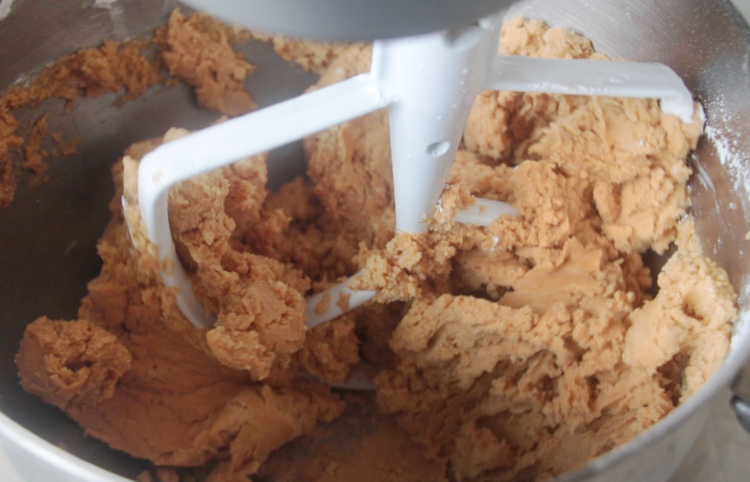
Step 1: Mix all ingredients (except the chocolate) together in an electric stand mixer until a soft dough forms.
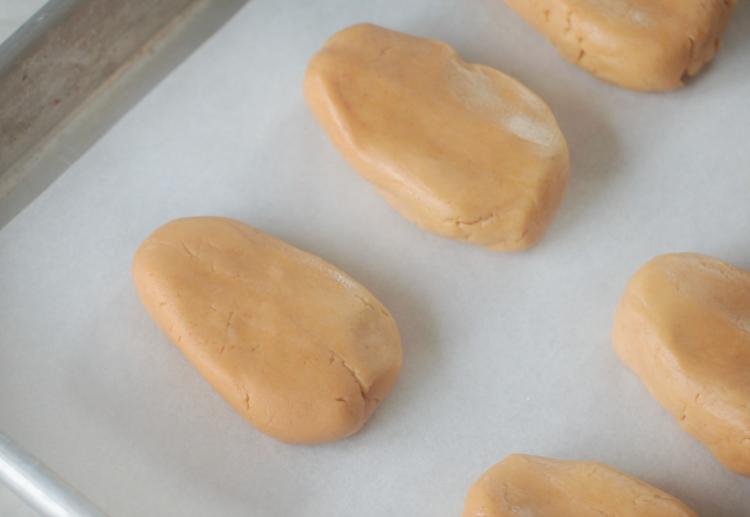
Step 2: Scoop the peanut butter mixture with a cookie scoop. Roll into a ball, then form into an egg shape and press down slightly.
Step 3: Place peanut butter eggs on a baking sheet lined with parchment paper. Place in the freezer for 1 hour or until hard.
Step 4: Melt chocolate in a microwave-safe bowl (in the microwave) using 30-second intervals (stir after each interval) until smooth. This will take about a minute. DO NOT overheat, or the chocolate will not be usable.
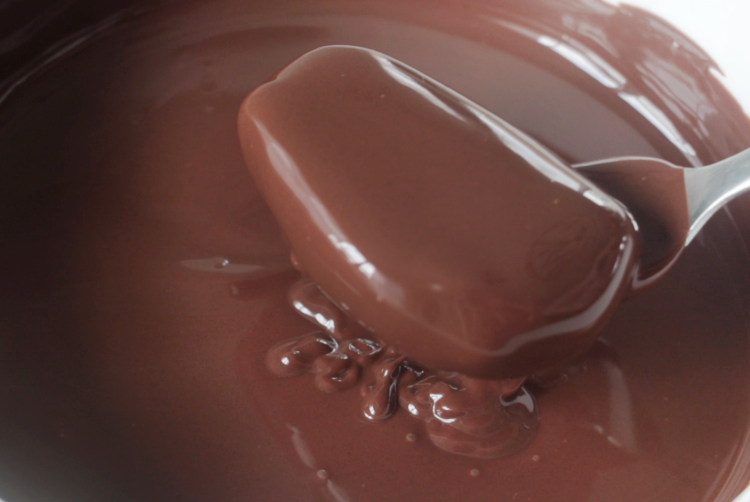
Step 5: Dip peanut butter eggs in chocolate, tapping the fork against the side of the bowl to allow excess chocolate to drip off.
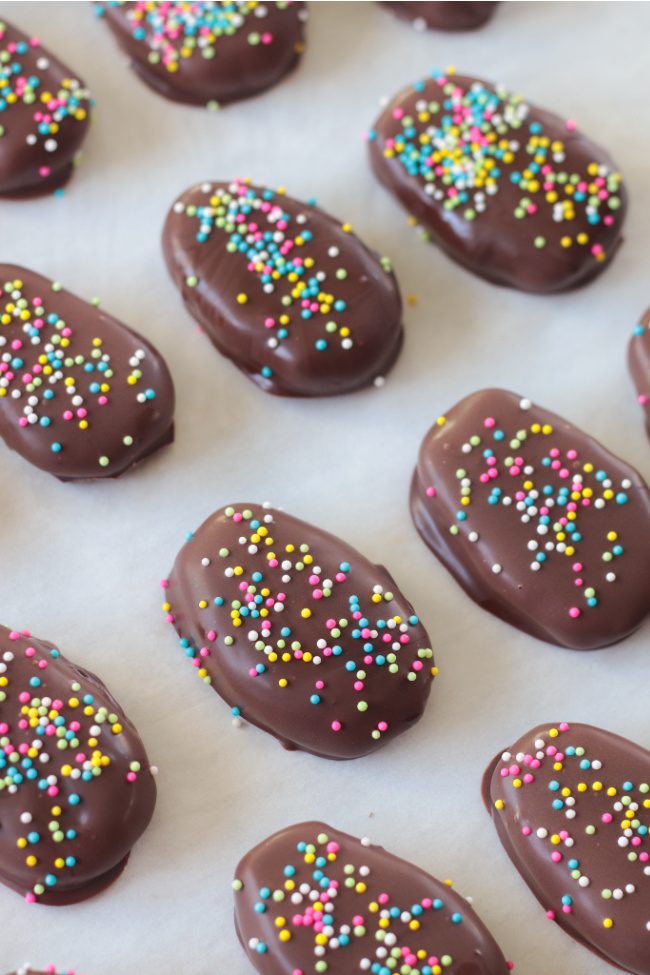
Step 6: Set on a cookie sheet lined with wax paper or parchment paper. Add sprinkles immediately before the chocolate hardens.
Store in an airtight container in the refrigerator for up to two weeks. This recipe makes 20-22 chocolate peanut butter eggs.
Chocolate Peanut Butter Eggs FAQs
For peanut butter eggs, I like using Ghirardelli melting wafers for these chocolate Easter eggs. You can find them at most grocery stores. You can also use chocolate chips melted down with a tablespoon or two of oil. Candy melts are another option.
If you find that your chocolate is beginning to cool towards the end (because you've been dipping cold peanut butter eggs into it), add some warm chocolate or gently warm the bowl until the chocolate reaches the correct working temperature.
You can use a mold to form each ball of peanut butter filling into an egg shape, or form them yourself. We've made them both ways, and I actually prefer just forming them by hand.

More Easter Recipes To Make


MADE THIS RECIPE AND LOVED IT? 💛 Please leave a STAR rating and COMMENT below! Post it to Facebook or Pinterest to easily share with friends!

Homemade Chocolate Peanut Butter Eggs
Ingredients
- 1 ½ cups creamy peanut butter
- ¼ cup butter softened
- 3 cups sifted powdered sugar
- 1 Tbsp. vanilla
- 3 Tbsp. milk
- 14-16 oz. melting chocolate wafers (Ghirardhelli)
- sprinkles optional
Instructions
- Mix all ingredients together (except for chocolate) using an electric stand mixer until it forms a soft dough.
- Scoop peanut butter mixture with a cookie scoop. Roll into a ball then form into an egg shape and press down to flatten, slightly.
- Place peanut butter eggs on a baking sheet lined with parchment paper. Place in the freezer for 1 hour or until hard.
- Melt chocolate in a microwave-safe bowl (in the microwave) using 30-second intervals (stir after each interval) until smooth. This will take about a minute. DO NOT overheat or chocolate will not be usable.
- Dip peanut butter eggs in chocolate, tapping fork against side of bowl to allow excess chocolate to drip off.
- Set on a cookie sheet lined with wax paper or parchment paper. Add sprinkles immediately before the chocolate hardens.
Maria says
Beautiful! Have you ever had the filling show through the chocolate on the bottom where you sit it back on the cookie sheet? Is there any way to avoid that? Thanks!
Brandy says
Hi Maria, I have had that happen on a few of them. I'm not sure how to avoid that except to maybe dip them a second time after they've hardened after the first dipping. It didn't bother me enough to do that, but I bet a second coating would help!
Maria says
Thanks for the speedy reply!
Lois Christensen says
Hi Brandy! This recipe was my favorite from last week's Delicious Dishes Recipe Party. I'm pinning it to our group board and I'll pinning a few extra from your site as well. Hope to see you again this week for another fun party!
Christine @ Must Love Home says
Thank you for sharing at Friday Favorites!! I love your egg ideas! They are all Super cute! My family still loves to head down to German Village every now and then...I love the old world feeling of it! We go to eat at Schmidt’s Sausage Haus for the best brats in the world!! BTW - your post will be featured at our next party..so I hope that you will stop by to see it and to share with us again! Hugs- Christine at Light and Savvy
Rachel Teodoro says
Thank you for sharing this. I added it as part of an Easter egg round up. Thanks for the inspiration on the create, link inspire party!
Liz W. says
I love it! These looks so yummy 🙂 Thanks for sharing with us at Funtastic Friday!