Gluesticks Blog

menu icon
go to homepage
  • Recipes
  • DIY
  • About Me
  • Subscribe
    • Facebook
    • Instagram
    • Pinterest
  • subscribe
    search icon
    Homepage link
    • Recipes
    • DIY
    • About Me
    • Subscribe
    • Facebook
    • Instagram
    • Pinterest
  • ×
    Home » Craft Tutorials

    Salt Art Painting for Kids: Add color and texture with salt!

    June 30, 2018 By Brandy 1 Comment

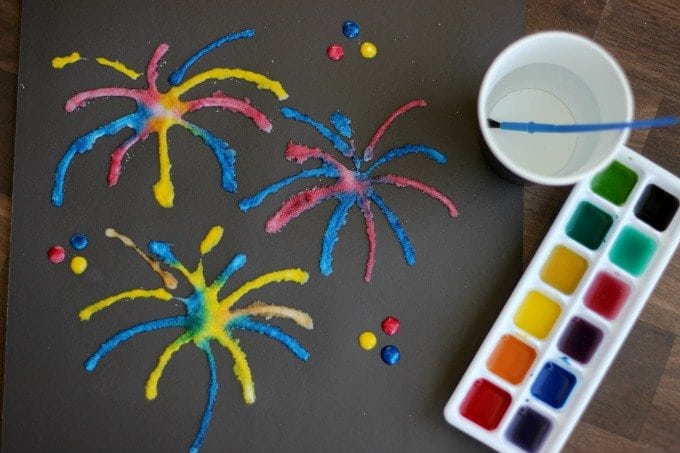
    Have you tried painting salt before? Salt art painting is such a fun way to add texture and color to a project. Today we are making a fireworks picture, but you can make ANY scene you'd like!

    Have you tried painting salt before? Salt art is such a fun way to add texture and color to a project. Today we are making a fireworks picture, but you can make ANY scene you'd like!

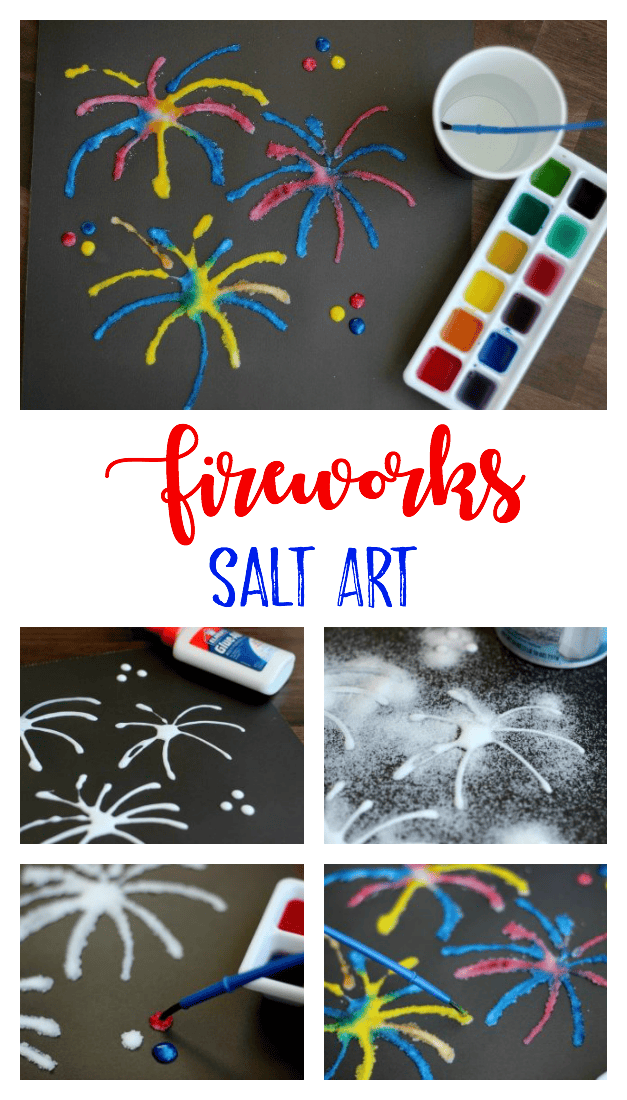
    The kids and I had a great time creating this fireworks salt art work of art. Salt adds such a fun texture and shine and is easy to paint on! I shared the tutorial on the Little Passports craft blog!  a couple of years ago and it is a project that we still enjoy making!

    Salt art is just about the most inexpensive craft to make with kids and it uses supplies that you probably already have on hand: water color paints, salt, white glue and paper.

    Salt Art Painting for Kids: Add color and texture with salt!

    Supplies:

    • black cardstock
    • water color paints
    • brush
    • salt
    • cup of water for cleaning brush

    Have you tried painting salt before? Salt art is such a fun way to add texture and color to a project. Today we are making a fireworks picture, but you can make ANY scene you'd like!


    Step 1: Draw firework shapes on black paper with white glue.

    Step 2: While the glue is still wet, pour salt all over design, liberally. Pick up paper and let excess salt fall off onto a cookie sheet or paper plate. Don’t worry about letting the glue dry. You can color the salt while it is still wet!

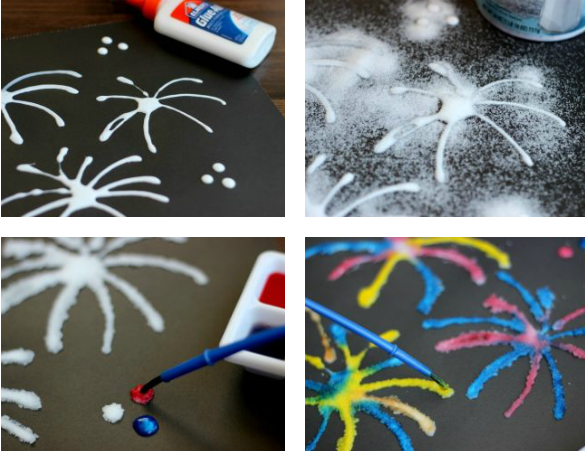
    Step 3: Dip brush in watercolor paints and dab the paint onto the salt.

    Note: DO NOT BRUSH the paint across the salt or it will wipe it away. Just drip the paint over the salt. You could even use a tiny syringe to apply the paint!

    Step 4: Keep dabbing until all of the salt is covered. It will bleed and create beautiful swirls and blends of colors!

    Step 6: Let dry completely before picking image up. Once dry, you can apply a light layer of hairspray to help keep the salt from flaking off easily, but either way the colors will fade a bit after a day or so. Expert tip – ours lasted over a week before the salt began to flake off, these aren’t forever pictures, but my kids sure had fun creating them!

    What other images can you create?

    The sky is the limit! My 3 year old and I made dinosaurs the other day. You could also make candy canes, trees, pumpkins, hearts, shamrocks or bunnies for year around fun!

    If you liked this salt art painting, you might also like these kids crafts!

    Sidewalk Chalk Rockets: A science experiment, crowd pleaser, and boredom buster all in one! Sidewalk paint rockets! We made an entire rainbow of them and had fun setting them off and decorating the sidewalk in the back yard. The kids had friends over and everyone got involved with the mess!

    Gelatin Birdseed Feeders: Birdseed feeders are easy for kids to make and require only a few ingredients! Hang them in a tree and take notes on the types of birds who come along to snack on them!

    Goldfish Soap: This melt and pour gelatin soap has a fun toy surprise inside! A goldfish! Such a fun activity to make for kids and they can even make them to give as gifts to friends and family!

    Share
    Pin

    More Craft Projects

    • basket of pillow treats
      YW Camp Pillow Treat Tags (Free Printables!)
    • two summer camp printable tags with drink packets
      Summer Camp Flavored Water Printable Tags
    • printable chapstick gift cards with chapstick
      "Don't Worry Be Chappy" Chapstick Printable Tags
    • Journaling Handout (Easy Gift Idea)

    About Brandy

    Welcome! I'm Brandy, mother to 5 darling kiddos and a cute black lab named Toby. My husband is in the Coast Guard so we've lived all over the place, turning each house into a home. I love baking, sewing, making cute things with my kids, and sharing what I've learned with all of you!

    Comments

    1. Marley Bloomer says

      January 07, 2020 at 12:10 pm

      Love all of this!!!

      Reply

    Leave a Reply Cancel reply

    Your email address will not be published. Required fields are marked *

    Recipe Rating


    This site uses Akismet to reduce spam. Learn how your comment data is processed.

    Welcome!

    I'm Brandy! I love to create and share my ideas through easy-to-follow recipes and tutorials.

    More about me

    As an Amazon Associate, I make a small commission on qualifying purchases.

    sew with me kids sewing book
    My Book

    Latest Posts

    • mini s'mores pie on white plate
      Mini S'Mores Pies
    • slab pie on white plate
      Peach Slab Pie
    • baba bar on spatula
      Frosted Banana Nut Bars
    • tray of baked cookies on parchment paper
      Martha-Stewart-Fired-Me Cookies

    Seasonal

    • M&M Cookies piled on top of each other
      Soft M&M Cookies (Soft and Thick) + Video
    • red, white and blue shortbread cookies
      Patriotic Shortbread Cookies (Video)
    • star shaped cookie with frosting and fruit
      Red White & Blue Mini Fruit Pizzas (Video)
    • Simple and Inexpensive Patriotic Wreath Tutorial

    Footer

    ↑ Back to Top

    About

    • Privacy Policy
    • Accessibility Policy

    Newsletter

    • Sign Up! for emails and updates

    Contact

    • Contact

    As an Amazon Associate, I earn from qualifying purchases.

    Copyright © 2025 Gluesticks Blog