Gluesticks Blog

  • About
    • About Me
    • Contact Me
    • Terms and Privacy Policy
  • Sewing
    • My Book
    • Kids Sewing Projects
    • All Sewing Projects
  • Crafts
    • Kids Crafts
    • Paper Crafts
    • Free Printables
    • All Crafts
  • Holidays
    • Christmas
    • Halloween
    • Patriotic Holidays
    • Easter
    • St. Patrick’s Day
    • Valentine’s Day
    • Gift Ideas
      • Teacher Gifts
      • All Gift Ideas
    • Parties
  • Home
    • Home Decor Projects
    • Cleaning & Organizing
    • Gardening
    • Motherhood
  • Recipes
    • Kids in the Kitchen
    • Appetizer Recipes
    • Bread Recipes
    • Dessert Recipes
      • Cake Recipes
      • Cookie Recipes
      • All Dessert
    • Main Dish Recipes
    • Slow Cooker
    • Sides & Salads
    • Holiday Recipes
    • All Recipes

December 2, 2022 By Brandy 46 Comments

Home » Holidays » Christmas

Cuffed Christmas Stocking Sewing Pattern (+ Video)

Filed Under: Christmas, Craft Tutorials, Holidays, Home & Garden Projects, Home Decor Projects, Sewing Tagged With: Home Decor Sewing

Make your own stockings this year with this free Christmas stocking sewing pattern. A great beginning sewing project and they turn out so beautiful! 


christmas stocking pdf pattern

Watch our step by step video!

Christmas stockings are fairly simple to make and are fun to customize for your family. I plan on making these for my children’s families when they are all grown up. A practical and thoughtful gift!


Christmas stocking on mantle

As you can see, I quilted my stockings. This is super simple to do but is completely optional. If you’d prefer to not machine quilt your stockings you can omit the batting.

Christmas Stocking Sewing Pattern

Sewing Level: Beginner

Time: 1 hour

Seam Allowance: 3/8″

Types of fabric: cotton, flannel, lightweight denim.

Supplies to make 1 stocking:

Stocking pattern:  download my free pattern here. It prints on 5 pages and all you have to do is cut and tape the pieces together. The cuff piece is separate.

  • 1/2 yard fabric for stocking
  • 1/2 yard fabric for lining
  • 1/2 yard batting (I like this kind)
  • 1 (5.5″ x 19.5″) piece of fabric for cuff
  • 1 (19.5″) piece of trim (bias tape, fabric, lace, etc.) My trim was 2.5″x19.5″.
  • 1 (2″ x 6″) piece of fabric for loop (stocking hanger)
  • thread
  • scissors
  • pins
  • sewing machine
  • iron

Homemade Stockings Cutting Guide

fabric pieces for christmas stocking pattern

You’ll need 2 out of the outer fabric, 2 out of lining fabric, and 2 pieces of batting. You will also need a cuff piece, trim (optional), and loop piece.

Note: I always cut the trim a few inches longer than what is actually needed to leave a little wiggle room, then trim to size after I sew it on.

  • Print out the pattern and tape it together.

quilting christmas stockings with sewing machine

  • Pin batting to the back of the outer pieces of fabric and quilt in straight lines across, horizontally. Do this for both outer pieces. For a post with more photos of straight-line quilting for pillows and stockings click here.

quilted christmas stocking without cuff sewn on

  • Place outer stocking pieces together with the right sides together. Sew around the edges of the quilted fabric, leaving the top open. Clip the curves close to the hem. Turn right side out. (see photo above)
  • Place lining pieces together with the right sides of the fabric facing each other. Sew around the edges, leaving the top open. Leave the lining inside out.

lining inside stocking

  • Place the inner/lining stocking inside the outer stocking, with the wrong sides facing each other and lining up side seams. (see photo above)
  • Fold the hanging loop (stocking hanger) piece in half (1″ wide) with the wrong side of the fabric facing out. Stitch the side seam. Turn right side out. Iron flat.

adding loop to christmas stocking

  • Fold the loop in half and pin it inside the stocking on the side seam and line up the raw edges.

trim for christmas stocking pattern

Trim for Cuff

  • If you’d like to add a trim to the cuff of the stocking, you can do that right now. I used a piece of fabric that I folded in half and pressed. I lined up the raw edges to the bottom edge of the cuff and stitched it together. (see photo above)

striped trim for christmas stocking

  • Then I folded it over (to enclose the raw edge–see photo above) and topstitched it into place. You can also add lace, pom pom trim, or any other trimming to the edge!
  • If you don’t want to add trim, just fold the bottom edge over 1/4″, press with an iron, then fold over once more and stitch in place to create a hem.

sewing cuff on stocking

Cuff

  • Fold the cuff in half with the wrong side of the fabric facing out (see photo above). Stitch the side seam. Turn right side out.
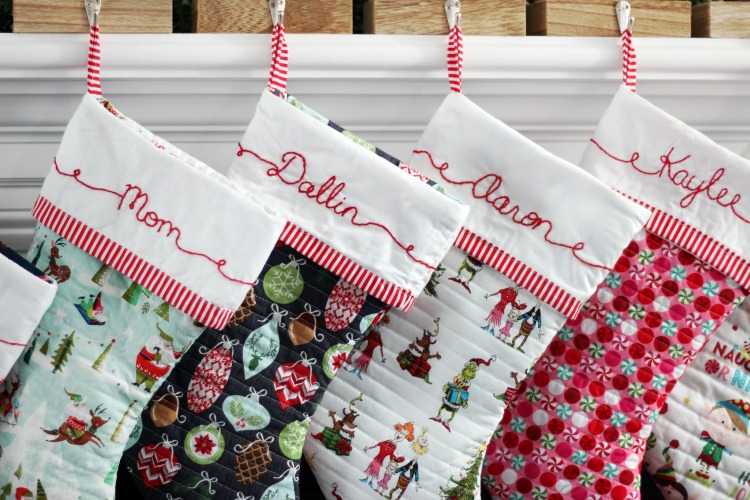
Note: if you’d like to add names to your stockings do this now, then proceed to tuck the cuff inside the stocking using the directions below. I used a photo of Christmas stockings that I found on Etsy as inspiration then freehanded the lettering using a pencil before stitching with embroidery thread.

assembling christmas stocking

  • Tuck the cuff inside the stocking with the right side of the fabric facing the lining fabric. The top of the cuff lining up with the raw edge of the stocking, and the side seam lining up with one of the stocking side seams. The loop (stocking hanger) will be between the lining fabric and the cuff. Pin in place.
  • Stitch around the entire top edge. Stitch over the stocking loop a few times, going forward and in reverse, to reinforce the seam.

free christmas stocking pattern

  • Pull the cuff out of the stocking and fold over the stocking.
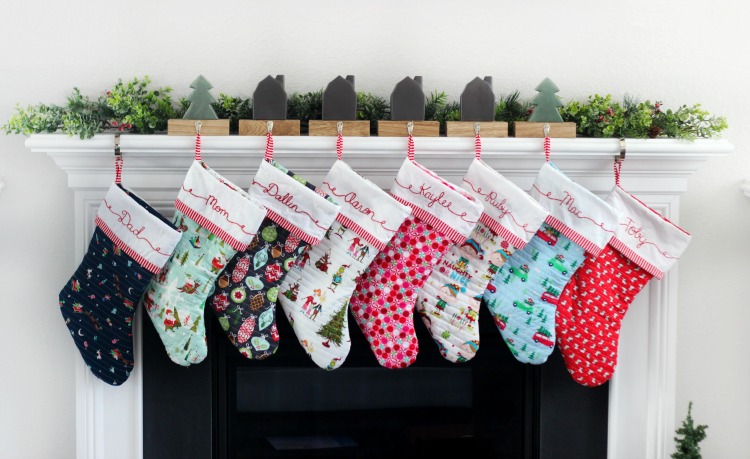
8 stockings hanging on a mantel

If you don’t have a mantel to hang them on you can use a quilt ladder! Here is our $15 stocking ladder tutorial. Perfect for blankets OR stockings!

And be sure to check out these 22 homemade stocking tutorials from the DIY Network!

Print Friendly, PDF & Email

Related

Share
Pin

About Brandy

Welcome! I'm Brandy, mother to 5 darling kiddos and a cute black lab named Toby. My husband is in the Coast Guard so we've lived all over the place, turning each house into a home. I love baking, sewing, making cute things with my kids, and sharing what I've learned with all of you!

Disclaimer: I am a participant in the Amazon Services LLC Associates Program, an affiliate advertising program designed to provide a means for me to earn fees by linking to Amazon.com without any additional cost to you. As an Amazon Associate, I earn from qualifying purchases.

Previous Post: « Gingerbread Playdough (+ Video)
Next Post: Double Chocolate Andes Mint Cookies (+ Video) »

Reader Interactions

Comments

  1. Elyce Treacy says

    December 15, 2023 at 4:19 pm

    Thank you Brandy I made 3 stockings based on your brilliant tutorial. Have a wonderful Christmas from Elyce in Ireland.

    Reply
    • Brandy says

      December 15, 2023 at 10:07 pm

      I’m so glad to hear that! Merry Christmas!

      Reply
  2. Emily Muir says

    July 31, 2023 at 9:18 pm

    I’m having a hard time finding the video link for this tutorial.

    Reply
    • Brandy says

      August 4, 2023 at 11:22 am

      Hi Emily! The videos plays directly under the first image of the post. Do you have an ad or pop up blocker on?

      Reply
  3. Mary says

    December 23, 2022 at 8:51 pm

    Great pattern fairly easy. It did take me longer than 1 hour! Closer to 2. And had a bit of trouble matching cuff edges- found cuff to be a hit too big. But will make again!

    Reply
    • Brandy says

      December 24, 2022 at 9:12 am

      Glad to hear!

      Reply
  4. Kyrie says

    December 17, 2022 at 12:19 pm

    Love this pattern so much! I’m new to sewing and this beautiful, simple pattern seems like a great beginners craft. Question though, did you use just a regular foot for the quilting part or a walking foot? I’m probably overthinking it.

    Reply
    • Brandy says

      December 17, 2022 at 12:49 pm

      You can use either one! I used a regular foot since it wasn’t very thick.

      Reply
  5. Dee says

    December 3, 2022 at 11:18 am

    Thank you for the pattern, Brandy! Quick question…where is the link to the step by step video? I see the words, “Watch our step by step video!” but I’m not able to find a link.

    Reply
    • Brandy says

      December 3, 2022 at 1:17 pm

      Hi Dee! The video plays right under the first image in the post. Do you have a pop up blocker on your browser by chance?

      Reply
  6. Morgan Fobare says

    November 16, 2022 at 5:41 pm

    I am a novice when it comes to sewing but this pattern and your detailed instructions were super easy to follow! This is the first time I’ve made anything like this and the first time I’ve ever embroidered but I wanted to make a Christmas stocking for my son’s first Christmas that he can cherish forever. My mother made me a personalized stocking when I was little and I really wanted to carry on the tradition. Thank you! I’m so happy with how this turned out

    Reply
    • Brandy says

      November 16, 2022 at 7:53 pm

      Morgan, this made my day! What a keepsake that will be!

      Reply
  7. Gail says

    November 14, 2022 at 2:13 pm

    Please describe exactly how to tape the stocking together A, B, C, & D. I understand cuff is cut separately. Had a terrible time printing instructions and would really like to make these soon.

    Reply
    • Brandy says

      November 14, 2022 at 3:37 pm

      A attaches to B. C attaches to D. Then attach the AB piece to CD piece.

      Reply
  8. Alex says

    December 16, 2021 at 4:25 pm

    Just made one last night! How fun. Sewed together a bunch of scraps from mask projects from the last year. My first quilting project, so things are a little catawampus. Everything was in the stash, and it was really satisfying to whip this up in a few hours.
    https://www.instagram.com/p/CXjwUhZPdR6/?utm_source=ig_web_copy_link

    Reply
    • Brandy says

      December 16, 2021 at 6:59 pm

      Beautiful!!

      Reply
      • Alex says

        December 16, 2021 at 10:53 pm

        Also appreciate that you can make the outside out of a quarter yard of fabric. Woohoo!

        Reply
  9. Nancy says

    November 28, 2021 at 4:43 pm

    Hi, I’m trying to download your pattern, but I can not get it to download. I’m clicking on everything I think should be the link, but nothing is taking me anyplace except the ads! My first thought was the stocking that says FREE PDF, but when I click there it does nothing. Any suggestions on how I can get the pattern?

    Reply
    • Brandy says

      November 28, 2021 at 5:12 pm

      Hi Nancy! That’s odd! I’ll go ahead and email it to you since it isn’t opening correctly. Could just be a pop up blocker or something.

      Reply
  10. Wanda says

    November 16, 2021 at 7:23 pm

    These are ADORABLE!!! How did you put the names on the stocking?

    Reply
    • Brandy says

      November 16, 2021 at 9:20 pm

      Thank you!! I penciled the names on then embroidered over it by hand. 🙂

      Reply
  11. ARNETTE WARREN says

    September 24, 2021 at 9:10 am

    Hi, Love the pattern. Can you tell me the finished size of these stockings? Thanks.

    Reply
    • Brandy says

      September 24, 2021 at 2:48 pm

      Hi Annette! Mine are packed away in the attic—where only my husband can climb and access the heavy totes, ha! They are a standard size though. I used a pre-existing stocking to create the pattern size!

      Reply
  12. Lisa says

    September 3, 2021 at 4:51 pm

    Hello,
    Thank you so much for the beautiful pattern. Few questions please. What do the dotted lines represent? What does (1”) mean? Just don’t want to make any mistakes!

    Thanks so much,

    Lisa

    Reply
    • Brandy says

      September 5, 2021 at 10:11 am

      Hi Lisa! When you tape the stocking together you’ll place the pieces over the dotted lines to match things up. The 1″ square is just for printing to make sure it prints to scale. If you print out the pattern and that box doesn’t measure 1″ wide, then you’ll need to check your printer settings to make sure it’s 100%. Have fun!

      Reply
  13. Sarah says

    December 12, 2020 at 10:36 pm

    Thank-you for sharing your Christmas stocking pattern and directions. I just finished making one for my two year old daughter. Your pattern and guide were a pleasure to work with. Now on to making five more, three for my other children and one each for my husband and I. I had to laugh when you described in your other blog post of having started your stocking project on Dec. 8th. For me, the time crunch is what makes me actually get the projects done :). Merry Christmas!

    Reply
    • Brandy says

      December 13, 2020 at 3:34 pm

      Haha! It’s so true. If I started making stockings in February I’d probably forget all about them. Working on them December was an easy way to light a fire under me! Glad the tutorial worked out for you! Merry Christmas!

      Reply
  14. Kimberly Raines says

    November 29, 2020 at 8:58 am

    It won’t allow the pattern link to be downloaded for printing.

    Reply
    • Brandy says

      November 29, 2020 at 2:57 pm

      Hi Kimberly! You should be able to click on it then click on the print icon. It looks like it’s working for me. If you try again and it doesn’t work I’ll download it and e-mail it to you using the email in your profile here. Just let me know, thanks!

      Reply
  15. Francine says

    November 30, 2019 at 6:47 pm

    I am SO happy to have found your tutorial! I plan on making at least 4 for my kids. I will be “making” my own fabric using a crazy quilting technique. Having the dimensions of the cuff and the free pattern is HUGE. So thank you!

    Reply
    • Brandy says

      December 1, 2019 at 3:19 pm

      That is awesome! Making your own fabric, too! I’m intrigued!

      Reply
  16. L says

    November 28, 2019 at 8:09 am

    Looking forwards to making these stockings for the family this year. I plan on buyingfabric of each persons favorite Christmas character/movie. Any last minute advice before i start

    Reply
    • Brandy says

      November 28, 2019 at 7:31 pm

      How fun! I don’t have any advice except to have fun! What a treasure these will be!

      Reply
  17. Pam Cox says

    November 6, 2019 at 2:13 pm

    I can not figure out how the stocking pieces, which one with each piece.

    Reply
    • cindi fairchild says

      March 12, 2021 at 6:13 pm

      This is the issue I am having. Did you ever find out which pattern pieces go to another? I’ve placed them back and forth the really don’t get it. I would love to make these for my family.

      Reply
      • Brandy says

        March 12, 2021 at 7:53 pm

        A goes to B and C goes to D.

        AB are on top and CD are on the bottom. Tape them together. The cuff piece is separate. Hope that helps!

        Reply
  18. Dawn says

    December 8, 2016 at 7:06 am

    Such a simple and sweet sewing Christmas craft!! I’m a new sewer myself but this stocking…just inspiring and stunning!! I’ve chosen your post as my feature this week over at the Friday Favorites Linky Party – it will also be pinned to our feature board! Swing by and link up again! 🙂

    Reply
  19. Debi Thurow says

    December 7, 2016 at 1:21 pm

    Thanks for sharing at our Thursday Favorite Things Blog Hop. I featured you this week on my round up!

    Reply
  20. diyadulation says

    December 7, 2016 at 5:12 am

    This is fantastic! Such a gorgeous project that’s easy to make. (And those lines truly are super crisp! That’s awesome!) Thanks for sharing with us at Merry Monday this week!

    Reply
  21. Julie says

    November 30, 2016 at 1:15 pm

    Love this so much!

    Reply
  22. Heather from Centsiblechateau.com says

    November 29, 2016 at 10:05 am

    Saw these on the nap time creations Linky Party and they are AWESOME! I wish I could sew, i’m going to be my mom to make them! lol I’m going to share them on my FB!

    Reply
    • Liz says

      November 17, 2020 at 6:33 am

      I’m loving your pattern and I’m about to make it but we live in a country where batting doesn’t exist 😡. Do you think it would turn out if I made it without batting.

      Reply
      • Brandy says

        November 17, 2020 at 7:00 am

        Hi Liz! You can make it without batting or even quilting it, it will just be a little thinner. You can also use felt instead of batting if you have access to that. 🙂

        Reply
  23. Theresa says

    December 5, 2013 at 6:25 pm

    Beautiful project. Love the soft color

    Reply
    • Brandy says

      December 5, 2013 at 10:26 pm

      Thank you Theresa! I hope you have a wonderful weekend!

      Reply
  24. Brandy says

    December 5, 2013 at 9:26 am

    I don’t have any more photos, but I did go back and clarify it as much as possible! Hope that helps!

    Reply

Leave a Reply Cancel reply

Your email address will not be published. Required fields are marked *

Recipe Rating


This site uses Akismet to reduce spam. Learn how your comment data is processed.

Primary Sidebar

I'm Brandy! I love to create and share my ideas through easy-to-follow recipes and tutorials. MORE ABOUT ME

Follow Along

  • Facebook
  • Instagram
  • Pinterest

Disclaimer: I am a participant in the Amazon Services LLC Associates program. As an Amazon Associate, I earn from qualifying purchases, at no cost to my readers.

My Amazon Store

Get My Best Projects and Recipes!

My Sewing Book for Kids!

kids sewing book cover
  • Home
  • Website Accessibility
  • My Book
  • Privacy Policy

Copyright © 2025 Log in

Gluesticks blog logoLogo Header Menu
  • About
    • About Me
    • Contact Me
    • Terms and Privacy Policy
  • Sewing
    • My Book
    • Kids Sewing Projects
    • All Sewing Projects
  • Crafts
    • Kids Crafts
    • Paper Crafts
    • Free Printables
    • All Crafts
  • Holidays
    • Christmas
    • Halloween
    • Patriotic Holidays
    • Easter
    • St. Patrick’s Day
    • Valentine’s Day
    • Gift Ideas
      • Teacher Gifts
      • All Gift Ideas
    • Parties
  • Home
    • Home Decor Projects
    • Cleaning & Organizing
    • Gardening
    • Motherhood
  • Recipes
    • Kids in the Kitchen
    • Appetizer Recipes
    • Bread Recipes
    • Dessert Recipes
      • Cake Recipes
      • Cookie Recipes
      • All Dessert
    • Main Dish Recipes
    • Slow Cooker
    • Sides & Salads
    • Holiday Recipes
    • All Recipes