

If you aren't into sewing, no worries! Here are two fun "no sew" kitchen crafts by my friends, Christie and Jillian! But if you'd like to try out our simple kids apron sewing tutorial, keep reading!
No Sew Monogrammed Kitchen Towels

For 60 more sewing projects, check out my sewing book for kids! And here is an adorable toddler Cookie Monster apron to make for a Sesame Street fan in your home!

Little Baker's Kids Apron Sewing Tutorial
gluesticksblog.com

(pattern pieces: two apron pieces, front and back, 2 pocket pieces, 1 neck band, 2 waist ties)
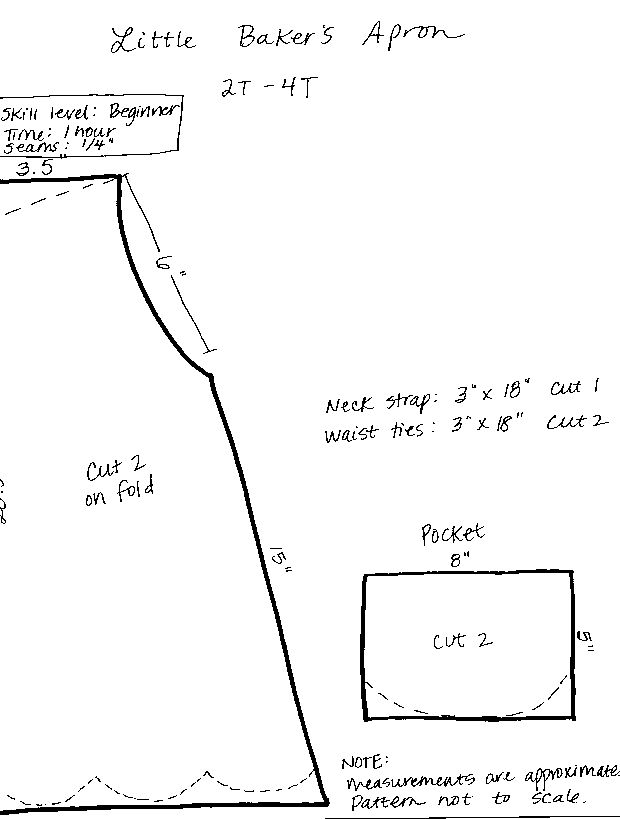
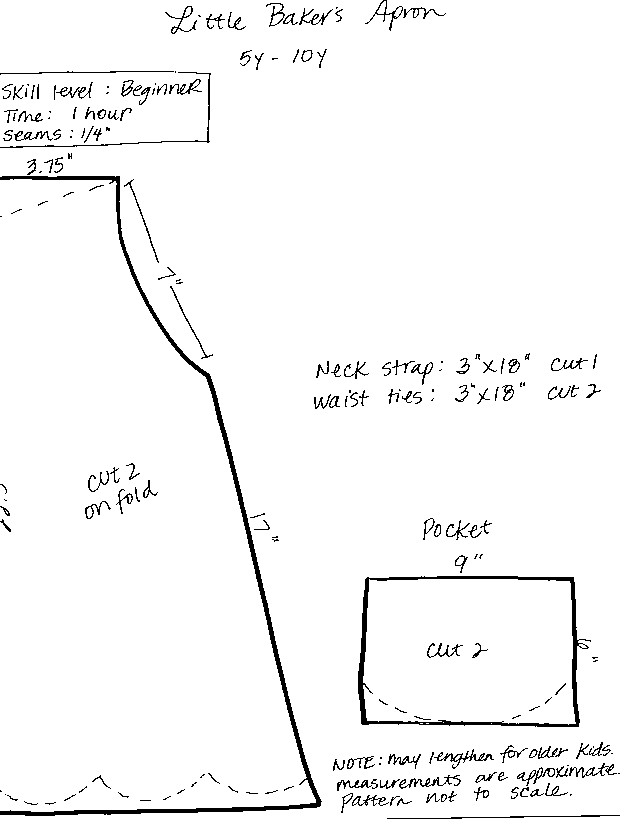
I don't know how to use pattern programs so I made a quick diagram with measurements to make this apron in two sizes.
You can download the diagram. Feel free to add inches to the length if needed for the larger pattern. It just depends if you want it to hit above/below the knee. For a boy apron, just cut out as shown. For a girl apron with a scalloped bottom, cut out following the dashed lines on the diagram.
Time: 1 hour
Seams: ¼"
Skill level: Beginner
PDF pattern diagram: click below to download
Supplies:
fabric for outer (I always just buy a yard)
fabric for lining
thread
measuring tape
iron/ironing board
sewing machine

1. Sew your two pocket pieces together (right sides facing), leaving a few inches on the top to turn right side out.
2. Clip curves and turn right side out. Tuck ends in where you turned it right side out and pin. Top stitch the top of the pocket piece, catching the tucked ends into the seam.
3. Center the pocket onto the apron front and pin into place. Stitch pocket onto the apron by sewing around the sides and bottom.

4.Fold waist ties in half and sew the side seam. Use a safety pin to turn the strap right side out. Press.
5.Fold one of the ends inside about ½" and pin.

Neck Strap:
Make the same way as the waist ties, but leave ends open. Top stitch all the way around.
7. Pin neck strap to apron front about ½" away from edges.
8. Pin the raw edge of each waist tie to apron front just below the arm opening.
9. Place apron lining on top of the front apron piece, right sides together, sandwiching the neck strap and waist ties in between. Pin all the way around, leaving a 4" gap on the side of the apron for turning right side out.

11. Fold over opening and pin. Top stitch around the entire apron.


Shelley Klein says
Aloha Brandy!
An adorable pattern that can easily be made reversible. Two questions about the v shape at the top of the apron. About how far down from the top along the fold line does the v go? Is there a slight curve or are those straight lines on the sides of the v?
Mahalo!
Brandy says
Hi Shelley! I’m out of town so I can’t measure the V, but I’d say it goes down about 2”. I can verify next week. The sides are a slight curve, but you can make them straight if you’d like. Hope that helps!
Lorena says
I love this apron tutorial! The fabric you chose is beyond adorable, perfect for the new little beret I bought my daughter!
I was wondering if you have a measurement for the bottom of the apron, from the fold to the outer edge? All other measurements are clearly there.
I'm most nervous about the scallops but it is the most adorable part!
Brandy says
Hi Lorena!
The measurements are approximate and you can kind of eye ball it. Here are the measurements I had: Small apron: 9.5" (before sewing). Larger apron: 13". Hope that helps!
Nici Higby says
I love, love, love this apron. From the scalloped edge to the adorable fabric... just perfect. Thanks so much for sharing it at my Creative Ways Link Party!
JESS44903 says
Isn't this too cute! LOVE it!
I would love for you to share this with my Facebook Group for recipes, crafts, tips, and tricks: https://www.facebook.com/groups/pluckyrecipescraftstips/
Thanks for joining Cooking and Crafting with J & J!
melanie973 says
Love the adorable apron design and simplicity! It seems like the perfect project for the child to help with, too, and learn a little bit about sewing in the process. Always enjoy seeing kids being active in the kitchen, whether real or pretend.
Susan says
Wow this kitchen is awesome! I'm tempted to get my sewing machine out for that darling apron!
shopannies (@shopannies) says
I love the fact it is so real like makes pretending even more fun
Ana from The Lost Apron says
I pinned this to my Apron Pinterest board. These aprons are super cute. I actually love your pattern and that is not professional. That makes us all feel like we can go "off-roading" and try something new.
Brandy says
Thank you, Ana!
Colletta says
I made myself an apron using that same material! I love it 🙂
I hope you can stop by:
http://collettaskitchensink.blogspot.com/2016/09/happy-homemaker-monday-92616.html
Colletta
Brandy says
I'm thinking I need one for myself too! 🙂
diy180 says
I love the apron and the great fabric you picked out. So much fun and I would love it if you would share at a link party I am co-hosting. I hope to see you there. Have a great week. http://diy180site.blogspot.com/2016/09/dishing-it-and-digging-it-link-party-115.html
Deb Lafond says
Can you tell me the length of the apron mid line for both sizes. I can’t see them on you draft? Thanks
d
Brandy says
It looks like it was cut off on the scan. Sorry about that!
Smaller apron: 20.5”
Larger apron: 22.5”