Gluesticks Blog

menu icon
go to homepage
  • Sewing
  • Crafts
  • Recipes
  • About Me
    • Facebook
    • Instagram
    • Pinterest
  • subscribe
    search icon
    Homepage link
    • Sewing
    • Crafts
    • Recipes
    • About Me
    • Facebook
    • Instagram
    • Pinterest
  • ×
    Home » Sewing

    PVC Framed Canopy Bed

    July 19, 2011 By Brandy 87 Comments

    wooden toddler bed with pink comforter
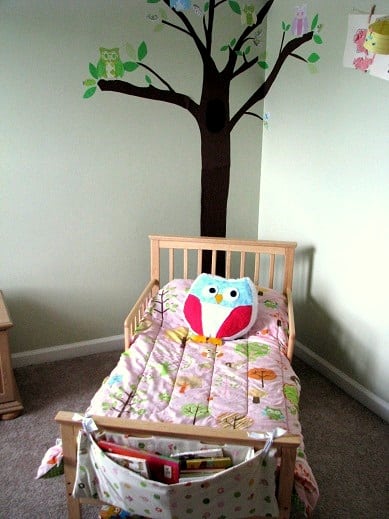
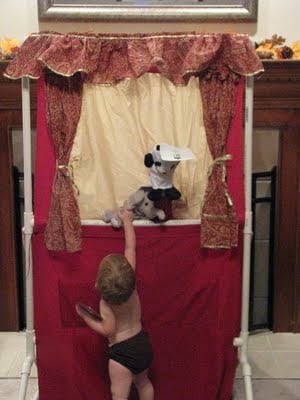
     While browsing Toys R Us & Babies R Us last weekend, we came across a cute Tinkerbell canopy bed that Kaylee just loved. She already had a nice toddler bed, so we didn't give it much though, or at least I didn't. Daddy had other plans...
    pvc pipe frame around toddler bed
     Derrick thought that it would be pretty simple to make her a canopy for her existing bed from a PVC frame. He is the king at PVC pipe creations...
    child playing with homemade pvc pipe sprinkler
     Homemade Sprinklers
    pvc pipe toy storage
    Toy Bucket
    pvc pipe puppet theater
    Doorway Puppet Theater Frame
    (Just to name a few 🙂
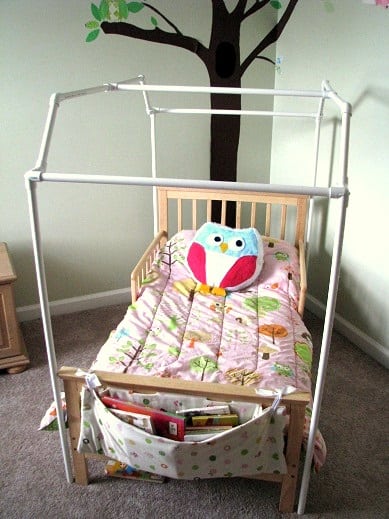
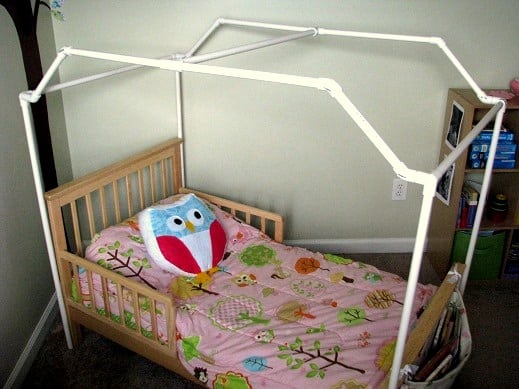
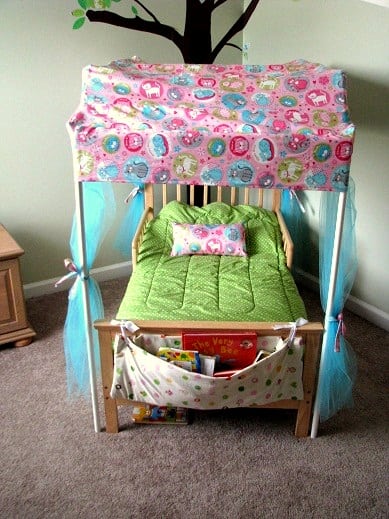
    And he was right. He was able to put this frame together in a matter of minutes and Kaylee was thrilled! She loved having just the frame, never mind having any sort of canopy attached. Kids are easy to please. I took her to the fabric store and she chose a couple of fabrics for the project. A pink kitty fabric and turquoise tulle.
    pvc canopy frame over toddler bed
     After a couple of hours of stressing (I'd never done something like this before and did not have a pattern) and sewing, here is the finished product!
    fabric canopy cover over pvc frame
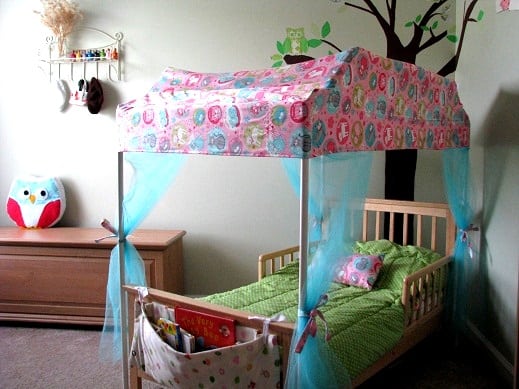
     It fits perfectly, thanks to a few minor adjustments and an extra seam through the center to tighten it up a bit in the end. I've already had some requests for a tutorial. If I had any idea what I was doing(when I was doing it), I might have written down some dimensions and instructions, but it was a first time project for me that would probably turn out differently if I did it again. Basically...
    toddler canopy bed
    You can see that both side panels are kind of a triangle shape. I followed the outline of the frame that Derrick made and added an ½" all the way around for seam allowances. I used a ⅜" seam and that gave it a little room for error. I used newspaper to make pattern pieces (taped it to the pipes) and then cut out the fabric shape. The top is one long piece that is the width of the pipes and stops where you see the crease on the front. That is a seperate piece so that it would fit the angle. It is also the width of the pipes, but only 4" or so in length. Then there is another piece directly on the front attached to the small 4" one.  I made it long enough so that it was flush in length with the side panels. So the sides are each 1 panel and the top is 1 large panel + 2 smaller ones on the front and another 2 smaller ones (the same size as the front) on the back. This probably doesn't make any sense. Just use your frame as a guide. I'm not sure what it would have looked like if I just did one piece for the top and didn't use seperate pieces for the angles, it might have been fine. I'm not an expert so I just did what I thought would work. Then I hemmed it all the way around and sewed the little curtains to the hem. Total fabric for the project 3 ½ yards pink + 4 yards tulle.
    ***
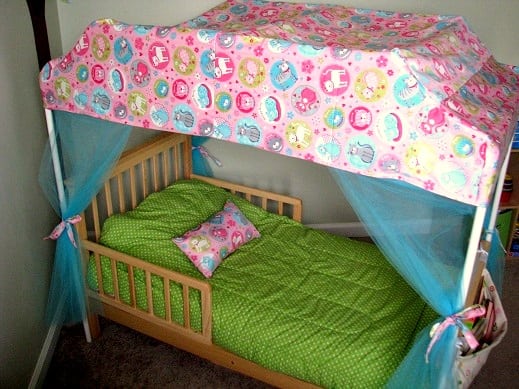
    I used extra fabric to make ties for the faux curtains and a throw pillow. This is the reverse side of her owl comforter in the first photos. It matched the new canopy perfectly!
    wooden toddler bed with canopy made out of pvc pipe
     She loves her kitty bed (although she calls it a Tink bed after seeing the Tinkerbell one at the store) and sleeps, not only in comfort, but in style!
    pink pillow with cat print
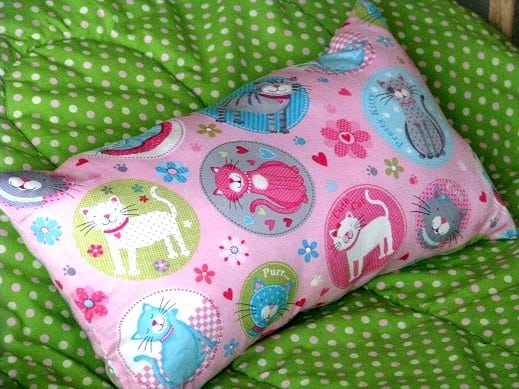
    Here is a close-up on the fabric. It was found at Joann's in the juvenile apparel selection at 60% off last week. I picked up several prints since it is so bright and cheerful, and nice and sturdy! So much better than calico.

    Pin It

    Share
    Pin

    More Sewing

    • 30 felt tutorials
      30 Felt Craft Tutorials (Toys, Gifts and More!)
    • collage of cheap and easy halloween crafts
      16 Cheap and Easy Halloween Crafts to Make
    • Kids Lacing Craft {Printable Template}
    • Teddy Bear Rice Pack Tutorial (Free Template)

    About Brandy

    Welcome! I'm Brandy, mother to 5 darling kiddos and a cute black lab named Toby. My husband is in the Coast Guard so we've lived all over the place, turning each house into a home. I love baking, sewing, making cute things with my kids, and sharing what I've learned with all of you!

    Comments

    1. Sarah says

      February 11, 2018 at 6:15 pm

      Hi, I know this post is old but I wanted to let you know I copied the idea and built a pvc frame and sewed a my little pony canopy for it. I wanted to send you a picture if I could.

      Reply
      • Brandy says

        February 12, 2018 at 4:06 am

        I'd love to see it! [email protected]. And (with your permission), I'd love to share it on my FB page!

        Reply
    2. Samantha Bodde-Spangler says

      March 07, 2014 at 7:45 pm

      Any way to get the pattern from ya? thanks

      Reply
      • Brandy says

        March 07, 2014 at 9:59 pm

        Hi Samantha, this was my first time making a canopy like this so I didn't make a pattern and we no longer have the canopy to get the dimensions for you. My girls outgrew it. I'm sorry!

        Reply
    3. Melissa C says

      December 18, 2013 at 6:11 pm

      I am wondering if your hubby secured the canopy frame to the bed somehow? We're looking to build my son a tent like structure for his twin captain bed, and I love the idea of pvp pipes. They really are so versatile.

      Reply
      • Brandy says

        December 18, 2013 at 6:46 pm

        Hi Melissa, I sewed the canopy so that it fit nice and snug. You could use sticky velco tabs to help secure it more, but then you couldn't ever wash the canopy. I'm wondering if there is another way. Maybe some ribbon sewn and then tied to the pipes?

        Reply
    4. B. Maura Townsend says

      October 15, 2013 at 3:09 pm

      I have an instructable up here: http://www.instructables.com/id/Make-a-Rainbow-Canopy-for-Your-Childs-Room/ for a canopy on a converted crib bed, and a bunch of folks had asked me how to do this for a regular toddler bed. Found you via pinterest, and I linked you from the comment section on my how-to.

      Awesome!

      Reply
      • Brandy@Gluesticks says

        October 15, 2013 at 7:59 pm

        That rainbow canopy is soooo cool! Thanks for sharing the link!

        Reply
    5. Betsy @ Anna Nimmity says

      February 12, 2013 at 5:13 pm

      Adorable!

      Reply
    6. shessuchariot says

      February 10, 2013 at 3:55 pm

      Ahh, I love those moments when you're mindlessly clicking links and out of nowhere stumble upon a really great blog, thinking why haven't I been following this woman before? 🙂

      Loooove this canapy. Thinking of buying a toddler bed similar to yours, but really wanted a canopy as well. For some reason every toddler canopy bed I find is made of plastic and I just can't swallow a plastic bed. Well you've answered my prayers darling, because my PVC-master husband has a new project to start. So cute!

      Reply
      • Brandy says

        February 10, 2013 at 8:03 pm

        Thanks for stopping by! I'm glad you stumbled upon our blog 🙂 my daughter loves her bed, and you are right. It's hard to stomach the cost of a storebought one!

        Reply
    7. .:+Pearlofafrika+:. says

      January 07, 2013 at 4:28 pm

      wow! super creative.

      Reply
    8. Jen says

      November 09, 2011 at 2:58 am

      Oh my goodness! THis is amazing! Please drop by and link this up to my very first link party at: http://icantstopcrafting.blogspot.com/2011/11/head-to-head-showdown-1.html

      ~Jen

      Reply
    9. Angie says

      October 15, 2011 at 1:26 pm

      Awesome project! Love your creativity. Tahnks for linking up!

      Reply
    10. Courtney ~ French Country Cottage says

      October 14, 2011 at 1:37 am

      This is WONDERFUL! I love it- what a great idea!! Would love for you to come share at Feathered Nest Fridays sometime! 🙂

      Reply
    11. Amber *SaltTree* says

      October 03, 2011 at 2:32 pm

      fantastic!

      Reply
    12. Nan @ Playful Decor says

      September 29, 2011 at 12:31 pm

      I love this idea! If I had a girl, we'd be buying pvc! Great idea! Thank you for linking up to Tuesday's Nursery!

      Reply
    13. robinhood says

      September 28, 2011 at 6:50 am

      I read your blog and knows, that we can use Glue Sticks as a maker of our home..

      Reply
    14. Jennifer Juniper says

      September 27, 2011 at 2:18 am

      Very clever! I featured your bed this week 🙂

      jen

      Reply
    15. Candace @ Candace Creations says

      September 16, 2011 at 3:58 pm

      That is super awesome I love the canopy!

      come link up tomorrow at scrappy saturdays!

      Reply
    16. Kathryne Joy says

      September 13, 2011 at 3:54 pm

      Cool have you been to pvcplans.com ? They would love your ideas.

      Reply
    17. Sara says

      September 07, 2011 at 3:38 pm

      How ADORABLE!!! Would LOVE it if you would link this project up to my turquoise linky party going on right now!! http://www.sweetlittlegals.com/2011/09/turquoise-lovin-3.html

      Reply
    18. cALyPsO says

      August 31, 2011 at 2:22 am

      THATS AWESOME!!!!!!!!!!!!!!!!!!!!!!!!!!

      Reply
    19. Delaney says

      August 26, 2011 at 1:09 pm

      Congrats! You've been featured on Fabulousity Friday at Sweet Tea Serendipity! Stop by & pick up your award: http://sweetteaserendipity.blogspot.com/2011/08/fabulousity-friday-10.html

      Reply
    20. Delaney says

      August 23, 2011 at 11:49 pm

      How awesome!

      Reply
    21. casserole says

      August 08, 2011 at 1:12 pm

      Brilliant!! I linked to your project on Craft Gossip Sewing:
      http://sewing.craftgossip.com/lookie-what-she-made-bed-canopy-from-pvc-pipe/2011/08/08/

      --Anne

      Reply
    22. Kristine @ JandMs Eye Candy says

      August 06, 2011 at 4:26 am

      Featuring all these awesome projects tomorrow on our blog!! We are blown away! Thanks so much for sharing and linking up! Please feel free to grab a button and get your brag on 😉 Thanks again!

      Reply
    23. Summer says

      August 04, 2011 at 5:43 pm

      Thanks for linking up to Market Yourself Monday! I'll be featuring this on Saturday on my blog.

      http://sumossweetstuff.blogspot.com

      Thanks!
      Sumo:)

      Reply
    24. Miranda @ Life in the Motherhood says

      August 03, 2011 at 2:11 am

      So cute!!! I wish I had a girl so I could do this. I'm totally pinning this...just incase we ever have a girl!!!

      Reply
    25. KRyStal says

      August 02, 2011 at 8:00 pm

      This is so awesome! I admire your work I would really love to make this for my little girl hopefully I can follow by these pics 🙂

      Reply
    26. Danielle says

      August 02, 2011 at 4:33 pm

      absolutely gorgeous. I am amazed at everything you guys have done with PVC pipes. So inspiring. I would love for you to link this up to my feature friday link party. This bed is just too cool.

      http://www.blissfulanddomestic.blogspot.com

      Reply
    27. Amy@Sassy Scarlett says

      August 02, 2011 at 4:02 pm

      Adorable idea! You guys did an awesome job, I'm very impressed!!

      Reply
    28. Michelle@Somedaycrafts says

      August 02, 2011 at 1:28 pm

      This is fabulous. Any kid would love to have this in their room! I am featuring this at somedaycrafts.blogspot.com

      Reply
    29. Rachel says

      August 01, 2011 at 1:52 pm

      Wow so adorable! I'm so impressed! I love the whole room (the tree on the wall, the owl pillow, the book caddy at the foot of the bed). I am definitely bookmarking this for when my daughter is out of her crib 🙂

      Reply
    30. Jennifer says

      August 01, 2011 at 1:10 am

      What a great idea!! That came out so good, I bet your daughter is thrilled! Thank you so much for linking up this week at Saturday Social!

      xoxo

      Jenn @ Social Salutations

      Reply
    31. April says

      July 31, 2011 at 12:19 am

      You are amazing! I am intimidated by learning how to thread my machine...

      Reply
    32. Em says

      July 30, 2011 at 3:28 am

      It's adorable! What a dream for a little girl!!

      Reply
    33. Carrie says

      July 30, 2011 at 2:30 am

      Darling! Gotta love how cheap and easy PVC is!

      Reply
    34. Desiree @ The 36th Avenue says

      July 28, 2011 at 3:36 am

      One word for you: STICKER!

      Awesome idea!

      Reply
    35. Suzy www.savedbysuzy.blogspot.com says

      July 28, 2011 at 3:17 am

      What a great idea. I bet your daughter loves it! Thanks for linking up.

      Reply
    36. Nicole@Thrifty Decorating says

      July 28, 2011 at 1:40 am

      That is amazing! Thanks so much for linking to Thrifty Thursday! I'd love to feature this next week! 🙂

      Reply
    37. Brandy says

      July 27, 2011 at 2:22 am

      Hi Sarah, yes it is the same concept as the ones I made the boys! Just used a sturdy cotton vs. fleece like I used with the other ones. It's nice to have a place to store their favorite bedtime stories!

      Reply
    38. Sarah says

      July 26, 2011 at 9:24 pm

      I just found you blog, such a cute idea. Quick question...I saw the book caddy's that you made for your boys, then notice the one on your daughters bed. Totally want to make these for my kids, so I was wondering, is the one on your daughters bed the same basic pattern as the boys or is it different. Thanks!

      Reply
    39. Sarah says

      July 26, 2011 at 9:23 pm

      This comment has been removed by the author.

      Reply
    40. Katie says

      July 26, 2011 at 3:51 pm

      love this canopy you guys made! Thank you for linking up last week at Sew Woodsy! Please come back tomorrow and link up your most recent project!

      Reply
    41. Confessions of a Stay at Home Mommy says

      July 26, 2011 at 2:17 pm

      That is SO cool! Is PVC expensive? I've always wanted to make one of those puppet theaters. I would be thrilled if you linked this up to my Tuesday Confessional link party going on now: http://www.craftyconfessions.com/2011/07/tuesday-confessional-link-up-party.html
      See you soon!
      ~Macy

      Reply
    42. Janet says

      July 26, 2011 at 4:44 am

      How sweet! You did a great job with the canopy and your husband with the frame. This is so creative and fun!

      Reply
    43. The Queen says

      July 26, 2011 at 4:36 am

      That is SOOO cute!!!! And looking at it I can see how if you had a boy (which I don't so no idea why the idea came to me 🙂 )you could totally turn it into a school bus bed by simply making the cover yellow and the flap of fabric stretch down to the bed frame with a window, etc.

      Reply
    44. Tonia @ TheGunnySack.com says

      July 26, 2011 at 4:05 am

      Just what every little girl dreams of...a canopy bed!! I love how you did it!!

      Reply
    45. Misty @Creative Itch says

      July 26, 2011 at 3:24 am

      LOVE this!! Thanks for sharing @'Sew Cute Tuesday'! I'll be featuring you tomorrow, so be sure to stop by and grab a 'featured' button!

      Reply
    46. Misty @Creative Itch says

      July 26, 2011 at 3:21 am

      This comment has been removed by the author.

      Reply
    47. Jen-CraftOManiac says

      July 25, 2011 at 4:06 pm

      THAT IS FLIPPEN AWESOME. I love the fabric and materials you used to dress the canopy too. Going to share this on COM-FB winks-jen

      Reply
    48. Stephanie says

      July 25, 2011 at 2:33 pm

      That has got to be like the cutest thing ever! And how creative to use pvc pipe...looks like you are a pro with that stuff though! I love the book bag at the foot of the bed.

      Reply
    49. nila1920 says

      July 23, 2011 at 5:10 am

      you did a wonderful job! very creative! oh and I love that book caddy you made out of the flat sheet! brilliant:D

      Reply
    50. Sachiko says

      July 22, 2011 at 8:22 am

      This is such a great idea! Thank you for sharing!

      Reply
    51. Prissyville says

      July 21, 2011 at 10:58 pm

      How cool is that?!? I would never have thought of that. Great blog and projects BTW!

      Reply
    52. the cape on the corner says

      July 21, 2011 at 7:21 pm

      oh my gosh, what a fabulous space for a little one! i would have loved to curl up with a book in that special bed!

      Reply
    53. thesleepyknitter says

      July 21, 2011 at 5:11 pm

      I love this so much! Beautiful and brilliant.

      Reply
    54. Adrianne says

      July 21, 2011 at 12:10 pm

      This is beautiful!! Oh man, when we get to big-girl bed in my household, it's going to be SO. MUCH. FUN. 🙂 Thanks for sharing.

      Happy to be your newest follower ~ Adrianne

      happyhourprojects.blogspot.com

      Reply
    55. Rachel @ Pleased as Punch says

      July 20, 2011 at 11:25 pm

      Your daughter must think she's in heaven! The ONLY thing I wanted when I was little, was a canopy bed. There's something so princess-y about it. 🙂

      Reply
    56. kasia says

      July 20, 2011 at 7:42 pm

      Awesome idea! And I love the toy bucket stand as well. Thank you for sharing

      Reply
    57. Katie says

      July 20, 2011 at 6:40 pm

      I would love the pattern for the Toy Bucket. Awesome job on the Canopy!!!

      Reply
    58. Amanda says

      July 20, 2011 at 6:17 pm

      You both did a fantastic job, it looks amazing!

      Reply
    59. Amanda @ The Little Giggler says

      July 20, 2011 at 5:12 pm

      What a sweet little bed! It looks amazing!

      Reply
    60. Ladyinwaiting35 says

      July 20, 2011 at 4:22 pm

      How bout a tutorial on that Canopy Cover? Or post the dimensions of fabric needed. I sew but I'm not the best at "from scratch" creations. 🙂 PLEASE 🙂

      Reply
    61. Juli says

      July 20, 2011 at 3:43 pm

      I love it! I would never think to make my own! Awesome job! -Juli
      ahenandherchicks.blogspot.com

      Reply
    62. Amanda says

      July 20, 2011 at 3:35 pm

      This is awesome! I love that it was a cheaper material & it is something removable, if needed.

      ~Amanda @ creatingamongstboys.blogspot.com

      Reply
    63. April says

      July 20, 2011 at 2:21 pm

      I love it! You did an awesome job!

      Reply
    64. btanders says

      July 20, 2011 at 1:53 pm

      Holy cow! How cool is this?!? My kids would go nuts!!

      Reply
    65. Katie says

      July 20, 2011 at 1:31 pm

      What a genius idea! I'd love if you would join us over at Sew Woodsy and link up this project!

      Reply
    66. Cindy says

      July 20, 2011 at 1:16 pm

      Awesome post! Thanks for sharing 🙂

      Reply
    67. TiffanyAnn says

      July 20, 2011 at 2:56 am

      This is so stinkin' adorable!!! Can I ask how you attached the tulle to the canopy? DI you just sew it on all the way along the top?

      Reply
    68. Lesley Litrento says

      July 20, 2011 at 1:54 am

      Seriously out of control creativity. Awesome.

      Reply
    69. Megan says

      July 20, 2011 at 1:41 am

      I always wanted a bed like this when I was a little girl!

      megan
      craftycpa.blogspot.com

      Reply
    70. Amy says

      July 20, 2011 at 1:07 am

      So cute! You did a really good job!

      Reply
    71. radn@HouseonAshwelllane says

      July 19, 2011 at 11:53 pm

      What a beautiful canopy.Decorating girls rooms is so much fun.

      Reply
    72. Deanne says

      July 19, 2011 at 10:45 pm

      what an amazing little girls bed!

      Reply
    73. Sam Findlay says

      July 19, 2011 at 9:43 pm

      Super super cute!!

      Reply
    74. Zerique says

      July 19, 2011 at 5:41 pm

      I love your blog and I really love this project!!!!!I am going to have to try this one! I would love if you would join my link up tomorrow where I am hoping to feature any and everything DIY, from recipes, to sewing, to before and afters, etc... Come on by!!!
      onesweetstory.blogspot.com

      Reply
    75. Faith, Trust, and a Little Pixie Dust says

      July 19, 2011 at 4:39 pm

      Oh my goodness, how creative & adorable. You & your hubby are geniuses!

      Warmly, Michelle

      Reply
    76. Art For Little Hands says

      July 19, 2011 at 3:52 pm

      My little girl would love this. So cute. I also like her little book thing on the bottom of her bed.

      Reply
    77. Mallory says

      July 19, 2011 at 3:44 pm

      This is AWESOME!!! I want one for my bed! 🙂 Thanks for sharing!

      Reply
    78. Connie the crafterbug says

      July 19, 2011 at 2:27 pm

      Wow this is genius and so adorable!
      Connie

      Reply
    79. Lisa says

      July 19, 2011 at 1:58 pm

      This is so neat! Great job to you and your husband!

      Reply
    80. LeighAnn says

      July 19, 2011 at 1:57 pm

      What a handy husband you have! I love PVC.

      Reply
    81. a&c says

      July 19, 2011 at 1:51 pm

      Amazing, you make it sound so easy!

      Reply
    82. Liz says

      July 19, 2011 at 1:48 pm

      That is amazing! Great job!

      Reply

    Leave a Reply Cancel reply

    Your email address will not be published. Required fields are marked *

    Recipe Rating


    This site uses Akismet to reduce spam. Learn how your comment data is processed.

    Welcome!

    I'm Brandy! I love to create and share my ideas through easy-to-follow recipes and tutorials.

    More about me

    Popular

    • cookies on wire cooling rack
      Mrs. Fields Blue Ribbon Chocolate Chip Cookies
    • basket of pillow treats
      YW Camp Pillow Treat Tags (Free Printables!)
    • two summer camp printable tags with drink packets
      Summer Camp Flavored Water Printable Tags
    • printable chapstick gift cards with chapstick
      "Don't Worry Be Chappy" Chapstick Printable Tags

    Seasonal

    • Journaling Handout (Easy Gift Idea)
    • variety of beadable pens with silicone beads
      Beadable Pen Tutorial (Easy Gift Idea!)
    • chocolate chip cookie on baking sheet
      Snoop Dogg's Rolls Royce Cookies
    • two metal stamped bracelts on table with marker and metal stamps
      Easy Metal Stamped Bracelets

    Footer

    ↑ back to top

    About

    • Privacy Policy
    • Accessibility Policy

    Newsletter

    • Sign Up! for emails and updates

    Contact

    • Contact

    As an Amazon Associate, I earn from qualifying purchases.

    Copyright © 2025 Gluesticks Blog