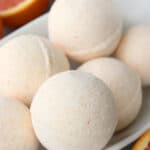
DIY bath bombs are a luxurious gift to make, easy to customize, and only require a few ingredients!
You might also like my homemade lotion bars, homemade lip gloss, or peppermint sugar scrub!
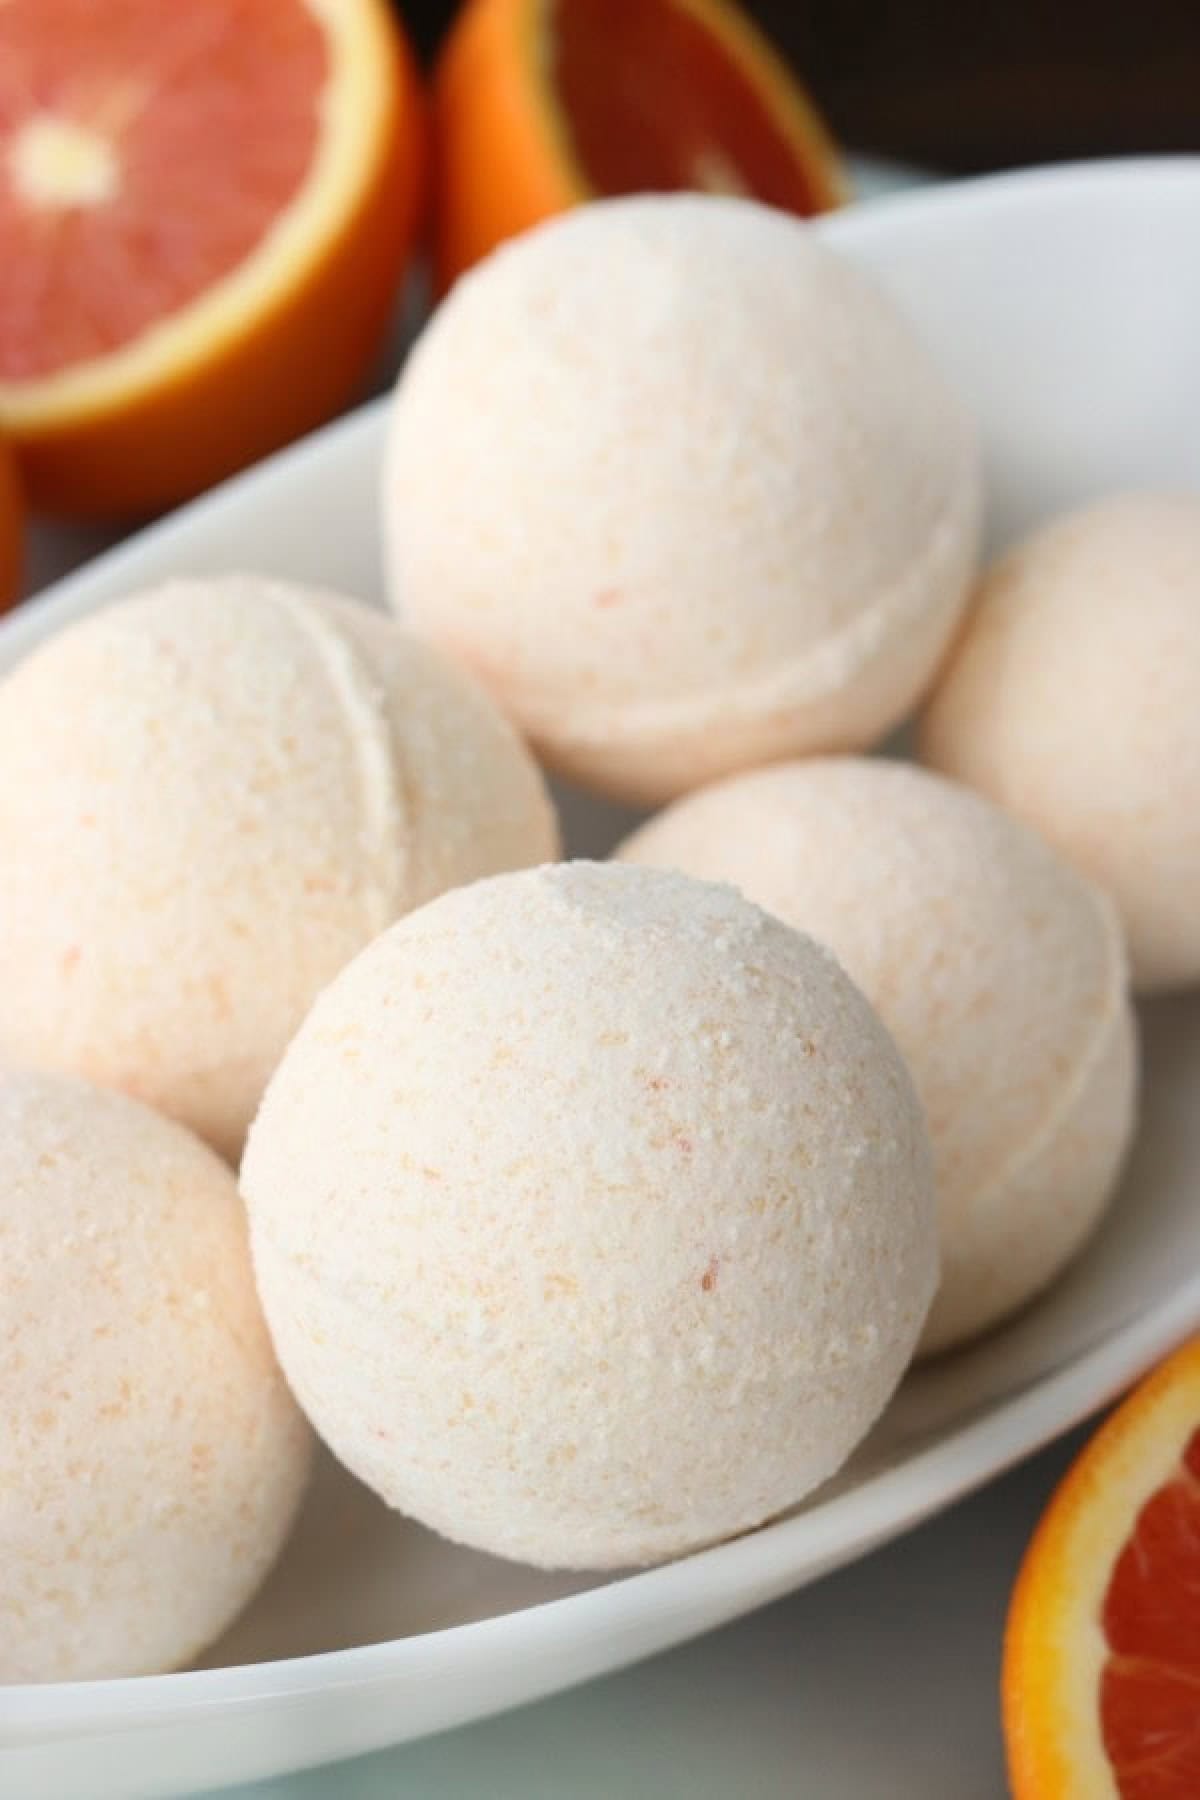
Have you tried your hand at making bath bombs? There's something so luxurious about bath bombs, and they smell absolutely heavenly!
Why I Like This Project
- Simple ingredients. You only need a few ingredients to make bath bombs, and they are easy to find at your local grocery store and on Amazon.
- Inexpensive. DIY bath bombs are far less expensive than purchasing them at the store, and the ingredients make a lot of bath bombs!
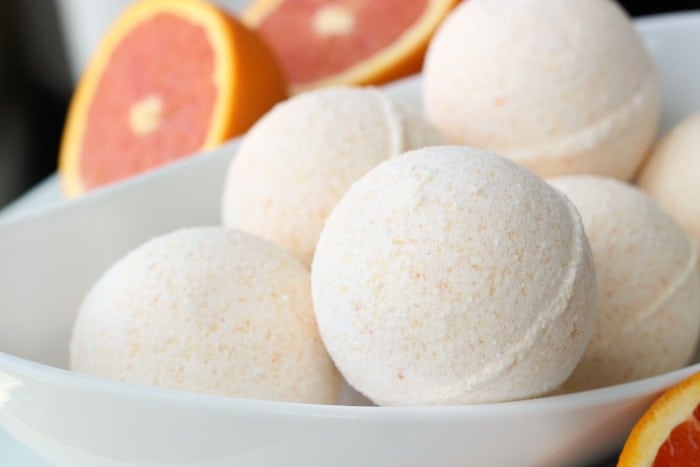
- Fun to customize. Make them any scent or color you'd like! Add fun add-ins like dried flowers or even body glitter!
What Others Are Saying
Thank you, I made a batch, and they are beautiful. I was frustrated with my first batch, but I got it now. ---Jacqueline on FB
Took me a little bit to get the mixture right. I kept wanting to add more liquid, but it made the bath bombs mushy. Stuck with a small amount of liquid, and they dried great! ---Laura on Pinterest
Jump to:
Tips and Tricks
- Don't add too much moisture. Why? Because water makes the bath bombs fizz and excess moisture in the dry ingredients will cause them to fizz prematurely! We don’t want them fizzing outside of the bathtub. You might be tempted to add extra liquid to help the sandy mixture come together, but it's best to keep it as dry as possible, with only a small amount of moisture.
- Don't add too much oil. Use my measurement for adding oil to your bath bomb. A little goes a long way. Too much oil will just sit on top of your bath water, leaving your skin greasy when you get out. It also hinders the bath bomb from drying out completely.
- Get creative with the molds that you use. You can use bath bomb molds or anything else that you might have on hand already, like a muffin tin or silicone baking mold. You can even use plastic Easter eggs!
- Let them dry for at least 24 hours. Once they are dry, they aren't brittle and can be packaged in cellophane for gift giving.
- Use your first batch as a trial run. Don't plan to gift the first batch of bath bombs you make. Use this as a trial run to get the bombs just right!
Supplies
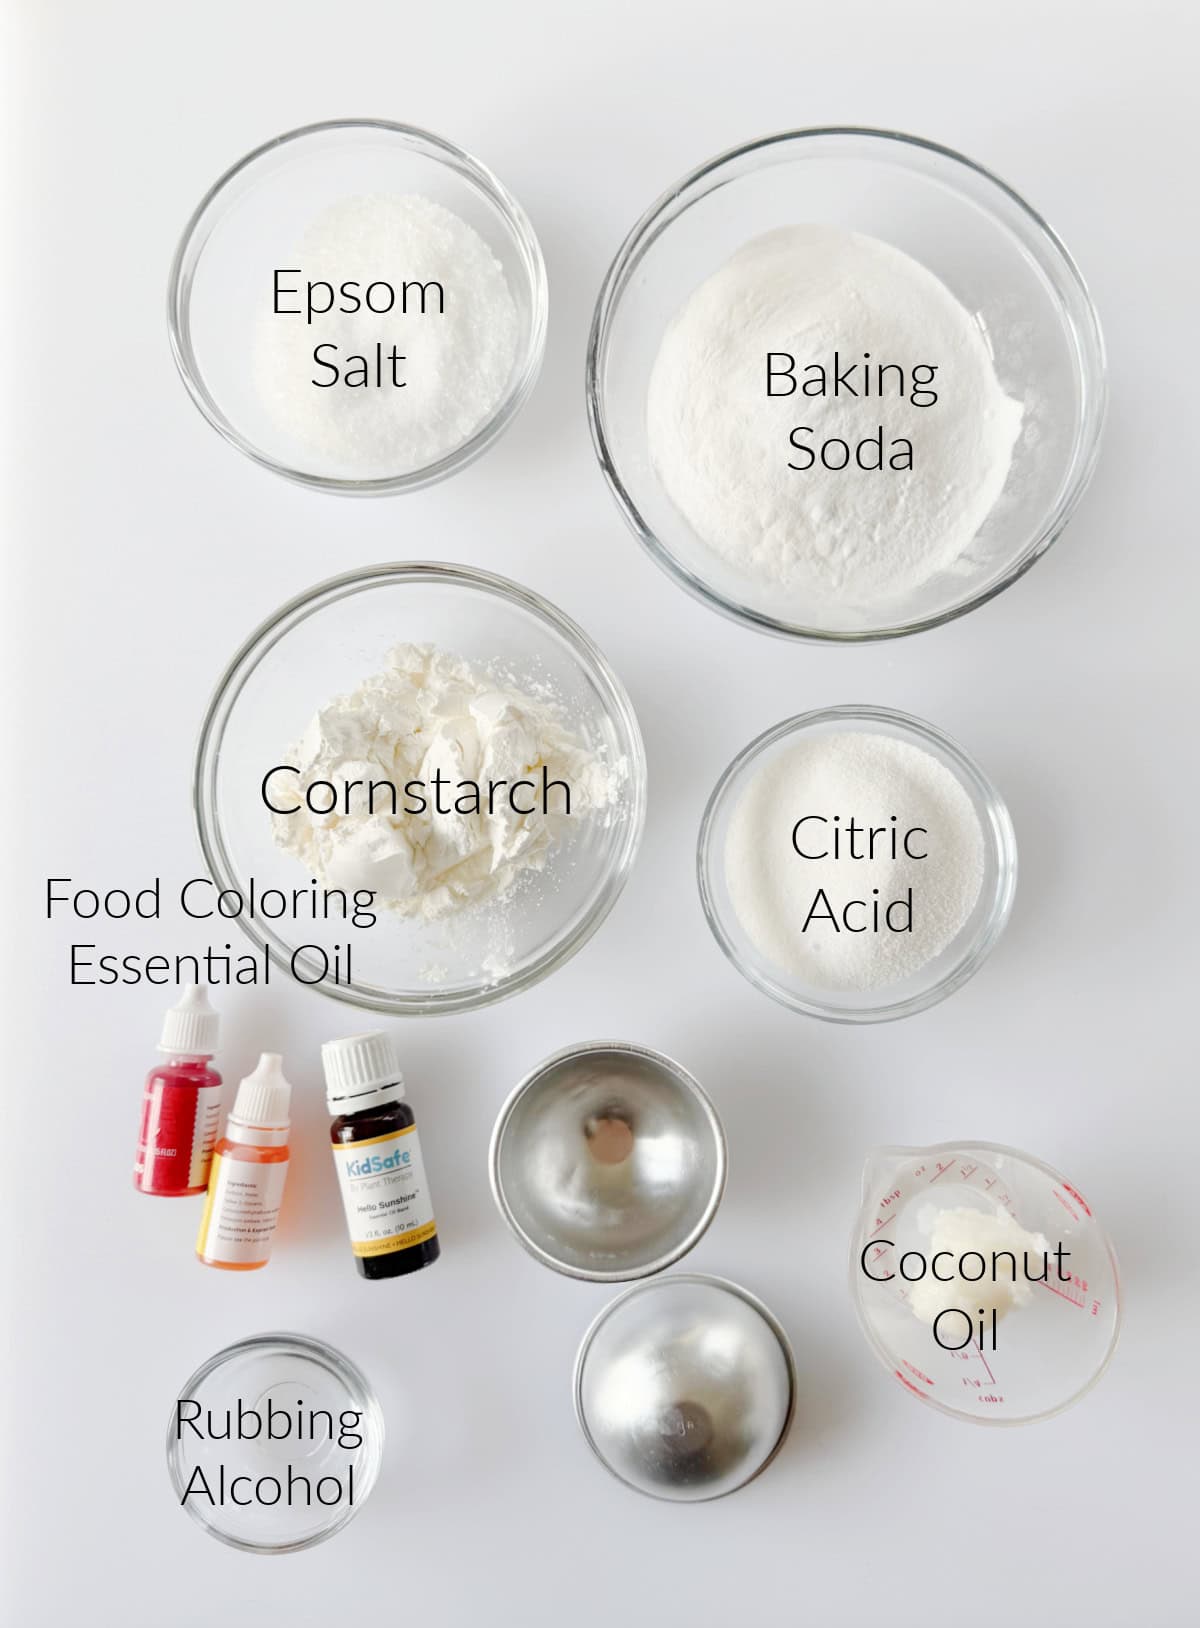
- Baking soda: Works with the citric acid to give bath bombs a fizzy reaction.
- Citric acid: Citric acid reacts with water and baking soda to give bath bombs a fizzy reaction. You can find citric acid at your local grocery store next to the pickling and canning supplies.
- Cornstarch: Cornstarch acts like a buffer. It slows the fizzing reaction, so the bath bomb lasts longer.
- Epsom salt: Softens bath water, draws toxins out through the skin, and soothes sore muscles.
- Coconut oil: You can use any oil you'd like. I like using coconut oil and warming it in the microwave for a few seconds to melt it before adding it to the bath bomb mixture.
- Rubbing alcohol: You can use rubbing alcohol, water, or witch hazel. I like using rubbing alcohol because it doesn't cause premature fizzing when added to the dry ingredients, but you need to work quickly, as it evaporates faster than water or witch hazel.
- Essential oil: If you'd like your bath bombs scented, add a teaspoon or so of essential oil.
- Food coloring: A few drops of food coloring mixed with Epsom salt give the bath bombs flecks of color throughout. You can also add the food coloring to the liquid ingredients.
See the how-to card at the end of the post for full information on supplies and quantities.
How To Make Bath Bombs
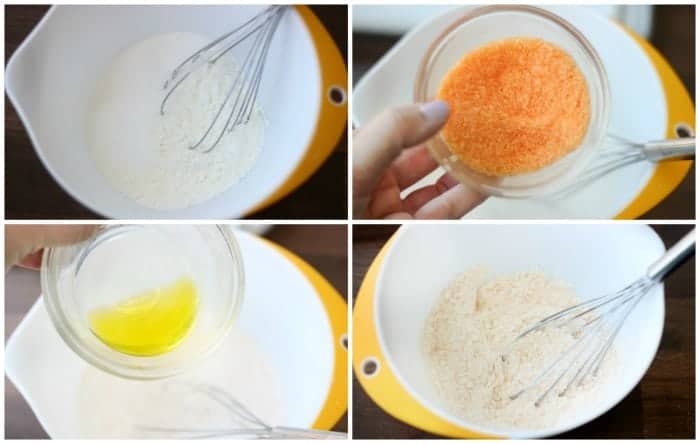
Step 1: Add baking soda, cornstarch, and citric acid to a mixing bowl. Whisk to combine.
Step 2: Combine Epsom salt with a few drops of food coloring in a small bowl. Stir thoroughly until the salt turns the color of the food coloring. Add colored salt to dry ingredients and mix.
Step 3: In another small bowl, combine melted coconut oil, essential oil, and 1 teaspoon of rubbing alcohol (or water).
Step 4: Slowly add the liquids to the dry ingredients, while whisking to combine. The mixture should feel like damp sand, but not wet. It should come together slightly when you squeeze it. If necessary, add an additional ½ teaspoon of rubbing alcohol or water.
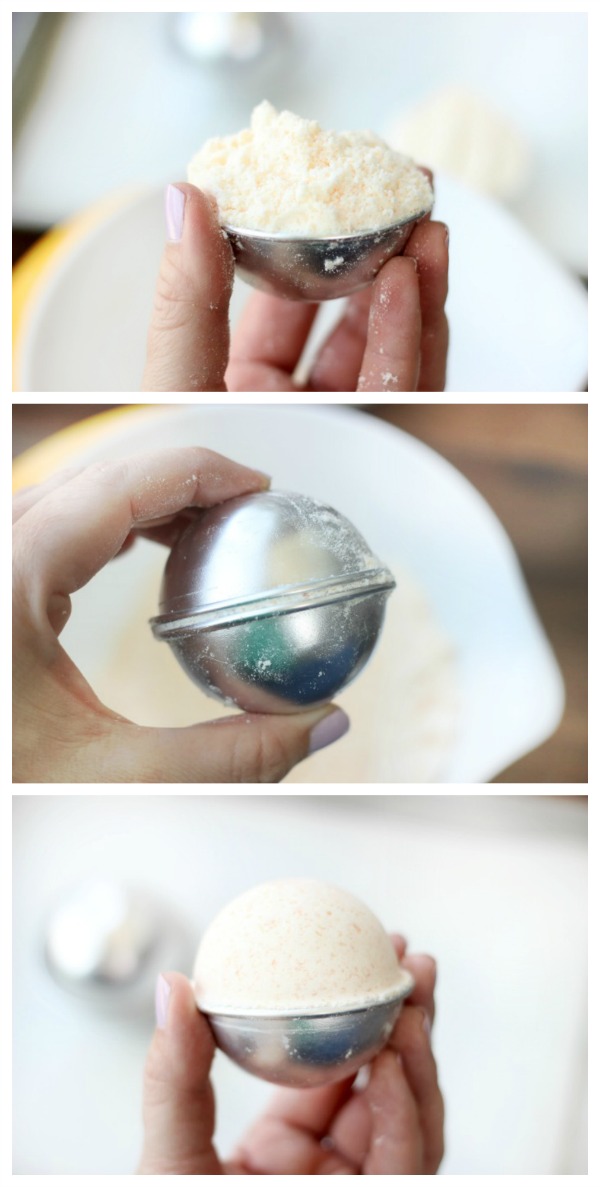
Step 5: Fill both sides of your bath bomb mold with the mixture and press them together tightly. Let it sit for a few seconds. Gently tap the mold with a spoon to loosen it, then remove it one side at a time.
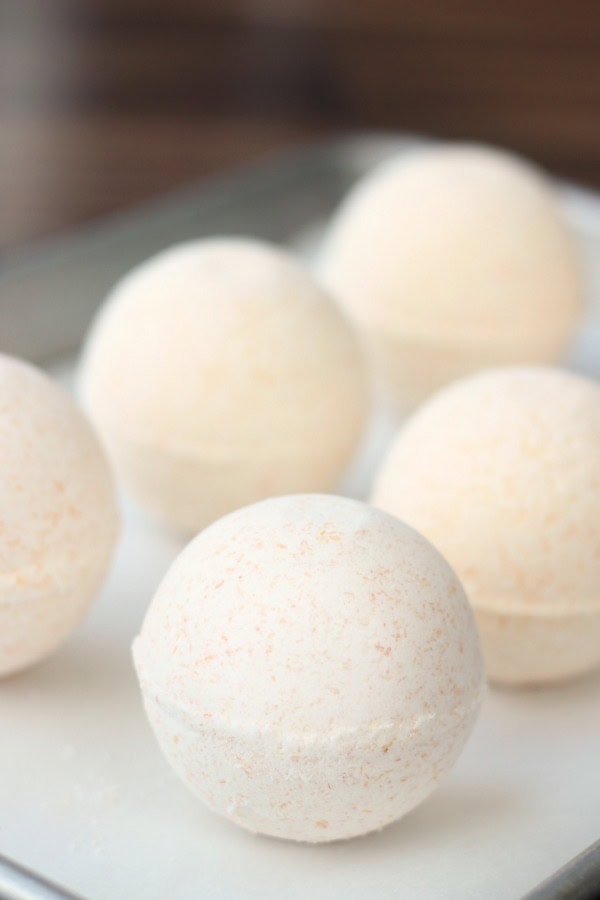
Step 6: Place the bath bombs on a baking sheet and let them dry for at least 24 hours. At first, your bath bombs will seem very delicate. Give them a few days to REALLY dry out before packaging, and you'll notice that they harden nicely and can be placed in a container together.
DIY Bath Bomb FAQs
If the bath bomb falls apart as soon as you place it on the baking sheet, simply gather up the crumbs, whisk to break apart any clumps, then press back into the mold. If the bath bomb cracks after it has been sitting out for awhile it may just mean that it expanded due to too much moisture if you used water.
If the mixture won't hold together after adding the first teaspoon of liquid, you can add another ¼-1/2 teaspoon of water or rubbing alcohol. If you are afraid of adding too much, you can use a spray bottle to give it a quick spritz of water.
No, the bath bombs will set up and dry quicker if they are not in the bath bomb mold. Leave them in the mold just long enough to press the mixture together nicely and firmly. Gently tap the mold with a spoon to release then carefully place the bath bomb onto a baking sheet.
You can make bath bombs in a variety of containers or molds. I've seen them made in Easter eggs, silicone molds or a muffin pan.
Adding more oil might soften the mixture and make it easier to press into the mold, but it will make the bath bomb soft and crumbly later and hinder it from drying out.
More Bath and Body Crafts To Make

MADE THIS CRAFT AND LOVED IT? 💛 Please leave a STAR rating and COMMENT below! Post it to Facebook or Pinterest to easily share with friends!
DIY Bath Bombs
Equipment
- bowl
- whisk
- measuring cups/spoons
- bath bomb mold
Materials
- ½ cup baking soda
- ¼ cup epsom salt
- ¼ cup cornstarch
- ¼ cup citric acid
- 2 teaspoon coconut oil in liquid form
- 1 teaspoon essential oil
- 1 ½ teaspoons rubbing alcohol, water or witch hazel divided, see notes
- food coloring
Instructions
- Combine baking soda, cornstarch, and citric acid in a mixing bowl. Set aside.
- Mix Epsom salt with a few drops of food coloring in a small bowl. Stir thoroughly until the salt turns the color of the food coloring*.* I like adding the food coloring to the salt so that I get flecks (sprinkles) of color throughout the bath bomb. Alternatively, you can add the food coloring when you add the wet ingredients.
- In another small bowl, combine melted coconut oil, essential oil, and 1 teaspoon of rubbing alcohol (or water).
- Slowly add the liquids to the dry ingredients, whisking to combine.
- The mixture should feel like sand, slightly moist, but not wet. It should come together slightly when you squeeze it. If necessary, add the additional ½ teaspoon of rubbing alcohol or water.
- Fill both sides of your bath bomb mold with the mixture and press them together tightly. Let it sit for a few seconds. Gently tap the mold with a spoon to loosen it, then remove it one side at a time.
- Place the bath bombs on a baking sheet and let them dry for at least 24 hours. At first, your bath bombs will seem very delicate. Give them a couple of days to REALLY dry out before packaging, and you'll notice that they harden nicely and can be placed in a container together.
Video
Notes
- Liquids. Rubbing alcohol won't cause the mixture to react prematurely, but it does evaporate, so you need to work quickly to form the bombs in the molds before the mixture dries out. Witch hazel and water add more moisture, so if using them, add the liquid slowly while whisking it into the dry ingredients to prevent premature reaction.
- Let them dry for at least 24 hours. Once they are fully dry, they aren't brittle and can be packaged in cellophane for gift giving.


Amy Simpson says
Question. Do you leave these in the metal molds or remove them immediately?
Brandy says
From the instructions: “ Fill both sides of your bath bomb mold with mixture and press together tightly. Let sit for about a minute. Tap mold with a spoon to loosen, then remove the mold one side at a time.”
I’m wondering why you left a 3 star review?
Brandy says
Hi everyone! Brandy here, and we just made another batch of bath bombs per my 8 year old's request. As always, these turn out great if you make sure to not use too much water. Just a spritz to dampen the mixture slightly.
Brandy says
"Spritz your mixture with water, making sure to whisk in between spritzes, until it reaches the desired consistency. DO NOT add too much water. You just want it to come together slightly when you press your fingers into it." Not sure what else to say.
Jim says
How many does this make?
Brandy says
I think it made 3 bombs.
Brandy says
Hi Donna! I live in a humid climate too and often just wait until winter/early spring to make them. Summers in Virginia are "hit you in the face humid". When I make mine I use as little amount of water as possible. And only with a spray bottle. They seem dry at first, but hold together ok. I'll have to look up what can be done to keep them dry as they set up because I know exactly what you mean. They can start to fizz just sitting on the counter.