Gluesticks Blog

  • About
    • About Me
    • Contact Me
    • Terms and Privacy Policy
  • Sewing
    • My Book
    • Kids Sewing Projects
    • All Sewing Projects
  • Crafts
    • Kids Crafts
    • Paper Crafts
    • Free Printables
    • All Crafts
  • Holidays
    • Christmas
    • Halloween
    • Patriotic Holidays
    • Easter
    • St. Patrick’s Day
    • Valentine’s Day
    • Gift Ideas
      • Teacher Gifts
      • All Gift Ideas
    • Parties
  • Home
    • Home Decor Projects
    • Cleaning & Organizing
    • Gardening
    • Motherhood
  • Recipes
    • Kids in the Kitchen
    • Appetizer Recipes
    • Bread Recipes
    • Dessert Recipes
      • Cake Recipes
      • Cookie Recipes
      • All Dessert
    • Main Dish Recipes
    • Slow Cooker
    • Sides & Salads
    • Holiday Recipes
    • All Recipes

January 5, 2012 By Brandy 32 Comments

Home » Sewing

No-Sew Fleece Poncho For Kids

Filed Under: Sewing

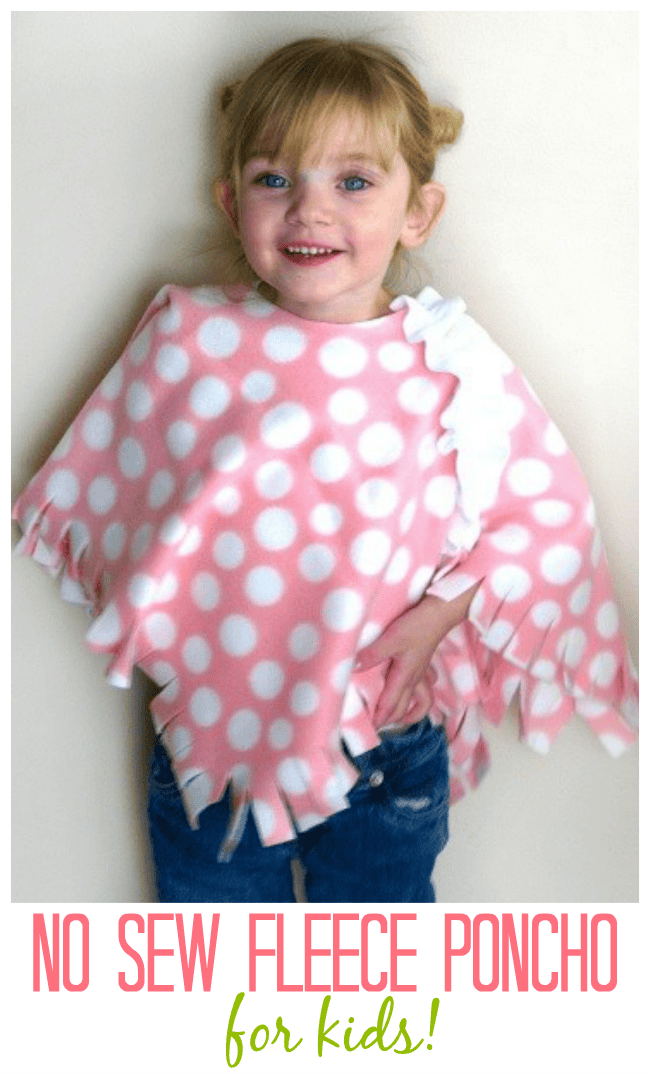
Make a no-sew fleece poncho for a toddler! So cute and cozy for fall, it’s like a blanket for their shoulders! I’ll share this quick 10 minute project with an optional ruffle detail.

little girl wearing pink polka dot fleece poncho
My mom called me the other day and told me about a little project that she made for her friend’s daughter. She thought Kaylee would like it too. I agreed!

It was a little no-sew fleece poncho that she found online.

I told Kaylee about it and told her it was a little blanket for her shoulders. She was thrilled to go to Joann’s and pick out some fabric for her new “shoulder blanket”.
square of fleece with white fleece ruffle down the center
3/4 of a yard of fleece will make 2 of these no-sew fleece ponchos. I didn’t need 2 so I used the scraps to make her a little scarf with the scraps.

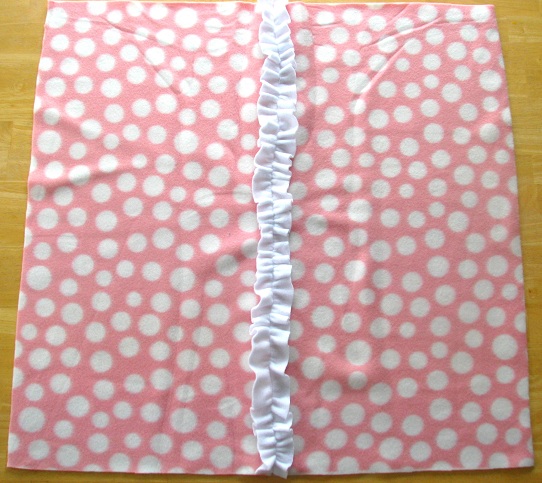
Measure the length from one wrist, across the chest, and all the way to the other wrist. This will be the measurement for the square of fleece. I used a 27″x27″ square for this one.

If you’d like to keep this a no-sew project, you can stop right there, but I thought I’d add a little ruffle. I cut a strip of fleece twice as long as the square and stitched through the center, pulling the end strings to scrunch it. Then pinned it to the fabric, stretching and adjusting as I went.
There was extra on the ends so I just trimmed that part off.
pink fleece folded into a triangle
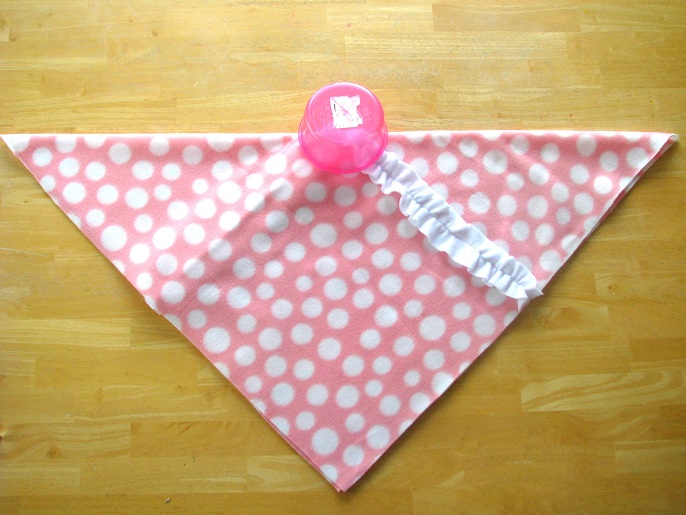
Then I folded it in half diagonally and made the hole for her head. This little bowl is 4″ in diameter and was perfect. I just used it as my guide. You’ll just need a semi-circle shape on the fold.
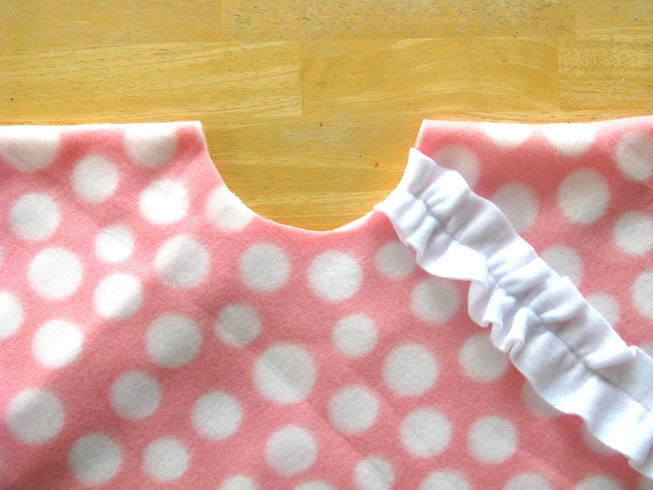
Fleece is stretchy. It’s better to start small and make the hole bigger if you need to later. If you made the ruffle, you can just back stitch a few stitches to keep the ends from unraveling after cutting the hole for the head.
hole for head cut out of fleece
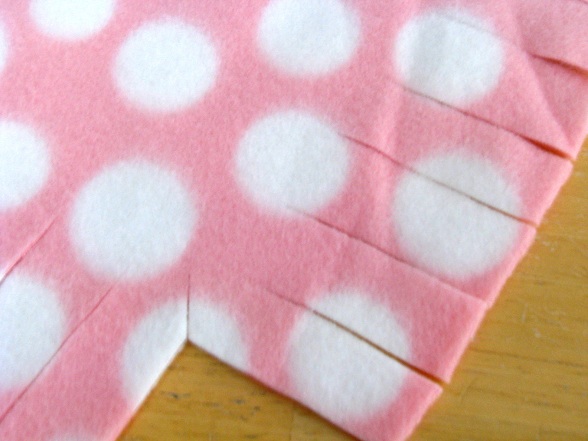
There are several ways to finish the bottom. You can just leave it or cut it with pinking shears, or create a fringe. I just trimmed 2″ up across the bottom to create a fringe. I didn’t tie the ends, just left them like fringe.
fleece edge cut into strips
little girl wearing pink polka dot fleece poncho
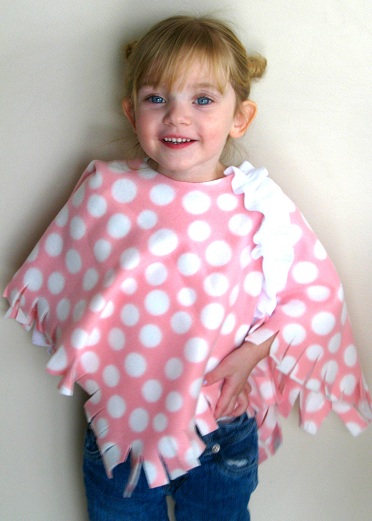
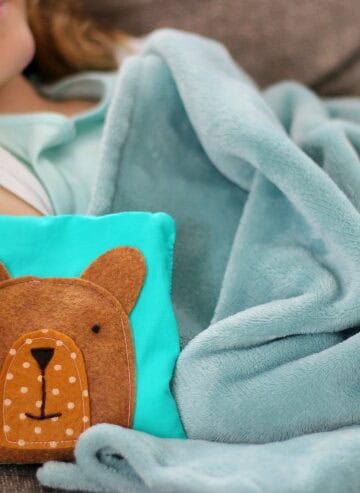
It was so easy to make and only cost around $3 that I decided to make her 2. The one pictured, and another little black with white polka dot one.
The perfect little blanket for her shoulders.
***My little gal is 38″ tall. 3/4 yard of fleece is about 27″ and is perfect for a little girl her size (3-4 years). You can adjust accordingly to fit your child. If making for a child 5-8 years old you’ll probably need a yard.***
You might also like…
girl wearing cowl neck fleece poncho
Cowl Neck Poncho For Kids
stack of fleece pillowcases
3 Step Fleece Pillowcases
Be sure to check out my No-Sew Projects Pinterest board for even more ideas!
Print Friendly, PDF & Email
Brandy
Website | + posts

Welcome! I'm Brandy, mother to 5 darling kiddos and a cute black lab named Toby. My husband is in the Coast Guard so we've lived all over the place, turning each house into a home. I love baking, sewing, making cute things with my kids, and sharing what I've learned with all of you!

  • Brandy
    https://gluesticksblog.com/author/brandy/
    Easy Christmas Treat Platters (Free Printable Tags)
  • Brandy
    https://gluesticksblog.com/author/brandy/
    Easy Chocolate Candy (Copycat Sno Caps)
  • Brandy
    https://gluesticksblog.com/author/brandy/
    Copycat Reese's Peanut Butter Trees (+ Video)
  • Brandy
    https://gluesticksblog.com/author/brandy/
    Easy Snow Globe Cupcakes (Using a Plastic Ornament!)

More Posts Like This

About Brandy

Welcome! I'm Brandy, mother to 5 darling kiddos and a cute black lab named Toby. My husband is in the Coast Guard so we've lived all over the place, turning each house into a home. I love baking, sewing, making cute things with my kids, and sharing what I've learned with all of you!

Disclaimer: I am a participant in the Amazon Services LLC Associates Program, an affiliate advertising program designed to provide a means for me to earn fees by linking to Amazon.com without any additional cost to you. As an Amazon Associate, I earn from qualifying purchases.

Previous Post: « Hot Cocoa Mix Recipe and Mini Cocoa Bar
Next Post: Potato Flake Chicken »

Reader Interactions

Comments

  1. Tonii says

    January 5, 2012 at 3:09 pm

    Ooohhh..thank you so much for sharing this! I am all about anything NO sew 😉 And your daughter is darling!

    Reply
  2. Kristy says

    January 5, 2012 at 3:48 pm

    That is so darling and you made it look so simple I’m just going to have to try it! I have the perfect fleece remnant too, so it’s going to be such an inexpensive project. Thanks for sharing! 🙂

    Reply
  3. glamourpuss says

    January 5, 2012 at 4:05 pm

    This is so precious! I just may have to add it to my “to sew” list for my lil sweetie! Love the polka dots!! 🙂

    Reply
  4. Stephanie says

    January 5, 2012 at 8:09 pm

    So cute, Brandy! Kaylee is so big now. When we moved, she was just babbling! I miss your cute family. 🙂

    Reply
  5. mellywoods5 says

    January 6, 2012 at 7:08 am

    love this and I think the ruffle just makes it so pretty. Going to make one for my 2 & 10 year old girls

    Reply
  6. Christine says

    January 6, 2012 at 3:40 pm

    OMG!! OMG!! OMG!!!!!!!

    I don’t sew…. this is PERFECT for me to try!!!! Thanks for sharing!!!

    Check out my blog too:
    http://thediydreamer.blogspot.com/

    Reply
  7. Ruby Jean says

    January 7, 2012 at 4:02 am

    This is so Very Cute and Sweet.. And not to mention SUPER easy… And don’t we ALL Love that… 🙂 I would love for you to stop in and share it http://shoprubyjean.com/2012/01/sew-crafty-tuesday-linky-4-and-giveaway/

    Reply
  8. Michelle says

    January 7, 2012 at 6:09 am

    This is AMAZING!!! I am going to pin this!!
    Michelle
    http://www.delicateconstruction.com

    Reply
  9. Jamie says

    January 7, 2012 at 2:43 pm

    That is awesome! love it. 🙂 now, if i only had a little girl to make that for…

    Reply
  10. Mary Jo says

    January 8, 2012 at 4:00 am

    Great idea! I’m going to pin it and try to get to it this winter. 🙂

    Reply
  11. Binge Crafter says

    January 9, 2012 at 2:15 pm

    This is so cute! I’ve been wanting to make my toddler a poncho and this is perfect! TFS! Found you through Skip to My Lou!

    Reply
  12. Marybeth says

    January 9, 2012 at 11:44 pm

    This is just adorable, I am new to your blog, and love it. I just forwarded to my 3 grown daughters, I know they will love it too. Take care and TFS

    Reply
  13. Melissa says

    January 13, 2012 at 4:17 am

    Gorgeous! And what a happy little model 🙂

    Reply
  14. Krista says

    January 18, 2012 at 6:28 am

    This is so cute! My daughter would love this! 🙂

    Reply
  15. Lindsi B says

    January 20, 2012 at 4:06 pm

    GORGEOUS!!!! I found you on Tip Junkie! I would like to invite you to share this post with our readers for Fun Stuff Fridays. http://www.toysinthedryer.com/2012/01/fun-stuff-fridays-7.html

    Reply
  16. The Stevens Family says

    January 25, 2012 at 11:10 pm

    Love this idea! I found you thru your rock candy idea on Pintrest. Will be following you now, you’re my kinda girl! 🙂
    Lisa

    Reply
  17. shirley says

    February 2, 2012 at 2:56 pm

    So cute and makes me sigh. With 4 boys, no cute little poncho in my house. Alas, my niece will look adorable. Thanks for sharing!

    Reply
  18. Natasha Mairs says

    February 20, 2012 at 7:52 pm

    So Cute

    Natasha xx

    http://www.serenityyou.blogspot.com

    Reply
  19. Jessica says

    March 13, 2012 at 1:30 am

    This is so cute. I posted a tutorial to a no sew fleece hat last week. I would love for you to share this with my readers on my Monday craft linky:
    http://www.clipwithpurpose.com/made-for-you-monday-craft-linky-6/

    Reply
  20. Lorna Doone Brewer says

    December 21, 2012 at 3:31 am

    I’m really interested in trying this and wanted to know how you dealt with the ruffle when you cut the hole for the head.

    Reply
    • Brandy says

      December 21, 2012 at 4:04 am

      Hi Lorna,
      I just cut the hole out and since it didn’t fray since it is fleece, I didn’t hem it or anything. But I did have to back stitch a few stitches since I cut through the ruffle stitching when I cut the hole. I can’t believe I didn’t add that to the post! It’s been a year since I wrote this up. Thanks so much, I’ll add that.

      Reply
  21. 8c008e14-ae93-11e2-8414-000bcdcb2996 says

    April 26, 2013 at 5:06 pm

    So clear! And finding the center for the head hole cut is so much simpler than the fold- in-half and then fold-in-half instructions I have seen. Thank you!

    Reply
  22. CTD says

    April 24, 2014 at 9:08 pm

    Thanks for this wonderful idea! I’m not very crafty so I had a question. For the white strip of fabric, you stitch it down the middle, pull it to scrunch it, and then pin it to the main fabric… then what? Do you sow it again to the main fabric? Sorry it’s hard for me to understand instructions some times! 🙂

    Reply
    • Brandy says

      April 24, 2014 at 9:46 pm

      No worries! You have it exactly right! Just stitch over the middle stitches in the center again after you pin it! 🙂

      Reply
  23. Shawna says

    January 2, 2015 at 1:15 pm

    Adorable! I don’t sew, but I do crochet. I think I might give this a try and then crochet a scalloped edge around the bottom. Thanks for the tutorial!

    Reply
    • Brandy says

      January 3, 2015 at 11:32 am

      I can’t crochet, but I can sew. I’d love to learn someday! 🙂 I think the scalloped edge sounds adorable, what a darling poncho it will be!

      Reply
  24. J says

    October 15, 2016 at 6:59 pm

    Thank you so much for this super cute tutorial. I whipped one up for a a little girl’s birthday today along with a matching ear warmer head band thing. I loved how the ruffle made it look a little more than just a hole cut out of a square of fleece.

    Reply
  25. Peggy says

    November 29, 2020 at 7:40 pm

    I’m hoping to make one of these for a 10 year old granddaughter. I was wondering about a finished edge around the neck. Does it stretch out, losing its shape with no finished edge? Suggestions welcome.

    Reply
    • Brandy says

      November 29, 2020 at 9:23 pm

      Hi Peggy! That’s the nice thing about fleece, it won’t fray or really stretch out. My daughter wore here until she grew out of it—- no issues! 🙂

      Reply
  26. Nancy says

    December 2, 2021 at 11:46 am

    What size rectangle would recommend for a child that is about 5 years old?? She would be about 6 inches taller than the pink one pictured
    .
    Thanks

    Reply
    • Brandy says

      December 2, 2021 at 1:42 pm

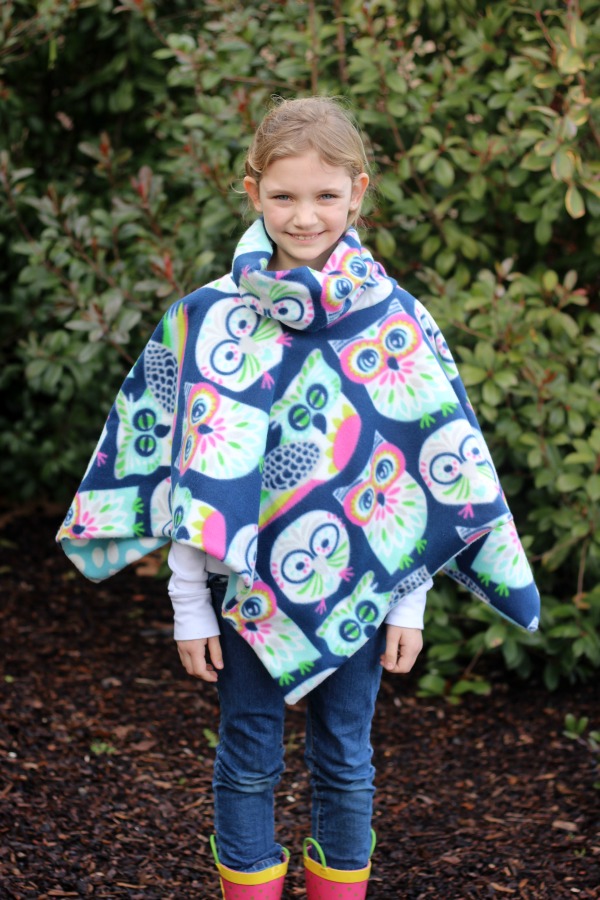
      Hi Nancy! Measure the length from one wrist, across the chest, and all the way to the other wrist and cut out a square that measurement. My 8 year old uses a 36″ square. Hope that helps!

      Reply
  27. Cathy Streett says

    December 23, 2021 at 3:18 pm

    My advice is to start smaller with the neck sizing. I did the math for my toddler granddaughter and ended up with a 6.3″ which was enough for my head….so I added the cowl from the other link and fingers crossed that it’ll work out when she puts it on tomorrow. I loved adding the ruffle too, great addition. The fabric had flowers and lady bugs so I used an accent color for the ruffle and cut out the flowers and bugs and tacked them to the ribbon. I added ladybug buttons in the center of the flowers too. Very cute.

    Reply

Leave a Reply Cancel reply

Your email address will not be published. Required fields are marked *

Recipe Rating


This site uses Akismet to reduce spam. Learn how your comment data is processed.

Primary Sidebar

I'm Brandy! I live in Virginia with my husband, 5 kids, black lab, and chickens. I love to craft and bake and share it all with you! MORE ABOUT ME

Follow Along

  • Facebook
  • Instagram
  • Pinterest

My Amazon Store

Get My Best Projects and Recipes!

My Sewing Book for Kids!

kids sewing book cover

Bonus Guide

  • Home
  • Website Accessibility
  • My Book
  • Privacy Policy

Copyright © 2023 Log in

Gluesticks blog logo
  • About
    • About Me
    • Contact Me
    • Terms and Privacy Policy
  • Sewing
    • My Book
    • Kids Sewing Projects
    • All Sewing Projects
  • Crafts
    • Kids Crafts
    • Paper Crafts
    • Free Printables
    • All Crafts
  • Holidays
    • Christmas
    • Halloween
    • Patriotic Holidays
    • Easter
    • St. Patrick’s Day
    • Valentine’s Day
    • Gift Ideas
      • Teacher Gifts
      • All Gift Ideas
    • Parties
  • Home
    • Home Decor Projects
    • Cleaning & Organizing
    • Gardening
    • Motherhood
  • Recipes
    • Kids in the Kitchen
    • Appetizer Recipes
    • Bread Recipes
    • Dessert Recipes
      • Cake Recipes
      • Cookie Recipes
      • All Dessert
    • Main Dish Recipes
    • Slow Cooker
    • Sides & Salads
    • Holiday Recipes
    • All Recipes