Does your little gal like rummaging around in your purse? Make her one of her own! This quick and easy toddler purse tutorial will walk you step by step through the process. A great project for beginners.


Kaylee is my little shadow. I just love this little lady to bits and pieces! She enjoys rummaging around in my purse and carrying it over her shoulder. It was time for her to have her own. One that is just her size! It turned out so cute that I made a couple more toddler purses to give as gifts and snapped a few pictures to create a tutorial for you!

Toddler Purse Tutorial
For this project you will need:
- fabric (scraps are perfect for this)
- fusible interfacing
- Velcro or snaps
- thread
- scissors
- pins
- sewing machine
- paper/pen to make a pattern
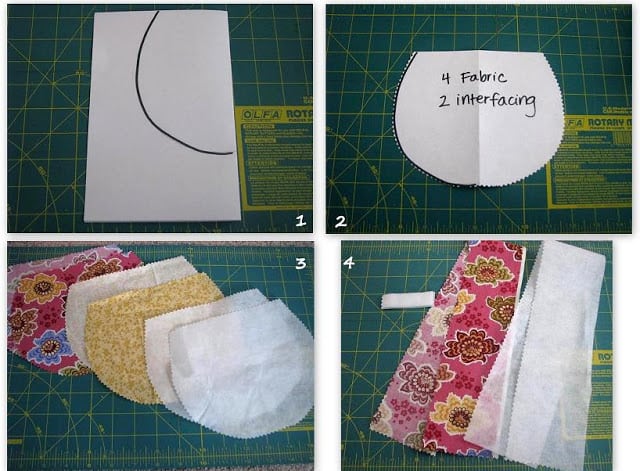
Step 1: Make a pattern.
- Fold a piece of 8 ½ x11" copy paper in half.
- For the top part measure out 3". Mark it with a pen. Then go down 4" and measure (from the fold) a 3 ½" width and mark that. Then, starting at your top mark, fill in the distance between the dots by rounding it off like the pattern above. Also round off from the bottom mark to the fold at the bottom of the pattern.
Note:
You can make it bigger or smaller. But if you are following mine for a tiny purse, follow my measurements. I forgot to snap a photo of the two marks before I rounded them off, but hopefully you get the idea.
Step 2:Â Open pattern.
- If it looks like an appropriate shape, sort through your fabrics and pick 2. One for the outer, and one for the lining. You'll also need some fusible interfacing in the same size.
Step 3: Cut fabric and interfacing.
- Cut two pieces from each fabric and another two pieces from the interfacing, for a total of 6.
Step 4:Â Cut strap pieces.
- For the strap, cut a piece of fabric that is 2 ½" x 20" and a section of interfacing the same size.
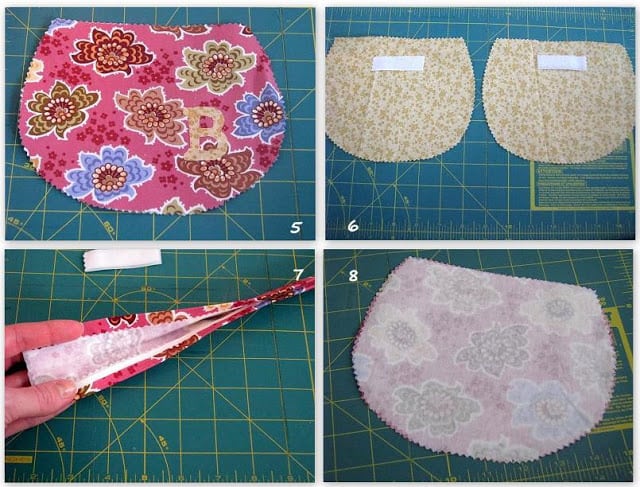
Step 5: Optional monogram.
- I added a little monogram to my purse. This is of course, optional, but such an easy embellishment to do. I used some "wonder under" (iron on adhesive) to the back of my fabric, cut out the B and ironed it onto a piece of the outer fabric.
Step 6: Velcro
- Â Cut 1 ½" of Velcro and sew it to the right sides of the lining fabric 1" from the top and centered in width.
Step 7:Â Make the strap.
- For the strap: Iron on the interfacing to the wrong side of the fabric. Press the length sides ¼" on each side (top and bottom as well). Then fold the strap in half ad press. This will make it look neat and tidy and you will not have to turn it right side out after sewing.
Step 8: Â Iron the interfacing to the wrong sides of the outer fabric.

Step 9:Â Using a ⅜" seam, sew the outer and lining sections on the sides and bottom, leaving the top open. Trim seams and clip curves. Using a ¼" seam, sew the strap side section.
Step 10:Â The outer fabric should be inside out. The lining fabric should be right side out. Place the lining section inside the outer section. You should only see the wrong sides of the fabric. The right sides will be touching inside. Pin around the top and stitch around, leaving a 3" gap to turn the purse right side out.
Step 11:Â Turn right side out. It will look like this.
Step 12:Â Gently push the lining down into the purse and tuck the opening down just a bit. Press and pin. Then top stitch around the top of the purse, catching the opening in the seam. This will close off the opening and finish up the bottom section of the purse!
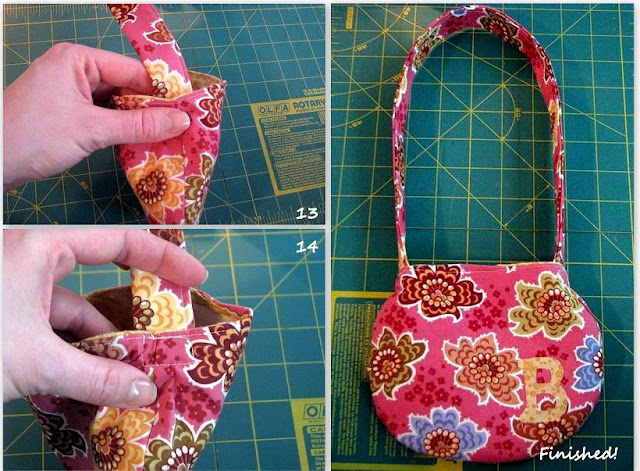
 Step 13: Position one side of the strap INSIDE the purse 1" from the top and centered with the side seam. Attach to the purse by sewing in a box shape. Do this to the other side as well.
If you liked this toddler purse tutorial you might also like simple sewing projects...
Gwen says
Thank you so much for the little purse pattern and tutorial. My granddaughter just turned one and I made her an outfit with a purse to match! She LOVED IT!! She walked around with her purse on her shoulder! It made this meme so happy❤️ Thank you!!
Brandy says
This literally made my day! I'm so glad she liked it! 🙂
Joan says
When did you add the velcro, I don't see it here? This purse
is so adorable I would like to make one for my Granddaughter
Brandy says
Hi Joan!
The velcro was added in step #6 (to the lining pieces before stitching them together). Hope that helps! your granddaughter is lucky to have someone to sew for her. How fun! Let me know if you have any more questions.
kpmattingly says
I tried to make this tonight but it seems my sewing machine is just a tad too big to fit the top part of the purse around it to sew. I'm going to try it again and make the top part a bit larger. Otherwise, so far so good! 🙂
Amie says
Thank u for sharing! I can't wait to make one. My baby girl keeps 'swiping' big sister's purse so this will be great.
Connie the crafterbug says
I made a purse from your tutorial. It is posted on my blog.Thanks again!
Connie
http://thecrafterbug.blogspot.com/
Geri Barranco says
I tried making this tonight but I’m confused ! Do you sew the outside fabric piece together, face to face and the inside fabric pieces together ? Is there a tutorial for this ? Need asap please ! Thanks
Brandy says
Hi! This is a very old tutorial, so I apologize about the formatting and glitches (it is showing some strange "A" looking characters). Yes, sew the outside pieces together, face to face, along the outer edge using a 3/8 seam. Do the same for the lining pieces. Then place the lining inside the outer purse with the right sides of the fabric touching and the wrong sides of the fabric facing out (step 10).
LambAround says
What darling photos! If you get a chance, I'd love for you to link this up to my Not "Baaad" (get it?) blog hop, which features a competition for the Best in Show award 🙂
kpmattingly says
Super cute! Thank you! I have a little one (18months) who already thinks she's five. Might have to make her one of these!
Rachel says
What a great idea, thanks for the tutorial too!
Jen-CraftOManiac says
so adorable, and great fabric too. winks-jen
Amanda says
I featured you today! Woot Woot! 🙂 Graat job!
Amanda
http://www.todaystoptwenty.blogspot.com
Kelly says
So Cute!!!!I'd love it if you would
link up over at the glitter party! http://runwithglitter.blogspot.com/2011/03/weekly-tues-thurs-link-party.html
Stephanie says
That's so cute! I'll bet Kaylee loved it!! I miss that little girlie!!
Allison Wagstaff says
So So cute! I can't wait to have a little girl to make this for. I just might make one for my niece!
Connie the crafterbug says
Thank you so much for this tutorial, I have been wanting to make a little purse for my baby girl.