Paint your own ceramic pumpkins to match your fall decor this year! These DIY ceramic pumpkins to paint come in a set of 3 and can be customized however you'd like.
You might also like our 10-minute sock pumpkins, easy fabric pumpkins, or felt Halloween candy pouches.
I searched all around this year for the perfect green pumpkins to buy for my fall decor. I went all over town without much luck. Either the patterns didn't match what I was looking for, they were too expensive, or they weren't the shade of green that I wanted. I even contemplated buying foam ones and painting them myself, but I was afraid that they would just look cheap. That's when I decided to find a set of ceramic pumpkins to paint.
I decided to check Oriental Trading to see what they had in stock and found these sets of unfinished ceramic pumpkins! They come in a set of 3 and have great reviews. I decided to give them a chance and ordered two sets.
Why I Like This Project
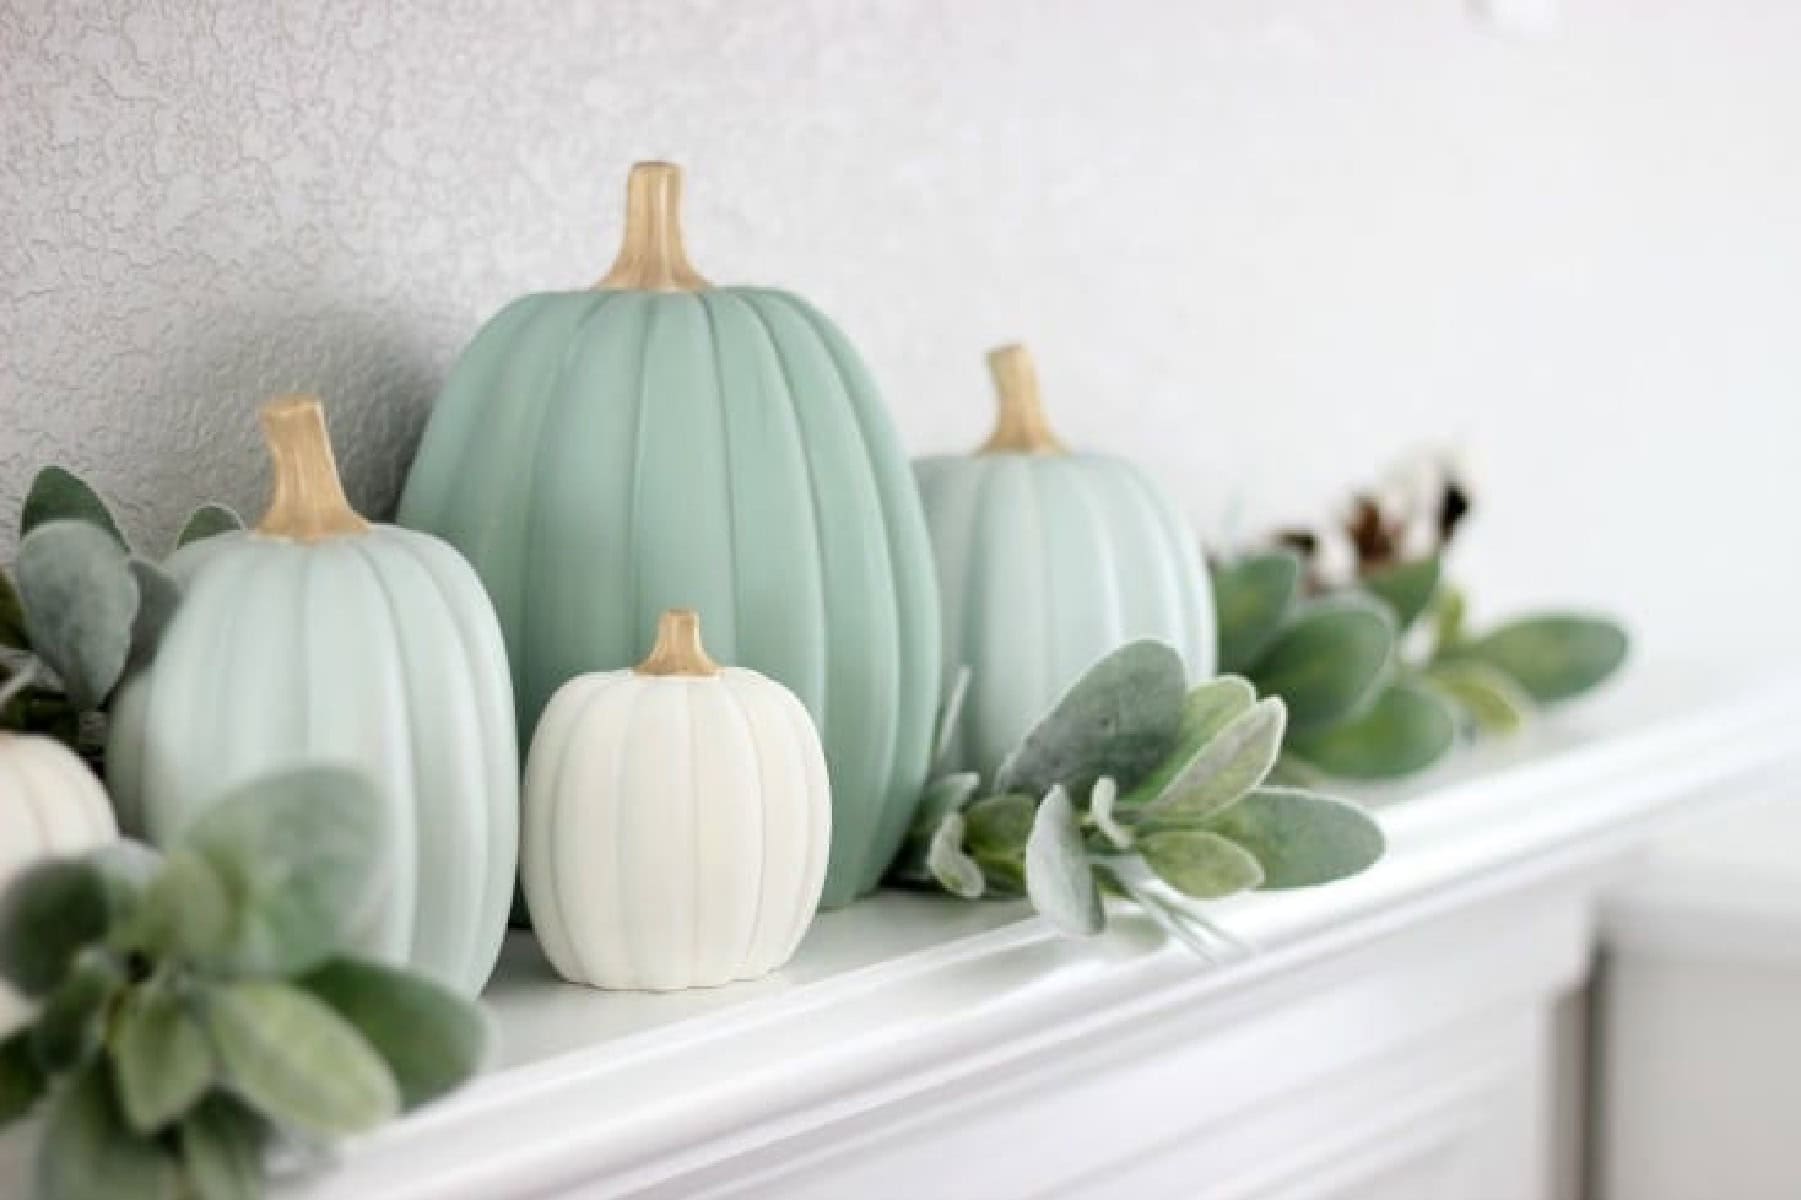
- Completely customizable. The beauty of painting your own pumpkins is that you can paint them any shade you want. You can add plaid designs, polka dots, strips, or whatever you like. I kept mine simple and classic.
- Easy to make. These pumpkins soak up the paint beautifully. They are easy to paint and dry quickly.
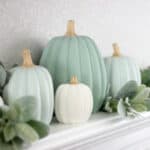
- Perfect size for home decor. The set that I purchased comes with 3 pumpkins: large, medium, and small. They are the perfect size for displaying on a shelf.
Jump to:
What Others Are Saying
I used very similar colors last year on these pumpkins and I'm still obsessed with them!---Kate
Love your craft pumpkins! They are lovely on your mantel. Thanks for the link to the Oriental Trading. Never thought to find items like ceramic pumpkins there. I have ordered mine and will be delivered this Monday! So excited to decorate mine and place on the mantel. Thanks so much for sharing!!---Cleone
Ceramic Painted Pumpkins Tips and Tricks
- Thin coats of paint. Always start with a thin coat, allow it to dry completely, then build from there. Thin coats dry quicker than thick, and you avoid the chance of having drips of paint on your finished project!
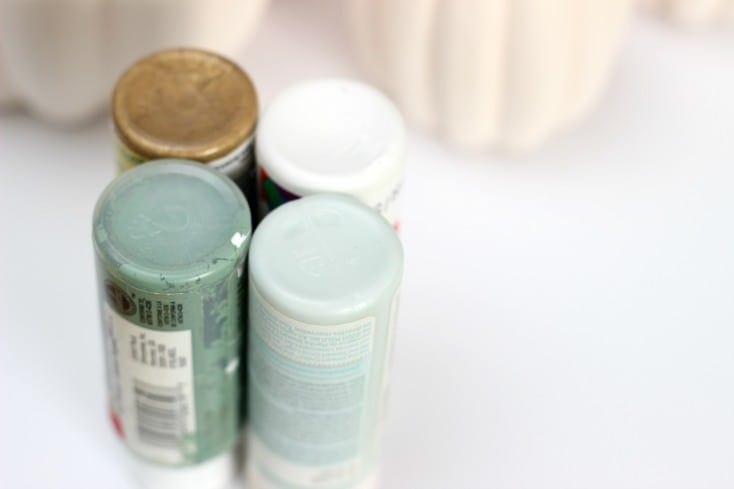
- Mix paint colors for a custom look. Can't find the exact shade that you want? Mix your own! I used a hodgepodge of paint brands and colors.
- For reference: Darker Green is: PLAID FolkArt #619 Poetry Green (I mixed a little white with it to tone it down)
Light Green/Blue is: MARTHA STEWART Satin #32022 Cloud
White: Apple Barrel #20503 White
- For reference: Darker Green is: PLAID FolkArt #619 Poetry Green (I mixed a little white with it to tone it down)
- Preserve the ceramic pumpkins with clear spray paint. Use a thin layer of clear spray paint (in any sheen you'd like; glossy or matte) to keep these pumpkins looking new for years and years.
Supplies
- Ceramic Pumpkins: You can usually find ceramic pumpkins to paint at Michael's in the fall, but can order them year round from Oriental Trading.
- Paint: Acrylic craft paint is perfect for this project. It is inexpensive, comes in countless colors and is easy to mix to achieve the exact hue you're looking for.
- Paint Brushes: You can use foam or regular paint brushes.
- Clear Spray Paint: To coat the finished pumpkins.
See the how-to card for full information on ingredients and quantities.
How To Make Your Own Painted Pumpkins
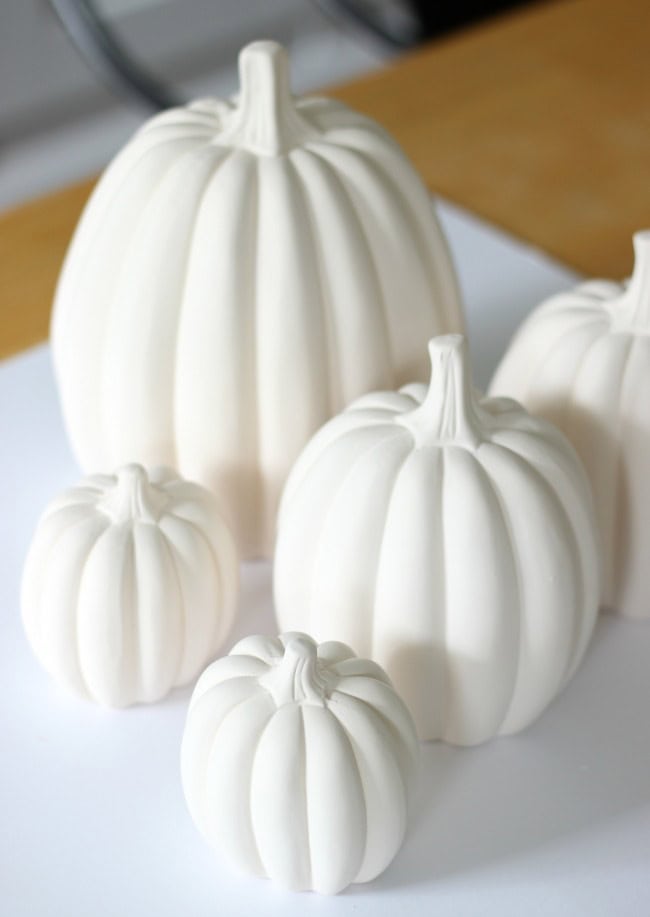
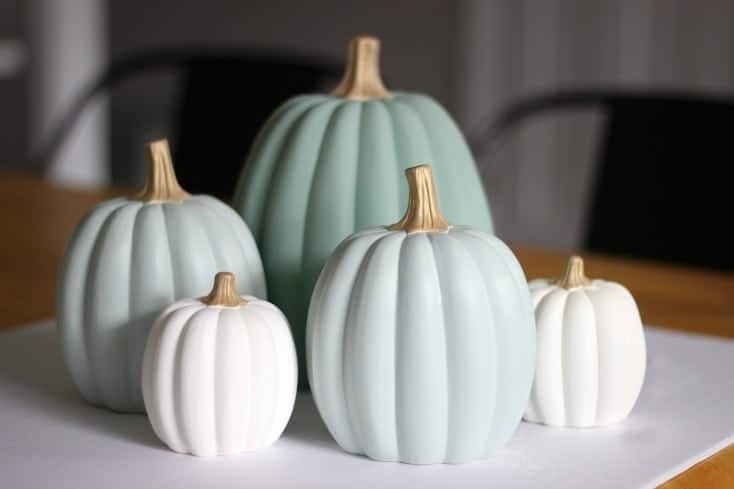
Step 1: Gather paint and mix colors, if applicable. I was happy to find a few paint colors in my stash that I was able to blend to create the shades I was looking for. The sage green is over ten years old, a $.10 clearance bottle from Walmart, but still worked! Just needed to be thinned a little with white. I added a tiny bit of white to the dark sage and a drop of yellow to the white paint so that the white pumpkins weren't too bright.
Step 2: Apply a thin, even coat of paint to your pumpkin. Allow the paint to dry completely. I was able to make mine with one coat of paint. The acrylic paint gave them great coverage.
Step 3: If you need it, add a second coat of paint and allow the paint to dry.
Step 4: Spray pumpkins with clear spray paint to preserve the paint colors and prevent fading or chipping.
I arranged them on my mantel with a few sprays of lamb's ear and cotton stems and absolutely love how they turned out!
Painted Pumpkin FAQs
For long-lasting coverage acrylic paint should be used when painting ceramic pumpkins. It is inexpensive and comes in many colors.
To give a glossy sheen, apply a thin layer of clear spray paint after painting the pumpkins with acrylic paint. Not only does it look beautiful, but it will keep the paint from chipping too.
Oriental Trading sells unfinished ceramic pumpkins in a set of 3. Mine are 7 years old and still look new. You can usually find unfinished ceramic pumpkins at Michaels and Hobby Lobby, too.
More Fall Crafts To Make
MADE THIS CRAFT AND LOVED IT? 💛 Please leave a STAR rating and COMMENT below! Post it to Facebook or Pinterest to easily share with friends!
DIY Painted Ceramic Pumpkins
Equipment
- paint brush
Instructions
- Gather paint and mix colors, if applicable.
- Apply a thin, even coat of paint to your pumpkin. Allow the paint to dry completely. I was able to make mine with one coat of paint. The acrylic paint gave them great coverage.
- If needed, add a second coat of paint and allow the paint to dry.
- Spray pumpkins with clear spray paint to preserve the paint colors and prevent fading or chipping.
Notes
- Use thin coats of paint for even coverage and to prevent drips.
- Allow paint to dry COMPLETELY before spraying with clear spray paint.
Brandy says
My pumpkins are 7 years old and still look new! Love the muted greens and white colors.
Cleone says
Hi Brandy! Love your craft pumpkins! They are lovely on your mantel. Thanks for the link to the Oriental Trading. Never thought to find items like ceramic pumpkins there. I have ordered mine and will be delivered this Monday! So excited to decorate mine and place on the mantel. Thanks so much for sharing!!
Brandy says
Yay! I've had mine for a few years now and love pulling them out in the fall!
The Freshman Cook says
These colors are gorgeous! I love how muted and pretty they are. Thank you for sharing at Celebrate It!
Leslie Clingan says
Long time Oriental shopper but never dreamed they would have ceramic pumpkins. Now I know! Love the minty-sagey colors you used, Beautiful.
Loni says
I love your color choices, what a beautiful twist on fall! You make me want to decorate in sage!
Brandy says
Thank you so much, Loni!
Julie Briones says
These look wonderful! And those ceramic pieces look like they are made really well, and still have lots of detail from the mold! Nice! Visiting from Dream Create Inspire!
Brandy says
Thank you, Julie!
Kate | The Organized Dream says
I love these colors. I used very similar colors last year on these pumpkins and I'm still obsessed with them! I'd love for you to share your pumpkin project at the Make Life Pretty Monday link party beginning tonight at 8 pm! Hope to see you there!
Ann says
Your pumpkins look amazing and I luv your color choices! Pinned. I'd luv to invite you to share it with us at Wall to Wall DIY Wednesday, which runs thru Mondays! Best, Ann
Debrashoppeno5 says
I love the colors. And how the pumpkins come in various sizes. It makes for a lovely vignette.
Pamela Speers says
Could you list the names of the actual paints you used? Who knows, maybe I have that ten year old green already! I have been trying to find nice green shades for something like this for a long time, and I think you nailed it. Brands and names please?
Brandy says
So true! You may just have the same color in your stash!
Darker Green is: PLAID FolkArt #619 Poetry Green (I mixed a little white with it to tone it down)
Light Green/Blue is: MARTHA STEWART Satin #32022 Cloud
White: Apple Barrel #20503 White
Pamela Speers says
Thank you, Brandy, I will go check my paint stash!
farmhouse40 says
Thanks for sharing at Inspire Me Monday. I wanted to let you know that you are one of my featured links this week. check it out https://www.farmhouse40.com/inspire-me-monday-149
sherrygcole says
I love your pumpkins! They are such a beautiful color and I will be featuring them at Totally Terrific Tuesday tomorrow.
Linda Bass says
Beautiful ideas thank you for sharing them with us. I'm going to post them. Hugs, Linda on Poinsettia Drive poinsettiadr.com
JoAnne says
Your pumpkins look great - I love the colors. I actually did try painting a dollar store styrofoam pumpkin and it turned out ok but it does look cheap. These are so much better!!