Stop by your local target, grab six $1 pumpkins from Bullseye's Playground and Dollar Spot, then follow our Dollar Spot pumpkin wreath tutorial for a gorgeous wreath to hang on your front door! This post contains affiliate links.
You might also like our winterberry wreath, our citrus greenery wreath our our hydrangea wreath!

I stopped Target last week to grab a few more things that the kids needed for school, and was surprised to see that they were already pulling out the fall items for the Dollar Spot! They only had a few bins unpacked, but I immediately spotted the cute velvety $1 pumpkins that they had last year. I grabbed 6, and had the beginnings of one of my FAVORITE homemade wreaths. This wreath was SO easy to make, especially since I re-used some greenery that I had from a previous project!
How To Make A Dollar Spot pumpkin wreath

First you will want to head to Target and pick out your pumpkins. They sell out of these fast, and while they do restock, it's best to get them early so that you can get your wreath up sooner vs. later.

Supplies That You'll Need for Your Dollar Spot Pumpkin Wreath
- Wreath base ($4.86 at Walmart)
- 4 greenery stems, plus one more as filler (Hobby Lobby, but you can also find similar ones at Target, Joann's, or Michael's)
- 6 mini pumpkins (Target Dollar Spot)
- Floral filler stems (Joann's, Hobby Lobby or Michael's)
- Ribbon for hanging
- Hot Glue/Gun
- Floral Wire
- Wire Cutters

Step 1: Gather Your Supplies
I used greenery from a previous project, and actually pulled these blue floral stems out of my citrus summer wreath. I don't glue floral stems into my wreaths unless I have to, this way I can mix and match and re-use them!
I wasn't sure which ribbon I would end up using, so I pulled out two and decided right before I hung the wreath. I ended up going with the black and white gingham wired ribbon.

Step 2: Assemble the Wreath
Trim the wire on the greenery stems so that it tucks in nicely into the wreath and doesn't poke out the back. Place two of the greenery stems in between the grapevine twigs. Tuck them in nice and tight. Have one stem going up, and the other one going down. Tuck one more greenery stem on each end to add a bit more fulness.

Step 3: Glue Pumpkins
Hot glue the pumpkins onto the wreath. Go slowly, and hold each pumpkin into place until the glue dries.
NOTE: If you live in a hot climate, and it doesn't cool off in the fall, you might consider wiring the pumpkins onto the wreath. I glued mine and my wreath has held up just fine, I simply touch it up every year before hanging it on the door. If you are worried about the hot glue shifting or melting you can can poke floral wire sticks through the plush pumpkin in one side (towards the bottom of the pumpkin) and out the other and then twist the wire onto the wreath.
Step 4: Tuck in the filler floral stems.
Add extra greenery stems that are smaller, and add them anywhere you'd like to create fullness. In the photo below you'll notice that I added them in between the pumpkins.

Step 5: Secure any loose areas with hot glue or floral wire.
I like using floral wire for the greenery and any sort of floral pick. Cut a long strand of wire then wrap it around the stems and greenery, twisting it to secure it on the back of the wreath.

Step 6: Cut a loop of ribbon and tie it around the wreath for hanging.
Last night a friend dropped by supplies for me to make a wreath, only it wasn't for her. She asked me to make the wreath and give it to her friend at church who really loves decorating, but doesn't have a lot of funds right now. She thought she might like a new wreath to brighten her porch.

I was so touched and honored to help in this sweet act of service. We used different colored pumpkins and floral picks and I love how it turned out!
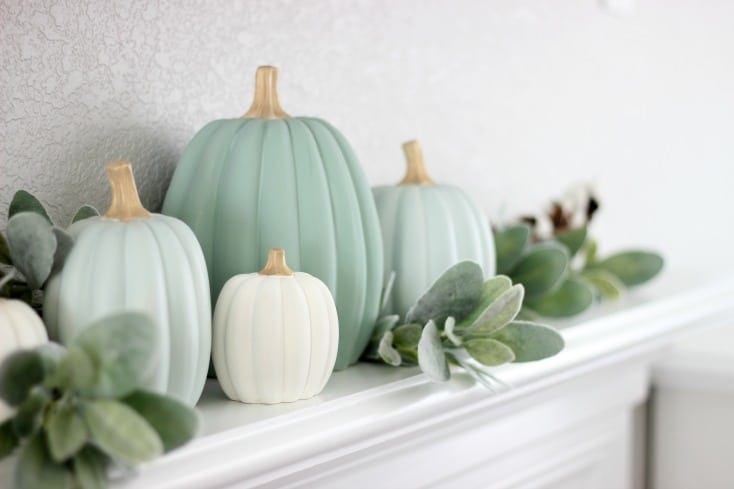
Looking for another project to make using these same colors and lambs ear greenery? Try my DIY painted pumpkins using these pumpkins!
If you like buffalo check, you may like this holiday wreath from Domestically Creative. So simple and cute!


tara gray says
What is the name of the gray paint on your door? Every thing looks beautiful
Brandy says
Hi Tara! It's called REFUGE by Sherwin Williams and is actually a grey/blue. It looks a bit darker in this photo than it really is. You can see a better representation of it in this photo: https://gluesticksblog.com/easy-wreath-tutorial/
Pamela says
Absolutely adorable!!