Paint your own ceramic pumpkins to match your fall decor this year! These DIY ceramic pumpkins to paint come in a set of 3 and can be customized however you'd like.
You might also like our 10-minute sock pumpkins, easy fabric pumpkins, or felt Halloween candy pouches.
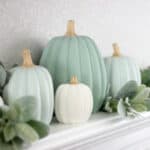
I searched all around this year for the perfect green pumpkins to buy for my fall decor. I went all over town without much luck. Either the patterns didn't match what I was looking for, they were too expensive, or they weren't the shade of green that I wanted. I even contemplated buying foam ones and painting them myself, but I was afraid that they would just look cheap. That's when I decided to find a set of ceramic pumpkins to paint.
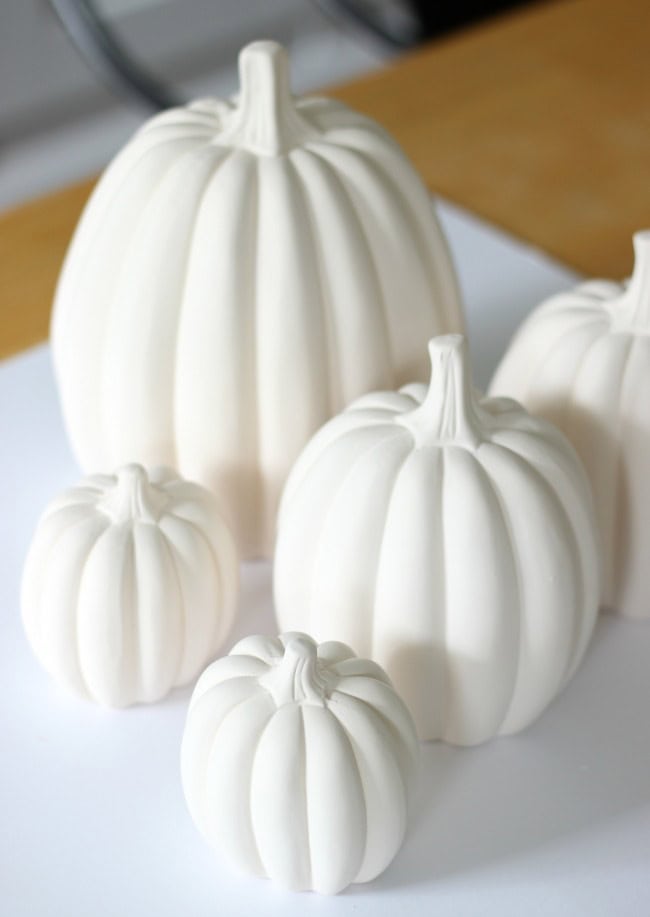
I decided to check Oriental Trading to see what they had in stock and found these sets of unfinished ceramic pumpkins! They come in a set of 3 and have great reviews. I decided to give them a chance and ordered two sets.
Why I Like This Project
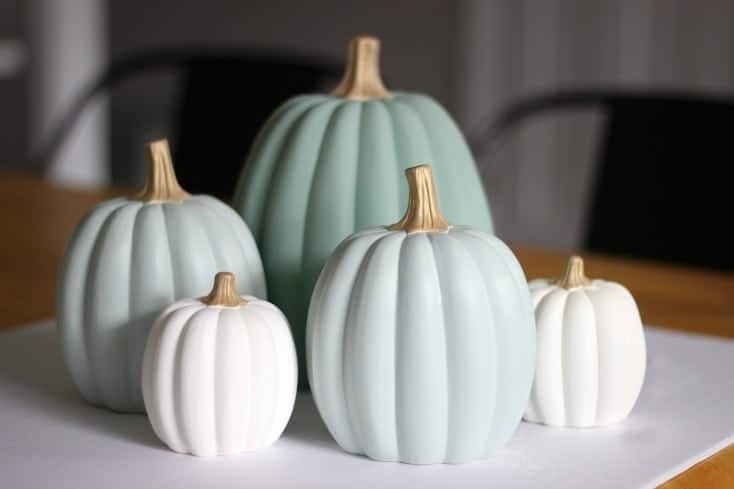
- Completely customizable. The beauty of painting your own pumpkins is that you can paint them any shade you want. You can add plaid designs, polka dots, strips, or whatever you like. I kept mine simple and classic.
- Easy to make. These pumpkins soak up the paint beautifully. They are easy to paint and dry quickly.
- Perfect size for home decor. The set that I purchased comes with 3 pumpkins: large, medium, and small. They are the perfect size for displaying on a shelf.
Jump to:
What Others Are Saying
I used very similar colors last year on these pumpkins and I'm still obsessed with them!---Kate
Love your craft pumpkins! They are lovely on your mantel. Thanks for the link to the Oriental Trading. Never thought to find items like ceramic pumpkins there. I have ordered mine and will be delivered this Monday! So excited to decorate mine and place on the mantel. Thanks so much for sharing!!---Cleone
Ceramic Painted Pumpkins Tips and Tricks
- Thin coats of paint. Always start with a thin coat, allow it to dry completely, then build from there. Thin coats dry quicker than thick, and you avoid the chance of having drips of paint on your finished project!
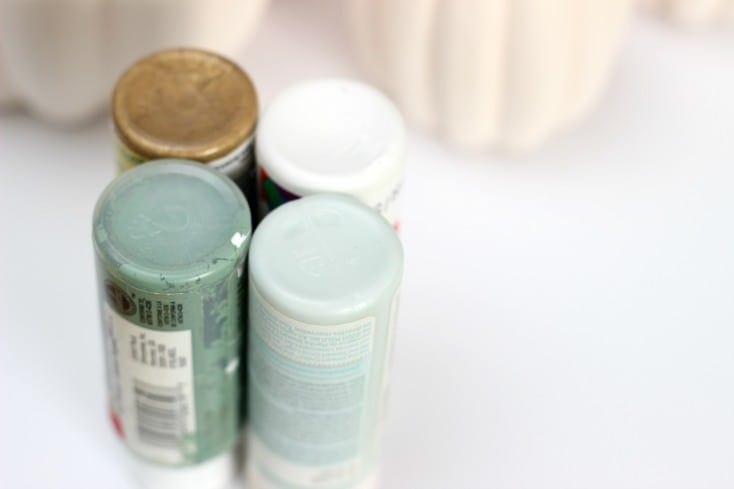
- Mix paint colors for a custom look. Can't find the exact shade that you want? Mix your own! I used a hodgepodge of paint brands and colors.
- For reference: Darker Green is: PLAID FolkArt #619 Poetry Green (I mixed a little white with it to tone it down)
Light Green/Blue is: MARTHA STEWART Satin #32022 Cloud
White: Apple Barrel #20503 White
- For reference: Darker Green is: PLAID FolkArt #619 Poetry Green (I mixed a little white with it to tone it down)
- Preserve the ceramic pumpkins with clear spray paint. Use a thin layer of clear spray paint (in any sheen you'd like; glossy or matte) to keep these pumpkins looking new for years and years.
Supplies
- Ceramic Pumpkins: You can usually find ceramic pumpkins to paint at Michael's in the fall, but can order them year round from Oriental Trading.
- Paint: Acrylic craft paint is perfect for this project. It is inexpensive, comes in countless colors and is easy to mix to achieve the exact hue you're looking for.
- Paint Brushes: You can use foam or regular paint brushes.
- Clear Spray Paint: To coat the finished pumpkins.
See the how-to card for full information on ingredients and quantities.
How To Make Your Own Painted Pumpkins
Step 1: Gather paint and mix colors, if applicable. I was happy to find a few paint colors in my stash that I was able to blend to create the shades I was looking for. The sage green is over ten years old, a $.10 clearance bottle from Walmart, but still worked! Just needed to be thinned a little with white. I added a tiny bit of white to the dark sage and a drop of yellow to the white paint so that the white pumpkins weren't too bright.
Step 2: Apply a thin, even coat of paint to your pumpkin. Allow the paint to dry completely. I was able to make mine with one coat of paint. The acrylic paint gave them great coverage.
Step 3: If you need it, add a second coat of paint and allow the paint to dry.
Step 4: Spray pumpkins with clear spray paint to preserve the paint colors and prevent fading or chipping.
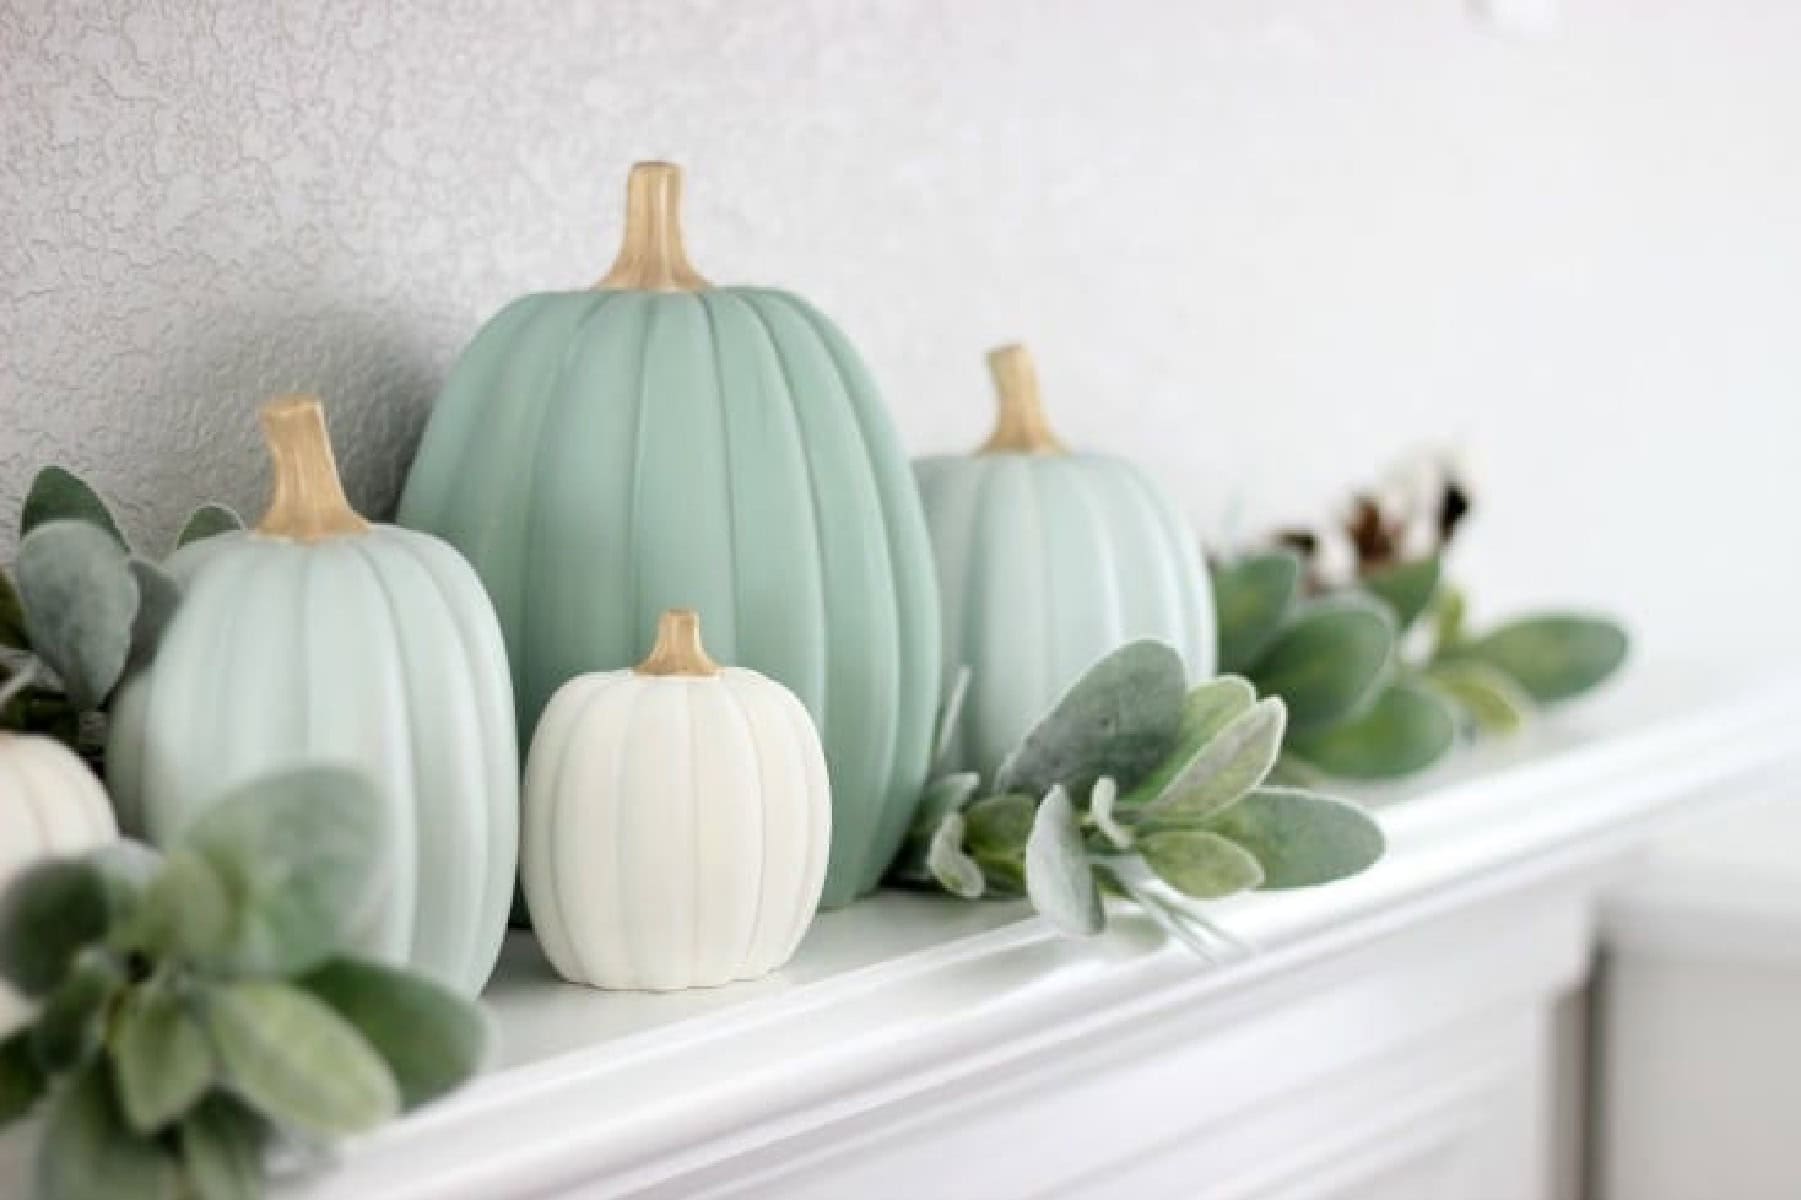
I arranged them on my mantel with a few sprays of lamb's ear and cotton stems and absolutely love how they turned out!
Painted Pumpkin FAQs
For long-lasting coverage acrylic paint should be used when painting ceramic pumpkins. It is inexpensive and comes in many colors.
To give a glossy sheen, apply a thin layer of clear spray paint after painting the pumpkins with acrylic paint. Not only does it look beautiful, but it will keep the paint from chipping too.
Oriental Trading sells unfinished ceramic pumpkins in a set of 3. Mine are 7 years old and still look new. You can usually find unfinished ceramic pumpkins at Michaels and Hobby Lobby, too.
More Fall Crafts To Make
MADE THIS CRAFT AND LOVED IT? 💛 Please leave a STAR rating and COMMENT below! Post it to Facebook or Pinterest to easily share with friends!
DIY Painted Ceramic Pumpkins
Equipment
- paint brush
Instructions
- Gather paint and mix colors, if applicable.
- Apply a thin, even coat of paint to your pumpkin. Allow the paint to dry completely. I was able to make mine with one coat of paint. The acrylic paint gave them great coverage.
- If needed, add a second coat of paint and allow the paint to dry.
- Spray pumpkins with clear spray paint to preserve the paint colors and prevent fading or chipping.
Notes
- Use thin coats of paint for even coverage and to prevent drips.
- Allow paint to dry COMPLETELY before spraying with clear spray paint.


Jolena says
This is my first visit to your blog and so glad I found it! The pumpkins are so pretty. Thanks for sharing. Caught up with you through The Boondocks Blog, Sweet Inspiration Party.
Brandy says
Thank you Jolena!
Christine @ www.rustic-refined.com says
They turned out gorgeous, love them!
A Pretty Fix (@aprettyfix) says
Hi Brandy! I just wanted to pop in again to let you know that I absolutely adore this DIY and will be featuring it at the next Sweet Inspiration Link Party (tomorrow!). Hope you pop by again for a visit. I love all your projects!
Brandy says
Thank you so much!
Tanya Derrey Bingham says
Just found you from the Sits Girls link up and now following!! 🙂
Nikki G says
I love every single display that you made with them! Great job. I especially love the first ones that are greenish.
🙂 gwingal
acraftymix says
Oh those are gorgeous Brandy. Love, love, love the colors you used. So subtle and classy
Mary-RealGirlsRealm (@maryharne) says
I decorated mine with orange and black for Halloween, but I may need to get another set to paint for Fall. I love these colors!
JESS44903 says
These are so cute! 🙂
I would love for you to share this with my Facebook Group for recipes, crafts, tips, and tricks: https://www.facebook.com/groups/pluckyrecipescraftstips/
Thanks for joining Cooking and Crafting with J & J!
JaneEllen says
Love your mantel decorations with the cotton bolls and lambs ear. Hmmm, would love to have set of ceramic pumpkins could paint whatever colors I wanted. Glad for you to get them when you did. I painted a few orange plastic pumpkins from $ tree white, just couldn't deal with so much orange in our very light gray walls, little bit of coral and more aqua in our living room. Kept decorations more sparse this year. Our l/r is small so too much really makes it look cluttered. Hardly used much of what I had for decorations. Did do more out on our front porch table.
Your home looks so perfectly decorated, very nicely done.
Happy week
Brandy says
Thank you Jane! We have light grey walls and I felt the same way! Wanted more subtle colors than the traditional Halloween colors. Take care!
Marsha says
Oh my goodness...the possibilities are endless. It is amazing how a pumpkin can be decorated in so many ways. I love the subtle sage green pumpkins. Perfect for neutral colored decor. I would love to pair it up with burlap.
Brandy says
Thank you, Marsha!
karen martin says
what did you use to paint your pumpkins with (paint and applicator) i love the colors totally matches my decor
Brandy says
Hi! I used acrylic craft paint and craft paint brushes. I found that sponge brushes didn’t work as well as the regular art brushes for smooth strokes. Hope that helps!
roseannmhampton says
I love those shades of green! Very pretty!
Calypso in the Country says
These are so pretty! Visiting from DIY Showoff party!
Shelley
A Pretty Fix (@aprettyfix) says
I absolutely love this project! Those pumpkins look stunning in your space. The gold against those soft, pastel greens is a beautiful colour combination. Beautiful results!
Brandy says
Thank you so much!
Mary-The Boondocks Blog says
These are really gorgeous shades of green and the pumpkins looks really unique painted like that. When you can't find what you need make it yourself!!
Brandy says
Thank you, Mary!
Michele says
?? they're sold out!
These are beautiful & love that color!!
Brandy says
I know, such a bummer! I ordered mine on Sunday and they came Thursday. So in just that amount of time they sold out! I'm sure they'll stock them again quickly. They had them last year too, apparently so it's one of their popular items!
Michele says
I can see why!!