Gluesticks Blog

menu icon
go to homepage
  • Recipes
  • DIY
  • About Me
  • Subscribe
    • Facebook
    • Instagram
    • Pinterest
  • subscribe
    search icon
    Homepage link
    • Recipes
    • DIY
    • About Me
    • Subscribe
    • Facebook
    • Instagram
    • Pinterest
  • ×
    Home » Holidays » Halloween

    Sew A Drawstring Trick or Treat Bag for Halloween

    October 23, 2014 By Brandy 1 Comment

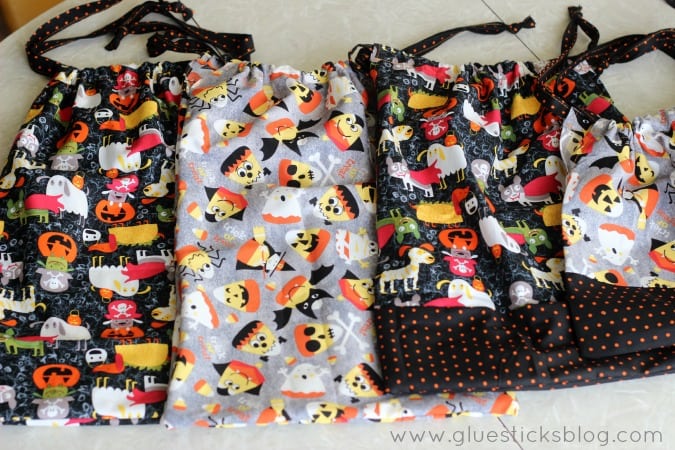
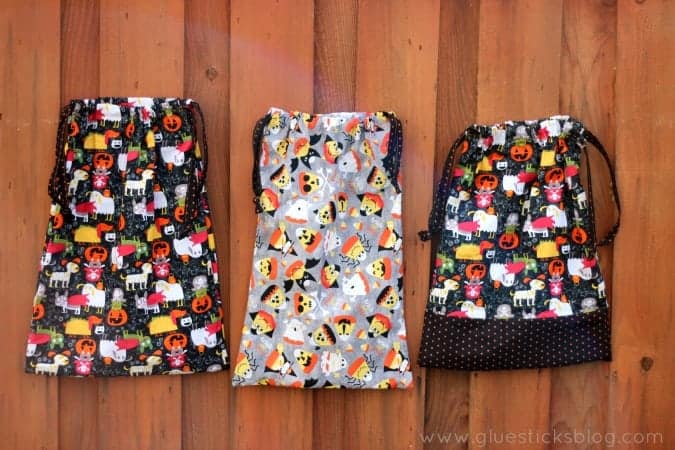
    Bigger than a plastic pumpkin, smaller than a pillowcase, and the top cinches closed. The perfect trick or treat bag for Halloween night!

    3 homemade fabric halloween bags

    The kids each have a fabric trick or treat bag that I made 4 years ago and they still use them! Just a basic drawstring bag that holds plenty of sweet treats! And this pattern is great for other bags too, just swap out the fabric! Use them to store Legos, or a place to keep wooden magnetic dolls, or jewelry! They are so fun and so easy to make.

    drawstring treat bag

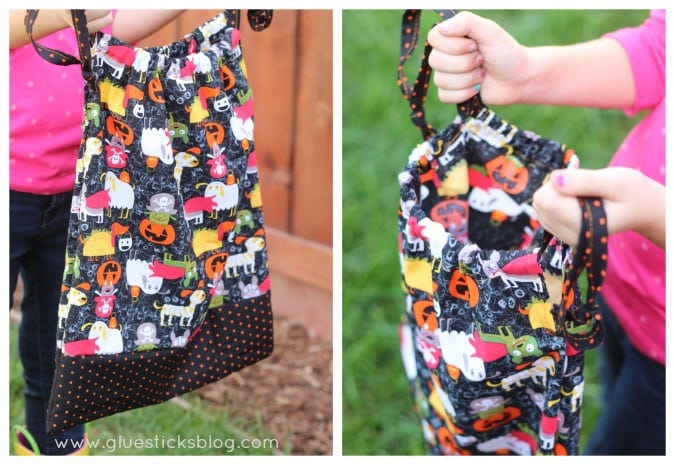
    I made some with one type of fabric and some with a cute contrasting band at the bottom. I found these fabrics at Joann's and knew I needed them...for something. Anything! And the kids needed new buckets for trick or treating so it was the perfect match.

    halloween fabric

    Drawstring Trick or Treat Bag Tutorial

    You will need:

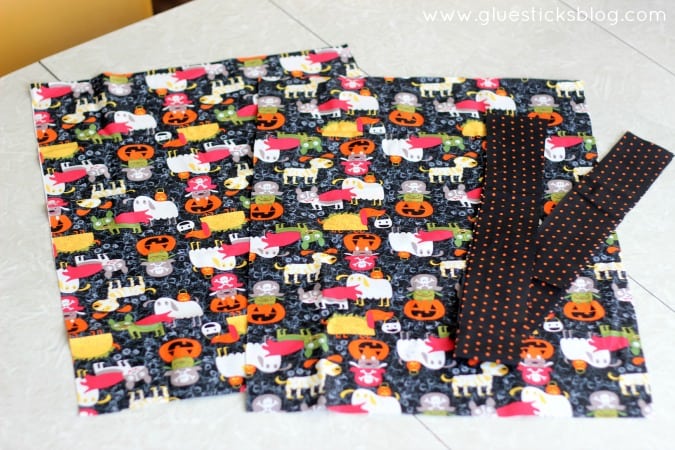
    2 pieces of cotton fabric for each bag (21"h x15" w)**

    2 strips cotton fabric for the drawstrings (2"x32")

    thread

    pins

    scissors

    measuring tape

    sewing machine

    iron

    **if you want a contrasting band, cut your bag fabric 15x15 and a piece that is 15x6" for the band. Sew together. Repeat for other side of bag.

    fabric folded and ironed

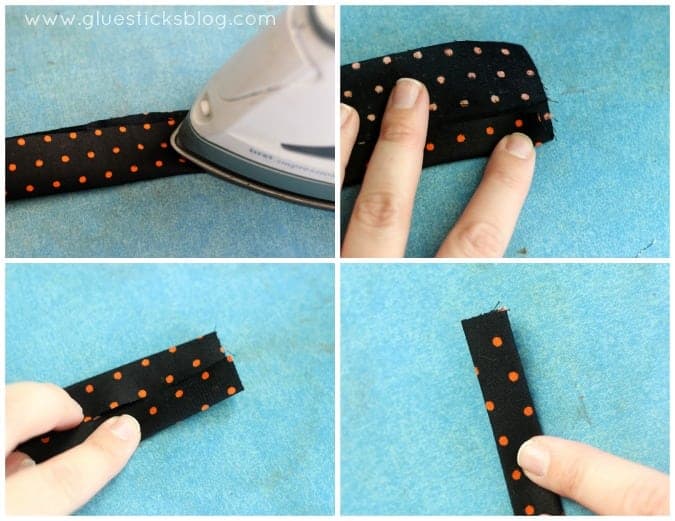
    Begin with your drawstring strips of fabric (2"x32"). Fold in half and press.

    Open and bring one side to the center fold. Press all the way down the strip.

    Repeat on other side, bringing side to center fold and pressing.

    Fold in half and press. It should look like a strip of bias tape now.

    sewing machine stitching halloween treat bags

    Stitch along each strip using ⅛" seam allowance. Set drawstrings aside.

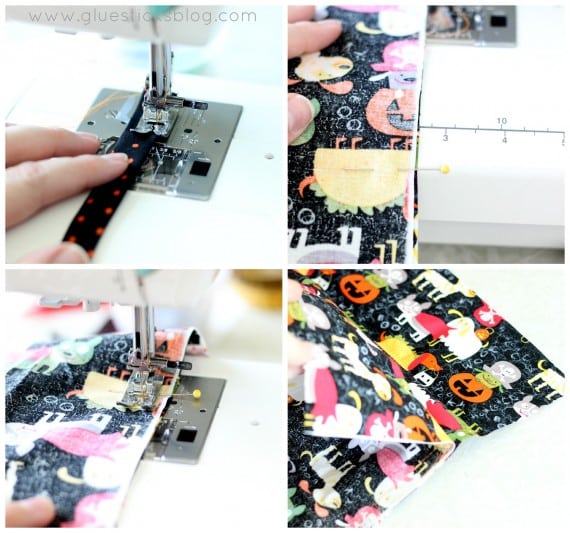
    With right sides together, pin 5" from the top on both sides of the bag (see 2nd photo).

    Begin at the pin and stitch all the way around (side, bottom, and other side) until you reach the pin on the other side of the bag.  Clip corners. Use a ⅝"  seam allowance.

    Your bag will have 5" flaps like this (see 4th photo)

    hands holding fabric and sewing bags

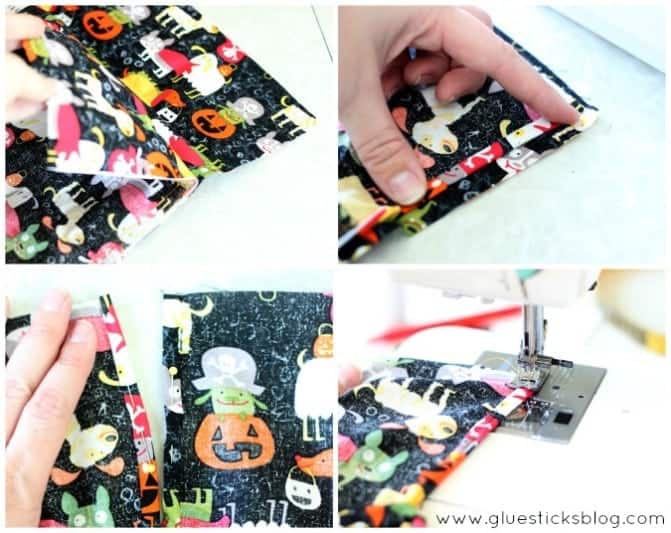
    These flaps allow the bag to open wider. You need to hem them so that they do not fray.

    To do this, fold each side over ¼" then over another ¼". Press and pin. Repeat for the other side.

    It should look like this. (see 3rd photo above) The bottoms won't form a perfect square, it will come to a point like a "v".

    Begin at the top and stitch down one side to the "v" then up the other side. Hem the other side of the bag as well.

    I hope that made sense. My photos are a little washed out, I realize now. Basically, just make sure the sides are hemmed somehow to avoid fraying. Serging or zig zagging works too.

    drawstring for halloween bags

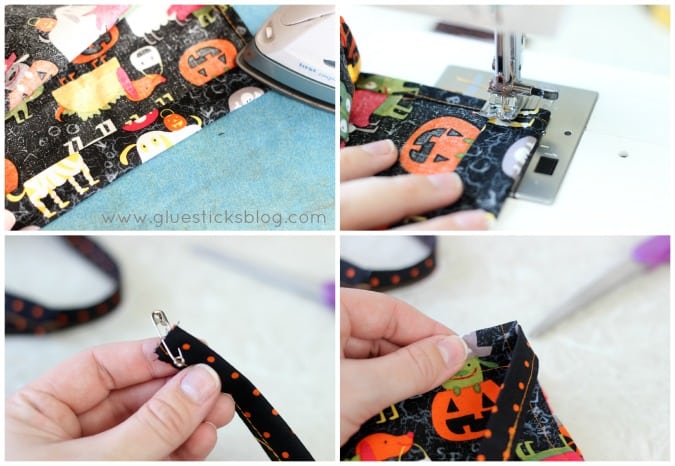
    Now that the side flaps are hemmed you need to hem the top of the bag to create a casing for the drawstring to slide through. Fold over ¼" press. Fold over 1" and press. Repeat for the other side.

    Stitch, close to the edge. Repeat on other side.

    Attach a safety pin to the end of one of your drawstrings and slide through casing. Repeat with other drawstring on the other side of the top of the bag.


    treat bag with drawstring tied through

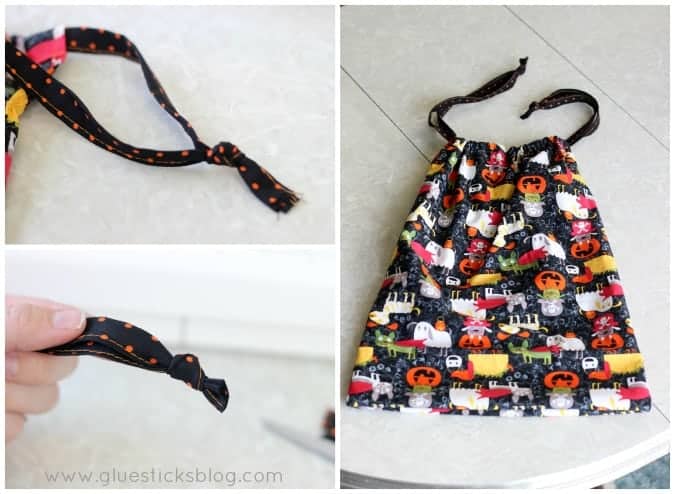
    Almost done! You will now have two drawstrings coming out each end. Tie them together. Repeat on other side. Trim end.

    3 halloween treat bags

    That's it! Scrunch to close, loosen to open. Perfect for keeping candy safe, even if the bag gets full (heaven forbid!...we will stop trick or treating before that happens.)

    3 drawstring treat bags hanging on fence


    You might also like...

    jar filled with halloween candy

    DIY BOO Kit

    halloween lollipop topiary

    Halloween Lollipop Trees

    vampire donuts on colorful plates

    Vampire Donuts

    Share
    Pin

    More Halloween

    • chocolate chip cookies with melted chocolate faces and candy eyes
      Halloween Chocolate Chip Cookies (Goofy & Hilarious)
    • collage of cheap and easy halloween crafts
      16 Cheap and Easy Halloween Crafts to Make
    • Kids Lacing Craft {Printable Template}
    • treat bags on a black platter
      Halloween Glove Treat Bags (Monster)

    About Brandy

    Welcome! I'm Brandy, mother to 5 darling kiddos and a cute black lab named Toby. My husband is in the Coast Guard so we've lived all over the place, turning each house into a home. I love baking, sewing, making cute things with my kids, and sharing what I've learned with all of you!

    Comments

    1. Crystal says

      September 14, 2019 at 10:16 am

      Can you make a video of a tutorial??

      Reply

    Leave a Reply Cancel reply

    Your email address will not be published. Required fields are marked *

    Recipe Rating


    This site uses Akismet to reduce spam. Learn how your comment data is processed.

    Welcome!

    I'm Brandy! I love to create and share my ideas through easy-to-follow recipes and tutorials.

    More about me

    As an Amazon Associate, I make a small commission on qualifying purchases.

    sew with me kids sewing book
    My Book

    Latest Posts

    • mini s'mores pie on white plate
      Mini S'Mores Pies
    • slab pie on white plate
      Peach Slab Pie
    • baba bar on spatula
      Frosted Banana Nut Bars
    • tray of baked cookies on parchment paper
      Martha-Stewart-Fired-Me Cookies

    Seasonal

    • M&M Cookies piled on top of each other
      Soft M&M Cookies (Soft and Thick) + Video
    • red, white and blue shortbread cookies
      Patriotic Shortbread Cookies (Video)
    • star shaped cookie with frosting and fruit
      Red White & Blue Mini Fruit Pizzas (Video)
    • Simple and Inexpensive Patriotic Wreath Tutorial

    Footer

    ↑ Back to Top

    About

    • Privacy Policy
    • Accessibility Policy

    Newsletter

    • Sign Up! for emails and updates

    Contact

    • Contact

    As an Amazon Associate, I earn from qualifying purchases.

    Copyright © 2025 Gluesticks Blog