A simple vinyl pencil pouch tutorial with step-by-step photos for making a pencil pouch for school! This 10" x 6" pouch is large enough to hold anything you might need including pencils, pens, glue sticks, or scissors! This shop has been compensated by Collective Bias, Inc. and its advertiser.

My sweet Kaylee is moving up to middle school this year, and is a bit nervous about it. The middle school is quite large with lockers and 7 classes. She is such an organized little gal, and I know she will do just fine, but I remember very well the anxiousness of starting a new school when I was her age.
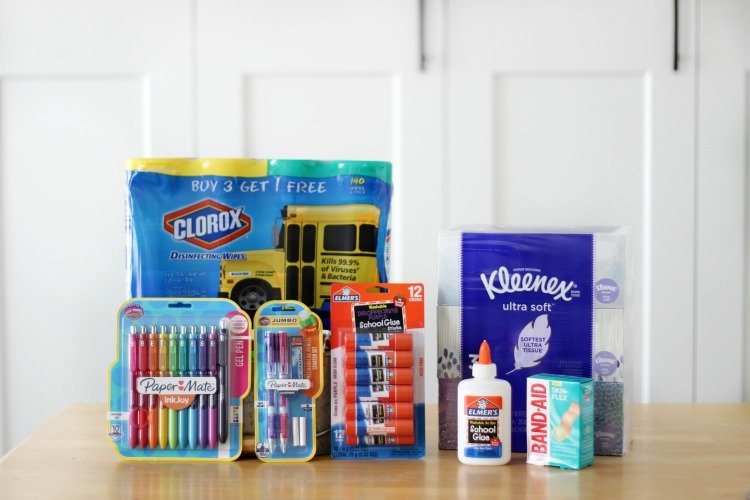
Kaylee is just like me. She finds great joy in a new box of crayons, a crisp and clean binder backpack, and an organized binder. She ENJOYS labeling her items, each and every one, with a label maker and makes lists. Bless her heart. The middle school sends out the school supply list in May, and it is the same for all 6th, 7th, and 8th graders which makes supply shopping a breeze. I've been adding a few items here and there with my Walmart Grocery pick up order to simplify things, and compiled a list of must-haves for anyone else wanting to get a head start, too!
Hover over the image above to easily add them to your grocery order!
Must Have School Supplies
Kleenex® Brand Ultra Soft™ Facial Tissue
Every school supply shopping list that I've ever seen includes Kleenex facial tissues. They are strong and soft and come in multiple packs, great for home and school! Each of my kids has a small travel sized tissue pouch that they keep in their backpack.
Clorox® Disinfecting Wipes
I like the multi pack which comes with enough to send with each child for their classroom. Clorox wipes kill 99.9% of germs on hard, non-porous surfaces so they are perfect for wiping down desks and counter tops. I only have 5 kids to watch over at home (only, haha!) so I can't imagine trying to keep the surfaces clean in a classroom of 24 kids. These wipes are an absolute must, combined with proper hand washing in a classroom.
BAND-AID® Brand Adhesive Bandages
I like sending the kids with a few BAND-AID® Brand Bandages in their backpacks. For simple scrapes and paper cuts that don't require a trip to the school nurse. Use product as directed. BAND-AID® Brand SKIN-FLEX™ Bandages expand and contract so they are flexible and are comfortable to wear, lasting 24-hours, even with hand washing!
Elmer's® Glue
Elmer's® Disappearing Purple School Glue Sticks are my favorite to buy. It's easy for kids to see where the glue has been applied, and the purple disappears as the glue dries! Glue sticks are one of the items that my kids' teachers usually ask for more of mid-year so I go ahead and just send in a large 12-pack at the beginning of the year.
Elmer's® Washable School Glue is useful for so many projects at school (and slime-making endeavors at home)! It's washable, non-toxic, and strong enough to attach items to wood, cloth, potter, paper and more!

Paper Mate® Pens and Pencils
Kaylee specifically asked for these Paper Mate® Inkjoy Gel Pens for middle school. They are fun to use and have soft grips, bright colors, and the ink dries quickly! She likes to color-code her planner and they are perfect for that!
All of my middle and high schoolers prefer mechanical pencils vs. regular pencils. There's no need for sharpening and the Paper Mate® Clear Point Mechanical Pencil Starter Set comes with a spare twist-up eraser.
Other Items:
Scissors, ruler, colored pencils, highlighters, dry-erase markers, and calculator.
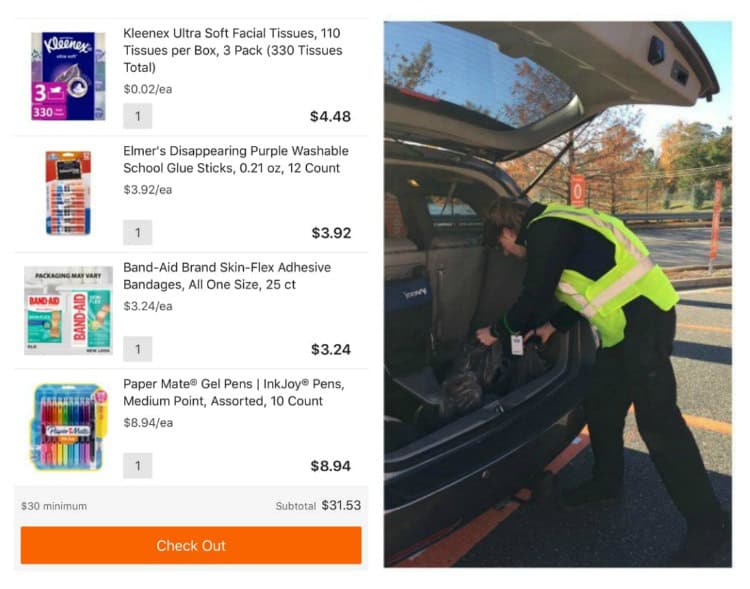
Did you know that you can add non-grocery items to your Walmart Online Grocery order during the back to school season? It's pretty awesome! My sister said she did her school shopping this way last year and it was a light bulb moment, for sure. I've been using Walmart Grocery Pick-Up for a couple of years, but hadn't tried school shopping yet. Life changing.

I thought it would be fun to make Kaylee a new vinyl pencil pouch to hold her school supplies. We had so much fun rummaging through our scrap fabric basket and coming up with cute color combinations.

I couldn't stop at one and ended up making a bunch of them. She's excited to give a couple to her friends who are also starting middle school!

Each pouch takes about 20 minutes to make. Have you tried sewing with clear vinyl? It's actually pretty easy to work with with these simple tips that I share at the end of the tutorial.
Three more sewing tutorials you might be interested in:
Liner Sewing Tutorial for Square Storage Totes
Ready to make a bright and colorful pencil pouch for the first day of school? Let's get started!
Vinyl Pencil Pouch Tutorial

Supplies for Vinyl Pencil Pouch Tutorial
1 (10" zipper)
2 (11" x 4") pieces of fabric
2 (11" x 5") pieces of clear vinyl (12 or 16 gauge)
scissors
sewing machine
coordinating thread
pins

Step by Step Vinyl Pencil Pouch Instructions
Step 1: Fold each fabric band in half with the right side out the fabric facing out. Press with an iron. Zig zag the side edge.
Fold side edge over ¼" and press with an iron. Repeat for the other fabric band. This will be the side that you sew the zipper to.

Step 2: Place zipper on work surface. Center one piece of fabric on top. Line up the folded edge of the fabric with the edge of the zipper. The zipper will be about ½" longer on each side than the fabric band. Pin into place.
Repeat on the other side of the zipper with the other fabric band.

It will look something like this. (A photo from this project.)

Step 3: Open the zipper. Stitch the fabric to the zipper, using a zipper foot to keep the stitches close to the zipper. Repeat for the other side. Close zipper.

Step 4: Place one piece of vinyl on the work surface. Lay the fabric/zipper piece on top with the right side of the fabric facing down.

Step 5: Pin vinyl to fabric.

Step 6: Stitch the vinyl to the fabric piece using a ⅜" seam allowance.
Repeat on the other side with the other piece of vinyl.

Step 7: Turn the bag over so that the zipper is facing up. Top stitch along the top of the fabric where it meets the vinyl.
NOTE: you can't see the vinyl in this photo because of the lighting, but it is there!
Step 8: OPEN ZIPPER before starting step 9.

Step 9: With right sides together, fold the bag so that the vinyl corners line up. Stitch the sides and bottom of the bag using a ¼" seam allowance.
Trim close to the edge, and trim corners on an angle. Turn right side out.

Vinyl Pencil Pouch Tutorial: Tips for Sewing With Vinyl
- Pull the vinyl through the machine. Normally, you'd let the sewing machine take care of pulling the fabric through the machine, while you gently guide it. With vinyl, keep one hand on each end of your project so the you can gently guide AND pull it through the machine. This prevents the vinyl from sticking as you sew.
- Sew Slowly. If you're like me, you're a pedal to the metal kind of sewer. When working with vinyl, sew a bit slower to keep an eye on the stitches.
- Use tape. Add a couple of pieces of tape on the bottom plate of your sewing machine as well as the bottom of the pressure foot to keep the vinyl from sticking.
- Use a new needle. This is always a good idea when starting a new sewing project. A nice, sharp needle, makes all the difference!


Amber says
This is so confusing. I am not a beginner, but the pictures don't show where the raw edges are. I want to love this, but it's taking way longer than it should to do a simple project. A video added would be perfect.
Brandy says
Hi! What raw edges are you referring to? In one of the first steps you fold the edge up after zig zag stitching it. That’s the side that is then seen to the zipper. So there aren’t any raw edges except for the vinyl inside the pouch.
Kelly Jo says
I’m definitely giving this a try! Thank you for another awesome project!
Sherry says
I was looking for the tutorial for double-sided tissue holders and this is where the link brought me. Still would like to see the tutorial I was looking for.
Brandy says
https://gluesticksblog.com/tissue-holder-tutorial/ Here is the link for that tutorial!