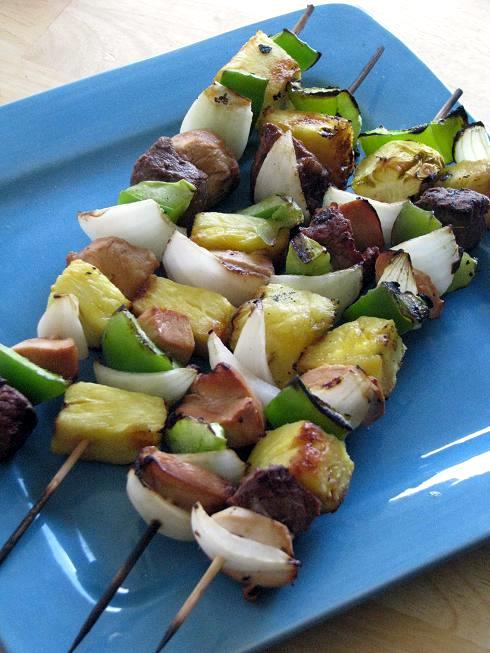
menu icon
go to homepage
  • Christmas
  • DIY
  • Recipes
  • About Me
  • Subscribe
    • Facebook
    • Instagram
    • Pinterest
  • subscribe
    search icon
    Homepage link
    • Christmas
    • DIY
    • Recipes
    • About Me
    • Subscribe
    • Facebook
    • Instagram
    • Pinterest
  • ×
    Home

    Indoor Spring Planter for Bulbs

    February 28, 2013 By Brandy 2 Comments

    indoor bulb planter

    My favorite flowers come from bulbs. Maybe it is the bright colors of the tulips or the fact that they are easy to grow, but I just love them. The problem is REMEMBERING to plant them! For the past several years I have had it in my mind to plant tulips and always forget in the fall. I keep hearing about forcing bulbs in the winter to grow indoors and would love to try that too, but this year we totally cheated and bought pre-potted bulbs.
    collage of bulb plants from nursery
    Kaylee has been asking to plant flowers and we aren't ready to begin landscaping our yard so we decided to create some indoor flower planters. We picked up daffodils, pink and blue hyacinths, and red, yellow, and purple tulips.  Most were $.82. So we grabbed a bunch of them and a bag of potting soil.
    children planting bulbs in planter
    Then we raided the cupboards for pots to plant them in. We found a bunch that would work and also some small rocks for to put in the bottom for drainage.
    hands breaking apart roots on bulb plants
    These bulbs were totally ready to be re-potted. We just pulled them out, separated the roots a bit and re-potted them.
    spring bulbs in dirt and planters
    The girls made a HUGE mess and used the plastic containers that the bulbs came in to re-plant some flower weeds they found in the lawn. Good times.
    planted bulbs in pots
    When we finished we had 5 small planters ready to brighten the house. They looked so pretty with just the green stems and still have a whole blooming life left in them!
    spring bulbs in pot on piano
    Then we found spots to put them inside of the house where they would get a lot of natural light which is pretty much every room in the house.
    little girl smelling flowers
    The girl's room has a really nice window shelf that is great for flower pots. Kaylee's mini daffodils look so pretty with her little solar flower.
    bulbs in pot on cabinet
    The tulips, daffodils and hyacinth planter is the one I am most excited about. It's been about 5 days since we re-potted these and the larger daffodils have started to bloom.
    pot of bulbs in kitchen
    And the last two are in my kitchen. Next to the vase of weed flowers. I always have lots of those from my sweet girls.
    We have big plans to landscape the back yard this year. I really hope it happens {time and money willing}. Details, details....
    What are your spring planting plans?

    Lucky Lime Float

    February 24, 2013 By Brandy 3 Comments

    lime sherbet float in glass with shamrock straw
    What makes this float "lucky"? Well, if you were one of my kids and were served this as your evening beverage with dinner instead of water....you might feel lucky too!
    lime sherbet float in glass with shamrock straw

    One of our family's favorite treats are sherbet floats. You can customize them  just by swapping out the flavor of sherbet. My personal favorite is raspberry. To make one all you need is a scoop of your favorite sherbet, following by lemon lime soda. To make a fun St. Patrick's day float, use lime sherbet! It's as easy as that.

    lime sherbet float in glass with shamrock straw

    How to Reupholster a Swivel Rocker Chair

    February 9, 2013 By Brandy

    Breathe new life into an old chair and learn how to reupholster a swivel rocker with step by step photos and tips! reupholstered rocker with gray fabric

    I recently received  my Grandmother's sitting chair. The one that I remember her having in her home for YEARS. She rarely watched TV, but when she did it was in this chair. And she usually was working on a sewing project while she was doing so. She passed away in September and this was one of the items left in her home that was going to be given away to a thrift store. This would be my first upholstery project, but I thought that I'd give it a go.
    The chair had been in the family for 25 years and still had good bones. It would be nice to have a new chair with old memories. So I decided to take the plunge to reupholster a swivel rocker.
    old rocker chair
    I wasn't really sure where to start on a project this big. After all, it isn't every day that you sit down and decide to reupholster a swivel rocker. So I went on pinterest and found this guide to buying fabric. It said that I would need about 7 ½ yards for a chair this size and it was dead on. I purchased 8 yards and had some left over. The fabric that I bought wasn't as thick as what was on the chair before, but it was still sturdy home decor fabric.
    chart showing how much fabric you will need to cover a variety of chairs
    via
    So I had my fabric...now what?
    What I learned is that upholstering a piece of furniture is just a big puzzle.  I didn't create a full tutorial since every chair is different, but the following things would be the same for any chair that you are working on.

    How to Reupholster a Swivel Rocker

    1. Take the chair apart completely.
    2. Re-use what you can. (Hardware, piping, etc.)
    3. Make new fabric pieces by using the old ones as a pattern and replace batting and foam if necessary.
    4. Carefully start putting the chair back together, starting with the piece you took off last and ending with the piece you took off first.Here is how my project went.
    collage showing steps to take apart old rocker chair
    Take the Chair Apart
    The first thing I did was label the chair. Front/Back/Left Side/Right Side/Ruffle, etc. I marked the whole thing up with a sharpie. I figured if I was ever going to put the chair back the way it was before that the more markings and photos I took, the better! I think I ended up with about 30 photos of the demolition process. Every fabric stretcher and every section where the fabrics met up in a funky way (like around the arms). If I had to choose one piece of advice for someone starting their first re-upholstery project, that would be it. TAKE LOTS OF PICTURES! They really helped when I went to put it back together later.
    After I marked the chair, I used pliers to pull the staples out. I looked for a good place to start and that was the bottom ruffle. I started pulling staples and carefully removing the skirt and ruffle. Then I went on from there with the sides, the back, the front ruffle, and the arms. Taking pictures of each step as I went. I saved each and every piece, labeled it, and used it as a pattern to cut the new fabric.
    I found sewing needles and toothpicks inside of the chair. That made me smile and miss my Grandma! She always had toothpicks in her apron pockets. You just never know when you are going to need one 🙂 And sewing needles. My grandma was an amazing quilter and made so many beautiful quilts and dresses for her daughters and grandchildren. For her birthday last year I compiled a book as a tribute to her and the legacy she left on our family.I vacuumed everything out of the chair. The needles, toothpicks, staples, etc. I also inspected the wooden frame to make sure nothing was broken or warped. It was in perfect condition.
    upholstery tack strip
    Re-Use What You Can
    I kept the original fabric stretcher strips, the foam cushions, wood tack strips  and the piping from the chair. I just cut out the casing and pulled the piping out.
    front of old rocker
    I also kept the button wires. The covers had to be replaced (I bought them in a kit at Joann's) and was able to string them with the long wires that were in the original ones which made it easy to put back in.
    hands taking apart old chair
    The batting was old and falling apart so I bought a bag of batting to replace it when I put the chair back together.
    After 3 nights of taking out staples....hundreds of them, the chair was empty and bare bones! And it was at that moment that I thought to myself, "What the heck did I just do?!?!?" But there was no turning back now!
    Put It All Back Together
    rocker chair with old and new fabric in stages
    And so I started slowly putting it back together!
    velcro closure on chair cushion
    Using the foam t-cushion as a pattern I made a slip cover for it with a velcro back. I used the previous cushion fabric as a pattern to make the new one. Sewing it up exactly as it was before.
    collage showing how to cut out new fabric for chair
    I found that the easiest way to get a perfect pattern piece was to lay the old one on top, cut around it and then use the folds as a guide for the new seam allowances. I'd pin the folds and then pin it to the chair to make sure it fit before stapling it on.
    When stapling the new fabric and wood strips back on the chair, I hammered over the staples to really make them set and also create a flush surface.
    collage of the steps it takes to reupholster chair
     It was like a big puzzle. Working from the last piece I took off of the chair, backwards, and finishing up with the ruffle and skirt that I took off the first night. The skirt was pretty easy to do since I tucked the old skirt inside the new one. Basically, I made a bunch of flap pockets (open on the top) and slipped the older one inside. I wanted them to be fairly heavy so that it would hang right and it worked out great.
    reupholstered rocker with gray fabric
    After a few coats of Scotch Guard, the chair was ready to start a new life in our home! Start to finish, it took about 2 ½Â weeks since I didn't work on it every day. If I had worked on it every night I could have finished it in about 6 nights. I have to say, it was one of the most labor intensive projects that I have ever done, but I was so darn proud of myself when it was finished. Now I know that I can do it!
    ***
    Supplies I used:
    Staples (⅝")
    Heavy Duty Pliers
    Staple Gun
    Hammer
    Scissors
    Pins
    Sewing Machine
    Sturdy Home Decor Fabric (Mine was from IKEA)
    Batting
    ***
    If you have any questions about starting a project like this, please don't hesitate to ask! Obviously I am not an expert since this was my first project and I learned as I went, but I'd be happy to help if I can.
    If you liked learning how to reupholster a swivel rocker you might also like...
    reupholstered ottoman
    How to Reupholster an Ottoman

    Perry the Platypus Cake

    February 4, 2013 By Brandy 9 Comments

    Perry the platypus cake

    pinterest pin it buttonWe have some "Phineas and Ferb" fans in our home so for Aaron's 7th birthday I made him a Perry the Platypus cake. It was extremely simple and he loved it. The only rough patch was the batch of fondant I made. Somehow I think I must have added too much water or something. It was so stretchy and hard to work with. It stretched so much when I picked it up that it ended up being really thin and impossible to spread the bubbles out...hence the texture you see, but everything else was easy to do. I used fondant for the features and then used concentrated food coloring to paint on the details.

    All 4 of our children were born the last quarter of the year. So now I can sit back and relax without planning a birthday party until September!
    Perry the platypus cake on table with presents

    pinterest pin it button

    Perfect Fried Chicken Recipe

    January 23, 2013 By Brandy 23 Comments

    Make Flavorful and CRISPY fried chicken at home with my perfect fried chicken recipe! You'll be surprised by the ingredient list! I have a love-hate relationship with fried chicken. I LOVE eating it, but I HATE making it. If you've made fried chicken in the past, only to have it fail (or anything fried only to have it fail), you will understand where I'm coming from. You will also understand my excitement for a delicious recipe like this that actually turns out great every time.


    crispy fried chicken

    I promise this is the most foolproof fried chicken recipe I've ever made.

    I've made fried chicken in the past only to have it end up bland, burned, and all of the coating falling off in the oil. I've also had it look perfect on the outside, but raw on the inside. Medium rare chicken? No thanks, but not with this recipe. Is it the soup? The cornstarch? I'm not sure, but it is crispy, light, and has great flavor.

    crispy fried chicken

    This is a very messy fried chicken recipe, but really what fried chicken recipe isn't?

    First, I lay out a baking rack on top of a cookie rack that has paper towels under it for draining the chicken once it was done as well as another one to hold my raw, dredged chicken. That way I'm not dipping chicken and frying, then dipping again. Then I dip them all at the same time, wash my hands REALLY good, then begin the frying process.

    I've tried this with legs and chicken breast tenders. Both turned out fabulous. Just make sure to adjust your cooking time for the tenders. Without a bone, they will cook a lot quicker than the legs.

    fried chicken in oil

    This fried chicken recipe is adapted via a recipe on allrecipes.com (the basic recipe here is great, just lacked seasoning. I quadrupled the seasoning and added a measurement for seasoning salt and thought that it gave it much more flavor.)
    crispy fried chicken

    Perfect Fried Chicken

    crispy fried chicken

    • 8 chicken leg drumsticks
    • 1 ounce can condensed cream of chicken or mushroom soup (10.75)
    • 1 ½ teaspoon . seasoning salt
    • 1 egg
    • ½ cup all-purpose flour
    • ½ cup cornstarch
    • 2 teaspoons garlic powder
    • 2 teaspoons paprika
    • ¾ teaspoon . seasoning salt
    • pepper to taste
    • oil for frying
    1. In a shallow dish or bowl combine the soup, egg and seasoning salt (be careful, as soup is already salted); mix together. Dip chicken in mixture and turn to coat completely. Set aside.
    2. In a resealable plastic bag mix together the flour, cornstarch, garlic powder, paprika, salt and pepper.
    3. One at a time, place chicken pieces in bag, seal and shake to coat. Add more flour and/or cornstarch as necessary, but add them in equal parts (there should be an equal amount of each in the mixture).
    4. Heat oil in a deep-fryer or large saucepan to 375 degrees F. Be sure to use enough oil to cover chicken pieces.
    5. Place coated chicken on a baking sheet or platter and allow to sit until it becomes moist/doughy (this ensures nice and crispy chicken)
    6. Fry chicken pieces in oil for about 10-12 minutes, or until cooked through and juices run clear.
    7. Drain on baking rack or paper towels and serve.

    This post contains affiliate links.

    Painting Laminate Furniture

    January 18, 2013 By Brandy 18 Comments

    old file cabinet painted blue
    Today I'd like to share how I re-purposed  two pieces of furniture for my office space. Two cheapy laminate stands that were going to be kicked to the curb. Literally. I figured I had nothing to lose, and so I decided to do something with them.
    This was my first time painting furniture or finishing furniture of any kind. I was a bit hesitant since I wasn't sure if the paint would stick on top of laminate, but I found a wonderful step by step tutorial to help me along the way and  in the end I was able to save money by giving these stands a new life.
    unpainted wooden file cabinet
    Here is what my sewing machine storage stand looked like before. It was a wooden file cabinet, but the bottom drawer was broken. The hardware for the file folders was un-repairable so I took it out and got rid of the drawer front.
    painted wooden file cabinet
    The beauty of the type of primer that I used is that I didn't have to SAND before priming! I applied two coats of primer and followed it up with 2 coats of paint and a coat of clear spray paint.
    wire basket in bottom of file cabinet
    I added a wire basket to hold some fabric and my new storage stand was done! I keep my sewing machine on top and use the drawers for my pressure foot, user manuals, and other supplies.
    old entertainment stand
    We recently bought a new entertainment stand for our great room and didn't need this anymore. It worked out great since I needed a printer stand for the office. So I gave it the same treatment as the sewing machine stand and voila!
    old entertainment stand painted blue
    If you are like us you probably have some laminate furniture that could use some sprucing up. And it really is easier than you might think. I swear we have a piece in every room of the house and now I know what I am going to do with it when it starts looking a bit drab.

    Our Favorite Chinese Food Recipes To Make At Home

    December 27, 2012 By Brandy 4 Comments

    Enjoy your favorite Chinese food dishes at home with a collection of our FAVORITE Chinese food recipes! Egg Rolls, Chow Mein, Stir Fry and more!

    collage of homemade Chinese food
    When I was a teenager I was invited to an awesome New Year's Eve party at a friend's house. They served homemade Chinese food and it was amazing! I love Chinese food in general so figuring out how to make it at home is a fun challenge for me. Here are some of the Chinese food recipes we've tried and enjoyed in our home. Perfect dinner party food.

    Our Favorite Chinese Food Recipes To Make At Home

    plate of homemade egg rolls
    Homemade Egg Rolls
    Crispy wrappers filled with ground turkey or pork with fresh shredded veggies, and an amazing sauce. Deep fried to perfection. Don't be intimidated. They aren't hard to make!
    steak stir fry on red plate
    Steak & Vegetable Stir Fry
    The key to a good stir fry isn't necessarily a wok. You just need heat. And lots of it. Don't be afraid to crank the burner to HIGH. Searing the steak makes it moist on the inside and cook fast. Same with the veggies. And always serve it with yum yum sauce! (see recipe below).
    homemade yum yum sauce in dish
    Homemade Yum Yum Sauce
    This sauce is simply amazing. Dip shrimp in it, drizzle it across your stir fry or steamed rice. It's always a good idea to double the batch so that you have it on hand for leftovers. Two tips: ALWAYS use real mayonnaise (not light) and let it sit for at least 6 hours to let the flavors meld. You won't be sorry!
    box of homemade fortune cookies
    Homemade Fortune Cookies
    Homemade fortune cookies are absolutely delicious! Fill them with your own fortunes for a wonderful new year. Dip them in chocolate for even more fun.
    chicken chow mein on plate
    Homemade Chow Mein
    This chow main comes together quickly, making it the perfect week night meal. It's delicious too!
    If you liked these Chinese food recipes you might also like one of my favorite weeknight meals from Damn Delicious. These Korean beef bowls are legit! I always make them with ground turkey. A family favorite!

    60+ FREE Printable Christmas Gift Tags

    December 21, 2012 By Brandy 2 Comments

    Over 60 free printable Christmas gift tags to make holiday gift giving easier this year! Cute, colorful, and creative. Just print and cut.

    Over 60 free printable Christmas gift tags to make holiday gift giving easier this year! Cute, colorful, and creative. Just print and cut.
    I went online this morning to find some printable gift tags for some treat boxes that I'm putting together  and couldn't believe how many darling ones were out there! So I thought I'd do a quick round-up of FREE printable gift tags that you can download.  So quick, so easy, and so pretty! Just what I was looking for (since I have no design skills of my own)! Some of the gals have created a dozen to print at once. Awesome.
    thumbprint reindeer ornaments
    Last year Mac and I made this cute thumbprint ornament. Wouldn't this be a cute gift for a grandparent? You can even use it as a gift tag, tied to a present! Just hand write your message next to the reindeer!
    Santa suit gift tag
    The kids and I also made these Santa Suit Gift Tags out of soda bottle tabs! You can get all of the details here to make your own.

    5 Creative Holiday Gifts and Gift Wrapping Ideas

    Creative Ways To Package Holiday Treats
    Christmas Donut Treat Cups
    Reindeer Snack Cups With Printable Template
    Reindeer Candy Tins
    Holiday Hostess Gift Basket
    Okay, okay. I know you came here for PRINTABLE gift tags, not ones you have to create yourself, but I just couldn't help myself! We had so much fun making those that I decided to give you options. Without further adieu, here are over sixty free printable Christmas gift tags.

    60+ FREE Printable Christmas Gift Tags

    Say what you're really thinking with this funny Christmas gift tags! These printable gift tags will make the recipient laugh out loud and probably score you some points before the gift is even opened!
    6 Totally Honest Gift Tags from Hey Let's Make Stuff
    These totally honest gift tags make me laugh. They are probably my favorite out of all of the free printable Christmas gift tags! "This took me forever to make" Accurate.
    printable Christmas Gift tags
    9 Printable Tags from Skip to My Lou
    Such a gorgeous color combination of printable gift tags that will coordinate with a variety of wrapping papers.
    penguin christmas gift tags
    4 Printable Gift Tags from The Idea Room
    Isn't that penguin cute? I love these modern printable gift tags from The Idea Room!
    Free Printable Gift Tags
    12 Printable Gift Tags from Shanty 2 Chic
    12 classic tags from Shanty 2 Chic to print and attach to gifts this year. I love their use of brown paper to wrap the presents.
    free ornament christmas gift tags
    Ornament Gift Tags Designed by: Martha Stewart {download here}
     Love these ornament tags from Martha Stewart. Would be perfect to tie onto red and white wrapping paper.
    free christmas gift tags to print
    5 Holiday Christmas Tags Designed by: Bora {download here}
    Wouldn't these free gift tags from Bora be cute tied onto a baking gift?
    red and blue christmas gift tags
    9 Darling Winter Gift Tags From: Lemon Squeezy {download here}
    Another bright and refreshing color combination for the holidays from Lemon Squeezy. I especially like the snowman!
    pastel christmas gift tags free
    12 Gift Tags Designed by: Love vs. Design {download here}
    Pretty and feminine. These would be beautiful tied to a package wrapped in gold paper.

    Christmas Spritz Butter Cookies

    December 20, 2012 By Brandy 12 Comments

    red green and white spritz cookies

     My cookie press broke after last year so I purchased a new one and WOAH. A good cookie press makes such a difference! The other one I had worked ok and lasted 8 years, but I seemed to have more issues with mis-shaped cookies and the trigger sticking. Not anymore. We pressed out 10 dozen cookies in less than 10 minutes.
    toddler adding sprinkles to cookies
    This was Ruby's first time making Christmas cookies! If you think her cookies look good, you should see her booster seat and the kitchen floor!
    little girl adding sprinkles to cookies
    Kaylee is a pro at these things and loaded up her cookies with sprinkles and pearls, galore!
    flower spritz cookie with sprinkles
    I hope you enjoy these fun little treats as much as we do!
    stove with trays of cookies on it

    Spritz Butter Cookies

    {Our Version}
    1 cup butter, softened
    ½ cup sugar
    2 ½ cups flour
    1 egg
    2 tsp. vanilla
    2 tsp. butter flavoring
    2 tsp. almond extract
    Cream butter and sugar. Add egg and flavorings. If you want to color your dough, you can add the coloring now as well. I like Wilton's concentrated paste because it doesn't water down the recipe.
    (Or if you want several colors, just wait until you've made your dough and separate it into sections and mix it in then.)
    If you are using salted butter, you don't need to add salt in your recipe. If you are using unsalted, add ¼ tsp.
    Add flour (and salt if needed) to butter/sugar and mix until dough forms.
    Drop onto ungreased cookie sheet using a cookie press. Add sprinkles. Bake @ 400 degrees for 7 minutes.
    Store in air tight container. These cookies freeze really well.
    Yield: 4-5 dozen cookies.
    • « Previous Page
    • 1
    • …
    • 141
    • 142
    • 143
    • 144
    • 145
    • …
    • 155
    • Next Page »

    Welcome!

    I'm Brandy! I love to create and share my ideas through easy-to-follow recipes and tutorials.

    More about me

    As an Amazon Associate, I make a small commission on qualifying purchases.

    sew with me kids sewing book
    My Book

    Christmas Posts

    • Christmas stocking on mantle
      Cuffed Christmas Stocking Sewing Pattern
    • Pop tart gingerbread house decorated with candy and mints.
      Make a Pop Tart Gingerbread House
    • hands holding chocolate truffle wreath
      Candy Truffle Wreaths (Easy Gift Idea!)
    • White flannel pajama pants with black dogs on the front.
      Sew Your Own Pajama Pants Without a Pattern
    See more Christmas →

    Latest Posts

    • Chubby gingerbread man cookie with white icing and red candy buttons.
      Chubby Gingerbread Man Cookies
    • No bake chocolate silk pie in glass pie pan.
      Easy French Silk Pie (No Bake Crust)
    • Wire basket of crescent rolls.
      Homemade Crescent Rolls
    • Buttercream frosted ginger cookies with sprinkles.
      Frosted Ginger Cookies

    Footer

    ↑ Back to Top

    About

    • Privacy Policy
    • Accessibility Policy

    Newsletter

    • Sign Up! for emails and updates

    Contact

    • Contact

    As an Amazon Associate, I earn from qualifying purchases.

    Copyright © 2025 Gluesticks Blog