
3 More Projects for Baby Outings
Fabric Diaper Clutch Sewing Tutorial
Diaper Change and Play Mat Sewing Tutorial
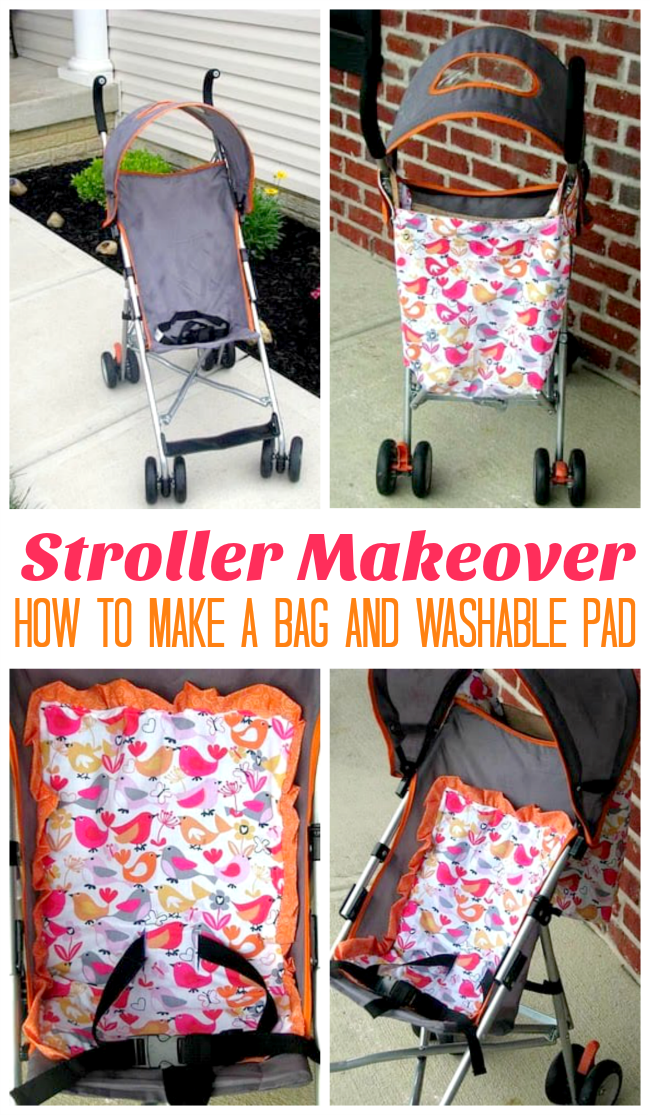
Stroller Makeover: How To Make A Stroller Bag

Here is a tutorial for bag that can be used as a stroller bag. If you use home decor fabric, you don't need to line it. I lined mine with corduroy to make my cotton fabric sturdier.
The boxed corners give the bag some shape and allow for plenty of room to store diapers, wipes and other necessities.

I also made button flaps to strap it to the stroller and for easy removal for cleaning. Here is a simple button hole tutorial.
Stroller Makeover: How To Make a Washable Stroller Pad

I had enough fabric to make a cushion too! Nice and cozy. It's also nice to have an extra layer that can come out and be washed, if something leaks or spills on the stroller. We all know what a nightmare it is to try to take a stroller apart to wash.
- To make a stroller pad, simply measure the width and length of the stroller back and bottom.
- Cut two pieces, one for the front and one for the back.
- You'll also need a layer of batting for a bit of padding.
The ruffle is optional, but pretty! Here is video tutorial on how to make a ruffle. My finished ruffle was 2" wide and the length of all 4 sides of my pad.
- Place the front piece of fabric on your work surface with the right side of the fabric facing you.
- Pin the ruffle along the edge, all the way around, lining up the edges. Place the back piece of fabric on top and pin, sandwiching the ruffle in between. Leave a 4-5" space for turning right side out.
- Stitch around the edge using a ⅜" seam allowance.
- Turn right side out.
- Slide a rectangle of batting inside.
- Fold sides of the opening over and stitch closed.
- Create two button holes for the stroller straps to slide through.

I marked the fabric where the straps would go through, then made large button holes for them to slide through. Here is a simple button hole tutorial that you can use to create the slits for the stroller straps to go through.

That's it! I left it in the hallway when I was done. Kaylee saw it when she woke up from her nap and it was love at first sight.
She loves pointing at the little birds. She climbed in and sat in it while I pushed her around for an hour. I made lunch, cleaned the living room, got the kids ready to go to the science museum....all while she sat in her stroller. She screamed when it was time to get out and get into the truck. Crazy little girl!


inday_adin says
It looks fancy! The stroller makeover made the stroller looks like the ones that you buy for a higher price. 🙂
Tricia says
I love the stroller redo- and the fabric. I actually just posted some pincushions on my blog out of the same fabric. Check them out at leafytreetopspot.blogspot.com.
Good work and thanks for sharing.
Tricia
Stephanie Lynn says
Love the fabric - What a darling transformation. The bag on the back is wonderful. Love the ruffles too! Thanks for joining The Sunday Showcase. I greatly appreciate it! Hope you have a wonderful week! ~ Stephanie Lynn
Andy Porter says
How cute you are!!! She is riding around in style now!!! Great job good mama!! I really like this one!
Stephanie Cameron says
Super adorable!! Great job!
Dayna says
This is fantastic! What a stellar project!
Sachiko says
Very nice! I love the fabric you chose for this project. Thank you for sharing this at my link party.
Sarah says
Thank you for the response! I may have to try this.
Sarah says
Very cute! I have a similar stroller. While it was in my trunk a grocery bag spilled and some dish soap leaked onto the seat of the stroller. I've yet to figure out how to get it out. I wonder if a seat cover like yours would work. Is it attached in any other way than the strap holes?
Lori says
Very cool!
Thanks for joining Get Your Craft on Thursday at Life As Lori. Please join me next week for another great party.
Tere says
Love it! My almost 4 year old rides in her stroller occasionally at the mall or when lots of walking is required and i really need a storage bag.....I'll be making one soon! Thanks for sharing! Link up to my party....terelauritsen.blogspot.com
Baby says
Super cute! I love this idea, and the fabric is fantastic!
Sew Much Ado says
That turned out so cute, I love the little ruffly cushion! Can you guarantee that it will make a child sit still for an hour? Hehe, if you can I'll make one today!
Erin says
Super cute!! Great job!
Lynette @ My Craft Discovery says
I love it! What a fabulous idea, and how cute!