Make soft, fluffy homemade Peeps marshmallows! Make chicks and bunnies from scratch with this copycat recipe. Better than store-bought with delicious vanilla flavor!
You might also like my peeps sugar cookies, scotcheroo birdsnest treats, or vintage panoramic sugar eggs!
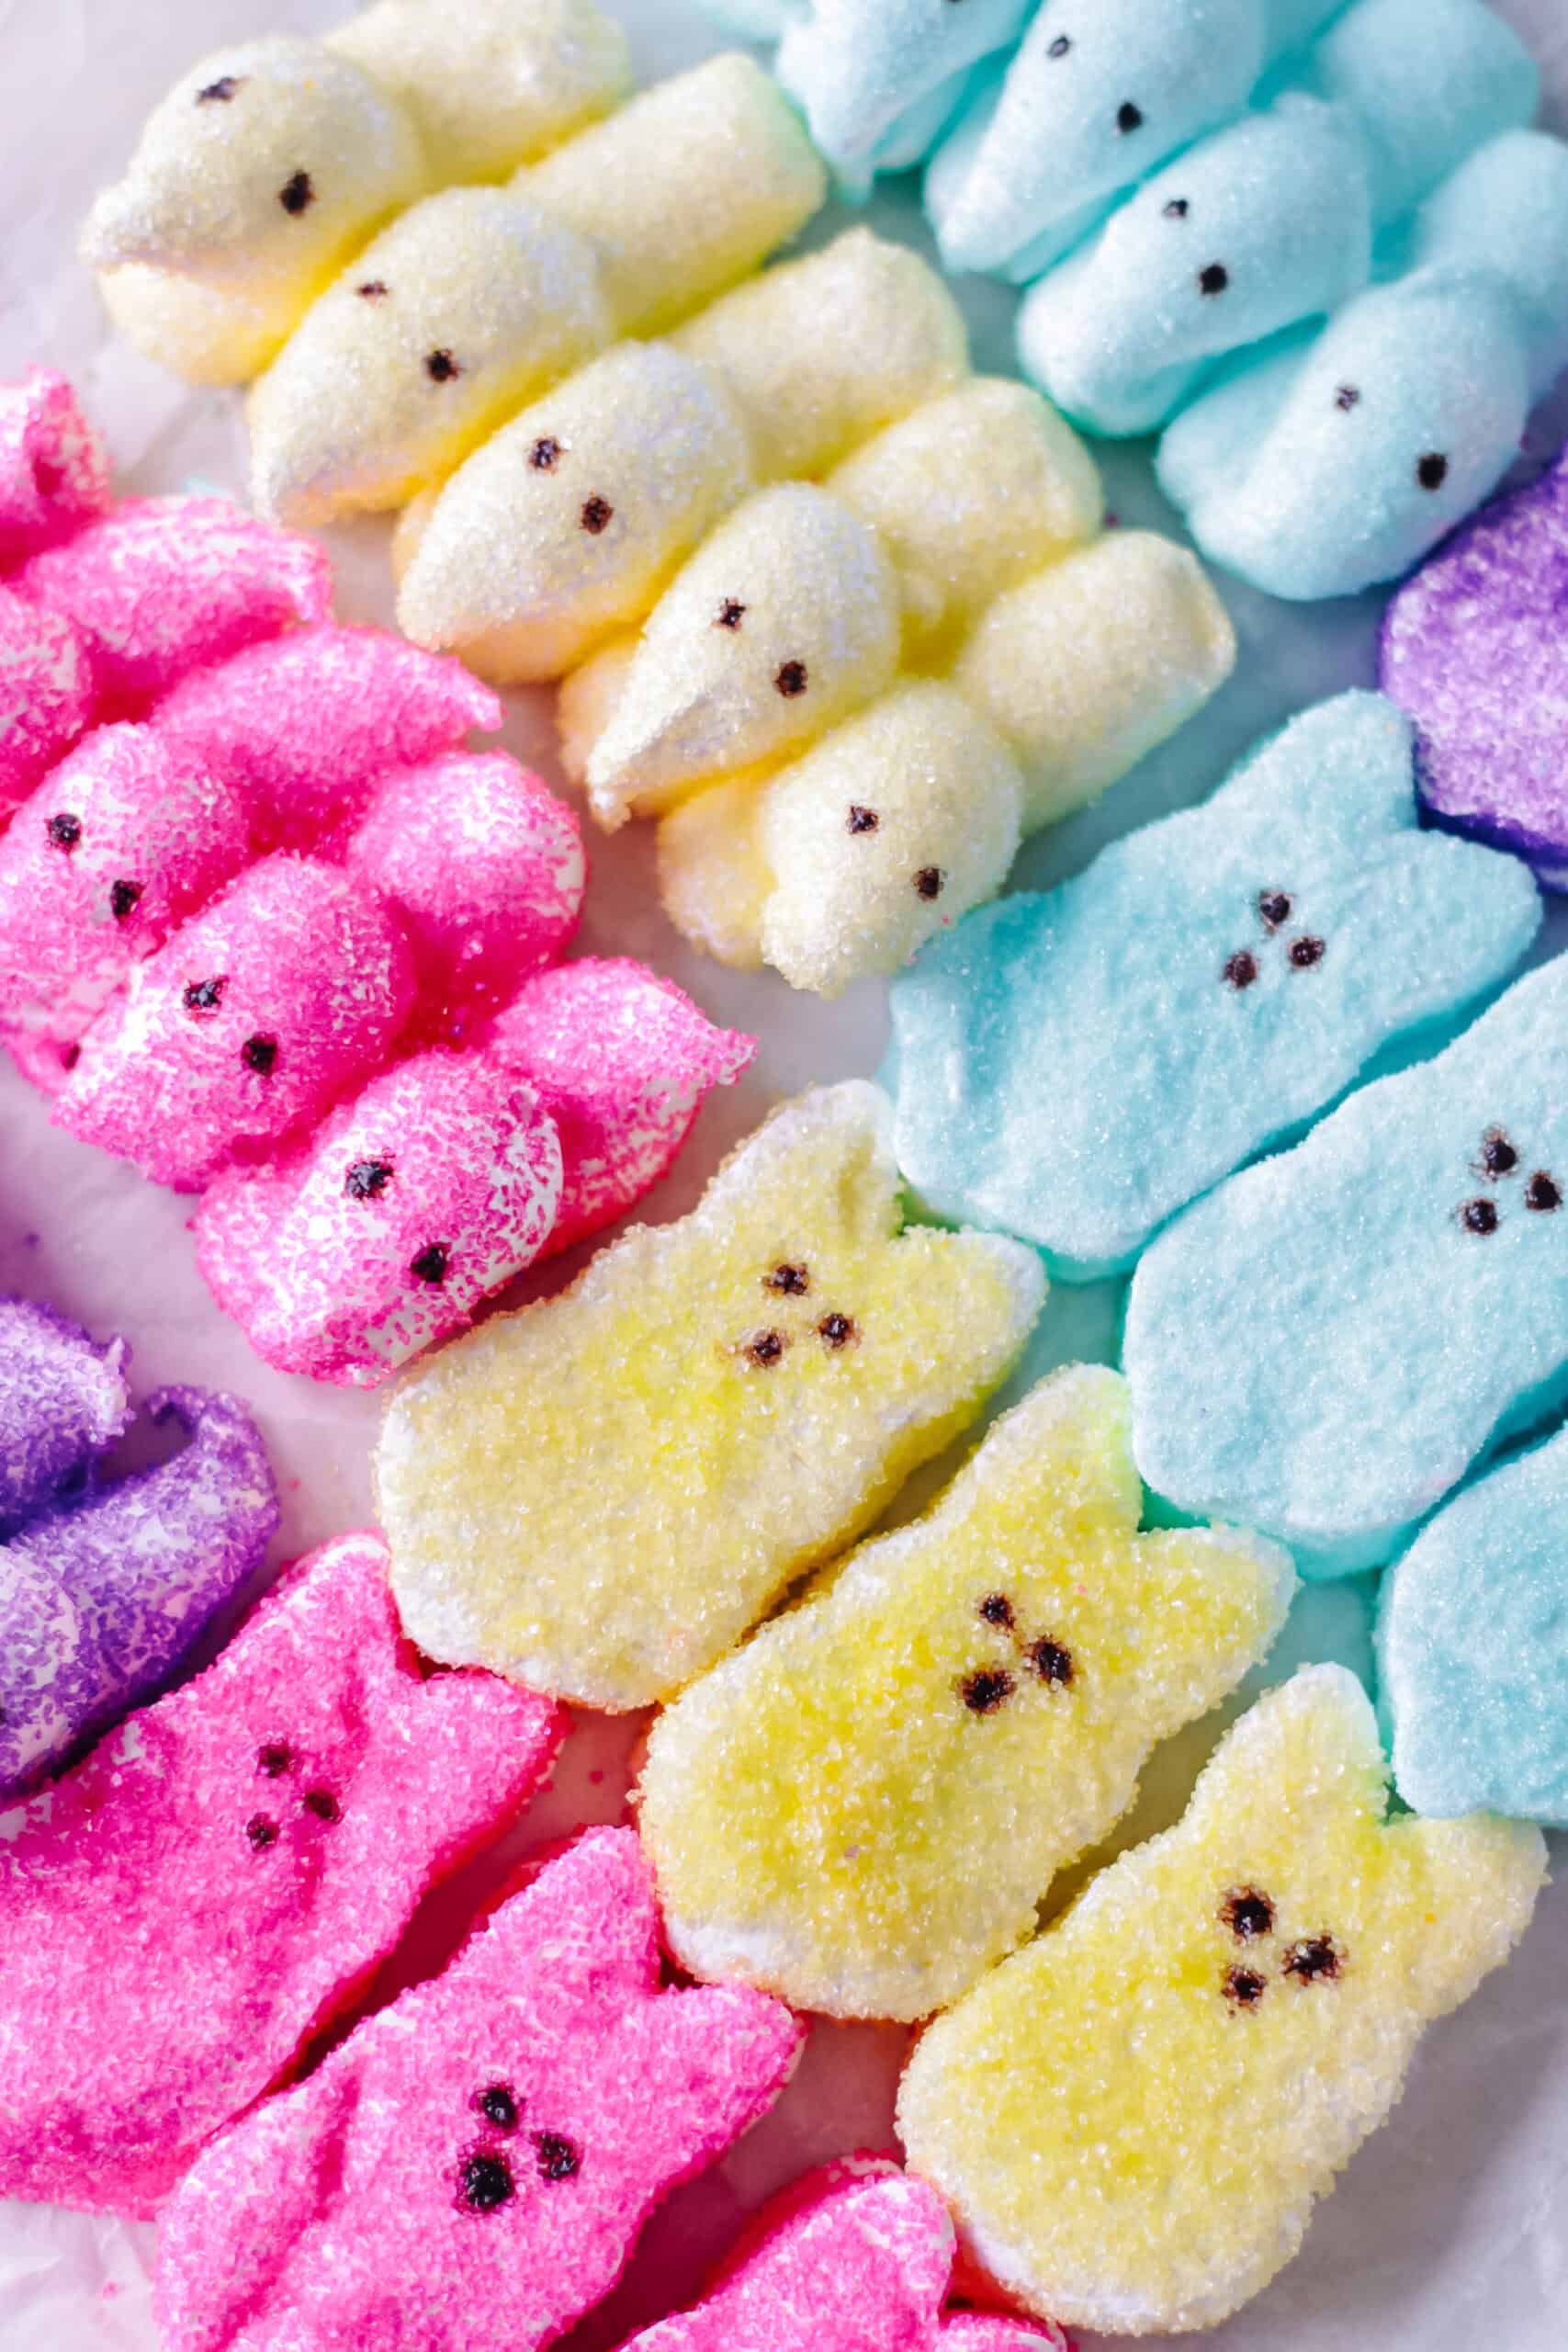
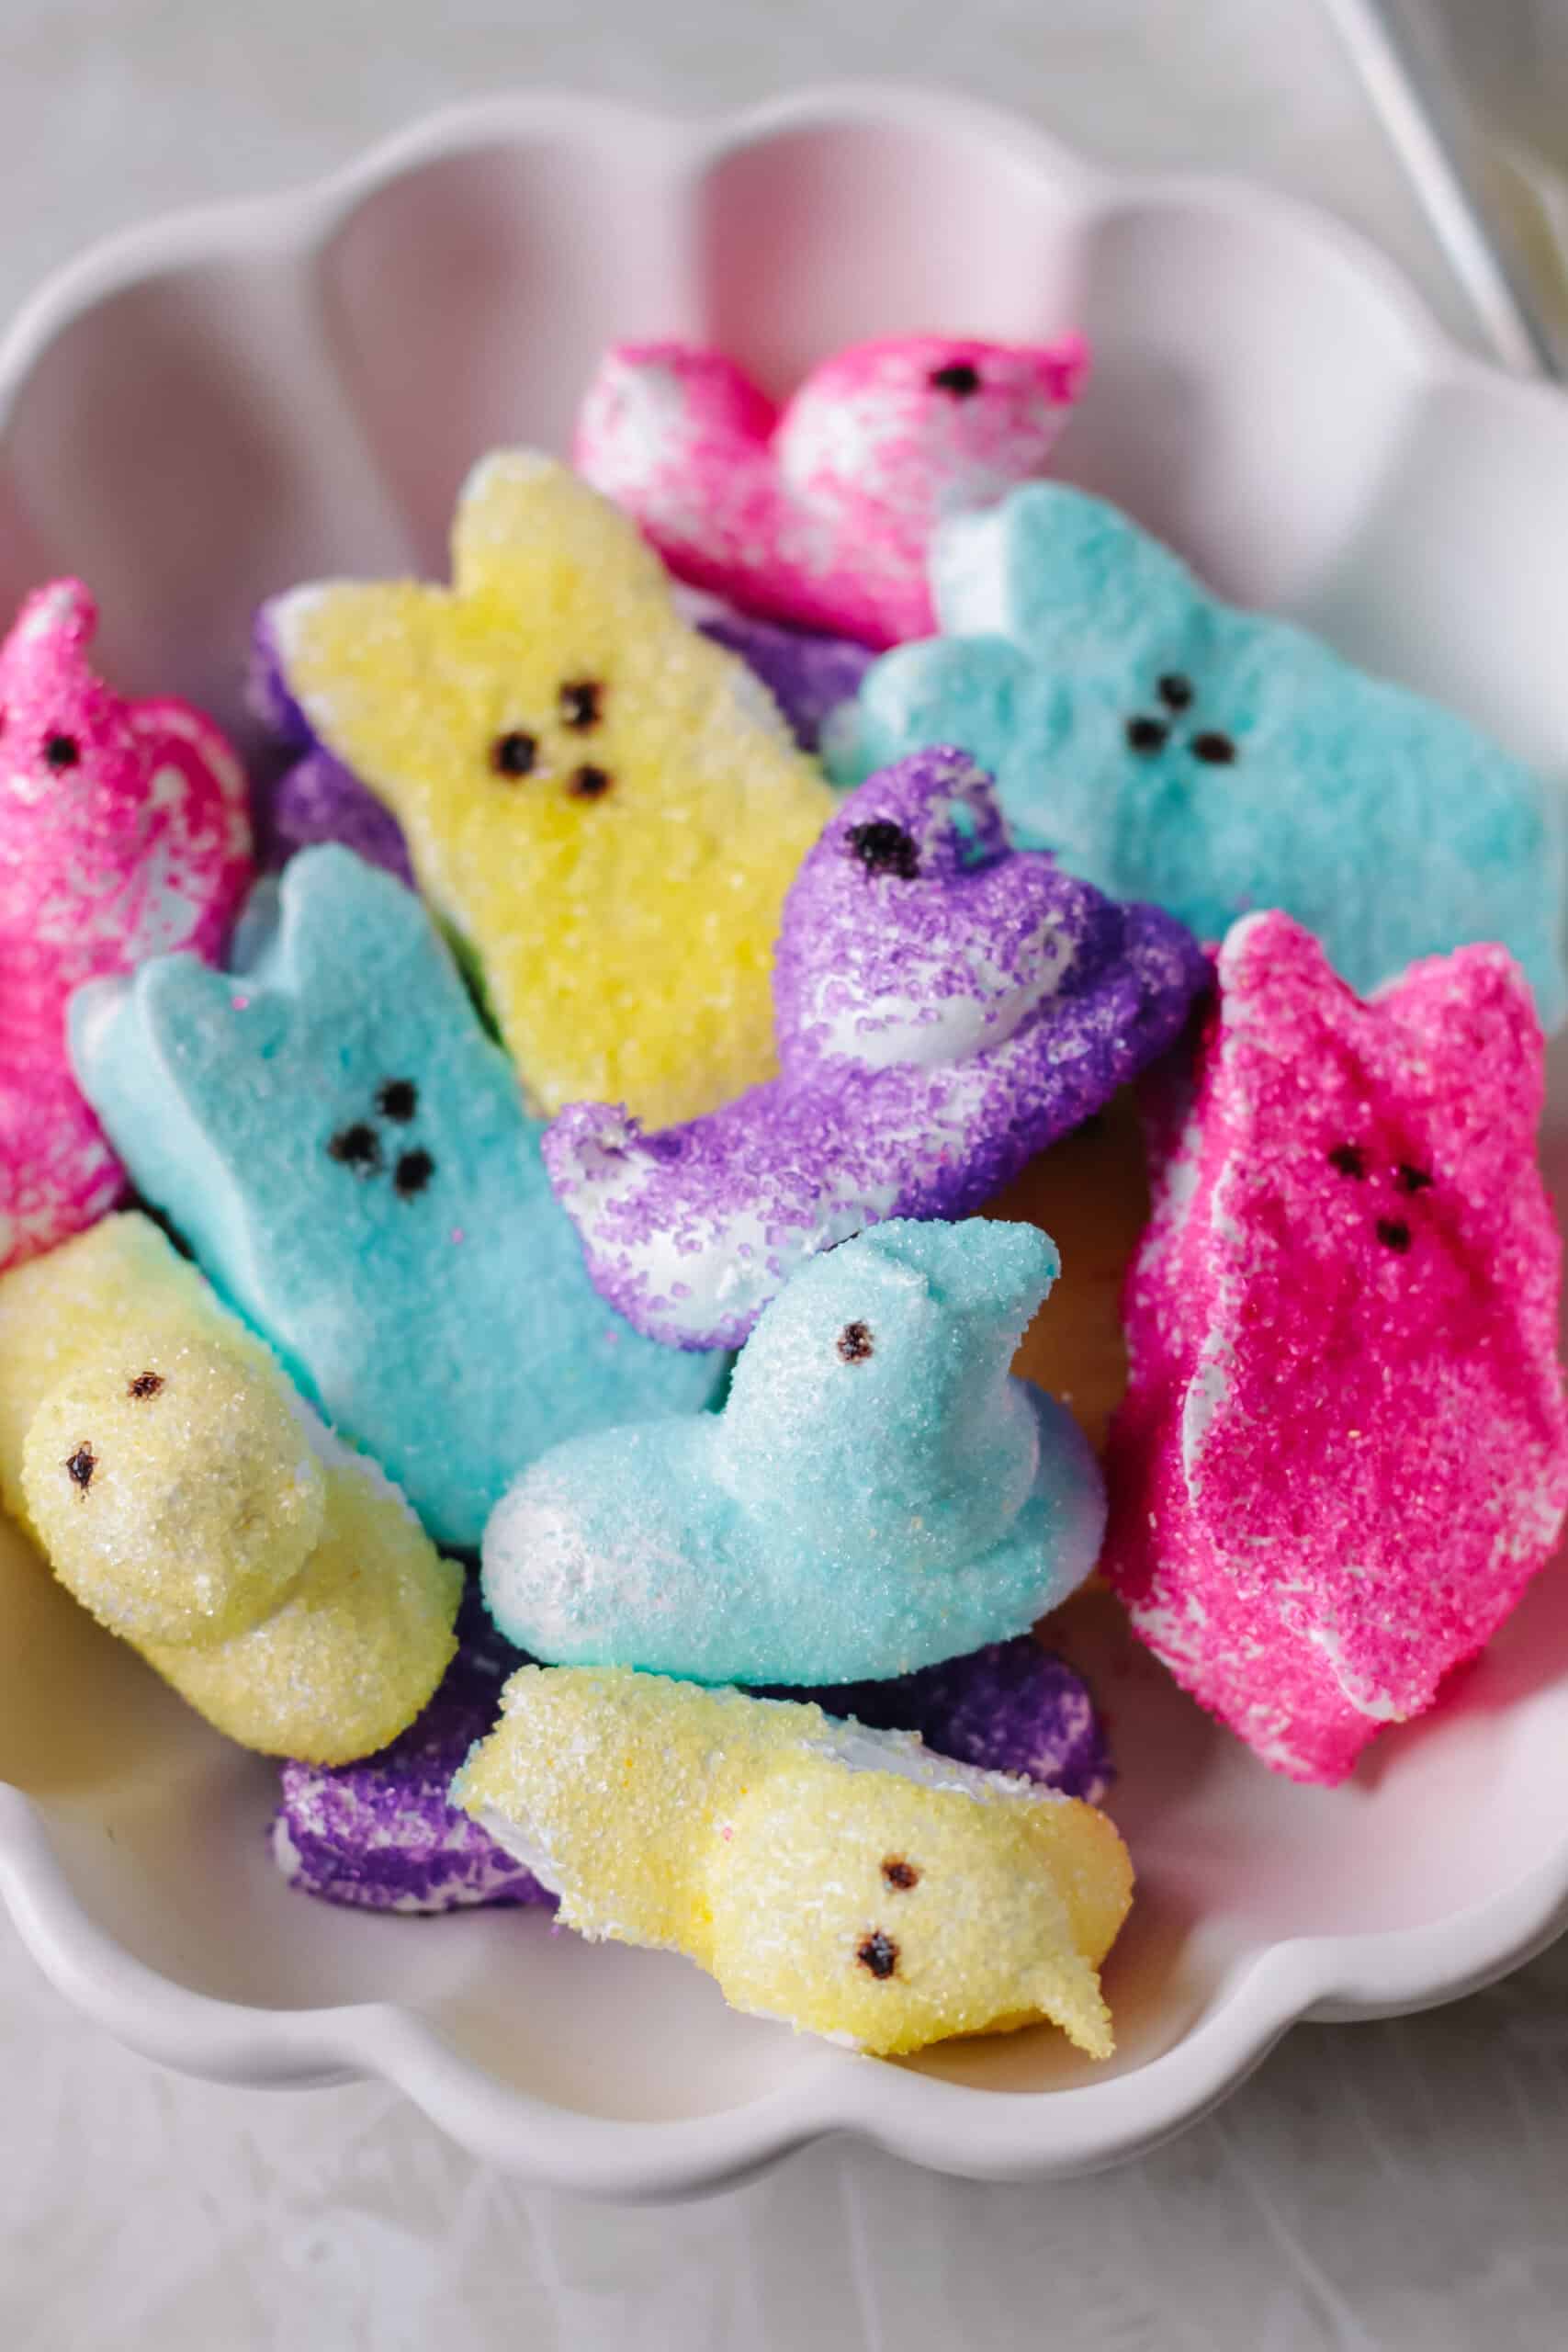
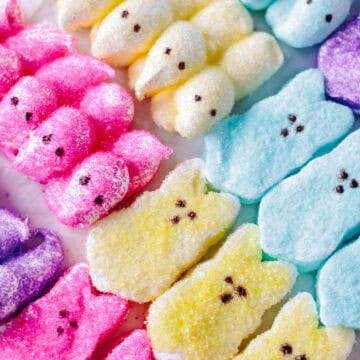
I have never cared for the texture or taste of store-bought Peeps marshmallows, but I do love the texture and taste of homemade marshmallows. These homemade Peeps are just so fun. I made both bunny and chick shapes and have instructions for both!
Why I Like This Recipe
- Tried and true marshmallow recipe. My marshmallow recipe is adapted from Alton Brown. It's a good one, and they have the best soft, chewy texture.
- Minimal ingredients. Marshmallows are mainly made from sugar and gelatin. White sugar plus corn syrup make them sweet and chewy. You can flavor them with any extract you'd like. I use vanilla.
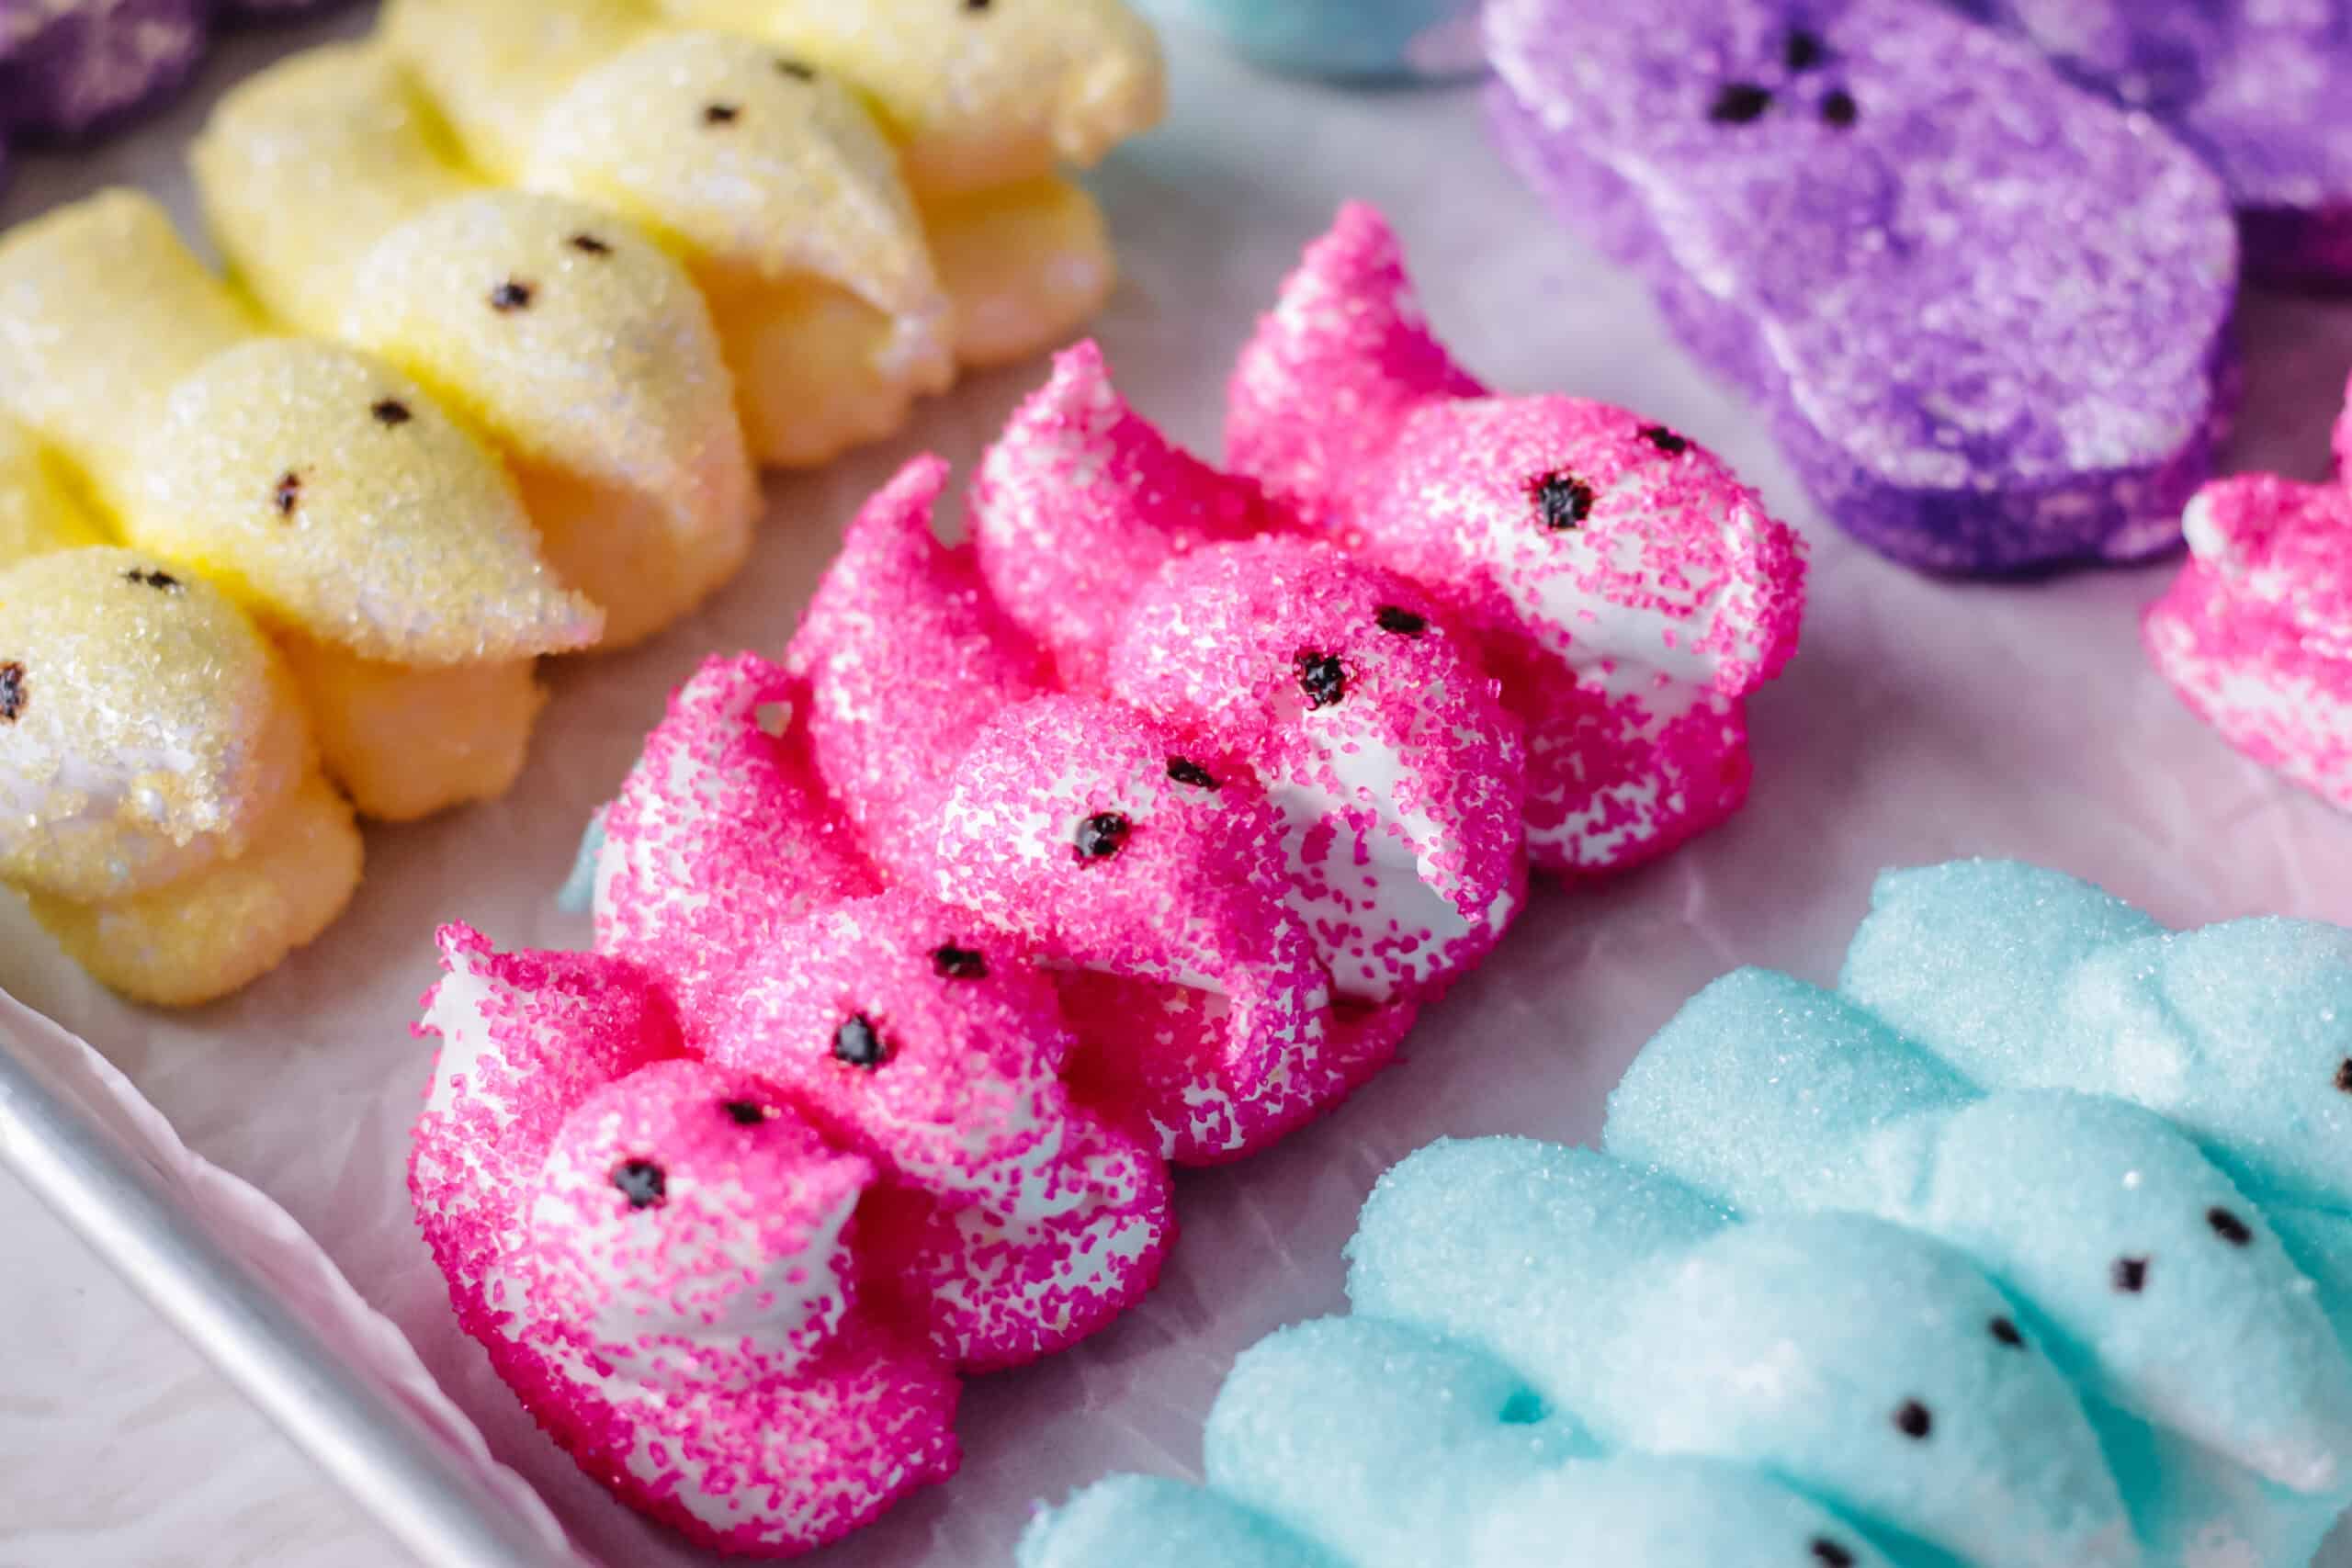
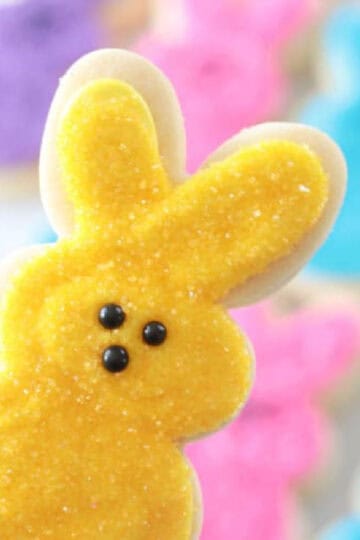
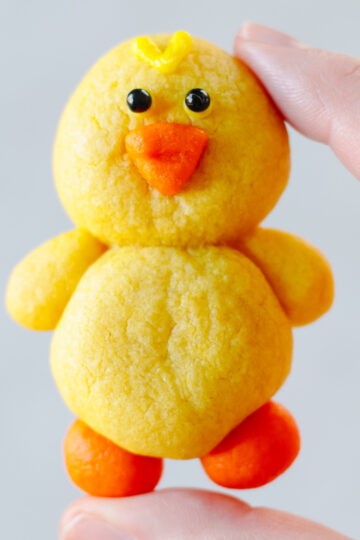
- Multiple shapes. Make bunnies or chicks with my tutorial! Bunnies are easier, but chicks are so fun and hilarious. Mine aren't perfect, but they make me smile! There are so many ways to shape homemade Peeps: silicone molds, piping bag (with or without a tip).
Jump to:
Tips and Tricks
- Make one batch at a time: I recommend making the bunnies and chicks separately, and not from a single batch of marshmallow mixture. If you want to make them at the same time, quickly spread half of the mixture into an 8x8 baking dish, then spoon the rest into a pastry bag and pipe into chick shapes. I find it easiest to only make one shape per batch because the mixture cools quickly and begins to thicken. You're fighting the clock more if you stop to spread half the mixture into a pan for the bunnies, then go back to shape the chicks.
- Stand mixer: You can use an electric hand mixer, but just remember that you are beating the marshmallow whip for 15 minutes—that could get tedious. I highly recommend using a stand mixer with a whisk attachment.
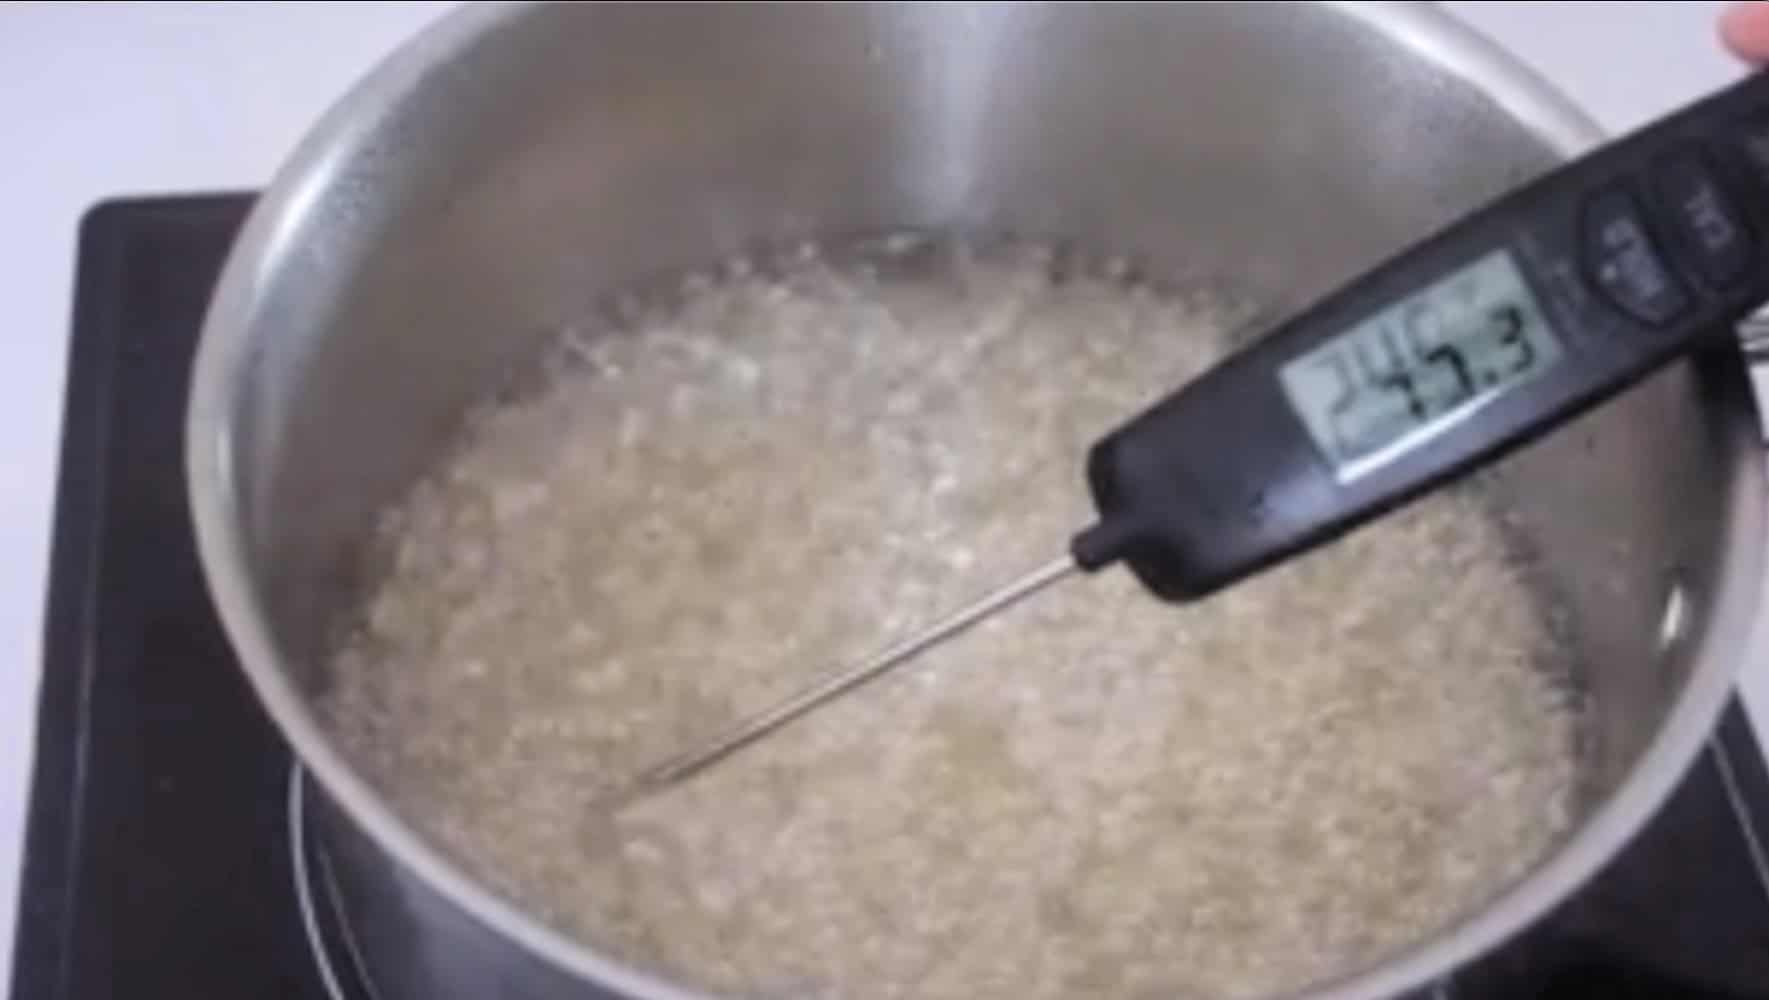
- Candy thermometer: an absolute must. When making homemade toffee, I can get away without using a thermometer because you just set a timer and watch for the toffee to turn color. That isn’t the case when working with a clear syrup like this recipe. You need to let the mixture simmer until it reaches 245 degrees. That’s easy to do with the help of a thermometer. One that clips onto your pan makes it even easier, but you can use one that you hold, like I did.
- Sanding sugar: The marshmallows are sticky on the sides and slightly sticky on the flat surfaces, so the sanding sugar sticks easily to them. If you find that your sanding sugar isn't sticking to the front as much as you'd like, you can brush a SMALL amount of water over the front of the bunny-shaped marshmallows before rolling them in sugar. I did not do this.
- Tips for shaping Peeps. The chicks are piped into shapes. The marshmallow mixture will begin to set up, so it's important to work quickly and pipe them into shape. The bunnies are spread into a pan and left to set for a couple of hours, then cut into shapes with a bunny cookie cutter.
- Be patient. Making marshmallows is a sticky process! Spooning the mixture into the piping bag and then shaping the mixture takes patience. Avoid touching the mixture with your hands, if possible, but if you do, no worries, just do your best to detach yourself from the mixture.
- Storage tips. For soft and chewy marshmallows, store them in an airtight container after they have completely set. For marshmallows with a dry exterior, allow finished marshmallows to sit overnight, then store in an airtight container.
Ingredients
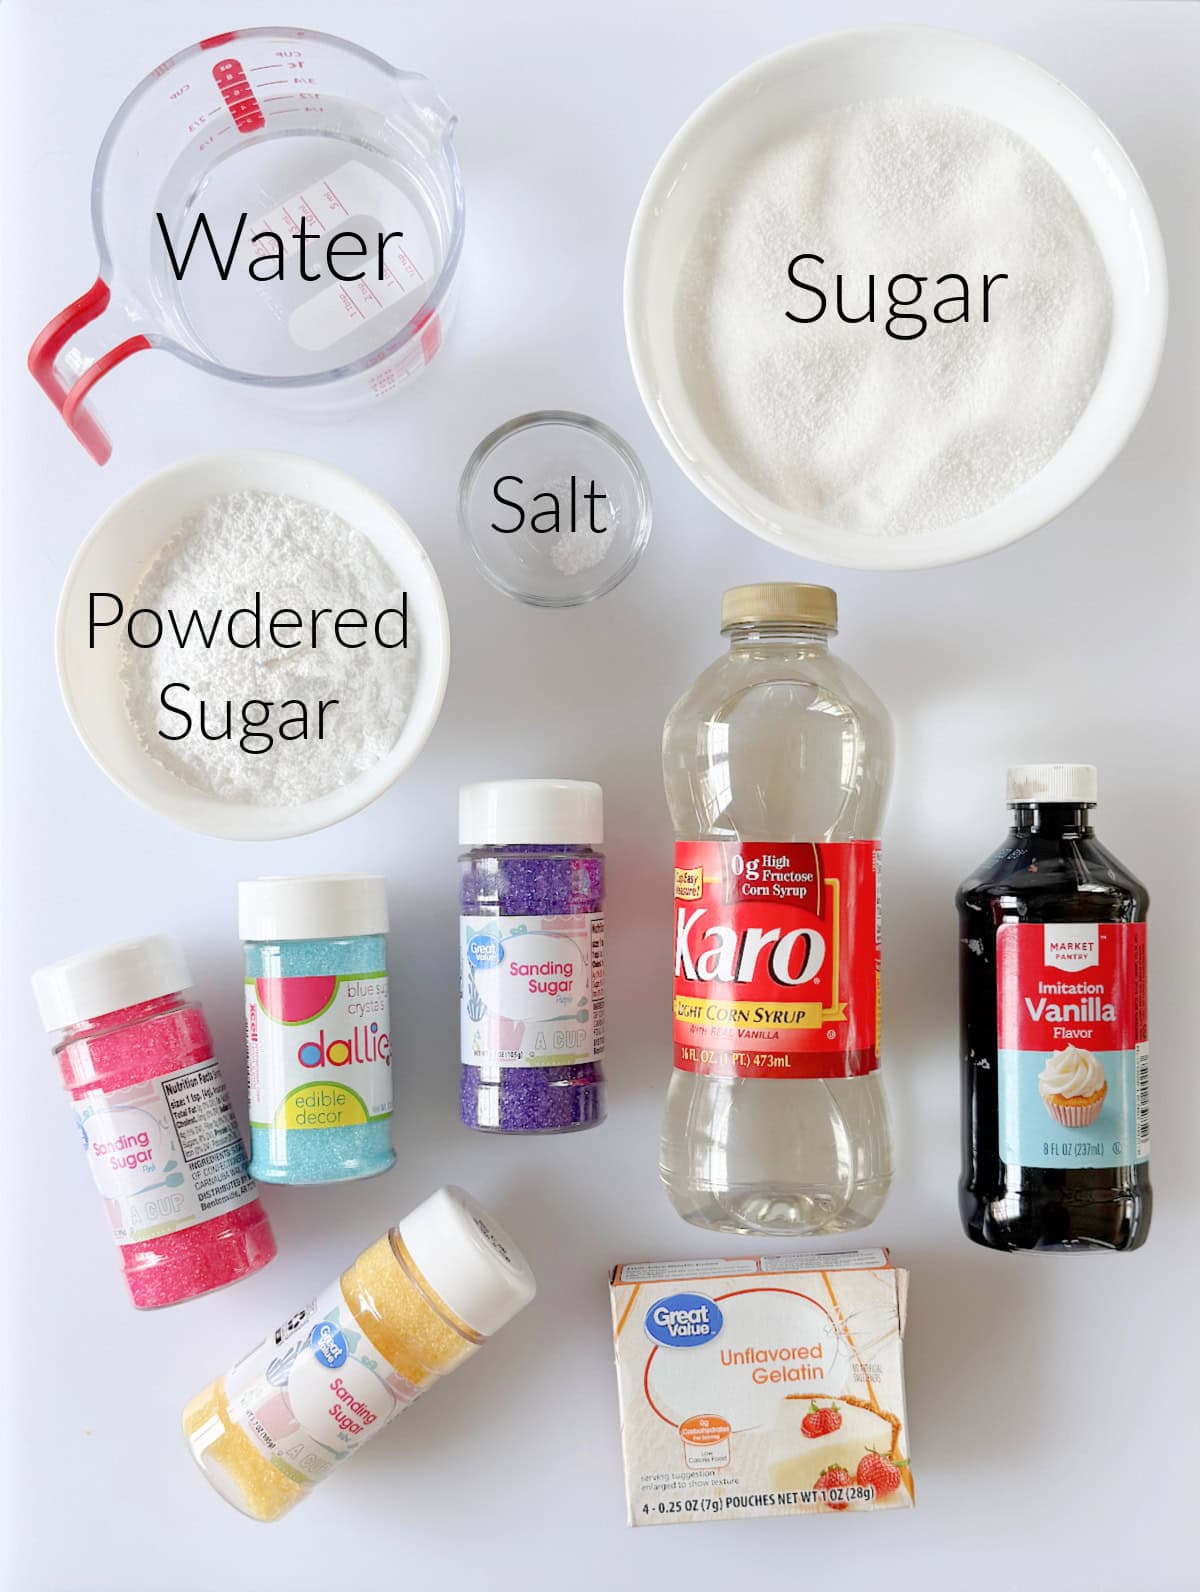
- Unflavored gelatin: This is what gives the marshmallows their bouncy, fluffy texture.
- Water: You'll need ice water and cold water
- Sugar: White granulated sugar for sweetness and structure.
- Salt: for flavor.
- Corn syrup: Prevents sugar crystallization, giving the marshmallows a smooth, not grainy texture.
- Vanilla extract: for flavor.
- Powdered sugar: Optional, but you can use a small amount on your fingers to keep them from sticking to the marshmallow chicks as you roll them in sugar. A light dusting of powdered sugar is also used in the 9x13 pan for bunny marshmallows.
- Sanding sugar: In a variety of colors to coat the outside of the marshmallows.
- Cocoa powder and water: Mix these together to create an edible paint for the eyes.
See the recipe card for full information on ingredients and quantities.
How To Make Peeps Marshmallows
Step 1: Mix 3 packets of unflavored gelatin with ice water. Set that aside.
Step 2: Heat sugar, water, salt, and corn syrup until boiling. Reduce the heat to medium and let the mixture simmer until it reaches 243-245 degrees. Depending on your stove, pan, etc., this could take approximately 8-10 minutes. Just keep an eye on the mixture and stir occasionally.
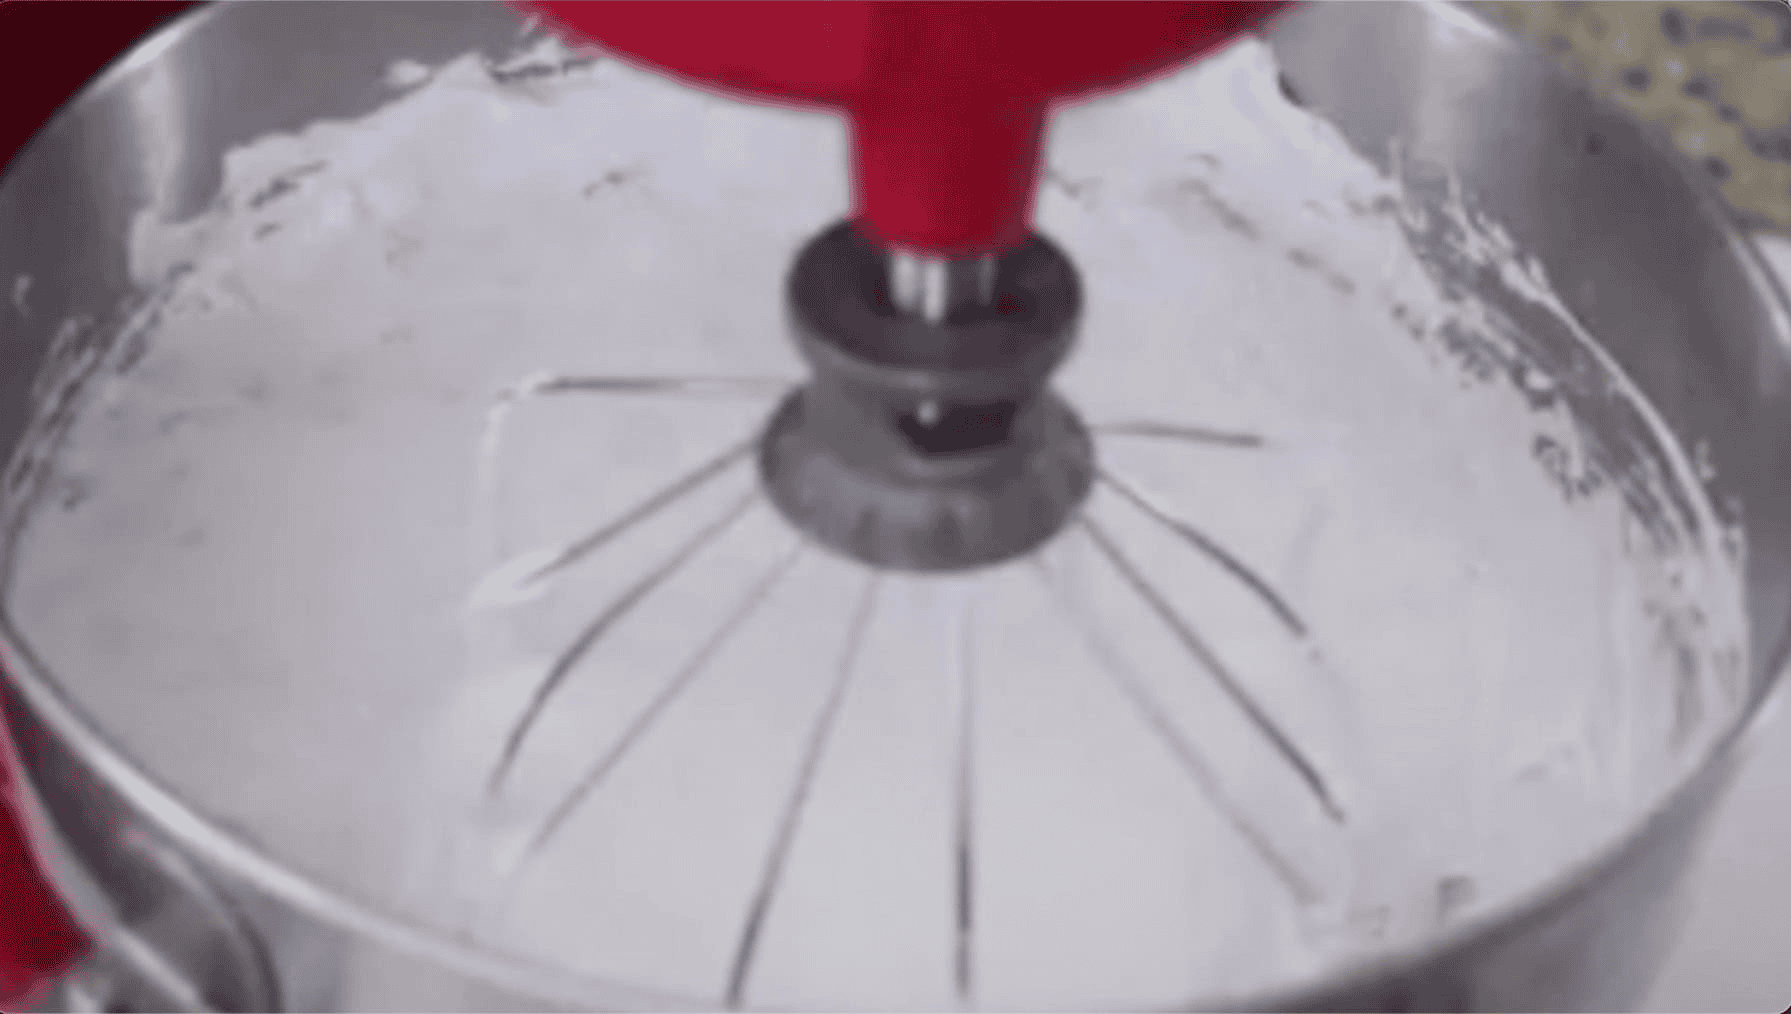
Step 3: Add the gelatin mixture (which will look like a gelatinous blob) and the hot syrup mixture to the bowl of a stand mixer. Be careful not to splash as you pour the hot mixture into the stand mixer bowl.
Step 4: Beat on med-high speed for 13 minutes. Add vanilla and beat another minute.
The next few steps depend on the shape you plan to make. Follow the directions accordingly.
Chick Marshmallows
Step 1: Cover a plate with a thin layer of sanding sugar.
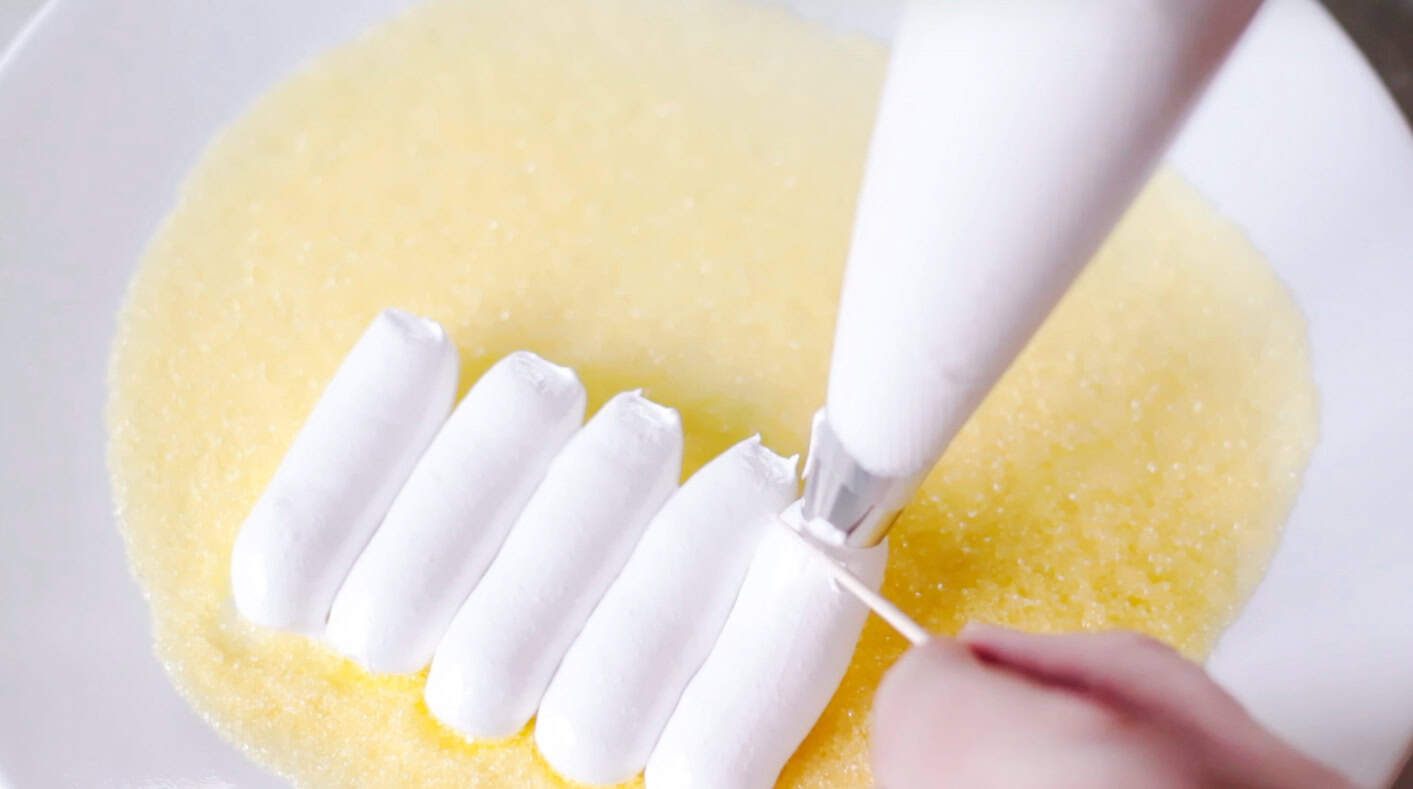
Step 2: Spoon the marshmallow mixture into a piping bag fitted with a 1A tip (or cut the tip off the bag). Pipe sections for the chick's body.
Tip: If necessary, use a toothpick to help break the stream of marshmallow as you pipe.
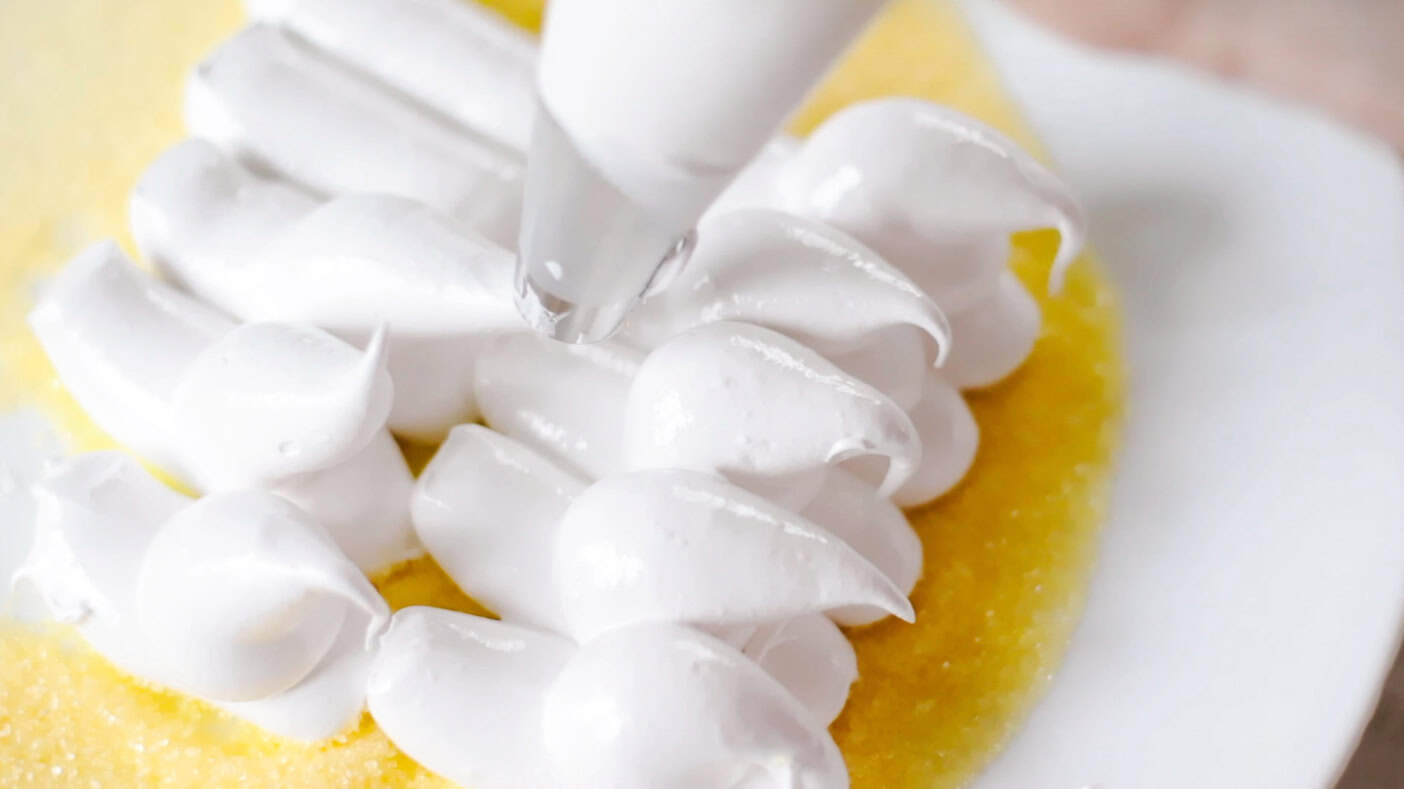
Step 3: Pipe in the opposite direction, starting in the middle of each chick's body and pulling towards you to create a head.
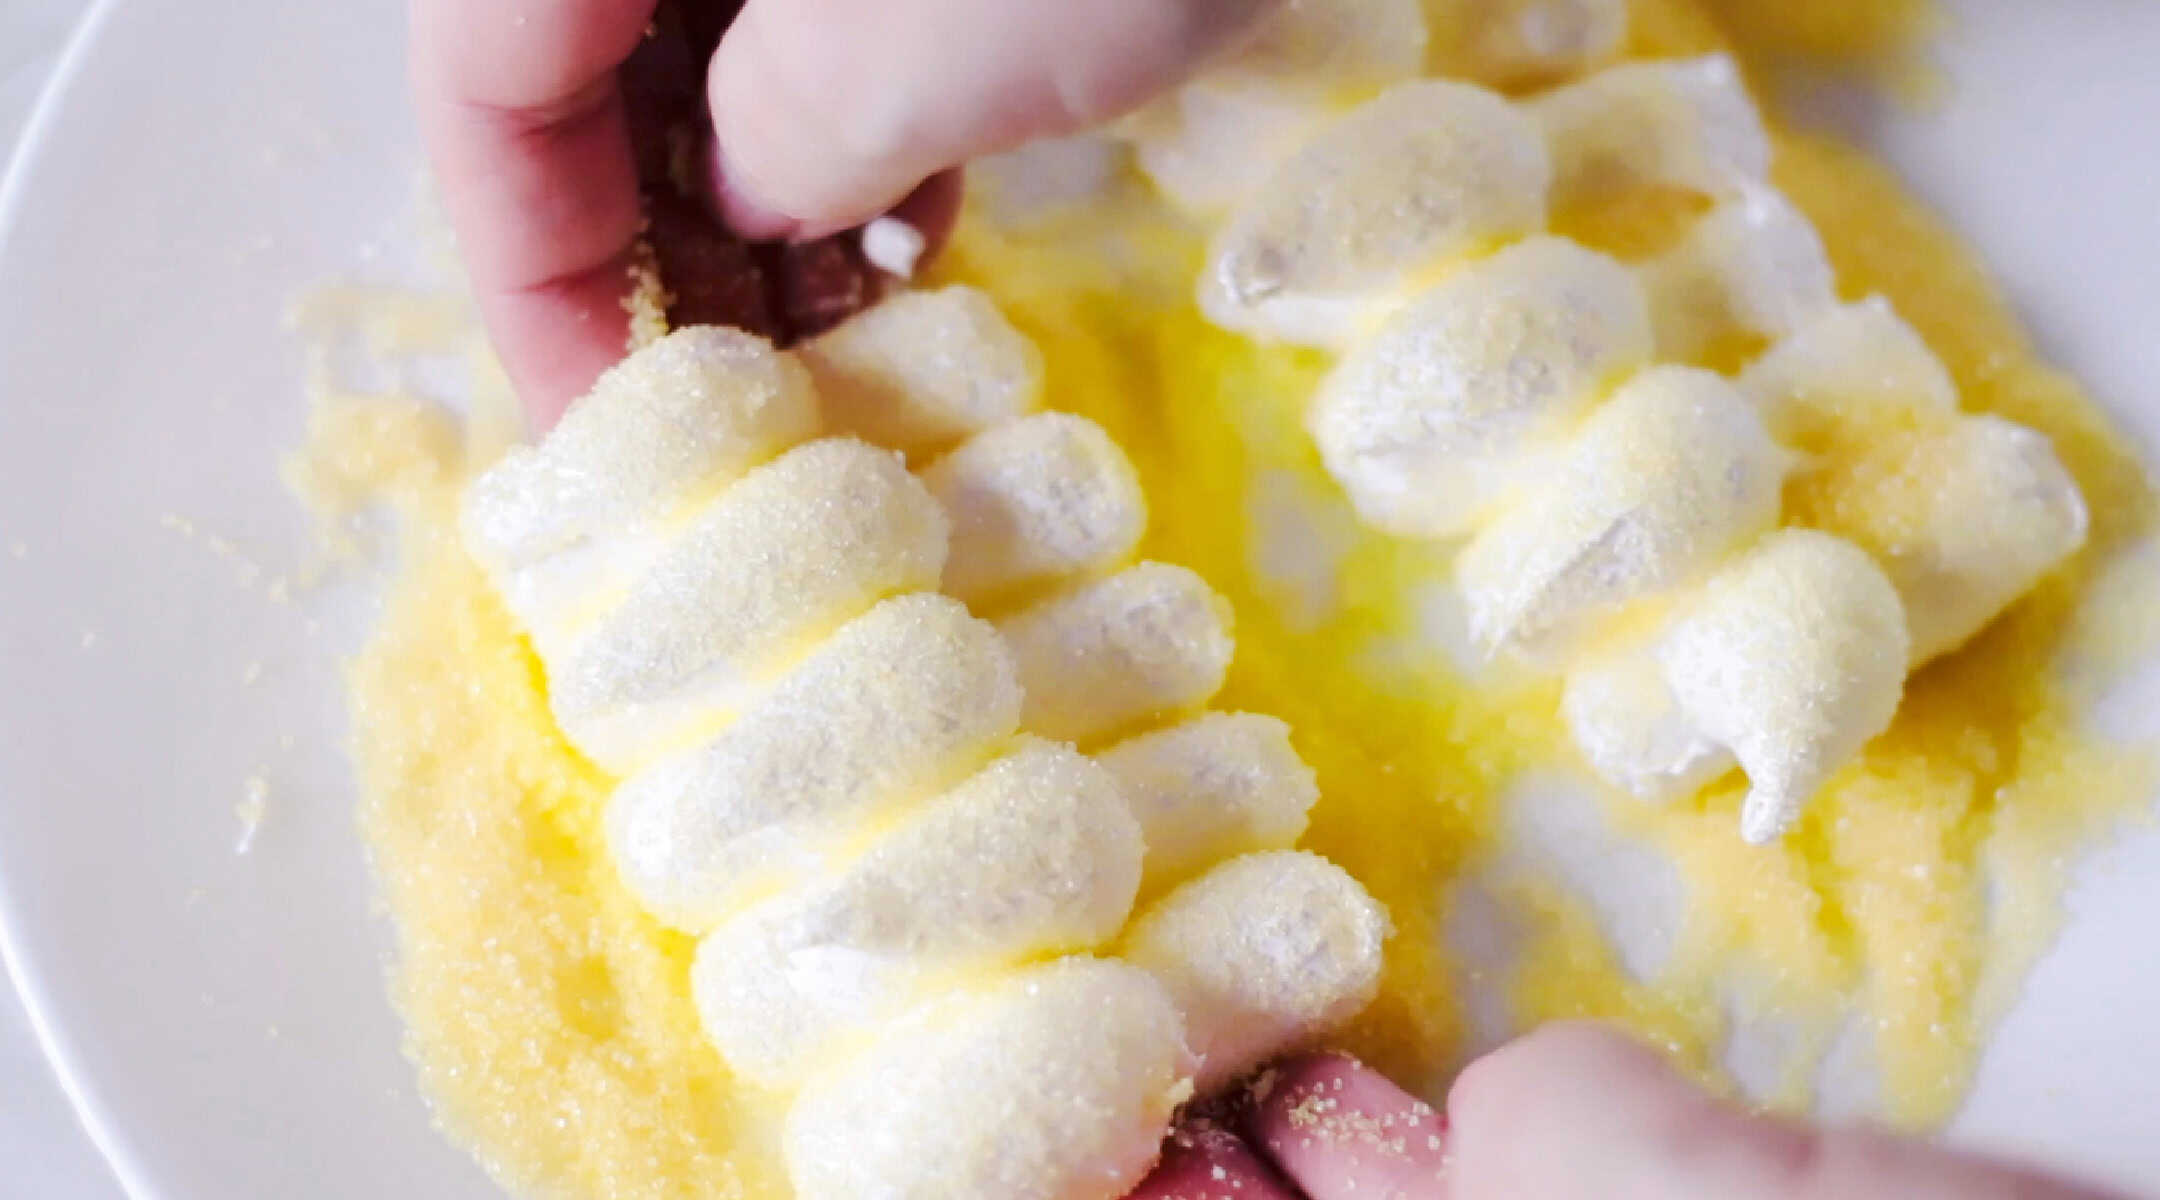
Step 4: Pour sanding sugar over the tops and sides of the rows of chicks, then pick them up and coat them really well in sugar. Repeat these steps for the remaining marshmallow mixture, shaping and then coating in sugar.
Tip: You have about 10 minutes before the marshmallow mixture will start to set up in the bag, so work quickly to prevent it from setting up in the piping bag.
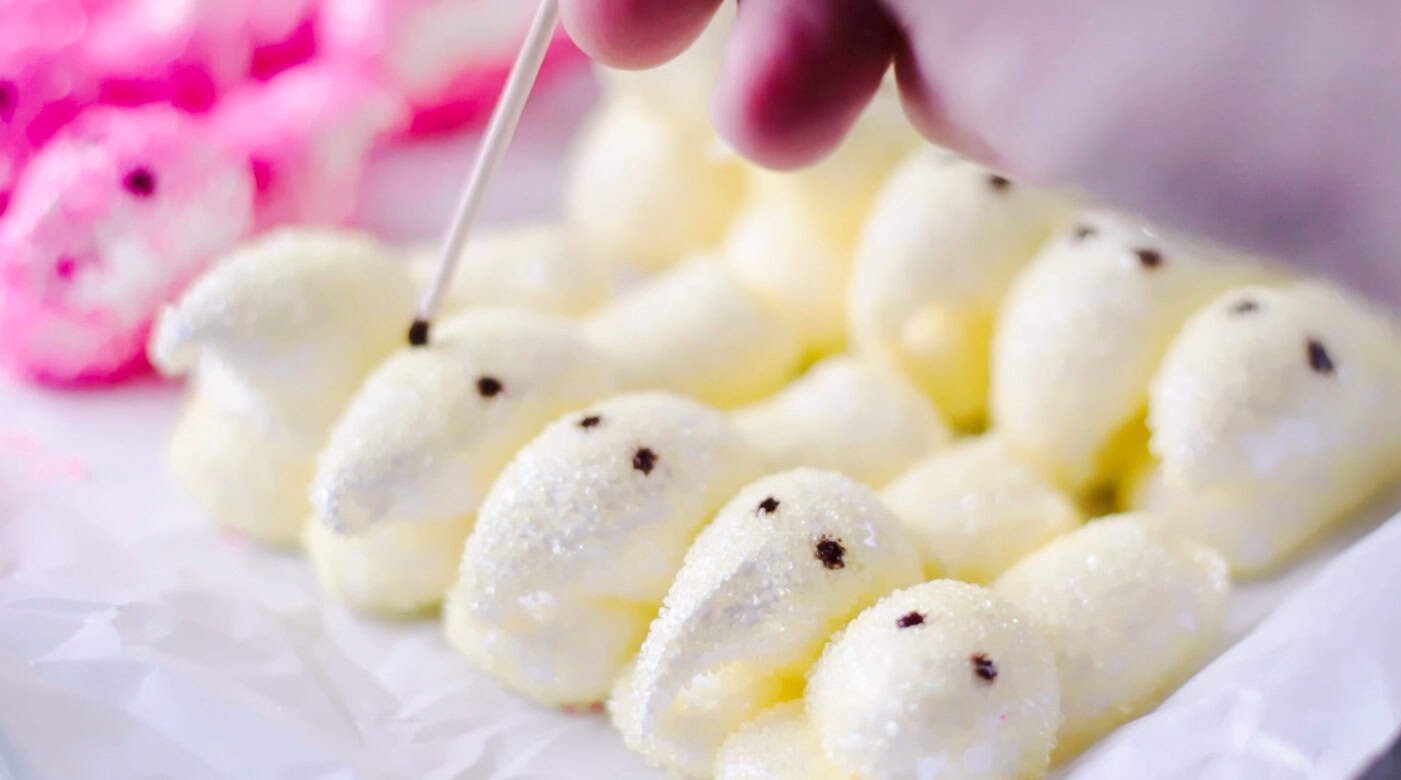
Step 5: Mix ¼ teaspoon of water with ¼ teaspoon of cocoa powder. Dip a toothpick into the mixture and dot the marshmallows to create eyes. If you want a thicker mixture, add an extra ⅛ teaspoon of cocoa powder.
Allow the chicks to sit for a few hours, then transfer them to an airtight container for storage. One batch of homemade marshmallow mixture will make 50-60 2" chicks.
Bunny Marshmallows
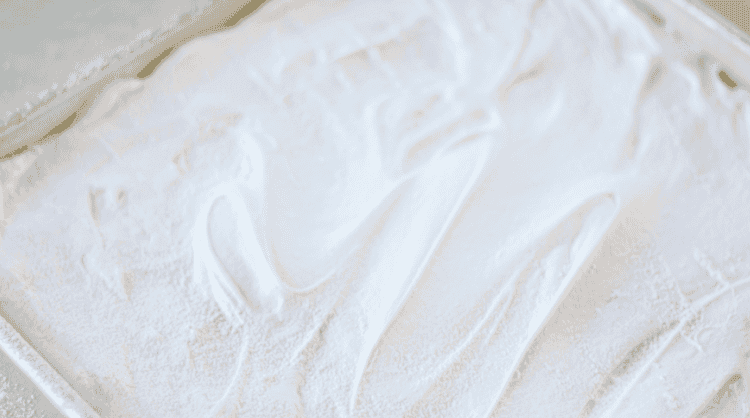
Step 1: Spray a 9x13 baking dish or pan with nonstick spray. Dust the pan LIGHTLY with a small amount of powdered sugar. Spoon the marshmallow mixture into the pan. Spray a spatula with nonstick spray, then smooth the mixture until evenly distributed.
Step 2: Allow the pan to sit, uncovered, for 30 minutes, then cover with plastic wrap and let sit for 3-4 hours.
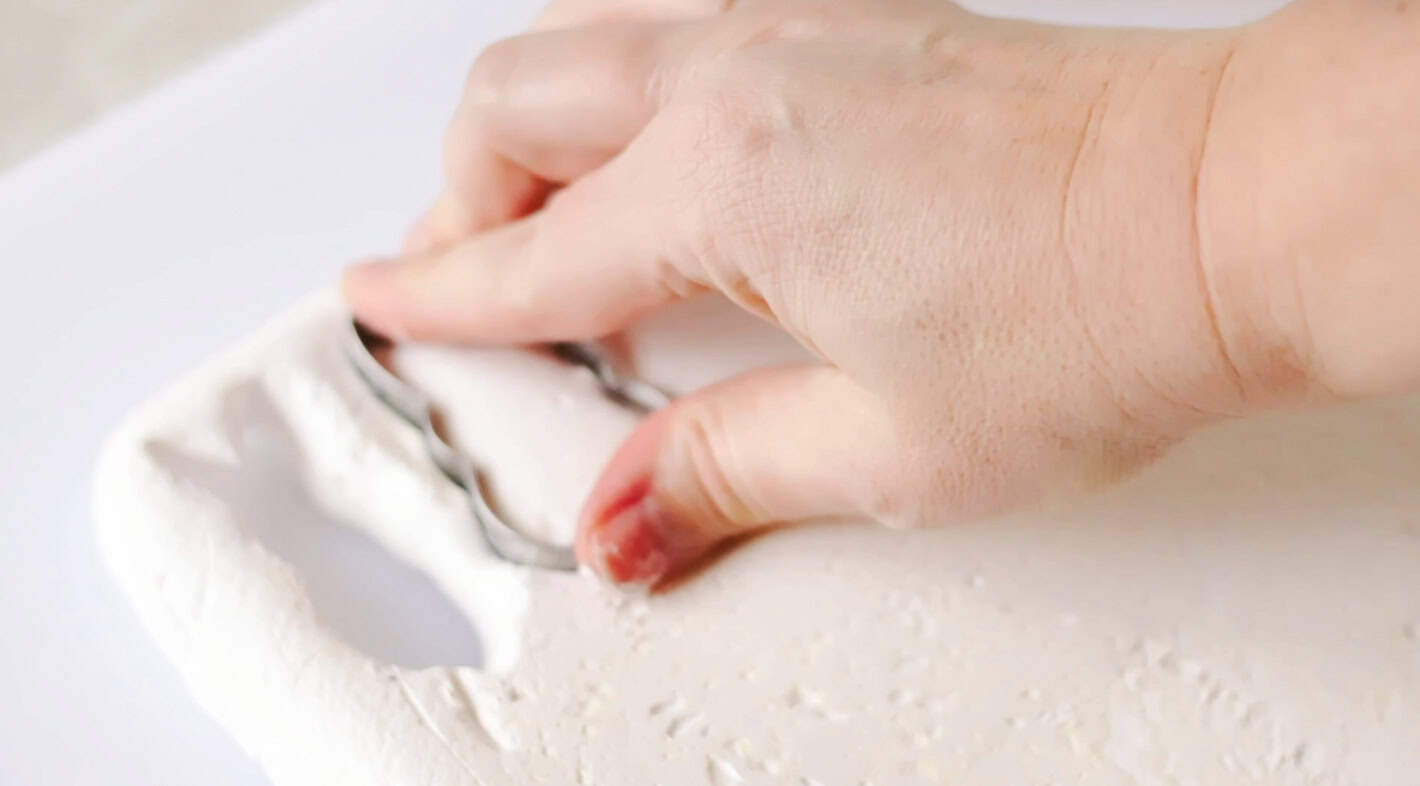
Step 3: Transfer marshmallow mixture from the pan to your work surface. Use a cookie cutter to cut bunny shapes.
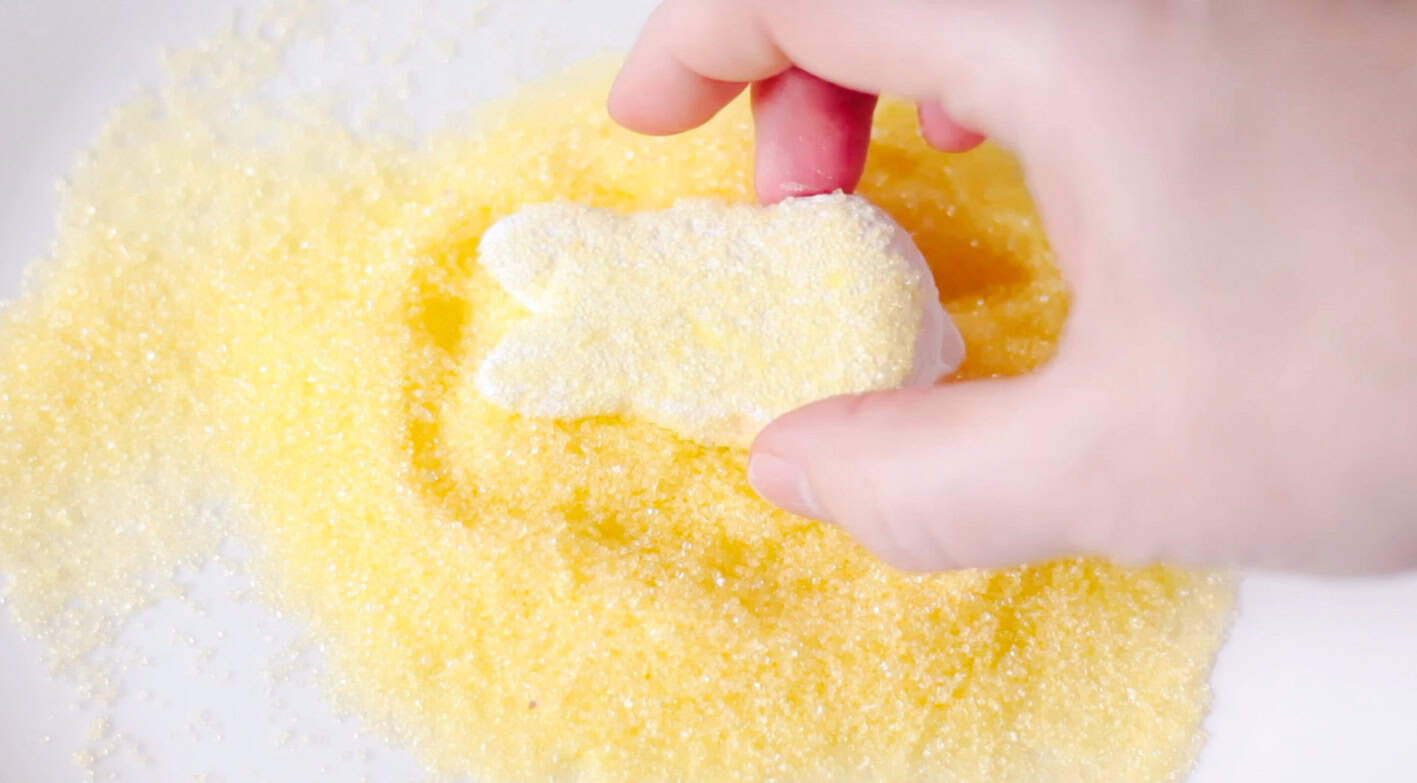
Step 4: Cover a plate with a thin layer of sanding sugar. Coat all sides of the marshmallow in sanding sugar. Place coated marshmallows onto a piece of parchment paper.

Step 5: Mix ¼ teaspoon of water with ¼ teaspoon of cocoa powder. Dip a toothpick into the mixture and dot the marshmallows to create eyes. If you want a thicker mixture, add an extra ⅛ teaspoon of cocoa powder.
Allow the chicks to sit for a few hours, then transfer them to an airtight container for storage. One batch of homemade marshmallow mixture will make 20-24 2" bunnies, with leftover pieces to cut up and use in slow cooker hot chocolate.
Homemade Peeps FAQs
A candy thermometer is an absolute must. You need to let the mixture simmer until it reaches 245 degrees. That’s easy to do with the help of a thermometer. One that clips onto your pan makes it even easier, but you can use one that you hold, like I did.
I kept my marshmallows white and coated them with colored sugar. If you'd like to color the marshmallow mixture, add a few drops of food coloring to tint your marshmallows before the mixing process ends.
The chicks are piped into shapes. The marshmallow mixture will begin to set up, so it's important to work quickly and pipe them into shape. The bunnies are spread into a pan and left to set for a couple of hours, then cut into shapes with a bunny cookie cutter.
or soft and chewy marshmallows, store them in an airtight container after they have completely set. For marshmallows with a dry exterior, allow finished marshmallows to sit overnight, then store in an airtight container.
If you enjoyed this recipe, don't miss my growing collection of Copycat Recipes! From famous restaurant dishes and luxury hotel cookies to bakery favorites and nostalgic grocery store treats, there's something for everyone.
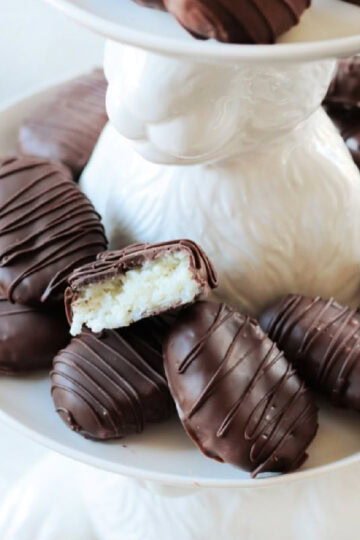
More Easter Treats To Make
MADE THIS RECIPE AND LOVED IT? 💛 Please leave a STAR rating and COMMENT below! Post it to Facebook or Pinterest to easily share with friends!
Homemade Peeps Marshmallows
Equipment
- stand mixer
- candy thermometer
Ingredients
- 3 packets unflavored gelatin
- ½ cup ice water
- 1 ½ cups sugar
- ¼ teaspoon salt
- 1 cup light corn syrup
- ½ cup water
- 2 teaspoons vanilla
- colored sanding sugar
- ¼ teaspoon cocoa powder
- ¼ teaspoon water
- powdered sugar to sprinkle on pan
Instructions
- Mix 3 packets of unflavored gelatin with ice water in a small bowl. Set that aside.
- Heat sugar, water, salt, and corn syrup until it comes to a boil. Reduce the heat to medium and let the mixture simmer until it reaches 243-245 degrees. Depending on your stove, pan, etc., this could take 8-10 minutes. Just keep an eye on the mixture and stir occasionally.
- Scoop the gelatin mixture in the bowl of a stand mixer. Carefully pour the hot syrup mixture into the bowl (it will be HOT).
- Beat on med-high speed for 13 minutes.
- Add vanilla and beat another minute. It should be lukewarm at this point.
Chick Shapes
- Cover a plate with a thin layer of sanding sugar.
- Spoon the marshmallow mixture into a large disposable piping bag fitted with a 1A tip (or cut the tip off the bag). Pipe sections for the chick's body. Tip: If necessary, use a toothpick to help break the stream of marshmallow as you pipe.
- Pipe in the opposite direction, starting in the middle of each chick's body and pulling towards you to create a head.
- Pour sanding sugar over the tops and sides of the rows of chicks, then gently pick them up and coat them really well in sugar. Make sure the sides of the marshmallows are coated in sanding sugar before you pick them up, or the marshmallow mixture will stick to your fingers.Repeat these steps for the remaining marshmallow mixture, shaping and then coating in sugar. Tip: As the mixture cools, it will begin to thicken in the pastry bag. Work quickly to shape the chicks. It's best to have everything set up and ready to go (plates with colored sprinkles) when the marshmallow mixture is ready to pipe.
- Mix ¼ teaspoon of water with ¼ teaspoon of cocoa powder. Dip a toothpick into the mixture and dot the marshmallows to create eyes. If you want a thicker mixture, add an extra ⅛ teaspoon of cocoa powder.
- Let the chick marshmallows stand for a couple of hours to set up completely.
Bunny Shapes
- Grease a 9×13 baking dish (metal or glass). Sprinkle lightly with powdered sugar.
- Spoon marshmallow mixture into the prepared pan. Spray a rubber spatula with nonstick spray (the marshmallow mixture is super STICKY!) and smooth the mixture until it is evenly distributed. It may not be perfectly smooth and that’s fine.
- Let the pan sit at room temperature for 30 minutes to cool, then cover the pan with plastic wrap and let it stand for 3-4 hours.
- Transfer the marshmallow mixture from the pan to your work surface. Use a cookie cutter to cut bunny shapes.
- Coat a plate with a light layer of sanding sugar. Roll marshmallows in sugar, coating all sides. Place marshmallows on parchment paper.
- Mix ¼ teaspoon of water with ¼ teaspoon of cocoa powder. Dip a toothpick into the mixture and dot the marshmallows to create eyes. If you want a thicker mixture, add an extra ⅛ teaspoon of cocoa powder.

MAS says
Quick question, we all are vegetarian may I replace agar agar one for one substitution? If not, any suggestions?
Thank you!
Brandy says
Hi! I’m not sure what that ingredient is, I’m sorry!
Brandy says
These were a big hit with my kids!