Gluesticks Blog

menu icon
go to homepage
  • Recipes
  • DIY
  • About Me
  • Subscribe
    • Facebook
    • Instagram
    • Pinterest
  • subscribe
    search icon
    Homepage link
    • Recipes
    • DIY
    • About Me
    • Subscribe
    • Facebook
    • Instagram
    • Pinterest
  • ×
    Home » Holidays » Gift Ideas

    DIY Window Bags

    June 3, 2014 By Brandy 28 Comments

    These DIY Window Bags are so easy to make. They turn a basic white lunch bag into a darling gift bag in just a few minutes! You can use a template, trace the shape on your bag, and cut out your shape with scissors, but today I am going to show you how I used my Evolution machine to make mine. Either way works just fine!

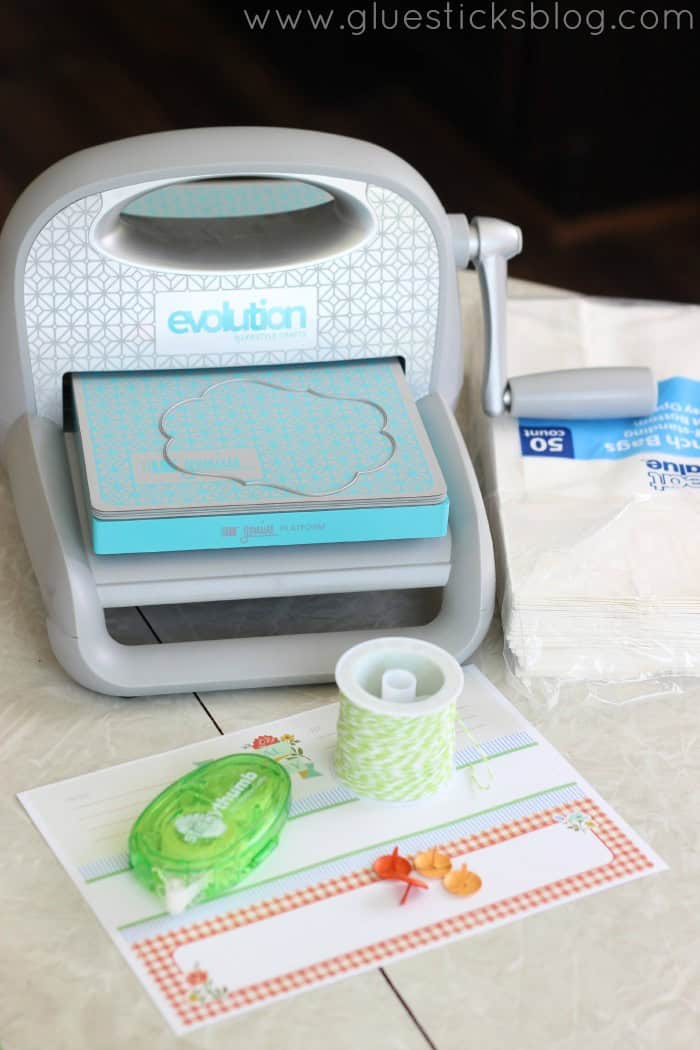
    Supplies Needed for Bag:

    Paper Bags

    Evolution Machine

    Nesting Dies

    Sticky Thumb or packing tape

    Clear Cuttable Sheets or Celophane

    Supplies Needed for Closure and Embellishments:

    Brads

    Bakers Twine

    Envelope Wraps, labels or any other embellishments

    Place your die (cutting side up) inside your bag.

    Run through your evolution machine.

    Remove insert. You now have a window!

    To make these without an evolution machine, trace your shape onto the front of your bag. Gently poke a hole in the center of the traced shape and cut out with scissors.

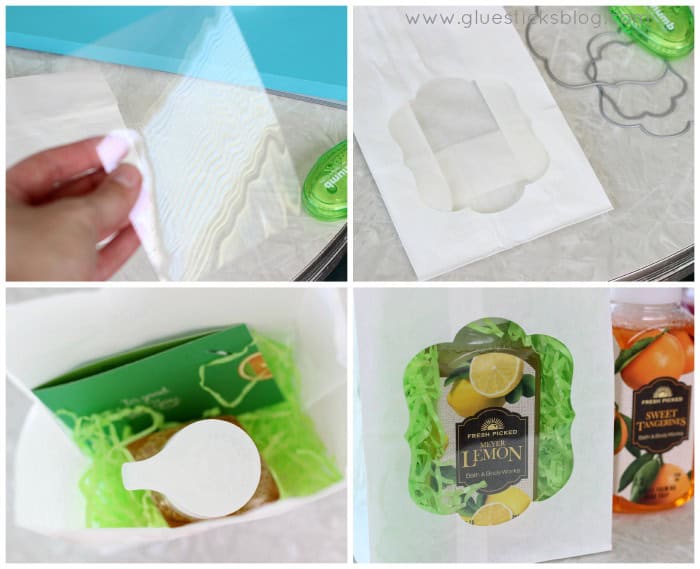
    Use a piece of cellophane or clear plastic big enough to cover your opening. Secure it to the inside of your bag, covering the opening, using sticky thumb or a few pieces of packing tape.

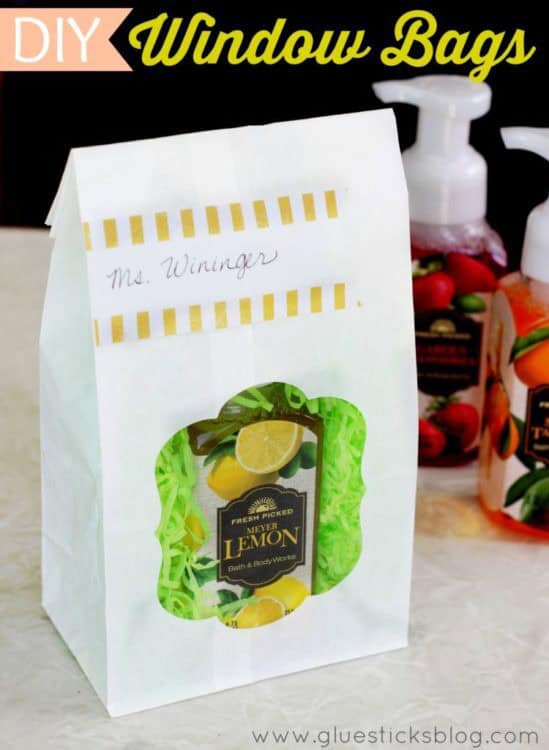
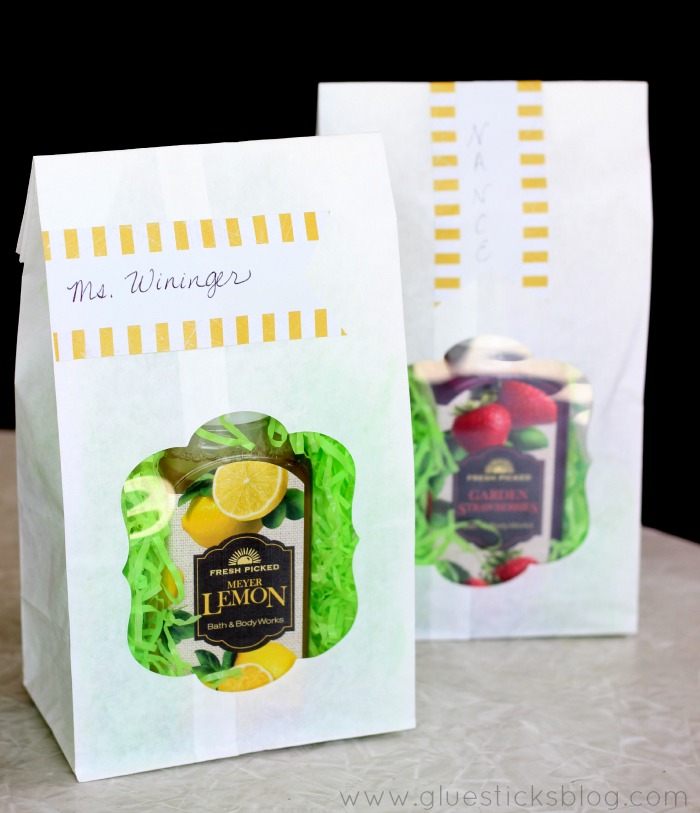
    Fill your bag with treats or a gift. I used these for teacher's gifts. A Jamba Juice gift card and a Fresh Picked bottle of hand soap (in my favorite Bath and Body Works scents).

    You can stop there, but I added a fun closure and embellishments to my bag.

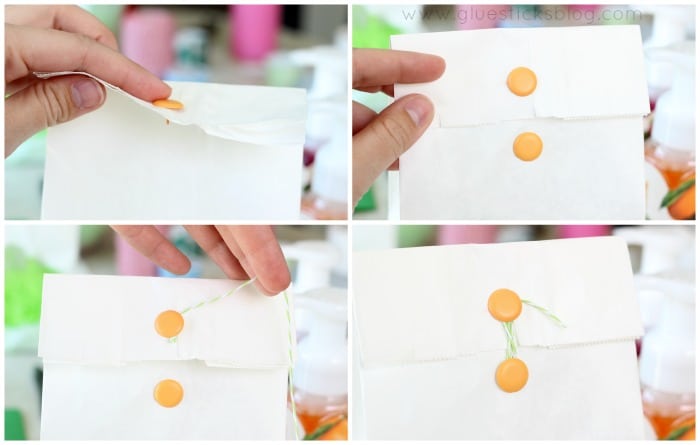
    To make a crazy 8 closure, fold the top of your bag down 1".

    Poke one brad the center of the 1" flap. Open the brad to flatten.  Place the second brad just below (about an inch) and open to flatten.

    Cut a small length (5") of bakers twine. Tie a knot at one end. Slip the twine under the top brad and loop in a crazy 8 fashion around the second brad and back to the first. Repeat a few times to close off bag. Trim excess twine.

    Add a label or any other embellishments you'd like! I love these envelope wraps and like using them for labels on bags too.

    Share
    Pin

    More Craft Projects

    • basket of pillow treats
      YW Camp Pillow Treat Tags (Free Printables!)
    • two summer camp printable tags with drink packets
      Summer Camp Flavored Water Printable Tags
    • printable chapstick gift cards with chapstick
      "Don't Worry Be Chappy" Chapstick Printable Tags
    • Journaling Handout (Easy Gift Idea)

    About Brandy

    Welcome! I'm Brandy, mother to 5 darling kiddos and a cute black lab named Toby. My husband is in the Coast Guard so we've lived all over the place, turning each house into a home. I love baking, sewing, making cute things with my kids, and sharing what I've learned with all of you!

    Comments

    1. barbara n says

      June 10, 2014 at 4:20 am

      These would make great treat bags for end of school year teacher gifts!!!

      Reply
    2. Jen says

      June 09, 2014 at 5:56 pm

      Would love to try making the bags and also use the supplies for card making

      Reply
    3. Mauri says

      June 08, 2014 at 10:06 pm

      We R products are some of my favorites! I would use those for scrap pages, cards and crafts for sure! Getting my boys involved in crafty things and letter-writing lately, so might use for some of those projects too.

      Reply
    4. MichelleC says

      June 08, 2014 at 5:05 pm

      they would be given as a treat to my craftoholoc friend!

      Reply
    5. laurieire says

      June 08, 2014 at 8:08 am

      Those bags are a great idea for end of the year teacher/bus driver gifts. As for the craft supplies, I think I'd use them with my rubber stamps for cards or maybe do some frames with the kids. Thanks for all the great ideas!

      Reply
    6. Tammie says

      June 06, 2014 at 9:23 pm

      I love doing crafts but most of all i love watching my kids do them so it would be for whatever they want to be creative and use it for

      Reply
    7. Stephanie says

      June 05, 2014 at 7:49 pm

      I would probably make some scrap book pages.

      Reply
    8. Jennifer says

      June 05, 2014 at 10:32 am

      I will be sharing with my daughter to create cards for her friends over summer break.

      Reply
    9. Katharine Swanson-Devinney says

      June 05, 2014 at 12:02 am

      I'd use the brads to make folders for different organizing folder/notebooks. I'd use the floss to make banners and I'd start working on more scrapbook pages.

      Reply
    10. Melanie says

      June 04, 2014 at 7:10 pm

      I need to catch up on my sons scrapbooks

      Reply
    11. Aubree says

      June 04, 2014 at 6:36 pm

      I want to make these bags for my baby shower in a few months. This is the cutest idea. I am obsessed with your blog! My husband works during the summer doing door to door sales, so I sit at home all day. I am going to start doing some of these fun crafts and recipes with my little one to keep me busy and sane all summer!

      Reply
      • Brandy says

        June 04, 2014 at 8:43 pm

        Thank you Aubree, I'm so glad that you are enjoying the site and even more thrilled that you are crafting and getting creative too! 🙂

        Reply
    12. Natalie W says

      June 04, 2014 at 11:54 am

      I am brand new to crafting... My life flipped upside down and I am discovering my hobbies for the first time 🙂
      I would use these to make gifts for all my family and friends who have been so supportive over the last year!

      Reply
    13. Mary L says

      June 04, 2014 at 10:45 am

      I don't know what I'd use them for yet. I'd search pinterest to see some good ideas. First thing that comes to my mind is cards, but I want to see what other ideas are out there. Thanks!!

      Reply
    14. Rebecca Ball says

      June 04, 2014 at 8:55 am

      I would use thus prize pacakge to embellish homemade greeting cards!! Just got my new desk set up - and am having a lot of fun!!

      Reply
      • Brandy says

        June 04, 2014 at 8:43 pm

        Ooo, a new crafty space! How fun!

        Reply
    15. Rebecca Ball says

      June 04, 2014 at 8:53 am

      I don't necessarily have a favorite brand - but I tend you steer towards the brads and ribbons for embellishments! They add just the right touch of finish to an otherwise "simple" card. :o)

      Reply
    16. tara leigh kimble says

      June 04, 2014 at 7:45 am

      Making greeting cards!

      Reply
    17. Stephanie says

      June 04, 2014 at 7:34 am

      I want to make those window bags!

      Reply
    18. Shannon Thomas says

      June 04, 2014 at 7:32 am

      I need to embellish more!!!!

      Reply
    19. Courtney A says

      June 04, 2014 at 6:16 am

      These look like so much fun. I'd use the goodies for a memory book to celebrate my daughters preschool years, now that shes on to kinder. Thanks.

      Reply
    20. Brenda says

      June 04, 2014 at 6:00 am

      These are way cute Brandy and I bet the teacher's loved them!

      Reply
    21. califncsun says

      June 04, 2014 at 5:10 am

      Making greeting cards! And I would love to try making the window bags.
      TYFS

      Reply
    22. Lydia says

      June 04, 2014 at 4:51 am

      Making those window bags. 🙂

      Reply
    23. Christina Bowyer says

      June 04, 2014 at 3:20 am

      Making wedding invitations and favors for my sister.

      Reply
    24. Rachael Shirley says

      June 04, 2014 at 3:16 am

      Endless possibilities. Would love to try products and share results.

      Reply
    25. poorva bhatia says

      June 04, 2014 at 3:15 am

      I am a craftholic, if that's even a word. I will try to make some DIYs I have learnt from your blog with my community craftholics group.

      Reply
    26. Katrina Paul says

      June 04, 2014 at 12:40 am

      Making Cards with my son!

      Reply

    Leave a Reply Cancel reply

    Your email address will not be published. Required fields are marked *

    Recipe Rating


    This site uses Akismet to reduce spam. Learn how your comment data is processed.

    Welcome!

    I'm Brandy! I love to create and share my ideas through easy-to-follow recipes and tutorials.

    More about me

    As an Amazon Associate, I make a small commission on qualifying purchases.

    sew with me kids sewing book
    My Book

    Latest Posts

    • tray of baked cookies on parchment paper
      Martha-Stewart-Fired-Me Cookies
    • frosted and unfrosted sugar cookies
      Old Fashioned Buttermilk Sugar Cookies
    • jar of ranch dressing
      Homemade Ranch Dressing (Better Than Store-Bought!)
    • platter of onion rings
      Crispy Buttermilk Onion Rings

    Seasonal

    • M&M Cookies piled on top of each other
      Soft M&M Cookies (Soft and Thick) + Video
    • red, white and blue shortbread cookies
      Patriotic Shortbread Cookies (Video)
    • star shaped cookie with frosting and fruit
      Red White & Blue Mini Fruit Pizzas (Video)
    • Simple and Inexpensive Patriotic Wreath Tutorial

    Footer

    ↑ Back to Top

    About

    • Privacy Policy
    • Accessibility Policy

    Newsletter

    • Sign Up! for emails and updates

    Contact

    • Contact

    As an Amazon Associate, I earn from qualifying purchases.

    Copyright © 2025 Gluesticks Blog