
Gluesticks Blog

menu icon
go to homepage
  • Summer
  • DIY
  • Recipes
  • About Me
  • Subscribe
    • Facebook
    • Instagram
    • Pinterest
  • subscribe
    search icon
    Homepage link
    • Summer
    • DIY
    • Recipes
    • About Me
    • Subscribe
    • Facebook
    • Instagram
    • Pinterest
  • ×
    Home » Home & Garden » Home Decor Projects

    How To Reupholster a Storage Ottoman: Step by Step

    Modified: Aug 21, 2019 · Published: Aug 24, 2015 by Brandy · This post may contain affiliate links.

    These step by step photos will show you how to reupholster a storage ottoman the quick and easy way! Breathe new life into an old ottoman with new fabric! This two hour project is great for beginners. This post contains affiliate links.
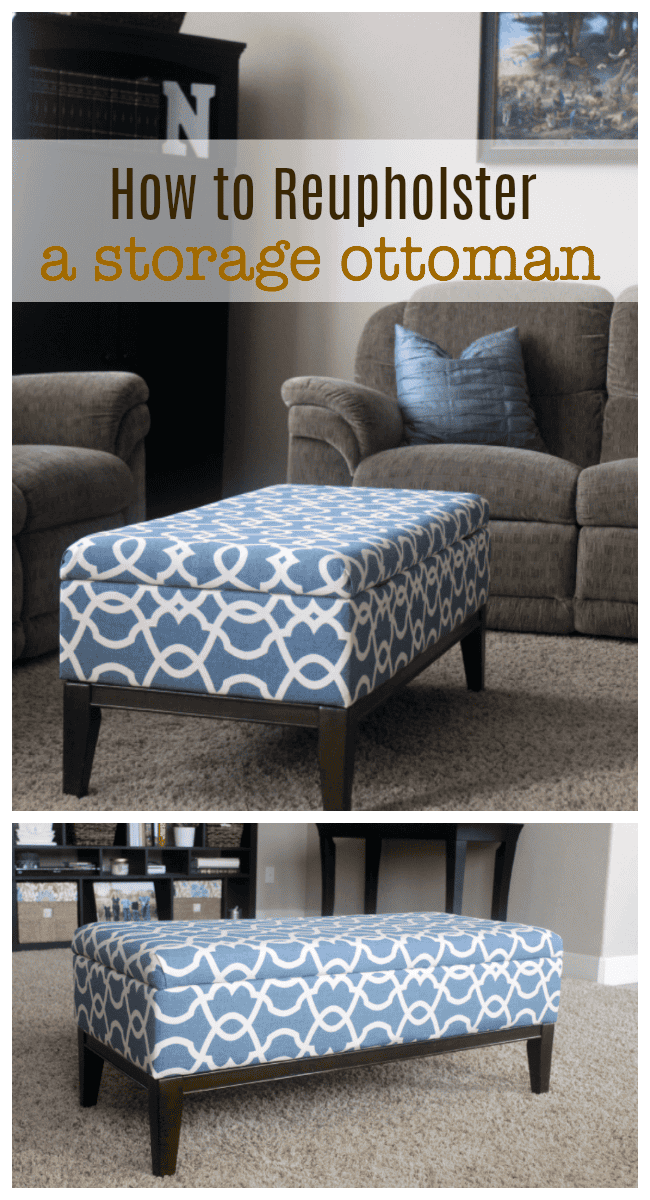
    These step by step photos will show you how to reupholster a storage ottoman the quick and easy way! Breathe new life into an old ottoman with new fabric! This two hour project is great for beginners.

    This is the story of a beautiful ottoman who began its life like this...
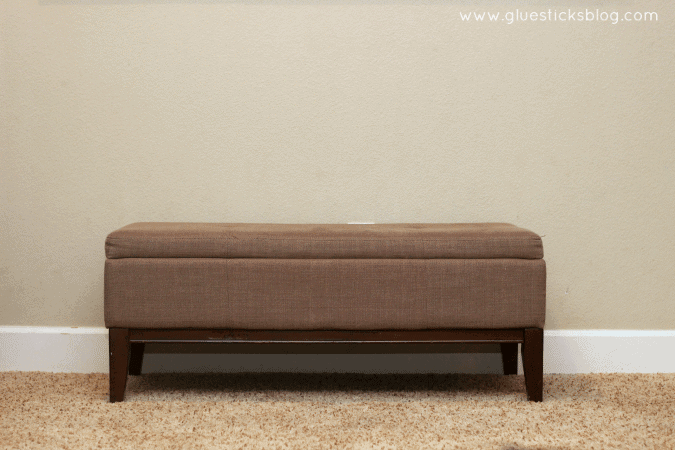
    These step by step photos will show you how to reupholster a storage ottoman the quick and easy way! Breathe new life into an old ottoman with new fabric! This two hour project is great for beginners.

    We've had this ottoman for six years and it's held up amazingly well until the hinges started acting up. The lid would randomly spring open or fall to the side with the slightest touch. That's when I started to think that a brand new ottoman sounded really nice. And curbing this one sounded even nicer. After reupholstering my grandma's chair I vowed I would never tackle anything like that again, but once I started examining how this ottoman was put together I realized that this was going to be a piece of cake compared to that confounded swivel chair!

    And it might even save me some money vs. purchasing a new one. So I'll go ahead and share yet another "How to Reupholster" project with any of you who might be feeling as ambitious as I was!

    How To Reupholster a Storage Ottoman
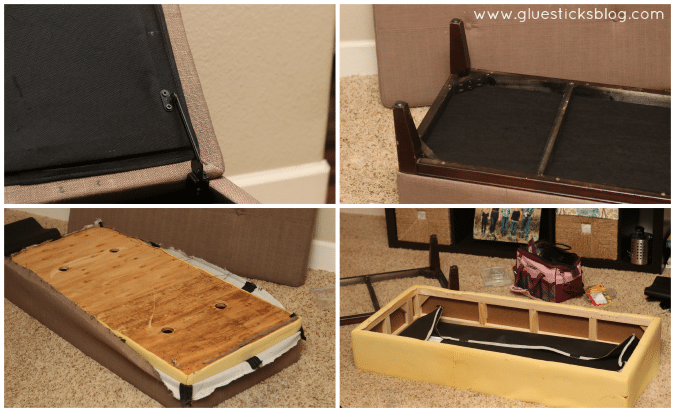
    These step by step photos will show you how to reupholster a storage ottoman the quick and easy way! Breathe new life into an old ottoman with new fabric! This two hour project is great for beginners.

    The first thing to do is examine how it was put together and find a good starting place to strip it down. I began by removing all of the hardware and screws. The lining was in great shape so I saved it. It had all of the holes from the screws which would make it easy to line everything up later! I removed the fabric from the bottom of section of the ottoman by pulling the staples out and also saved the foam since it was in great shape. I decided to not deal with sewing a new cushion for the seat and just reupholstered over the existing fabric.
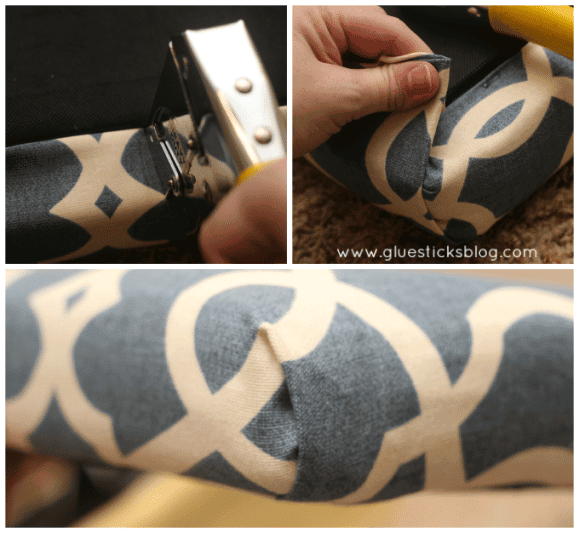
    These step by step photos will show you how to reupholster a storage ottoman the quick and easy way! Breathe new life into an old ottoman with new fabric! This two hour project is great for beginners.

    The seat was super easy. I laid it on top of my fabric and cut around it leaving about 6" on each side to fold over and around to the other side. Then I tucked the corners in to create a finished look. You could definitely sew a nice cover, but this took about 10 minutes to finish. Sewing would have taken much longer.
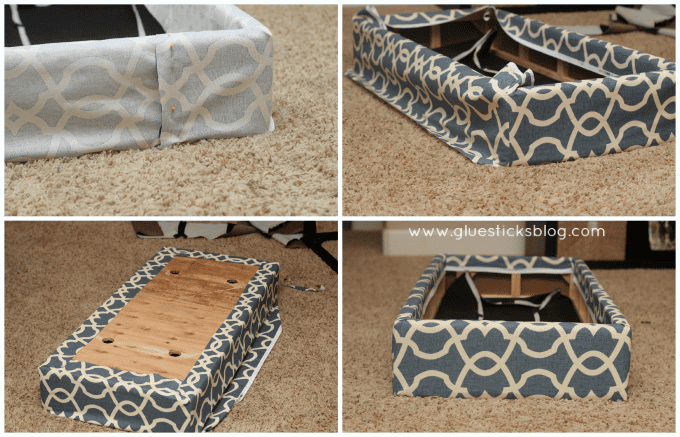
    These step by step photos will show you how to reupholster a storage ottoman the quick and easy way! Breathe new life into an old ottoman with new fabric! This two hour project is great for beginners.

    The bottom only had fabric around the sides. The underside of the ottoman was actually just plywood and lining. So I cut a long strip of fabric (using the old fabric as a pattern piece and adding a few inches on both sides for wiggle room) and wrapped it around the sides of my box (inside out) and pinned it where it met up. (pic 1)

    That was the only thing I sewed for this whole project. Just a quick seam. Then I turned it right side out and slipped it back onto the ottoman. It fit nice and snug, perfect! I lined up my sewing seam with one of the corners  so that you couldn't really see it. (pic 2)

    Then I stapled the fabric to the under side of the ottoman (pic 3) and then flipped it over and finished around the top. (pic 4)
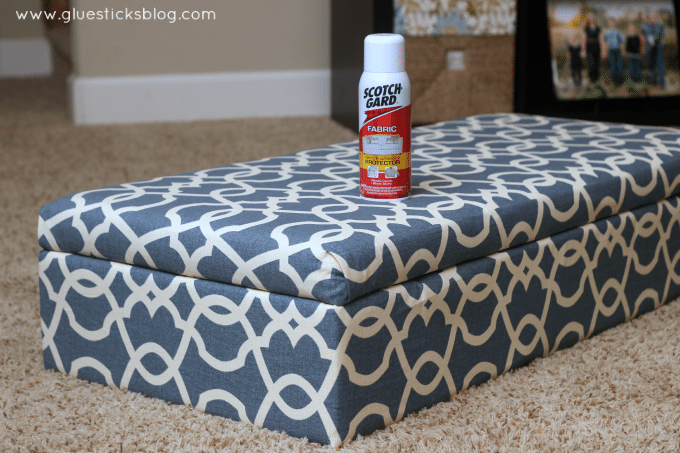
    These step by step photos will show you how to reupholster a storage ottoman the quick and easy way! Breathe new life into an old ottoman with new fabric! This two hour project is great for beginners.

    Before adding the hardware  I took it out to the garage and scotch guarded the heck out of both pieces. With 4 kiddos and a dog, that was a must.
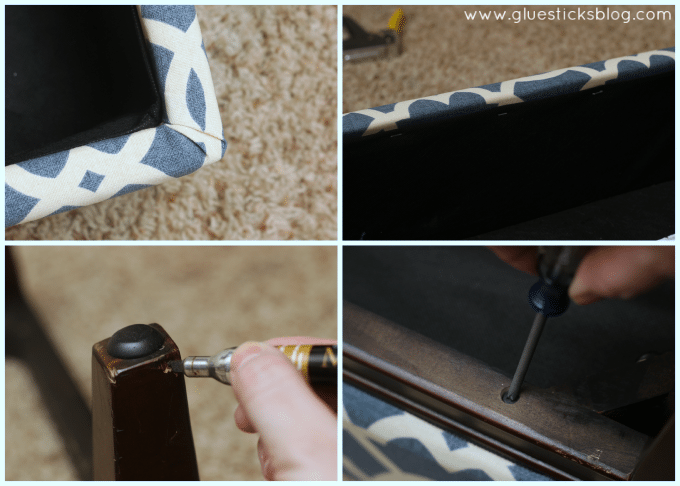
    These step by step photos will show you how to reupholster a storage ottoman the quick and easy way! Breathe new life into an old ottoman with new fabric! This two hour project is great for beginners.

    All that was left to do now was put it back together! I started by stapling the lining back into place. It gave it a nice finished look. Then I attached the hardware and touched up some scratches with a furniture marker.
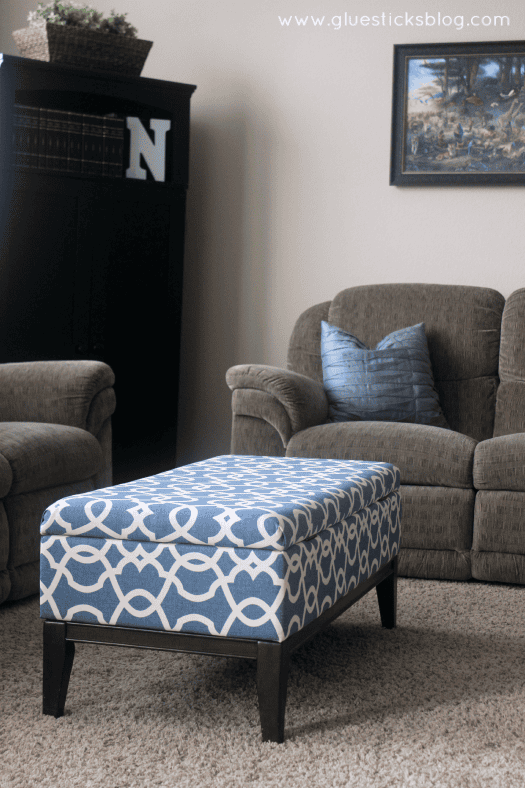
    These step by step photos will show you how to reupholster a storage ottoman the quick and easy way! Breathe new life into an old ottoman with new fabric! This two hour project is great for beginners.

    A 22-hourproject that set me back 1 can of Scotch Guard and $25 in fabric. I added a new screw to the hinge and it works perfectly once again. I am so glad that I decided to breathe some new life into this instead of just buying a new one. Sometimes it doesn't seem like it is worth the time and energy, but this DIY project definitely was.
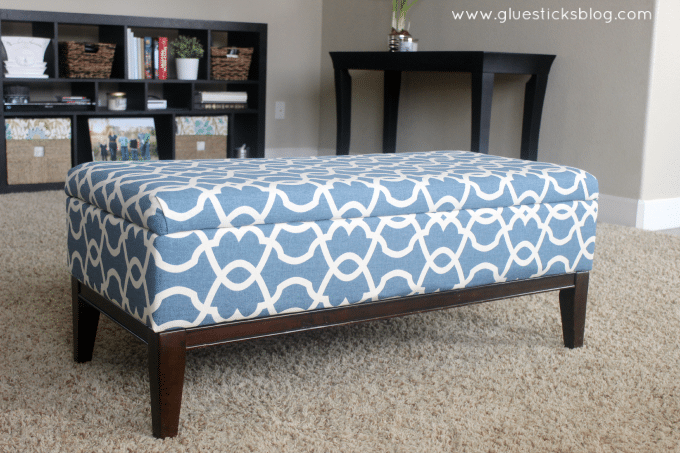
    These step by step photos will show you how to reupholster a storage ottoman the quick and easy way! Breathe new life into an old ottoman with new fabric! This two hour project is great for beginners.

    It adds so much color into our living room. Here is a quick comparison shot...
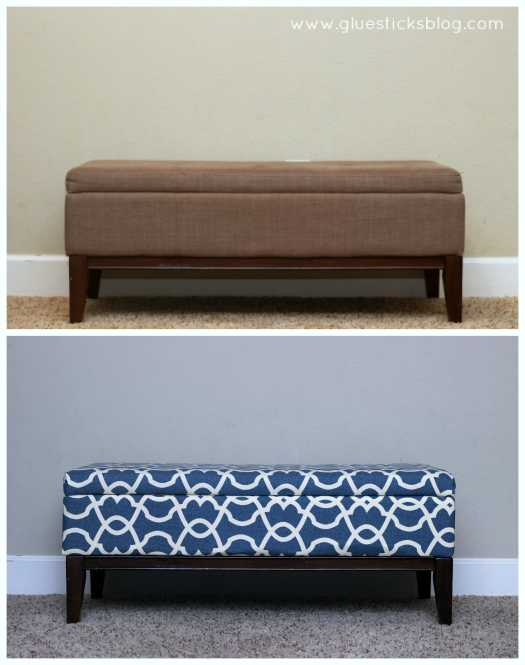
    These step by step photos will show you how to reupholster a storage ottoman the quick and easy way! Breathe new life into an old ottoman with new fabric! This two hour project is great for beginners.

    Ahh, so much better! As you can see, it doesn't take much to learn how to reupholster a basic furniture piece like an ottoman or chair (with the exception of a cushioned swivel chair or recliner, ha!). Just think of all of the possibilities!

    You might also like...

    Ikea Living Room Storage Built Ins
     

    Share
    Pin

    More Craft Projects

    • Two bandana tote bags.
      DIY Bandana Tote Bag Tutorial (Easy Sewing Project)
    • Arms with stacks of bandana bracelets on them.
      Easy DIY Bandana Bracelets
    • Stack of colorful bandana hair bows.
      How To Make Easy Bandana Hair Bows (No-Sew)
    • White candles decorated with wax candle pens.
      How to Decorate Candles with Wax Candle Pens

    About Brandy

    Welcome! I'm Brandy, mother to 5 darling kiddos and a cute black lab named Toby. My husband is in the Coast Guard so we've lived all over the place, turning each house into a home. I love baking, sewing, making cute things with my kids, and sharing what I've learned with all of you!

    Comments

    1. Dan says

      December 11, 2022 at 11:15 am

      I'm a bit late to post here I think, but I am about to try to re-upolster an ottoman (just a top) to use as a dog bed. I have never done any sewing whatsoever, except maybe when I was a child at summer camp. Anyhow, I am hoping to do this without sewing and also I will definitely need new filler.
      Any other tips or warnings before I start would be greatly appreciated
      Thanks,
      -7 years late, Dan

      Reply
    2. Jenna says

      October 05, 2018 at 5:33 pm

      Hey! Thanks for this tutorial! I’m looking to do the same for my ottoman that’s the same size! How many yards of fabric did you have to buy?

      Reply
      • Brandy says

        October 05, 2018 at 8:30 pm

        Hi Jenna! I honestly can't remember! I want to say that I bought 3 yards and had a bit of extra left, but I think I must have checked out as a "guest" on Fabric.com because my order doesn't show up in my account. I'm sorry!

        Reply
    « Older Comments

    Leave a Reply Cancel reply

    Your email address will not be published. Required fields are marked *

    Recipe Rating


    This site uses Akismet to reduce spam. Learn how your comment data is processed.

    Welcome!

    I'm Brandy! I love to create and share my ideas through easy-to-follow recipes and tutorials.

    More about me

    As an Amazon Associate, I make a small commission on qualifying purchases.

    sew with me kids sewing book
    My Book

    Summer Posts

    • Cherry pie on prep mat.
      Best Cherry Pie Recipe
    • Bandanna Picnic Blanket Tutorial
    • diy tiki torch planter on black plant stand
      DIY Tiki Torch Planter (Table or Stand) + Video
    • slab pie on white plate
      Peach Slab Pie
    • toddler playing with dinosaur garden
      Dinosaur Garden For Kids (Fairy Garden) (Video)
    • water bottle sewing tutorial
      Color Block Fabric Water Bottle Holder Tutorial
    • strawberry pie with whipped cream on top.
      Fresh Strawberry Pie Recipe (Video)
    • slice of ice cream cake on spatula
      Oreo Ice Cream Sandwich Cake
    See more Summer →

    Latest Posts

    • Slice of strawberry rhubarb pie on plate with scoop of vanilla ice cream.
      Strawberry Rhubarb Slab Pie
    • Dot cakes in dessert cups.
      How To Make Viral Dot Cakes Using Cupcakes
    • 3 walnut brownies stacked.
      Katharine Hepburn's Brownie Recipe
    • Slice of Chessmen banana pudding on a metal spatula.
      Chessmen Cookie Banana Pudding (Easy No Bake Recipe)
    • Chocolate cake coated in ganache and mini chocolate chips.
      Best Chocolate Pudding Bundt Cake
    • Corned beef, cabbage, carrots, potatoes and roll in serving dish.
      Corned Beef and Cabbage (Stovetop, Slow Cooker or Instant Pot)

    Footer

    ↑ Back to Top

    About

    • Privacy Policy
    • Accessibility Policy

    Newsletter

    • Sign Up! for emails and updates

    Contact

    • Contact

    As an Amazon Associate, I earn from qualifying purchases.

    Copyright © 2025 Gluesticks Blog