Gluesticks Blog

  • About
    • About Me
    • Contact Me
    • Terms and Privacy Policy
  • Sewing
    • My Book
    • Kids Sewing Projects
    • All Sewing Projects
  • Crafts
    • Kids Crafts
    • Paper Crafts
    • Free Printables
    • All Crafts
  • Holidays
    • Christmas
    • Halloween
    • Patriotic Holidays
    • Easter
    • St. Patrick’s Day
    • Valentine’s Day
    • Gift Ideas
      • Teacher Gifts
      • All Gift Ideas
    • Parties
  • Home
    • Home Decor Projects
    • Cleaning & Organizing
    • Gardening
    • Motherhood
  • Recipes
    • Kids in the Kitchen
    • Appetizer Recipes
    • Bread Recipes
    • Dessert Recipes
      • Cake Recipes
      • Cookie Recipes
      • All Dessert
    • Main Dish Recipes
    • Slow Cooker
    • Sides & Salads
    • Holiday Recipes
    • All Recipes

February 14, 2014 By Brandy 7 Comments

Home » Craft Tutorials » Kids Crafts

The Mini Heart Tee

Filed Under: Craft Tutorials, Kids Crafts

white t-shirt with heart

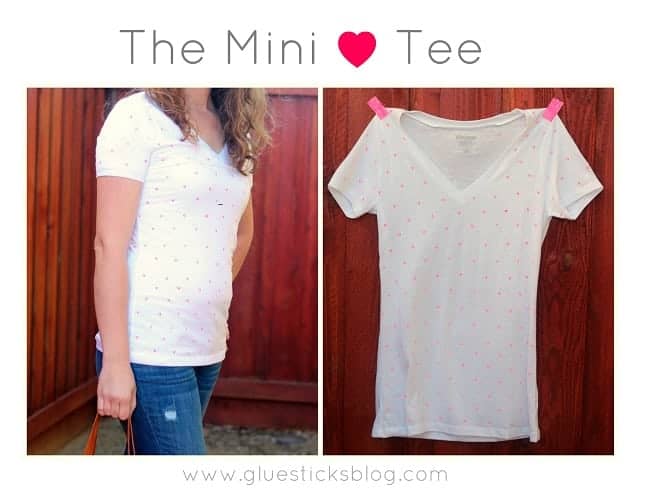
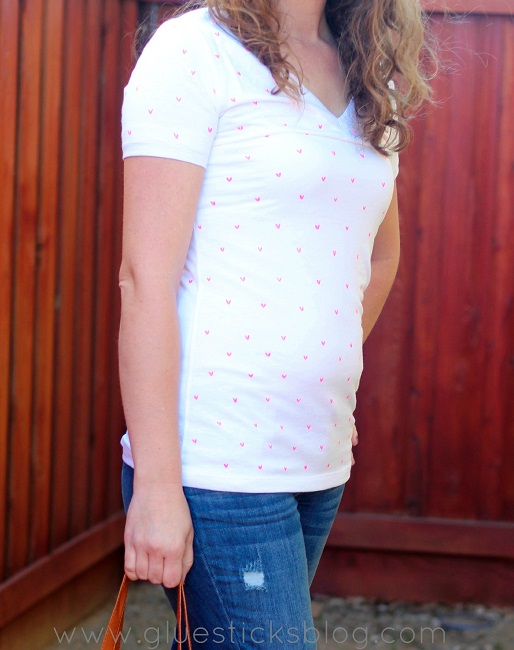
I wear jeans and a tshirt probably 5 days a week. It’s my raising 4 children, walking the dog, yard work, and housewife uniform. When I find a tshirt style I like, I become a creature of habit and buy every color they have. I absolutely love these vintage washed tees from my favorite clothing store. I love that I can get them for around $5 so if I want to try customizing one, it’s worth a shot! 

To make a Mini ♥ Tee you will need:

1 plain t shirt, washed without fabric softener, and dried.

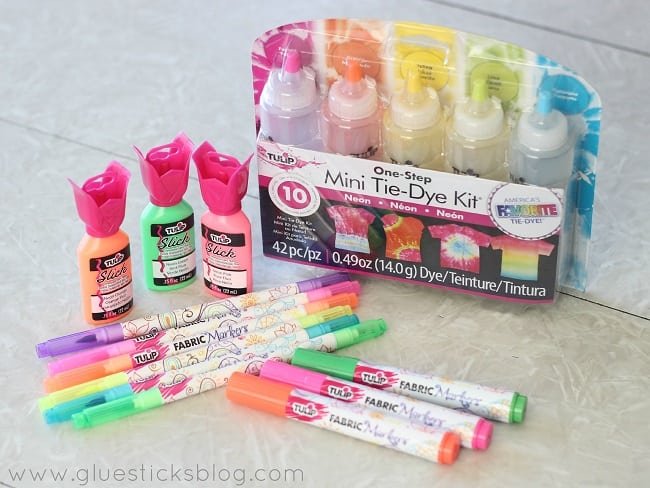
Tulip Fabric Markers

A cutting board, piece of cardboard or waxed paper

plastic board inside shirt

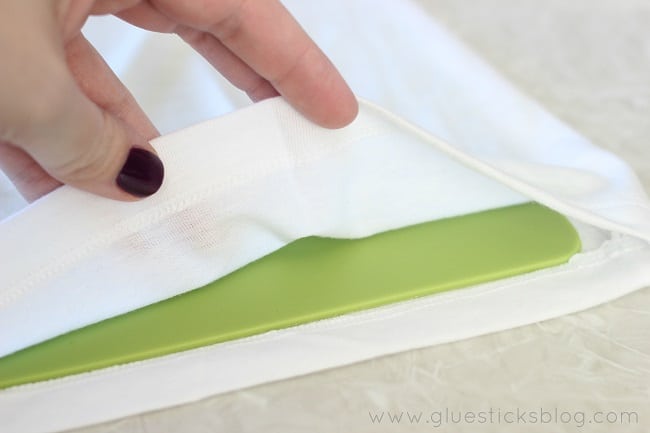
Place your work surface board inside of your t shirt. This will prevent the ink from bleeding through your shirt to the other side.

pink fabric pen and white shirt

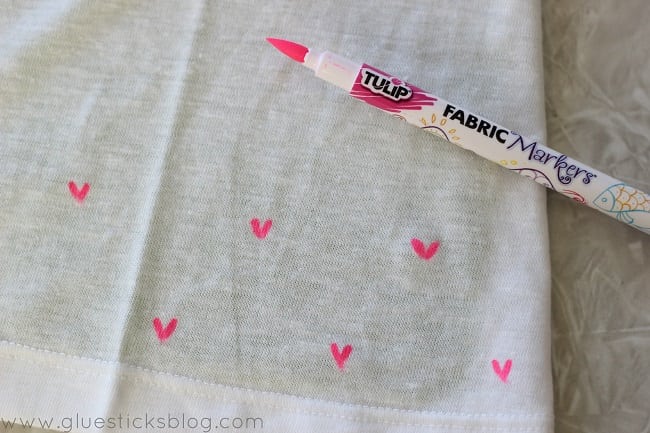
Shake marker well. Begin marking small hearts (in a quick “v” motion)  about 2″ apart along the bottom of the shirt. Begin your second row 1″ above and 1″ to the side of  your first row so that the second the hearts don’t line up with the first row.

white shirt with fabric pen hearts

Continue up the entire front of the shirt. Flip the shirt over and mark all long the back. When doing the sleeves, use waxed paper inside instead of the board (it fits better) and lay the sleeve flat.

white shirt with mini pink hearts drawn on it

No ironing needed! Dry flat for 24 hours before wearing. Wash in warm water, gentle cycle with mild soap after 24 hours; line dry. Do not dry clean.

bottom of heart shirt

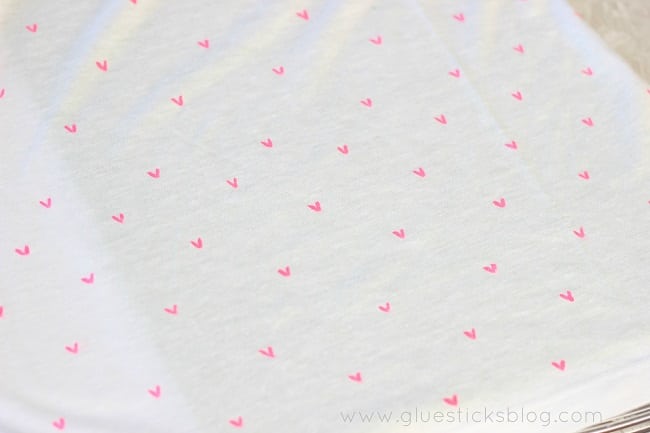
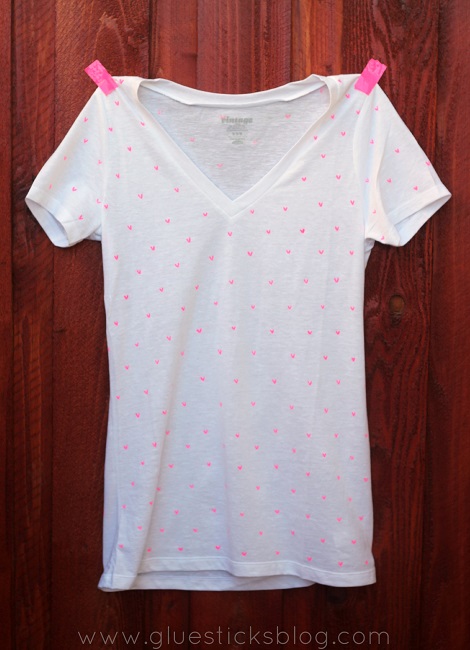
I think it came out perfect! The hearts aren’t all completely identical. I could have used some sort of stencil, but it was simple enough to free hand and I like the look of it.

woman wearing white heart shirt

A quick and easy makeover to one of my favorite tees!

This post was sponsored by Tulip. All opinions are 100% mine.

Print Friendly, PDF & Email

Related

Share
Pin

About Brandy

Welcome! I'm Brandy, mother to 5 darling kiddos and a cute black lab named Toby. My husband is in the Coast Guard so we've lived all over the place, turning each house into a home. I love baking, sewing, making cute things with my kids, and sharing what I've learned with all of you!

Disclaimer: I am a participant in the Amazon Services LLC Associates Program, an affiliate advertising program designed to provide a means for me to earn fees by linking to Amazon.com without any additional cost to you. As an Amazon Associate, I earn from qualifying purchases.

Previous Post: « Tissue Paper Stained Glass {Sun Catchers}
Next Post: Baby Doll Basket »

Reader Interactions

Comments

  1. Marilyn says

    February 18, 2014 at 9:32 am

    I LOVE your t-shirt…I never would have thought that a “quick v” could look like a heart!

    Reply
    • Brandy says

      February 24, 2014 at 11:20 am

      Thank you Marilyn! It was a pretty fun and quick project, my favorite kind! 🙂

      Reply
  2. detta says

    February 14, 2014 at 4:52 pm

    Cute. I’d love to know where you got those shirts

    Reply
    • Brandy says

      February 14, 2014 at 8:54 pm

      Old Navy! I love their vintage v-neck tees 🙂

      Reply
  3. abbeycron says

    February 14, 2014 at 1:12 pm

    Super cute!

    Reply
  4. Gina says

    February 14, 2014 at 7:58 am

    Nice quick project.

    Reply
  5. Brandy says

    February 14, 2014 at 7:16 am

    So cute! I love this. I need to find some of those pens.

    Reply

Leave a Reply Cancel reply

Your email address will not be published. Required fields are marked *

Recipe Rating


This site uses Akismet to reduce spam. Learn how your comment data is processed.

Primary Sidebar

I'm Brandy! I love to create and share my ideas through easy-to-follow recipes and tutorials. MORE ABOUT ME

Follow Along

  • Facebook
  • Instagram
  • Pinterest

Disclaimer: I am a participant in the Amazon Services LLC Associates program. As an Amazon Associate, I earn from qualifying purchases, at no cost to my readers.

My Amazon Store

Get My Best Projects and Recipes!

My Sewing Book for Kids!

kids sewing book cover
  • Home
  • Website Accessibility
  • My Book
  • Privacy Policy

Copyright © 2025 Log in

Gluesticks blog logoLogo Header Menu
  • About
    • About Me
    • Contact Me
    • Terms and Privacy Policy
  • Sewing
    • My Book
    • Kids Sewing Projects
    • All Sewing Projects
  • Crafts
    • Kids Crafts
    • Paper Crafts
    • Free Printables
    • All Crafts
  • Holidays
    • Christmas
    • Halloween
    • Patriotic Holidays
    • Easter
    • St. Patrick’s Day
    • Valentine’s Day
    • Gift Ideas
      • Teacher Gifts
      • All Gift Ideas
    • Parties
  • Home
    • Home Decor Projects
    • Cleaning & Organizing
    • Gardening
    • Motherhood
  • Recipes
    • Kids in the Kitchen
    • Appetizer Recipes
    • Bread Recipes
    • Dessert Recipes
      • Cake Recipes
      • Cookie Recipes
      • All Dessert
    • Main Dish Recipes
    • Slow Cooker
    • Sides & Salads
    • Holiday Recipes
    • All Recipes