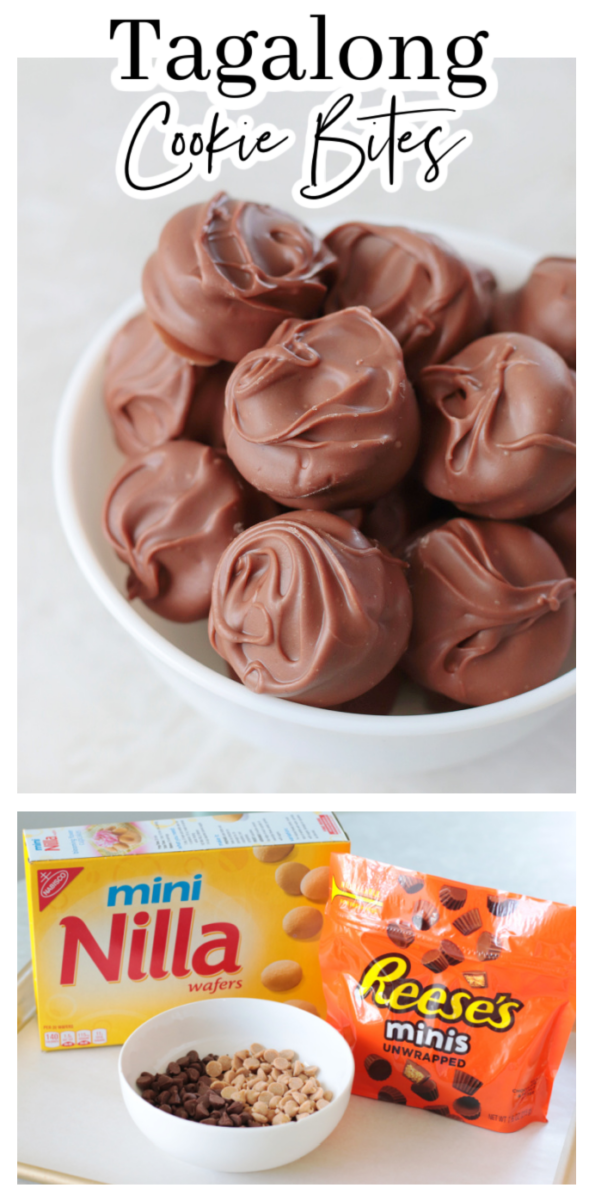
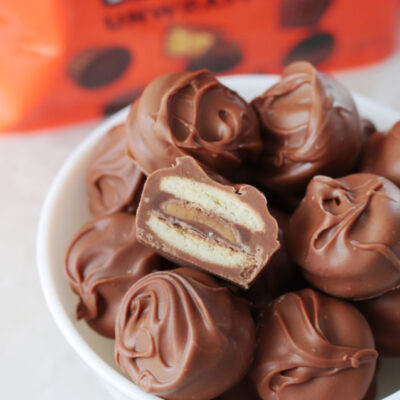
If you like Girl Scout peanut butter patties (AKA tagalongs) you'll love these homemade tagalong cookie bites! Made from Nilla wafers, Reese's peanut butter cups and dipped in chocolate peanut butter!
You might also like our homemade Twix bites (made exactly like these tagalong bites!), our homemade butterfingers, or our homemade peppermint patties!
Watch our step by step video!
Peanut Butter Patties vs. Tagalongs
Tagalongs are the previous name of Girl Scouts peanut butter patties. They start with a crispy cookie, are spread with peanut butter, and then dipped in chocolate. My husband and I agreed that these little cookie bites taste very similar to the Girl Scout version---with a little less peanut butter. They are fun to make and fun to eat!
Homemade Tagalong Cookie Bites
I shared our Twix version on Facebook and someone commented and said that they made them for a bake sale recently and they did really well! She then made them with peanut butter cups and said that version was a hit too. PEANUT BUTTER CUPS? I had to copy her and make a batch---you know, to taste test. These homemade tagalong cookie bites are made just like our Twix cookie bites.
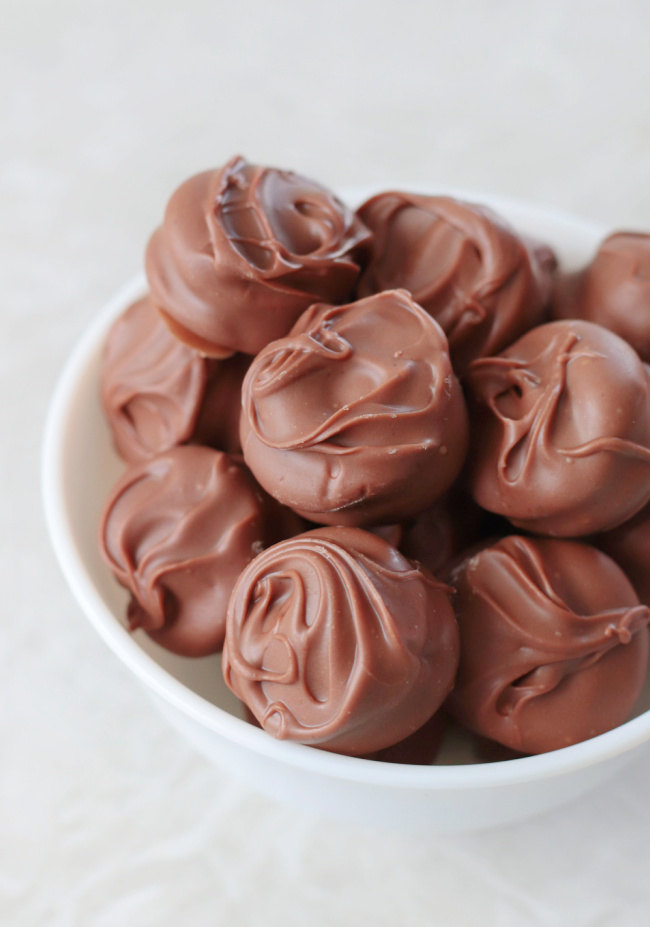
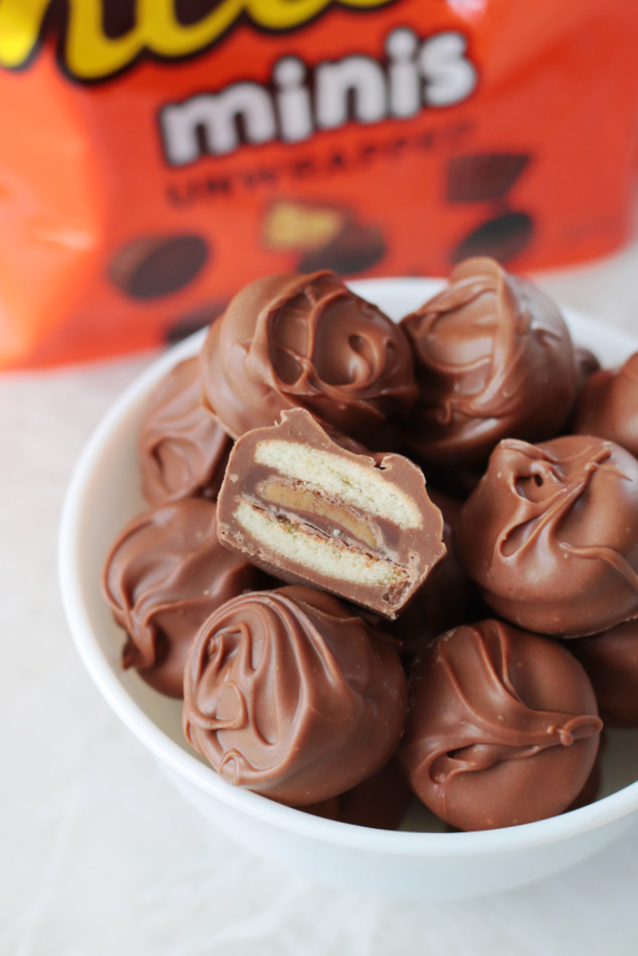
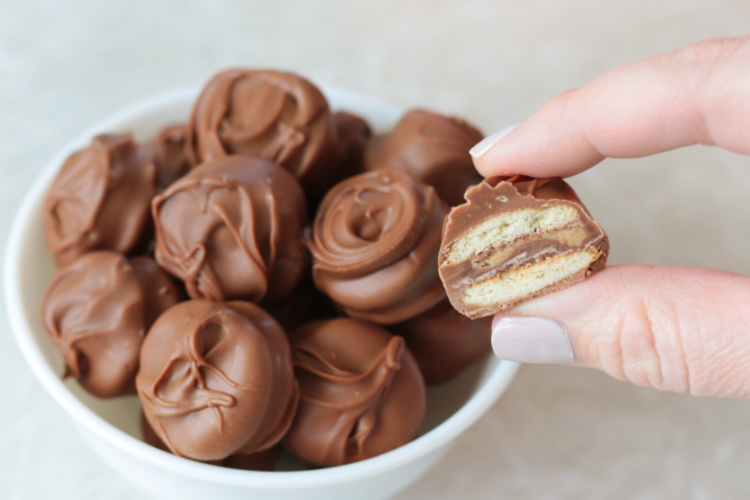
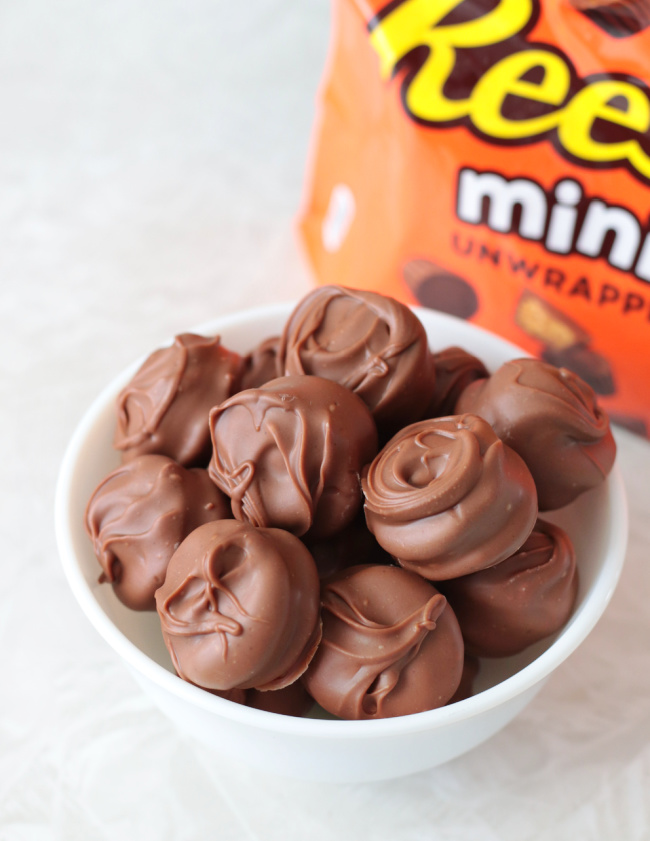
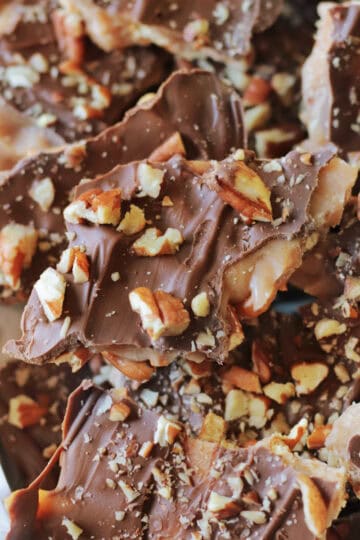
Nilla wafers are topped with mini Reese's peanut butter cups (you can buy these unwrapped in bags) and then heated to slightly melt the chocolate before another Nilla wafer is added to create a cookie sandwich. Then they are dipped in a combination of melted chocolate chips and melted peanut butter chips. They are SO GOOD, and the perfect bite-sized treat.
Dipped in chocolate they look like fancy chocolate candies, but there’s nothing fancy about them. It only takes 4 ingredients to make these semi-homemade treats. One batch makes 36 cookie bites.
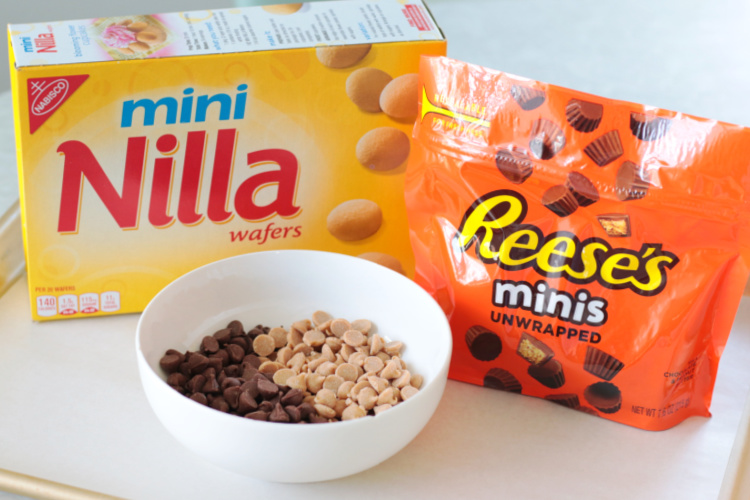
HOMEMADE Tagalong Cookie Bites INGREDIENTS
72 MINI Nilla Wafer cookies: you can use regular-sized cookies, but I think the mini ones are a better cookie-peanut butter ratio. The smaller size also makes them easier to dip and they are the perfect size to pop into your mouth.
1 (7-ounce) bag of mini unwrapped Reese's peanut butter cups: the teeny tiny ones
5 ounces chocolate chips or melting chocolate wafers: about a cup.
5 ounces peanut butter chips: about a cup.
HOW TO MAKE HOMEMADE Peanut Butter Patties Cookie Bites
Preheat your oven to 300 degrees.
Place 36 vanilla wafer cookies onto a baking sheet lined with parchment paper.
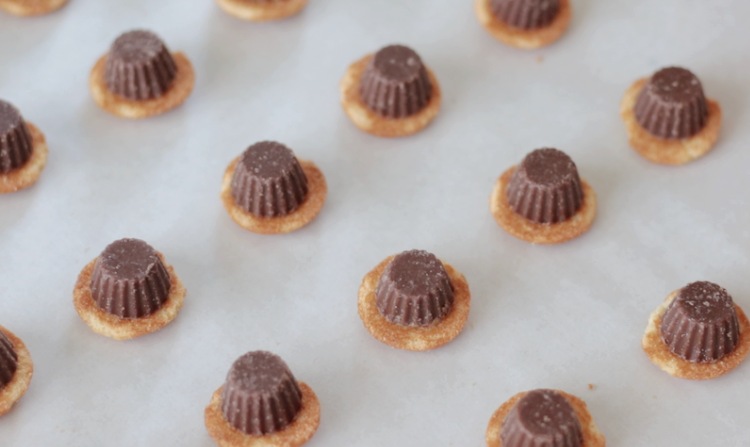
Place a mini peanut butter cup in the center of each one.
Heat in the oven for 90 seconds.
Now hear me out, I know that 90 seconds sounds very specific, but trust me on this. I experimented with baking temps. 2-3 minutes is too long and 1 minute isn’t long enough to soften the peanut butter cup. 90 seconds is just right to soften the chocolate slightly, but the peanut butter is still a little firm. We’re NOT squishing or completely flattening the Reese's, just adding a cookie on top and slightly pressing down.
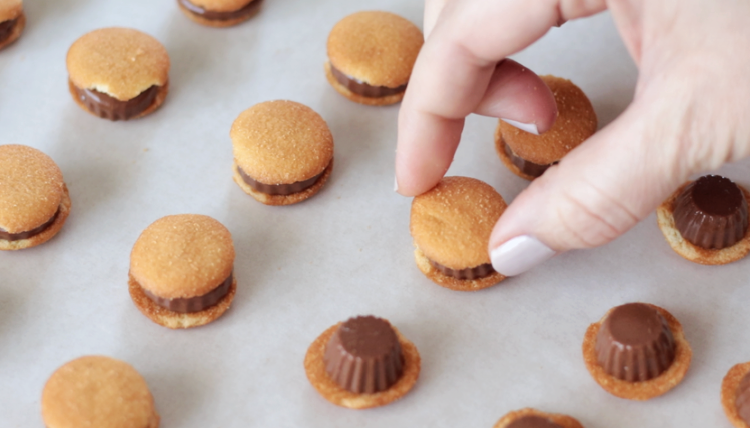
Remove from the oven and place another cookie on top of each peanut butter cup, pressing down slightly.
Chill the tray of cookies in the refrigerator for 15-20 minutes, or until the chocolate has set.
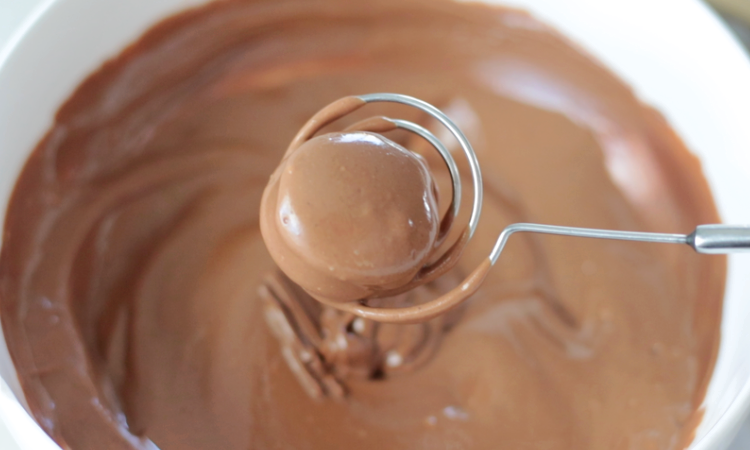
Melt chocolate chips and peanut butter chips together in a double boiler or in the microwave. You can use melting chocolate wafers or chocolate chips. I used 5 ounces of chocolate chips and 5 ounces of peanut butter chips then microwaved them for 60 seconds. I gave it a stir and heated an additional 15 seconds. Every microwave is different so just heat it long enough that you can easily stir the chocolate---DO NOT overheat. Heating in short increments works best.
Dip cookie sandwiches into chocolate using a chocolate dipping tool or fork. Tap the tool or fork against the side of the bowl to allow the excess chocolate to drip off before transferring the cookie back to the baking sheet.
Refrigerate cookies until the chocolate has hardened.

(Note: the swirly design on the top of my cookie bites comes from using the dipping tool. If you use a fork the tops of yours will be smooth)

Store homemade tagalong bites in an airtight container for up to 2 weeks.
Homemade Tagalong Cookie Bites (Girl Scout Peanut Butter Patties)
Homemade Tagalong Cookie Bites
Ingredients
- 72 MINI Nilla Wafer cookies (can use regular sized as well)
- 1 7-ounce bag of MINI peanut butter cups unwrapped
- 5 ounces chocolate chips or melting chocolate wafers (about 1 cup)
- 5 ounces peanut butter chips (about 1 cup)
Instructions
- Preheat your oven to 300 degrees.
- Place 36 mini Nilla wafer cookies onto a baking sheet lined with parchment paper.
- Place a mini peanut butter cup in the center of each one.
- Heat in oven for 90 seconds. Note: DO NOT heat longer than 90 seconds.
- Remove from the oven and place another cookie on top of each peanut butter cup. We're NOT squishing or flattening the peanut butter cup, just adding a cookie on top and slightly pressing down.
- Immediately chill the tray of cookies in the refrigerator for 15-20 minutes, or until chocolate has set.
- Melt chocolate chips and peanut butter chips together in a double boiler or in the microwave. Note: you can add a teaspoon of coconut oil to the bowl of chocolate chips if you'd like to thin them out a little (optional).
- Dip cookie sandwiches into chocolate using a chocolate dipper tool or fork. Tap the tool or fork against the side of the bowl to allow the excess chocolate to drip off before transferring the cookie back to the baking sheet.
- Refrigerate cookies until the chocolate has hardened.

Nancy says
I made these just like the recipe and they turned out great! I don’t have a dipping tool, but I found if I used a fork and turn them upside-down onto the parchment paper, they’re swirly. Thanks for the good recipe!
Brandy says
So glad to hear, Nancy! And that's a great tip about using a fork and turning them upside down. I'm sure others will find that helpful if they don't have a dipping tool too!
Ann says
Can these be frozen?
Brandy says
I haven’t tried freezing them, but I don’t see why you couldn’t.
LuAnn says
My question is about the list of ingredients. Which is kind of confusing. It says, 5oz or 1 cup of chocolate chips or melting chocolate wafers. Then it says. 5 oz peanut butter cups, 5oz.
When you get to the instructions. It says to melt the chocolate chips and the peanut butter chips. Now, there is no peanut butter chips listed in the ingredients. Just the 5oz of peanut butter cups. Is does not say mini or large size here. So, do I use peanut butter cups or peanut butter chip? Also, do I use mini peanut butter cups or peanut butter chips for melting and coating? I do hope you can clarify the correct ingredients and the correct amount/size needed to make these. Thank you for sharing/posting this amazing recipe for all of us.
Brandy says
Hi Luann! The ingredient list should say 5 oz peanut butter chips. I fixed it! Melt those with the 5 oz of chocolate chips. The rest of the ingredients are correct! Sorry about that and thank you for letting me know!
Gloria J Seales says
Quick question - could the heating method of the Doors be done in the microwave rather than 90 seconds in oven? It seems like that might be easier to control the length of time in oven. I usually use my microwave timer for baking. I guess i could buy a timer, but...