Gluesticks Blog

menu icon
go to homepage
  • Summer
  • DIY
  • Recipes
  • About Me
  • Subscribe
    • Facebook
    • Instagram
    • Pinterest
  • subscribe
    search icon
    Homepage link
    • Summer
    • DIY
    • Recipes
    • About Me
    • Subscribe
    • Facebook
    • Instagram
    • Pinterest
  • ×
    Home » Craft Tutorials

    DIY Photo Collage Clock

    Modified: Jun 4, 2025 · Published: Feb 25, 2019 by Brandy · This post may contain affiliate links.

    Jump to Project
    This DIY photo collage clock is a wonderful keepsake and puts a smile on your face every time you check the time!
    If you like this clock project, you'll love our DIY fairy house clock that kids can make!
    how to make a photo collage clock

    Aaron and I had a lot of fun making this photo collage clock last week! It makes me smile every time I walk past it. Wouldn't this be a great gift for a grandparent? It's so easy to make, too!

    First you'll need a clock base. What do I mean by a clock base? A wooden plaque (circle or square) that is about ½" thick. We found our base on clearance at Hobby Lobby. It was actually a clock, but was missing the hands. I bought a new clock kit for it and it worked like a charm. As an added bonus, it was pre-drilled. Don't worry though, a wooden plaque is easy to drill a hole in. So grab one, in any shape you'd like and you'll be good to go.

    You'll also need a clock kit and a photo collage. A clock kit comes with a small motor with a place to put a battery and 2-3 clock hands. You can create a photo collage on Picmonkey and have it printed at Walmart or Costco. If you have a bunch of photos already printed out and would like to use those, you can make your own collage!

    You'll also need a few basic supplies like a battery drill, sponge brush, scissors and mod podge.

    Now that you have your supplies, let's get started on your DIY Photo Collage Clock!

    clock in clock stand on table
    Print
    3 from 1 vote

    DIY Photo Collage Clock

    Create a photo collage clock in just a few steps. A beautiful keepsake, and it's functional too!
    Pin Recipe
    Prep Time10 minutes mins
    Active Time10 minutes mins
    Total Time20 minutes mins
    Yield: 1 clock
    Author: Brandy Nelson
    Cost: $15

    Equipment

    • drill

    Materials

    • 1 thin wood plaque
    • photo collage
    • scissors
    • mod podge
    • sponge brush
    • clock kit

    Instructions

    • Drill a hole in the center of your wood plaque the same width as the fitting from the clock kit.
    • Using a photo editing program, create a photo collage and print it out.
    • Trim the collage to fit the base using scissors.
      photo collage on clock front
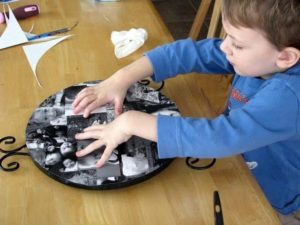
    • Apply a layer of mod podge over the face of the wood plaque. Lay the collage on top and press to smooth.
      child gluing photo collage on front of clock
    • Poke a hole through the center of the collage where the clock kit will fit through.
    • Attach clock kit according to package instructions.
      front of photo clock on table

    Notes

    I used a clock for my project that already had the hardware attached to the back. If you use a wood plaque, drill a hole in the center and attach a clock kit. A clock kit comes with two hands, a battery compartment and a motor. You can find them at most craft stores.

    3 More Personalized Gift Ideas:

    Family Tree Photo Canvas

    Mini Canvas Masterpieces

    Lead Me, Guide Me Handprint Canvas

    Share
    Pin

    More Craft Projects

    • Arms with stacks of bandana bracelets on them.
      Easy DIY Bandana Bracelets
    • Stack of colorful bandana hair bows.
      How To Make Easy Bandana Hair Bows (No-Sew)
    • White candles decorated with wax candle pens.
      How to Decorate Candles with Wax Candle Pens
    • 4 bags decorated like dress shirts with missionary tags.
      LDS Missionary Treat Bags (Gift Bag)

    About Brandy

    Welcome! I'm Brandy, mother to 5 darling kiddos and a cute black lab named Toby. My husband is in the Coast Guard so we've lived all over the place, turning each house into a home. I love baking, sewing, making cute things with my kids, and sharing what I've learned with all of you!

    Comments

    1. fawnda says

      March 05, 2010 at 4:01 am

      Great idea! This would be so fun to make as a gift for my mom and mom-in-law! Thanks for sharing! : )

      Reply
    2. Kim says

      March 04, 2010 at 6:45 pm

      Aww. I know what I'd do - when a hand got on a face, I'd say "time to kiss!".

      Reply
    3. Becky@Beyond The Picket Fence says

      March 04, 2010 at 2:55 am

      What a great and fun idea--how much would the grandmas go ga-ga over
      this!

      Reply
    4. Tammy at Tattered and Timeless says

      March 02, 2010 at 10:03 pm

      Wonderful idea..love it. Now I have to see if we have a costco here..hmmmm

      Reply
    5. Liz says

      March 02, 2010 at 4:03 am

      What a daring idea! Perfect gift for Mother's Day! Thanks for sharing!

      ~Liz

      Reply
    6. Heather says

      March 01, 2010 at 6:04 pm

      That turned out so cute, what a great idea! Thanks for sharing!

      Reply
    7. Angie @ The Country Chic Cottage says

      March 01, 2010 at 5:14 pm

      Gorgeous idea!! 🙂

      Reply
    8. Kaysi says

      March 01, 2010 at 4:48 am

      I LOVE this!!! What a great idea, thanks so much for the idea!

      Reply
    9. Kathleen says

      March 01, 2010 at 3:02 am

      Lovely!
      That brought back such memories. Before I retired I taught 4th grade. One of my little boys was diagnosed with a brain tumor. He was out of school for a long time.
      I bought a simple clock, popped off the cover and made a collage with pics of every kid in our class.
      We sent it home to him with the message..
      We are thinking of you all the time..
      He survived 9 more years..At his wake his mom told me the clock was still in his room...
      A simple thing, but it meant so much to him..
      You have created a great memory for your kids!

      Reply
    10. ♥Suzanne♥ says

      February 27, 2010 at 7:07 pm

      Thanks for the great idea! Love the collage!

      Reply
    11. Its So Very Cheri says

      February 27, 2010 at 6:38 pm

      Thanks for doing the Tutorial. I grabbed your button.

      Cheri

      Reply
    12. Carmie - the Single Nester says

      February 26, 2010 at 10:29 pm

      I just love this! Great inspirational project.

      Reply
    13. Brooke says

      February 25, 2010 at 10:21 pm

      Darling! I love it! Pictures are a great way to decorate.

      Reply
    14. the thrifty ba says

      February 25, 2010 at 6:18 pm

      read your post over at cheri and i have to say-you are one brave momma! i dont let me kids (9ys and 6yrs) help with crafts that will actually be displayed for more than a holiday! really cute blog you have here!

      Reply
    15. Appleseed Gifts says

      February 25, 2010 at 5:14 pm

      Brandy!!! I have given you the Kreativ Blogger award!! Please visit the link to check it out! Have a good day!

      http://superstinkyboys.blogspot.com/2010/02/kreativ-blogger-awardi-won.html

      Ginger
      Appleseed Gifts
      SuperStinkyBoys

      Reply
    Newer Comments »
    3 from 1 vote (1 rating without comment)

    Leave a Reply Cancel reply

    Your email address will not be published. Required fields are marked *

    Recipe Rating


    This site uses Akismet to reduce spam. Learn how your comment data is processed.

    Welcome!

    I'm Brandy! I love to create and share my ideas through easy-to-follow recipes and tutorials.

    More about me

    As an Amazon Associate, I make a small commission on qualifying purchases.

    sew with me kids sewing book
    My Book

    Summer Posts

    • Cherry pie on prep mat.
      Best Cherry Pie Recipe
    • Bandanna Picnic Blanket Tutorial
    • diy tiki torch planter on black plant stand
      DIY Tiki Torch Planter (Table or Stand) + Video
    • slab pie on white plate
      Peach Slab Pie
    • toddler playing with dinosaur garden
      Dinosaur Garden For Kids (Fairy Garden) (Video)
    • water bottle sewing tutorial
      Color Block Fabric Water Bottle Holder Tutorial
    • strawberry pie with whipped cream on top.
      Fresh Strawberry Pie Recipe (Video)
    • slice of ice cream cake on spatula
      Oreo Ice Cream Sandwich Cake
    See more Summer →

    Latest Posts

    • 3 walnut brownies stacked.
      Katharine Hepburn's Brownie Recipe
    • Slice of Chessmen banana pudding on a metal spatula.
      Chessmen Cookie Banana Pudding (Easy No Bake Recipe)
    • Chocolate cake coated in ganache and mini chocolate chips.
      Best Chocolate Pudding Bundt Cake
    • Corned beef, cabbage, carrots, potatoes and roll in serving dish.
      Corned Beef and Cabbage (Stovetop, Slow Cooker or Instant Pot)
    • Hand holding yellow chick sugar cookie.
      Chubby Chick Sugar Cookies (No Cookie Cutter Needed)
    • Bunny sugar cookie with buttercream carrot.
      Chubby Bunny Sugar Cookies (No Cookie Cutter Needed)

    Footer

    ↑ Back to Top

    About

    • Privacy Policy
    • Accessibility Policy

    Newsletter

    • Sign Up! for emails and updates

    Contact

    • Contact

    As an Amazon Associate, I earn from qualifying purchases.

    Copyright © 2025 Gluesticks Blog

    Rate This Recipe

    Your vote:


    A rating is required
    A name is required
    An email is required

    Recipe Ratings without Comment

    Something went wrong. Please try again.