Gluesticks Blog

menu icon
go to homepage
  • Easter
  • DIY
  • Recipes
  • About Me
  • Subscribe
    • Facebook
    • Instagram
    • Pinterest
  • subscribe
    search icon
    Homepage link
    • Easter
    • DIY
    • Recipes
    • About Me
    • Subscribe
    • Facebook
    • Instagram
    • Pinterest
  • ×
    Home » Craft Tutorials

    DIY Photo Collage Clock

    Modified: Jun 4, 2025 · Published: Feb 25, 2019 by Brandy · This post may contain affiliate links.

    Jump to Project
    This DIY photo collage clock is a wonderful keepsake and puts a smile on your face every time you check the time!
    If you like this clock project, you'll love our DIY fairy house clock that kids can make!
    how to make a photo collage clock

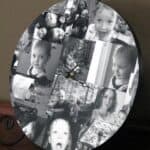
    Aaron and I had a lot of fun making this photo collage clock last week! It makes me smile every time I walk past it. Wouldn't this be a great gift for a grandparent? It's so easy to make, too!

    First you'll need a clock base. What do I mean by a clock base? A wooden plaque (circle or square) that is about ½" thick. We found our base on clearance at Hobby Lobby. It was actually a clock, but was missing the hands. I bought a new clock kit for it and it worked like a charm. As an added bonus, it was pre-drilled. Don't worry though, a wooden plaque is easy to drill a hole in. So grab one, in any shape you'd like and you'll be good to go.

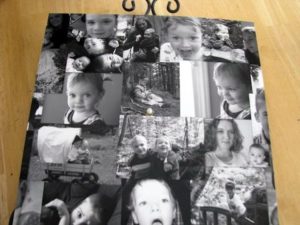
    You'll also need a clock kit and a photo collage. A clock kit comes with a small motor with a place to put a battery and 2-3 clock hands. You can create a photo collage on Picmonkey and have it printed at Walmart or Costco. If you have a bunch of photos already printed out and would like to use those, you can make your own collage!

    You'll also need a few basic supplies like a battery drill, sponge brush, scissors and mod podge.

    Now that you have your supplies, let's get started on your DIY Photo Collage Clock!

    clock in clock stand on table
    Print
    3 from 1 vote

    DIY Photo Collage Clock

    Create a photo collage clock in just a few steps. A beautiful keepsake, and it's functional too!
    Pin Recipe
    Prep Time10 minutes mins
    Active Time10 minutes mins
    Total Time20 minutes mins
    Yield: 1 clock
    Author: Brandy Nelson
    Cost: $15

    Equipment

    • drill

    Materials

    • 1 thin wood plaque
    • photo collage
    • scissors
    • mod podge
    • sponge brush
    • clock kit

    Instructions

    • Drill a hole in the center of your wood plaque the same width as the fitting from the clock kit.
    • Using a photo editing program, create a photo collage and print it out.
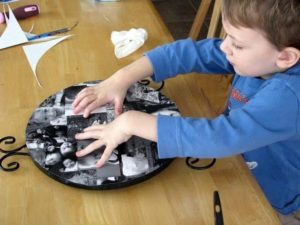
    • Trim the collage to fit the base using scissors.
      photo collage on clock front
    • Apply a layer of mod podge over the face of the wood plaque. Lay the collage on top and press to smooth.
      child gluing photo collage on front of clock
    • Poke a hole through the center of the collage where the clock kit will fit through.
    • Attach clock kit according to package instructions.
      front of photo clock on table

    Notes

    I used a clock for my project that already had the hardware attached to the back. If you use a wood plaque, drill a hole in the center and attach a clock kit. A clock kit comes with two hands, a battery compartment and a motor. You can find them at most craft stores.

    3 More Personalized Gift Ideas:

    Family Tree Photo Canvas

    Mini Canvas Masterpieces

    Lead Me, Guide Me Handprint Canvas

    Share
    Pin

    More Craft Projects

    • Stack of colorful bandana hair bows.
      How To Make Easy Bandana Hair Bows (No-Sew)
    • White candles decorated with wax candle pens.
      How to Decorate Candles with Wax Candle Pens
    • 4 bags decorated like dress shirts with missionary tags.
      LDS Missionary Treat Bags (Gift Bag)
    • Pop Tart nativity scene on white plate.
      Pop Tart Nativity Scene

    About Brandy

    Welcome! I'm Brandy, mother to 5 darling kiddos and a cute black lab named Toby. My husband is in the Coast Guard so we've lived all over the place, turning each house into a home. I love baking, sewing, making cute things with my kids, and sharing what I've learned with all of you!

    Comments

    1. ImaYaYa says

      March 18, 2011 at 7:17 pm

      Great idea! I happen to have a clock that needs updating.. guess what I'll be doing this weekend?
      Looking forward to finding more creative things on your blog!

      Reply
    2. Emily and Jaime at Everyday Art says

      March 04, 2011 at 4:42 pm

      That is gorgeous! I know a grandma who would really appreciate that. 🙂 Good job.

      Reply
    3. Sarah Vasbinder says

      December 16, 2010 at 1:31 am

      I LOVE IT!!! this i sooooo awesome! im going to be on the look out now for a marked down clock 🙂 thanks 🙂

      Reply
    4. An Experiment in Happiness says

      August 30, 2010 at 3:46 am

      I love this idea.. and I love the way you did it. Thanks so much for sharing you have a great site.
      Jessica

      http://www.myhappinessexperiment.blogspot.com/

      Reply
    5. Beat Until Fluffy says

      June 28, 2010 at 8:04 pm

      I cannot wait to make this clock. I'm an avid clock collector and saw this over in your sidebar. (found you at TGC) What a wonderful way to get people to actually look at the pictures on the wall... put them in a clock. Great idea. I love it.

      ~Dawn

      Reply
    6. Its A Blog Party says

      June 21, 2010 at 6:50 pm

      The clock looks beautiful!
      Thanks for linking up!
      ~Liz

      Reply
    7. Ashlee says

      May 26, 2010 at 2:35 am

      Thanks for the inspiration! I usually let people know when I post something inspired by them, I can't believe I forgot to do that this time. It's birthday season around here and a bit crazy! Fun that you found it on your own! I think I have a few of your crafts in my "to do" folder!

      Reply
    8. April says

      May 05, 2010 at 7:52 pm

      Wow! I love this idea and instructions! Its a perfect weekend project with the kids and a needed showcase in our house!

      I will be linking to it for my upcoming "Friday FieldTrip" at http://www.stitchngiggles.com!

      Reply
    9. Kristi Flanagan says

      May 04, 2010 at 1:26 pm

      Hi Brandi! This is so cool. I'm visiting you from Tip Junkie and wanted to invite you to plant your creative seeds at my blog party on Fridays: Plant a Punkin Seed at Punkin Seed Productions. Hope to see you there!

      Kristi
      Punkin Seed Productions

      Reply
    10. michelle@somedaycrafts says

      March 26, 2010 at 4:26 am

      That is adorable!!!

      Reply
    11. a little bit of everything says

      March 09, 2010 at 3:13 pm

      I am a sucker for anything involving photos and this is a fabulous idea! Love it!
      Thanks for visiting my blog- I invite you to become a follower...

      Reply
    12. Suzanne says

      March 09, 2010 at 1:32 am

      Wow, this is fantastic! I've got to give this a try, thanks so much for sharing!

      Reply
    13. fawnda says

      March 06, 2010 at 10:51 pm

      I just wanted to let you know that I featured you here:

      http://firefliesandjellybeans.blogspot.com/2010/03/sunday-spotlight-soys-favorites.html

      Reply
    14. Summer says

      March 06, 2010 at 3:47 am

      I am featuring this on my blog tomorrow! Thanks for linking up! Come grab my featured button!

      Sumo
      http://sumossweetstuff.blogspot.com

      Reply
    15. Lori says

      March 06, 2010 at 12:40 am

      Love this..

      Thanks for joining Get Your Craft on Thurs. Please join me next week for another great party!

      Reply
    « Older Comments
    Newer Comments »
    3 from 1 vote (1 rating without comment)

    Leave a Reply Cancel reply

    Your email address will not be published. Required fields are marked *

    Recipe Rating


    This site uses Akismet to reduce spam. Learn how your comment data is processed.

    Welcome!

    I'm Brandy! I love to create and share my ideas through easy-to-follow recipes and tutorials.

    More about me

    As an Amazon Associate, I make a small commission on qualifying purchases.

    sew with me kids sewing book
    My Book

    Spring Posts

    • Blue panoramic sugar egg frosted with flowers.
      How To Make Panoramic Sugar Eggs for Easter
    • Pop Tart bunny house on white plate with candy and coconut grass.
      Pop Tart Bunny House for Easter
    • Two fleece bunnies placed against a pillow.
      10 Minute Fleece Bunny Tutorial
    • Yellow peeps bunny sugar cookie.
      Peeps Bunny Sugar Cookies with Buttercream Frosting
    See more Easter →

    Latest Posts

    • Slice of Chessmen banana pudding on a metal spatula.
      Chessmen Cookie Banana Pudding (Easy No Bake Recipe)
    • Chocolate cake coated in ganache and mini chocolate chips.
      Best Chocolate Pudding Bundt Cake
    • Corned beef, cabbage, carrots, potatoes and roll in serving dish.
      Corned Beef and Cabbage (Stovetop, Slow Cooker or Instant Pot)
    • Hand holding yellow chick sugar cookie.
      Chubby Chick Sugar Cookies (No Cookie Cutter Needed)

    Footer

    ↑ Back to Top

    About

    • Privacy Policy
    • Accessibility Policy

    Newsletter

    • Sign Up! for emails and updates

    Contact

    • Contact

    As an Amazon Associate, I earn from qualifying purchases.

    Copyright © 2025 Gluesticks Blog

    Rate This Recipe

    Your vote:


    A rating is required
    A name is required
    An email is required

    Recipe Ratings without Comment

    Something went wrong. Please try again.