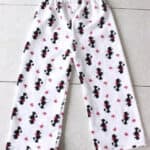
How to sew pajamas without a pattern! This method is ideal for making pajama pants for kids. Simply use an existing pair of pajama pants as a guide.
You might also like my favorite 1-hour nightgown pattern, soft-soled baby shoes pattern, or homemade dinosaur hoodie.

I like sewing pajama pants like this for my kids because it eliminates the guesswork. Printed PDF sewing patterns and the finished measurements have been hit-and-miss for me, but these pajama pants work! I’ve been making pajama pants and pants for Halloween costumes using this method for years. It's one of the most popular tutorials on the blog because it's so simple!
Why I Like This Tutorial
- Simple to follow. Not only do I provide step-by-step photos and instructions, but I also provide a video for you to follow!
- Quick project. This is a very quick sewing project. You can easily make a pair of pants in 30-60 minutes.
- Inexpensive. You don't need to purchase a pattern; just use a pair of pajama pants that you already have as a guide. It's ok if the existing pair is a little too small. You can adjust the hem to be longer and add width if needed.
What Others Are Saying
This was so fun! I’ve sewed NOTHING before and this came out perfectly and took such a short amount of time!---Sarah
It all worked brilliantly! The instructions and photos are so clear, and easy to follow. I'm really pleased with the result! Many thanks!---Kate
I just wanted to tell you thank you for explaining the steps on how to sew the crotch.. it just came out much better from you than any tutorial I've seen, you explained it pretty well.---Amanda
Jump to:
Tips and Tricks
- Use this method for children. If you look at store-bought toddler-big kid pajama pants you’ll notice that they look exactly like the ones that I am showing you how to make today. They are cut on the fold, without outer side seams, and are made out of 2 pieces of fabric. The front of the pants looks identical to the back.
- Don't use this method for adults. If you look at a teen-adult pair of pajama pants, you’ll notice they are made using 4 pieces of fabric and have side seams, as well as inner seams. The back is a bit baggier than the front, allowing for curves, hips, and more movement. For this reason I’d recommend using a pdf pajama pants pattern for the right size and best fit for curvier shapes. That being said, many exprienced sewers have used my method for adults, adding extra room in the waist and hips with great results. For beginners, I'd suggest using a pattern.
If you are looking to make basic elastic waistband pajama pants for toddlers, all the way up to big kids, without pattern pieces to cut out or pockets to sew let’s get started!
Supplies
- Existing pair of pajama or lounge pants
- Fabric: Cotton and flannel work well.
- Scissors
- Pins
- ¾" Elastic
- Sewing machine or serger
- Thread
- Measuring tape
How To Make Pajama Pants Without a Pattern
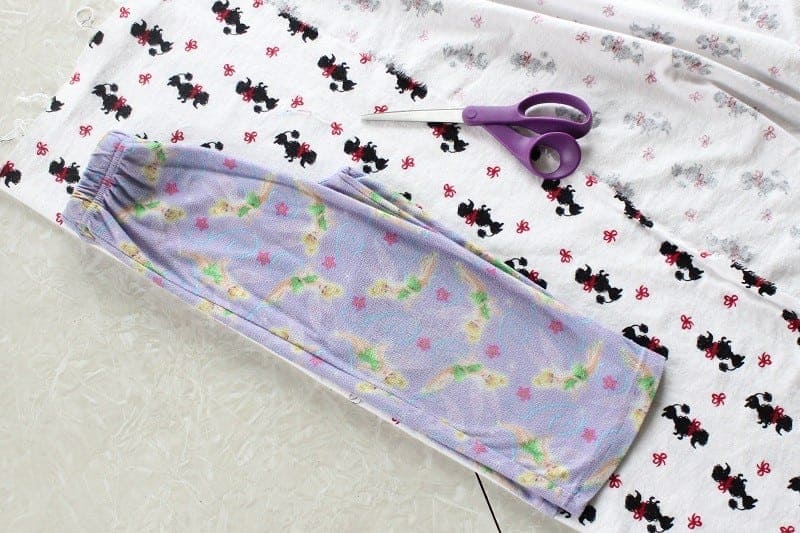
Step 1: Fold existing pajama pants in half. If necessary, iron to ensure you have the right shape. Lay the fold of the pants on the fold of the fabric. Pull the crotch area out a bit so that it is pointy.
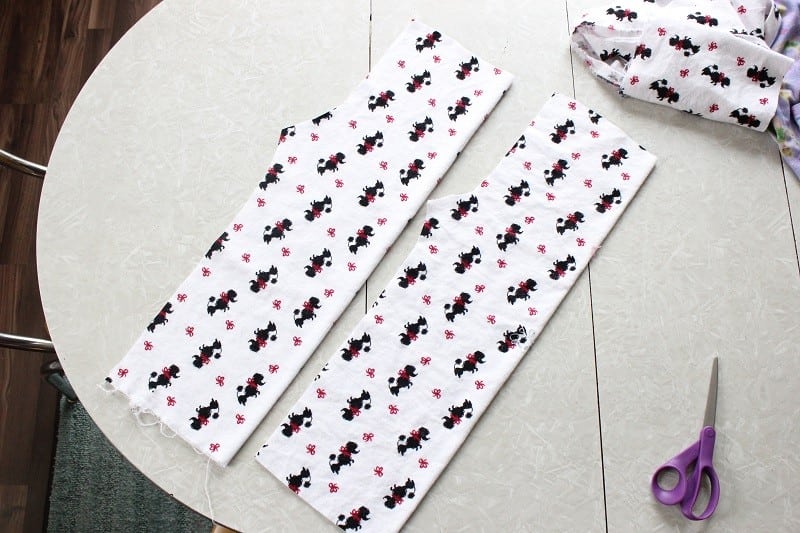
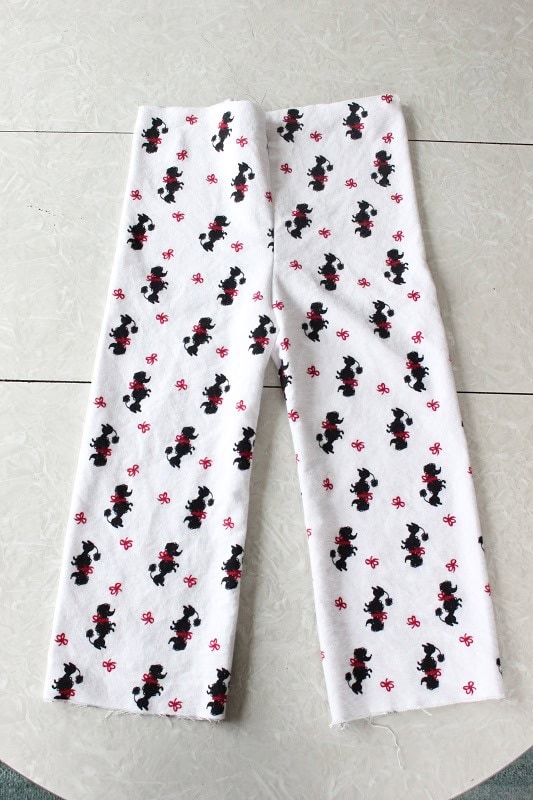
Step 2: Cut 2 pieces (one for each leg) on the fold, using your old pair as a guide (you can trace the cutting line onto the fabric before cutting if you'd like).
Cutting Guide
- Leave at least ½" for seam allowances on the sides.
- Add 3" on the top for the elastic casing.
- Add 1" for the bottom hem (can make it larger or smaller if you want).
- Be generous when cutting around the crotch area (where the back comes to a point) so that there is plenty of room to bend over and move around without stressing the seam. I usually go at least an inch away instead of ½" for the seam allowance in the crotch area.
Note: Since you are using an existing pair of pajamas, the elastic waist is already scrunched. You can also add an inch or so to the cutting area if you'd like for a bit of extra room. If the existing pajama pants are shorter than you'd like, add length when cutting out the pieces. If they are too narrow, add a larger seam allowance when cutting out the pants.
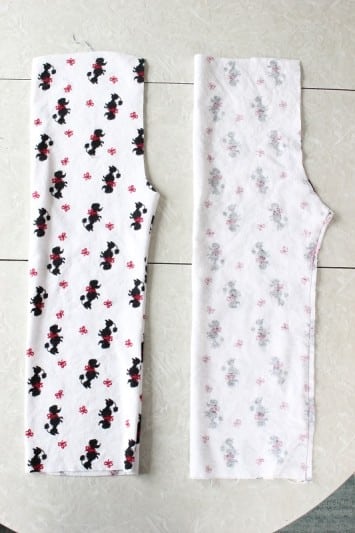
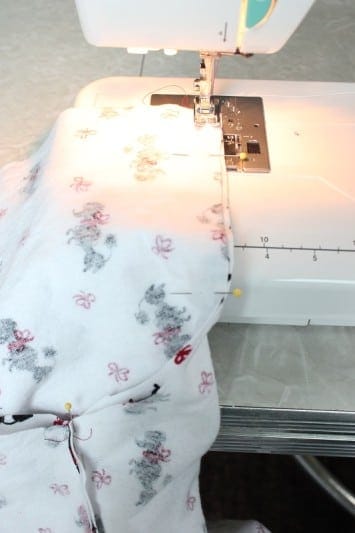
Step 3: Fold them inside out and sew (straight or zig-zag stitch) along outer leg length edge (from the bottom, to where the crotch begins to curve). Trim close to seams.
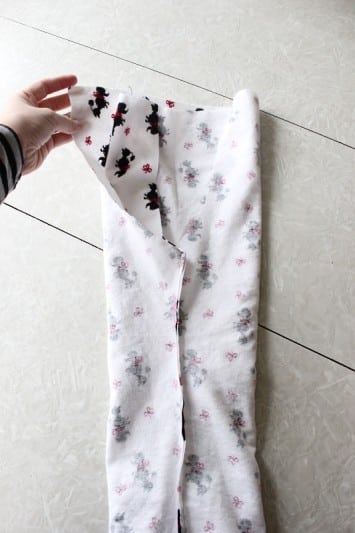
Step 4: Turn one pant leg right side out and stuff it inside the other pant leg. Right sides of the fabric will be facing each other. Make sure that the long seam that you just sewed on each leg matches the other.
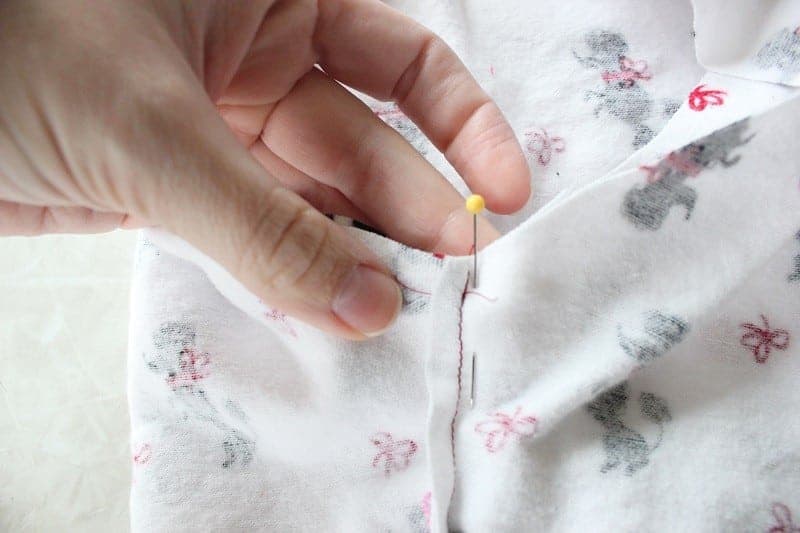
Step 5: Pin in the center to keep it in place.
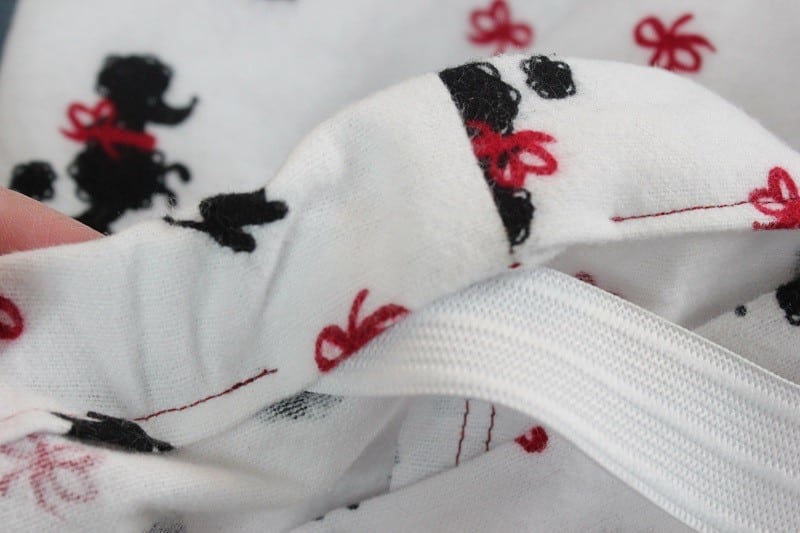
Step 6: Sew the crotch seam of the pajama pants using a ⅜" seam allowance. Begin at the waist, sew along, and end at the top again. Sew once more close to the seam line to reinforce, since this area will get a lot of wear.
Step 7: Turn pajama pants right side out.
Step 8: The length of the elastic should be the same size as your child's waist + 1".
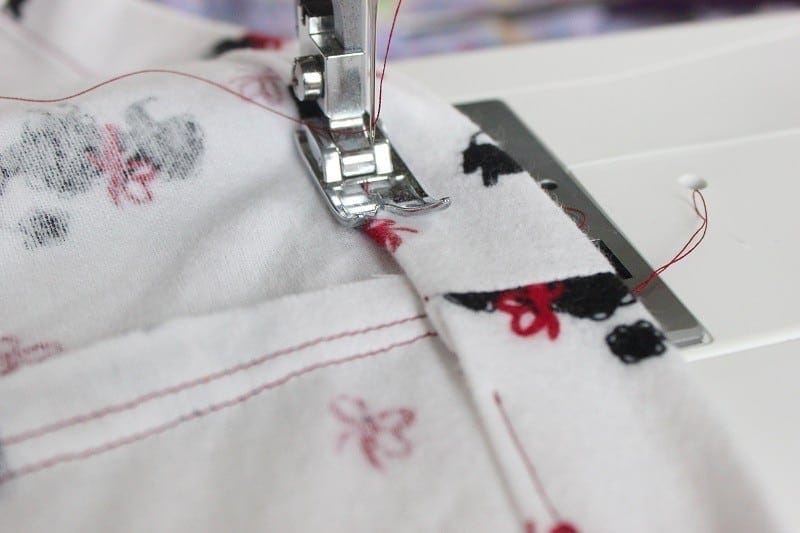
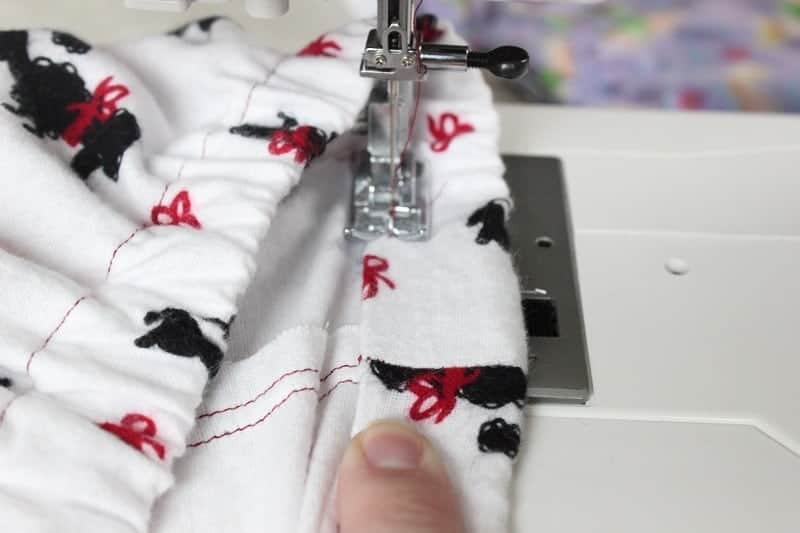
Fold down the waist ¼" inch and press it.
Fold it another 1 ¼ inch and sew the casing all the way around with a ¼" seam, also leaving a 2" gap to insert the elastic into later.
Step 9: Insert your elastic through the waistband using a safety pin to help guide it. Feed the elastic all the way through and out the other side of the opening.
Step 10: Sew the ends of the elastic together. Stretch the waist, pulling the elastic back into the opening.
Sew the gap in the waist closed.

Step 11: Fold the bottom hem up and press, then fold it up one more time and press. (This one is about ½"). Sew around on both legs. Flannel is so easy to work with. You don't need pins since it pretty much just sticks together.
Homemade Pajama Pants FAQs
Lightweight fabrics like cotton and flannel are easy to work with and work well for homemade pajama pants. Knit is also a good choice, but it isn't as easy to sew as cotton.
You do not need a pattern to make children's pajama pants, but you do need an existing pair of pajama pants to use as a cutting guide.
You can use this method for making adult pajama pants, but you will need to add a larger seam allowance in the hips and waist. This is not a standard measurement, as everyone's shape is different. You will need to adjust to your own measurements.
More Clothes To Sew


MADE THIS CRAFT AND LOVED IT? 💛 Please leave a STAR rating and COMMENT below! Post it to Facebook or Pinterest to easily share with friends!
Easy Pajama Pants Without a Pattern
Equipment
- pins
- measuring tape
- sewing machine
Materials
- Existing pair of pants
- Flannel or cotton fabric
- ¾" wide elastic cut to waist measurement
Instructions
- Use a pair of pajama pants that you already have and fold them in half. Iron if necessary to make sure you have the right shape.
- Lay the fold of the pants on the fold of the fabric.Pull the crotch area out a bit so that it is pointy.
- Cut 2 pieces (one for each leg) on the fold, using your old pair as a guide (you can trace the cutting line onto the fabric before cutting if you'd like).Note: Follow the CUTTING GUIDE in the notes section.
- Fold them inside out and sew (straight or zig-zag stitch) along outer leg length edge (from the bottom, to where the crotch begins to curve). Trim close to seams.
- Turn one pant leg right side out and stuff it inside the other pant leg. Right sides of the fabric will be facing each other. Make sure that the long seam that you just sewed on each leg matches the other.
- Pin in the center to keep it in place.
- Sew the crotch seam of the pajama pants using a ⅜" seam allowance. Begin at the waist, sew along, and end at the top again. Sew once more close to the seam line to reinforce, since this area will get a lot of wear.
- Turn pajama pants right side out.
- The length of the elastic should be the same size as your child's waist + 1".Fold down the waist ¼" inch and press it.Fold it another 1 ¼ inch and sew the casing all the way around with a ¼" seam, also leaving a 2" gap to insert the elastic into later.
- Insert your elastic through the waistband using a safety pin to help guide it. Feed the elastic all the way through and out the other side of the opening.
- Sew the ends of the elastic together. Stretch the waist, pulling the elastic back into the opening.Sew the gap in the waist closed.
- Fold the bottom hem up and press, then fold it up one more time and press. (This one is about ½"). Sew around on both legs. Flannel is so easy to work with. You don't need pins since it pretty much just sticks together.
Video
Notes
- Leave at least ½" for seam allowances on the sides.
- Add 3" on the top for the elastic casing.
- Add 1" for the bottom hem (can make it larger or smaller if you want).
- Be generous when cutting around the crotch area (where the back comes to a point) so that there is plenty of room to bend over and move around without stressing the seam. I usually go at least an inch away instead of ½" for the seam allowance in the crotch area.


The Freshman Cook says
Very cute idea! I love how your method is easy to understand! Great directions! New pajamas are my families thing on Christmas Eve! It is so much fun! Thank you for sharing at Celebrate It!
Bridget | Confessions of Parenting says
Excellent idea! Leave an extra inch of room and try a french seam 🙂
Leia cole says
I feel like both my front and my back look identical. Like the butt could fit in both, so its baggy in the front top. Any ideas?
Thanks!!
Brandy says
Hi Leia! It should be roomy in the front and the back because there really is no differentiation from the front and back. Once you add the elastic it should cinch things down a bit, but if you've already done that I'm not sure what to tell you!
Kathy Antis says
This is so easy, I just can't believe it! Your instructions are so clear that I felt I was standing right next to you watching you work. Thank you so much!
Brandy says
Thank you so much Kathy!
Diane Livingston says
I have started doing Christmas PJ's with the same theme be it different colors. I did penguin, and for 2018 the only thing I did was vinyl with elf. for 2019 I am going to sew some. I am a little nervous so have been checking out lots on pinterest. 1. Is they say sew the crotch first. 2. Then sew the legs. 3. to reinforce the crotch sew it up to 3 times as that is the first place it comes undone when wearing for a while. 4. When you put the elastic in tack it down front/back, and sides for adults. It keeps the elastic from moving around as in turning under. I can say I have some that happened. I hope mine turn out as I am putting in pockets and the crotch area for the guys. Kind of nervous but think I have it figure out. Also a little afraid to use my button hole maker, but I will practice before I actually do it. Thank you for sharing your method. It is really different than most.
Brandy says
That's awesome! I love that you make homemade themed pajamas every year. With 5 kids now, I usually just buy them, but I'm hoping to get back into making them for my kids again every Christmas!
Diane Livingston says
Good luck. I have two steps left to go. Sew the elastic and then put on the top buttons. Then done.
Maria says
Thanks for this tutorial! I am a beginner and this was really easy to follow. I made pajamas for my boyfriend and myself. The PJs fit my boyfriend perfectly (he's long and skinny) but are a little tight around my hips (I'm curvy). I wonder if that's because our hips go inside the straight fold?
Claire Nichols says
Hello, do you have the fabric to make a ladies large in the black poodle print? If so, what would be the cost? Thank you
Brandy says
Hi Claire! Unfortunately I do not have this print since it was a couple of years ago. I'm sorry! I also do not have an etsy shop right now to sell my sewing projects, but I'm thinking you may be able to find someone on there who might be able to help you more than I can!
Meghan says
Hi there- maybe I missed it but at what step do you sew the hem of the pant leg? Having a hard time visualizing....
Brandy says
Hi Meghan! The last instructional photo shows how to hem the pants 1/2". Is is the last thing you do before you are finished. Good luck! 🙂
Karlene Ball says
The same sale at Joann's is going on Wednesday too! (Just got a flyer in the mail for it)
Brandy says
Awesome! Thanks for the heads up!!
mindy says
thank you for such an easy way to make pj bottoms. i am a very beginning sewer & found this to be very easy to understand & make. i wanted the bottoms to be extra baggy for my son & so i exaggerated the point in the crotch area along with adding an extra inch & they came out perfect.
Brandy says
Wonderful! I'm so glad it worked out for you!
Marina says
Hi, thanks for sharing. I've made several PJ pants using this same method and found that adding a tiny bit extra to the "point" at the crotch when cutting out, just gives that bit of ease so one doesn't get as much creasing over the front.
Brandy says
GREAT tip, I will have to try that too!
Brandy says
Hi! I've had this problem too (for my toddler who still wears a diaper and needs a little more room). I just added an inch or so when cutting out the pattern and brought out that curved crotch area out a little more. It worked for hers!
Tina says
Great tutorial, thanks! I stocked up on flannel that day!
Tonia Jeffery says
That poodle fabric is just way too cute!
Brandy says
Thanks Tonia! I found it at Joanns! My daughter saw it and that was that!
Becca says
I'm a novice sewer, venturing into sewing clothes as opposed to quilt tops and curtains, and I found some of the directions confusing. Can you clarify the directions on sewing the waist of the pajamas to insert the elastic?
Brandy says
Hi Becca! Did you watch the video? I talk about the waistband a bit in it as well. If you still have questions let me know!
Jen says
As a novice sewer I searched everywhere for a great tutorial for pjs. I finally bought a pattern and managed to really just confuse myself.
Your instructions are the easiest to understand and the pictures are perfect. Thanks for sharing!!