Gluesticks Blog

menu icon
go to homepage
  • Sewing
  • Crafts
  • Recipes
  • About Me
    • Facebook
    • Instagram
    • Pinterest
  • subscribe
    search icon
    Homepage link
    • Sewing
    • Crafts
    • Recipes
    • About Me
    • Facebook
    • Instagram
    • Pinterest
  • ×
    Home » Holidays » Gift Ideas

    DIY Art Caddy Sewing Tutorial

    November 28, 2016 By Brandy 13 Comments

    ↓ Jump to Instructions
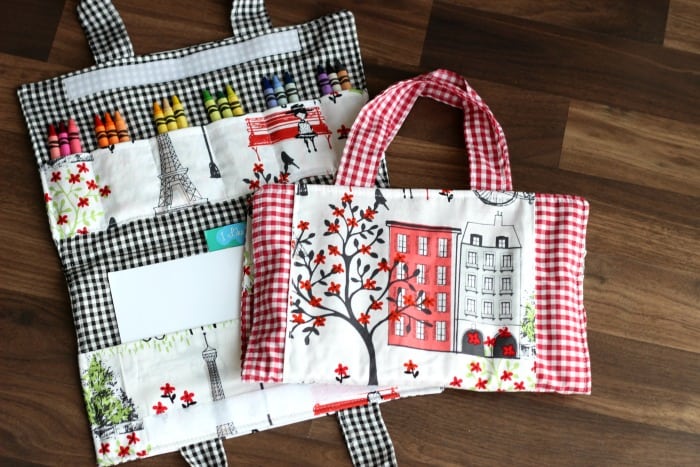
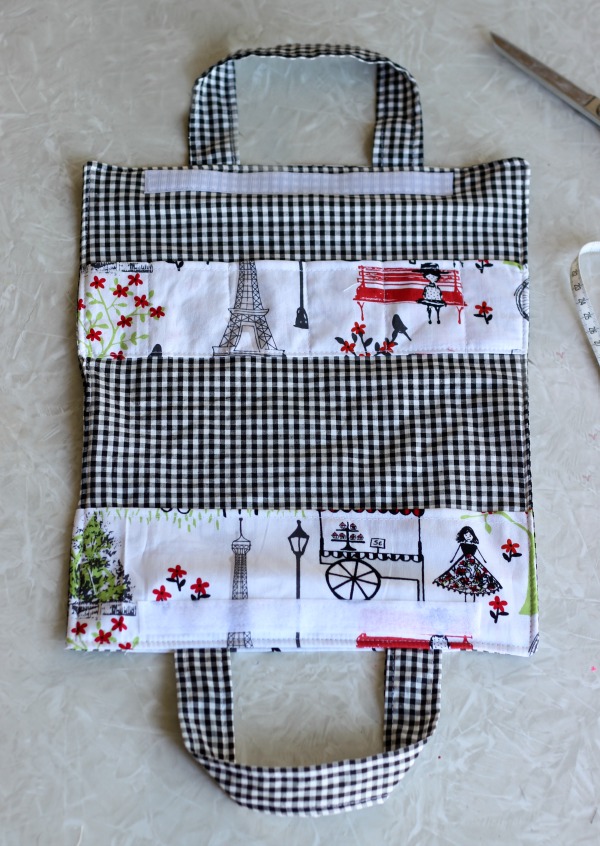
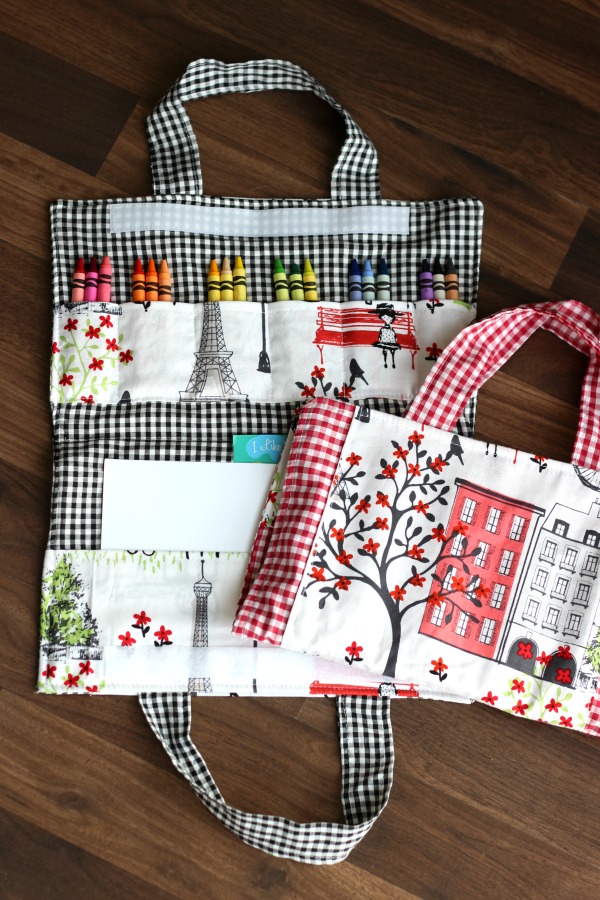
    The perfect little travel caddy to hold crayons, markers, paper and stickers! Folds up easily for storage. This quick and easy art caddy sewing tutorial will show you how to make your own! This post contains an affiliate link.
    DIY Art Caddy Tutorial
    I love finding uses for fabric scraps! After making the girls' aprons I had just enough to whip up two fabric caddies for them to hold art supplies.
    DIY Art Caddy Tutorial
    These art caddies are perfect for bringing to church or using while traveling in the car. art-caddy-tutorial2 DIY Art Caddy Tutorial 
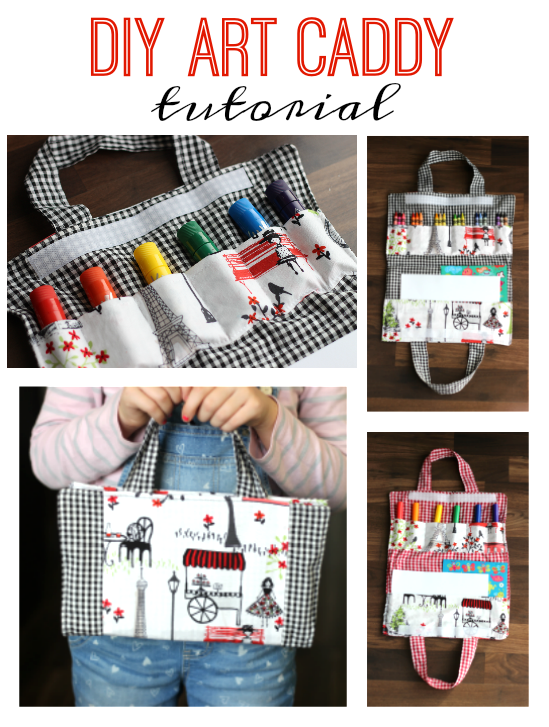
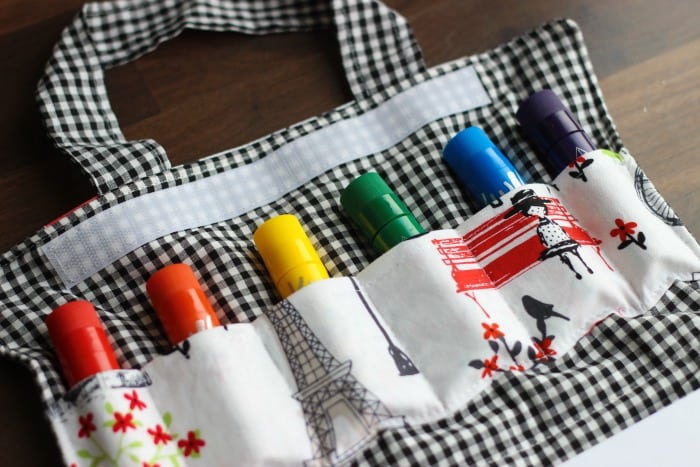
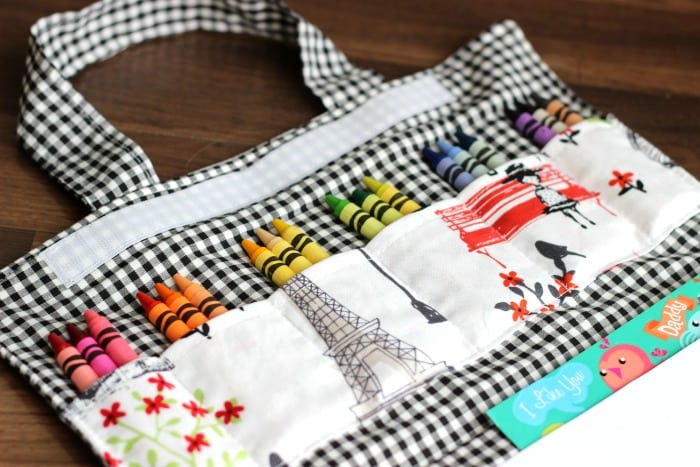
Each one comes with slots for markers and a large lower envelope for paper and stickers.
    paper pocket for art caddy
    The upper slots can hold 1 chubby marker, Kwik Stix, or 3 crayons. The bottom section can hold half sheets of paper (8.5x11" cut in half) with space to spare. 
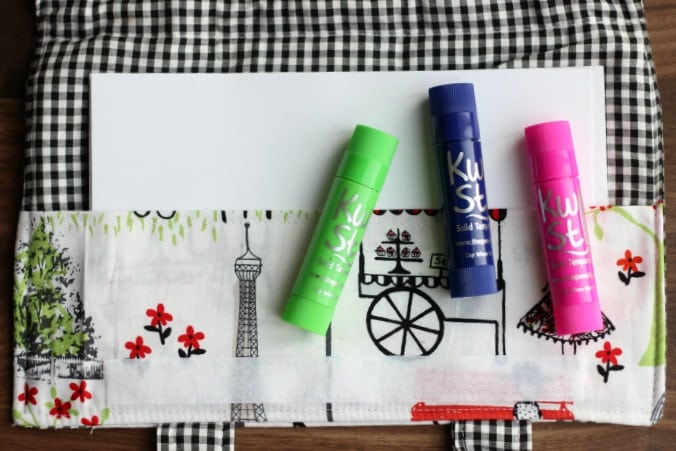
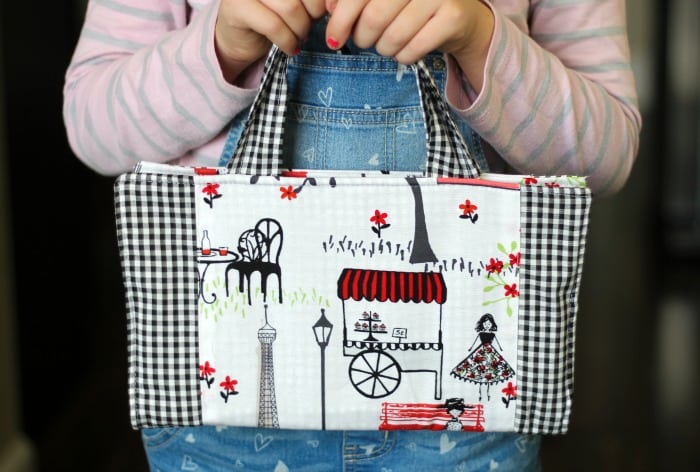
The velcro closure keeps everything nice and secure and it folds up easily with a handle for traveling!

    DIY Art Caddy Tutorial

    3 More Sewing Projects You Might Like!

    Boxed Zipper Pouch Tutorial Little Fabric Tote Bag for Lunch or Scriptures Fabric Basket Tutorial

    DIY Art Caddy Sewing Tutorial

    art caddy sewing tutorial
    Print
    5 from 1 vote

    DIY ART CADDY SEWING TUTORIAL

    The perfect little travel caddy to hold crayons and art supplies! This quick and easy art caddy sewing tutorial will show you how to make your own!
    Prep Time10 minutes mins
    Active Time30 minutes mins
    Total Time40 minutes mins
    Cost: $5

    Equipment

    • sewing machine
    • iron

    Materials

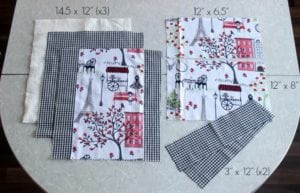
    • Outer fabric 14.5" x 12"
    • Lining fabric 14.5" x 12"
    • Thin quilt batting 14.5" x 12"
    • Upper pocket 12" x 6.5"
    • Lower pocket 12" x 8"
    • Straps 3" x 12" x 2
    • Velcro 8"

    Instructions

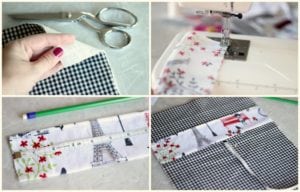
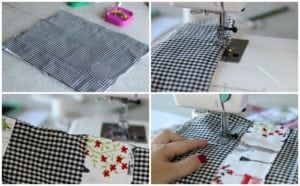
    • Cut fabric and organize fabric pieces.
      make an art caddy
    • Adhere fabric and batting with basting spray or baste a few stitches along the top and the bottom to keep it together. I used basting spray.
      quilt art caddy
    • Fold the upper pocket in half (right sides together) and sew along the long side. Turn right side out, press, and top stitch along the top.
    • Mark 2" increments along the pocket.
    • Find the midway point on the lining/batting piece and mark with a pin. Place pocket 1" above the pin and pin in place.
      sewing an art caddy
    • Sew along the 2" lines that you marked previously to create sections.
    • Stitch across the bottom. You will now have 6 sections to hold crayons, etc.
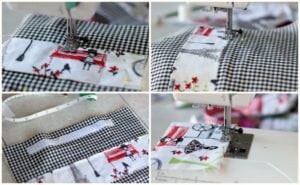
    • Place half of the Velcro ¾" from the top and center it with the sides. Pin. Stitch in place.
    • Fold the bottom pocket in half, right-side-out, leaving the sides and bottom edges raw. Top stitch along the top. Press.
      how to sew a crayon caddy
    • Pin other section of Velcro ¾" from the bottom of the lower pocket. Pin. Stitch into place. Pin onto the lining fabric, lining up raw edges and pin into place.
    • Fold each strap in half, right sides together and stitch along the side. Turn right side out and top stitch along the side seams. Leave ends raw.
    • Pin straps 3" from the sides of the lining piece on each side, lining raw edges up.
      finishing up caddy
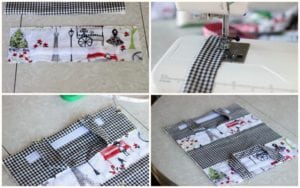
    • Place top fabric on top of lining/batting piece, right sides together. Pin all the way around, leaving a 4" section to turn later.
    • Stitch all the way around with a ⅜" seam.
    • Turn right side out, and fold raw edges of the opening closed. Pin. Top stitch around entire fabric caddy.
    • Top stitch a seam along the midway point of the caddy to make it easier to fold in half when closing.
    • Fill with art supplies.
      art caddy filled with crayons

    Notes

    14.5" x 12" I added a decorative strip of fabric to my outer fabric, but this is optional. You can use the same fabric for the outer fabric and the lining fabric.
    Fabric Art Caddy
    Now all that's left to do is fill it up with a rainbow of art supplies!
    DIY Art Caddy Tutorial

    For 60 more sewing projects, check out my sewing book for kids!

    Related

    Share
    Pin

    More Craft Tutorials

    • basket of pillow treats
      YW Camp Pillow Treat Tags (Free Printables!)
    • two summer camp printable tags with drink packets
      Summer Camp Flavored Water Printable Tags
    • printable chapstick gift cards with chapstick
      "Don't Worry Be Chappy" Chapstick Printable Tags
    • Journaling Handout (Easy Gift Idea)

    About Brandy

    Welcome! I'm Brandy, mother to 5 darling kiddos and a cute black lab named Toby. My husband is in the Coast Guard so we've lived all over the place, turning each house into a home. I love baking, sewing, making cute things with my kids, and sharing what I've learned with all of you!

    Comments

    1. Anne M (Domesblissity) says

      December 07, 2016 at 4:40 am

      Hi Brandy! What cute fabric! I think I might have to whip up a couple of these for my children for Christmas. Thanks so much for linking up to Thriving on Thursdays last week. I'm featuring your post at tomorrow's party.

      Anne xx

      Reply
    2. Anne @ Domesblissity says

      December 07, 2016 at 4:38 am

      Hi Brandy! Those fabric combinations are gorgeous. I've always wanted to make these for my kids. I think I might have to whip up a couple of these for Christmas. Thanks so much for linking up to Thriving on Thursdays last week. I'm featuring your post at tomorrow's party.

      Anne @ Domesblissity

      Reply
    3. Julie Christiansen says

      December 04, 2016 at 11:24 am

      What a fun little art bag! Love it!

      Reply
    4. JESS44903 says

      December 04, 2016 at 9:06 am

      Oh what a good idea!! 🙂

      I would love for you to share this with my Facebook Group for recipes, crafts, tips, and tricks: https://www.facebook.com/groups/pluckyrecipescraftstips/

      Thanks for joining Cooking and Crafting with J & J!

      Reply
    5. Angela Saver says

      December 03, 2016 at 9:36 pm

      Every year there is chocolate & toothbrushes in the stockings! Gotta brush after that chocolate!

      Reply
    6. Wendy says

      December 02, 2016 at 7:11 pm

      These are so cute for the little artist

      Reply
    7. Yuli Gonzalez says

      December 02, 2016 at 11:04 am

      Chocolate oranges .

      Reply
    8. Lauren says

      November 30, 2016 at 7:13 pm

      He always brings Tic Tacs.

      Reply
    9. Caitlin S. says

      November 30, 2016 at 1:47 pm

      We always do a new toothbrush in each stocking!

      Reply
    10. Kam Beal says

      November 30, 2016 at 9:20 am

      Santa brings tothbrushes, paste, and flossers every year.

      Reply
    11. Jennifer H says

      November 28, 2016 at 5:59 pm

      These are so cute!!

      Reply
    12. Tiffiny Banks says

      November 28, 2016 at 8:55 am

      This would be so fabulous! My little artist can do all her painting with none of the mess!
      Must haves in our stockings- toothbrushes, matchbox cars, chocolate oranges, special ornaments... and now maybe some paint sticks!

      Reply
    13. Tonia Jeffery says

      November 28, 2016 at 8:16 am

      Every year there are mandarin oranges in the stockings.

      Reply
    5 from 1 vote (1 rating without comment)

    Leave a Reply Cancel reply

    Your email address will not be published. Required fields are marked *

    Recipe Rating


    This site uses Akismet to reduce spam. Learn how your comment data is processed.

    Welcome!

    I'm Brandy! I love to create and share my ideas through easy-to-follow recipes and tutorials.

    More about me

    Popular

    • cookies on wire cooling rack
      Mrs. Fields Blue Ribbon Chocolate Chip Cookies
    • variety of beadable pens with silicone beads
      Beadable Pen Tutorial (Easy Gift Idea!)
    • chocolate chip cookie on baking sheet
      Snoop Dogg's Rolls Royce Cookies
    • two metal stamped bracelts on table with marker and metal stamps
      Easy Metal Stamped Bracelets

    Seasonal

    • ring bowl with 3 rings inside and 2 sitting next to it
      Easy Hand Stamped Rings Tutorial
    • DIY Jewelry Box for Kids to Organize Rings and Earrings!
    • yw camp shrink art keychains
      YW Camp Shrinky Dink Keychains
    • 100 grand bar with bite taken out of it
      Homemade 100 Grand Bars (3 Ingredients!)

    Footer

    ↑ back to top

    About

    • Privacy Policy
    • Accessibility Policy

    Newsletter

    • Sign Up! for emails and updates

    Contact

    • Contact

    As an Amazon Associate, I earn from qualifying purchases.

    Copyright © 2025 Gluesticks Blog

    Rate This Recipe

    Your vote:


    A rating is required
    A name is required
    An email is required

    Recipe Ratings without Comment

    Something went wrong. Please try again.