Gluesticks Blog

menu icon
go to homepage
  • Easter
  • DIY
  • Recipes
  • About Me
  • Subscribe
    • Facebook
    • Instagram
    • Pinterest
  • subscribe
    search icon
    Homepage link
    • Easter
    • DIY
    • Recipes
    • About Me
    • Subscribe
    • Facebook
    • Instagram
    • Pinterest
  • ×
    Home

    Make Your Own Flash Diffuser

    April 20, 2012 By Brandy 14 Comments

    homemade flash diffuser on camera
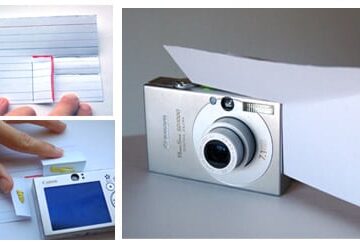
    Tired of your indoor photos being washed out because of the flash on your camera? Use this photography hack to create a simple flash diffuser using an index card!

    3 images showing the same photo in natural versus flash light versus diffused light

    I'm not a professional photographer, but I do enjoy trying out new things to get better pictures of my children. I recently got my first DSLR camera. I've used my Canon Powershot for the past 4 years and was very happy with it, but am having fun learning about my new camera too.
    I learned a tip not too long ago that I wish I had knows years ago!
    close up of baby's face

    How to make your own flash diffuser!

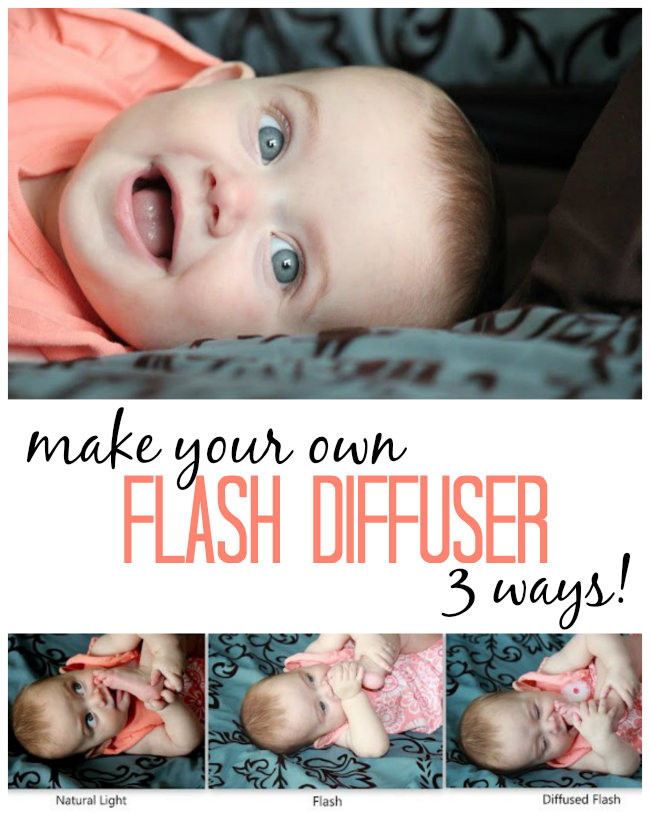
    I HATE using the flash and rarely use it. Ever. It looks awful when I do, and totally washes out any image with it. So I usually rely on sunny days with lots of natural light for any photo that I really care about. The above photo of Ruby was taken on a cloudy day when the sun popped out for about 5 minutes. But then it went back...and I still wanted to take more photos of her happy little self.
    white card against camera flash
    via
    flash on camera covered by white tissue
    via
    flash cover made from white paper
    via
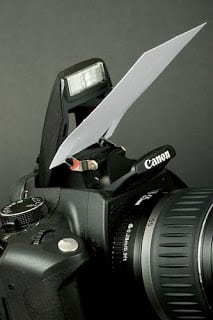
    When I saw this quick tip on how to get great photos indoors using a flash diffuser, I had to try it! I used a small white piece of cardstock and covered the flash and here are my results of my little experiment... (any professional photographer will laugh at this because they all know about this, but I just figured it was flash or no flash....I love the in-between).
    3 images showing the same photo in natural versus flash light versus diffused light
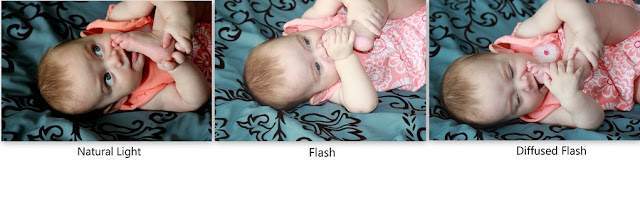
    The first one at the top of the post turned out so pretty! So I decided to test out the flash diffuser. It certainly brightened it up without washing her out like the middle photo did.
    You might also like...
    homemade cleaning products
    Homemade Cleaning Hacks

    Simple Wedding Cupcakes

    April 18, 2012 By Brandy 6 Comments

    vintage bride and groom chocolate molds on cupcake
    I made these cupcakes for the Kindergartner's "Q&U Wedding" a couple of weeks ago. Every year the teachers put on a wedding for the letters "Q" & "U". It is a fun way to instill the fact that they are forever united as they start to read and write. It's a kooky event, but they love it! After the wedding in the cafeteria, the students all go back to their classrooms for a reception.
    They were dressed in their best wedding attire, had snacks, and danced...a lot. It was a great day and our family was able to go and spend the day with Aaron at school.
    chocolate and vanilla wedding cupcakes on cooling rack
    I found a chocolate/soap mold online for a couple of bucks and used that to create the cupcake toppers. It was SO easy and quick. I thought they turned out darling and they were a huge hit with the kids and teachers. Much more so than if I had used picks.
    chocolate groom and vanilla bride molded cupcake toppers
    I used a 2D Wilton top for the icing. Another easy technique with great results. I was able to make 24 cupcakes, frosted and topped with chocolates in less than 2 hours. Not too bad!
    I'm not sure what I'll use this mold for in the future, but it is so cute I'm sure I'll find a reason to pull it out again!

    Our Quiet Book: 12 Layout Ideas

    April 13, 2012 By Brandy 31 Comments

    12 quiet book page layouts
    Children love playing with quiet books, and moms love how they inspire creative play. Here are 12 simple quiet book layouts to add to your fabric quiet book. From farm animals to pirate's treasure, there is something for every age!

     quiet book pages bound with rings

    Our Quiet Book: 12 Layout Ideas

    It's happened! After almost 9 years of wanting to make a quiet book for my children, I have finally done it! And it wasn't as hard as I thought it would be, and it wasn't as time consuming as I thought it would be! It could be because I've had layouts in my mind that I wanted to make for years, so it was just sitting down and putting them together.
    A friend at church invited some of us young mothers to her house to browse through a couple of quiet books that she had when her children were young. It was a lot of fun and gave me some ideas the motivation that I needed to get started.

    Some things that I would recommend for making a quiet book:

    Minimal Velcro! Velcro is loud. It's perfect for a busy book, but if this is going to church with you, I'd limit how much you use. I think I used it on one page.
    Minimal Felt. Felt will pill over time. I used it in a few places, but for the most part I used cotton. Since cotton frays, I used a zig zag stitch to sew the fabric on without having to hem it. I used sturdy cotton for all of the pages. A large rectangle of it that I folded in half and made 2 pages on. Then I flipped it in-side-out, sewed up 3 sides, slid a thin layer of batting inside, and then sewed up the top and top stitched the entire thing (on my machine, no hand-sewing here....I'm horrible at it) and that created 2 pages. They are a bit bulky, but I was able to fit more pages into my book that way.
    Puffy Paint/Fabric paint works well for adding details. Easier than hand stitching (although hand stitching would probably look better), and it dries within a couple of hours.
    Eyelets are inexpensive and work great to bind the book with rings. This also allows you to take the book apart and add more pages or split it up among a few kids at a time if they all want to use it.
    Here are the pages that I created. I don't have patterns to share, but thought that this give you an idea if you are looking for some fun layouts. Just simple shapes. As you can see, I used a lot of scrap fabrics to create mine. It really helped me go through my stash and organize it. It also helped me create some schemes. I'd find a print I liked and I'd create a page to go around it.
    quiet book farm page
    Barnyard: I bought the wooden farm animals. 4 in a pack at Michael's for $1. They are glued onto popsicle sticks.
    quiet book page with hand and ring. Child putting hand through ring.
    Does it Fit?: My kids love all of the fun erasers that have come out. I used a ring one for this page.
    quiet book camping page with tent and finger puppets.
    Woodland Campout: This page is definitely one-of-a-kind. I asked the kids what they thought should be under the tent and they decided that a penguin in underwear would be funny. So I cut one out of a scrap piece of fabric. Definitely original. It says "Keep Out!" I made little fabric pockets and put woodland finger puppets inside. I'm not sure where I got them from. We've had them for years.
    railroad track quiet book page with small wooden train toy
    Train Tracks: Not my favorite, but it works. I used puffy paint and created a pocket with Velcro for the little train to be stored in.
    treasure chest quiet book page with flap and beaded necklaces
    Treasure Chest: My friend gave me  a little lock and key for this one. She also had a cut out of a treasure box to use as a pattern. I put some fun things inside. It was a lot of fun to make this page!
    fish bowl quiet book page
    Button Fish: The fish button onto the matching color and are stored in the fish bowl which is a pocket.
    zip open jungle themed quiet book page
    Jungle: I made a pocket out of some scrap flannel and added a zipper and felt leaves. Finger puppets (purchased at IKEA a few years ago) fit perfectly inside.
    bugs and insects quiet book page
    Insect Jar: Scrap vinyl worked perfectly for the "glass" on the jar. Wooden bugs (4/$1 at Michael's) and a $1 magnifying glass.
    clothesline and hamper laundry quiet book page
    Clothes Line: Mini clothespins and fleece cutouts. Store in fabric laundry basket.
    flower petal quiet book page
     Numbers/Shapes Flower: Each petal folds over. Numbers and shapes are revealed.
    toddler hands in mittens page
     Mittens: Fleece mittens, left open on the bottom, for little hands to slide inside.
    purse with felt make up quiet book page
    My Purse: The little fabric purse holds Kaylee's felt make up perfectly.
    quiet book pages bound with rings
    Put together with rings and stored in a little tote bag, all ready to go. It isn't perfect, by a long-shot, but it works for us!
    small denim tote to store quiet book

    You might like...

    cardstock busy book for kids with rings

    Card Stock Busy Book

    fabric minion totes for kids to make

    Minion Summer Tote Tutorial

    Here are some fun sensory and creative activities for kids that you might want to check out!

    Lightsaber Bolster Pillow Tutorial

    April 11, 2012 By Brandy 4 Comments

    light saber bolster pillow on bed
    light saber pillow on bed
    The other morning, as Aaron was getting ready for school, I told him that if he remembered to make his bed there might be something waiting on it when he got home. He did....and there was! Most people probably zone out in the morning while in the shower, but I am not normal. I use that blessed 10 minutes to go over what I need to do that day and "organize" my thoughts....or brainstorm a new idea for a project. It seemed as though it had been FOREVER since I had sewed something for the boys and so I starting thinking of something that I could make....in under 2 hours...that didn't cost any money. Because that would require a trip to the store and then I wouldn't have had time to make it before Ruby woke up from her nap and Aaron got home from school!
    I'm rambling.....so to sum things up, I came up with this Lightsaber Bolster pillow! And each pillow that I made took about 30 minutes start to finish! I bet I could even cut it down to less time if I made more of them.
    So if you have a little Star Wars fan in your home, you might be interested in trying one of these as well!
    And this project is so EASY. So if you are just trying your hand at sewing, this is the project for you!
    fleece cutting guide for pillow
    You will need fleece scraps. 1 {10"x 24"} piece, 1 {8" x 10"} piece, and 2 {3.5"} circles.  You will also need extra small scraps for the details as well as polyester fiber fill. I used a good portion of a bag to fill one of these.
    fleece shapes cut out for saber handle
    The first thing you will need to do is design your handle. I sewed green stripes across mine and then folded it in half to make sure that the "buttons" were centered. Make sure that the 8" side is the height and the 10" side is the width.
    fleece handle section stitched
    Pin your handle to the saber piece and stitch using a ⅜" stitch.
    inside out pillow ready to turn right side out
      Then fold in half, and stitch up the side, leaving the ends open. Also a ⅜" Stitch.
    pinned bottom to pillow
    Pin your saber circle to the end.
    sewing machine stitching stitching bottom of pillow
    Stitch the circle closed using a ¼" stitch.
    light saber pillow tube ready to stuff
    Flip your saber right side out and you will have a tube like this!
    stuffed pillow
    Now stuff that bad boy until you can't stuff any longer. I was able to reach down with my hand for the most part, then used a wooden spoon to pack it in. Because we all know that even though this is a pillow, it will also be used as a weapon and nobody wants a limp light saber....although it will still be slightly limp, even with the best stuffing.
    hand stitching end of pillow closed
    Now use your handle circle and hand stitch the bottom closed. Since it is fleece and won't fray, you can just stitch it without folding the edges, or you can fold the edges as you go for a smooth finish.
    pillow end stitched closed
    Done!
    two beds with two light saber pillows
    When Aaron got off of the bus, I barely received a "hello". He hung up his back pack, threw his shoes into the closet and booked it upstairs to see if there really was a present waiting for him. Apparently he had been thinking about it all day in class so it was a good thing that I was able to finish them!
    Dallin was pretty excited when he came home too. They used them to smack each other, of course, and also used them as a neck roll while watching a show later in the evening.
    2 light saber pillows on twin sized bed
    These would make fun birthday gifts for their friends as well!
    bunk beds with saber pillows
    And are the perfect addition to the pirate, frog, Star Wars theme of their bedroom 😉

    Steak & Vegetable Stir Fry

    April 3, 2012 By Brandy 6 Comments

    Beef and broccoli stir fry served over white rice.
    steak stir fry in red bowl with chop sticks
    I absolutely love Chinese food and definitely have my favorite dishes. All which seem to be soy sauce based. The Beef/Broccoli, Lo Mein, Chicken/Cashew ones. So those are the ones I try to replicate at home. Here is one of our favorites. I like using a large amount of vegetables in my stir fry to make it go further and spare some calories. Especially when using beef, which I only cook with every few months or so. So this dish was a treat for us!
    Steak & Vegetable Stir Fry
    1 lb. sirloin steak, sliced on the grain
    2 T. vegetable oil
    Marinade:
    2 T. soy sauce
    1 T. white wine
    1 tsp. corn starch
    dash of pepper
    1 T. vegetable oil
    1 carrot, peeled and sliced
    1 bunch asparagus, chopped into bite size pieces
    2 c. broccoli florets
    Stir Fry Sauce:
    2 T. white wine
    2 T. soy sauce
    ½ c. chicken broth
    ¼ tsp. ground ginger
    1 T. corn starch
    3 T. oyster sauce
    Marinate the steak in the marinade while you prepare your veggies. Heat 2 T. of oil in pan (I use a large skillet) on HIGH HEAT. When you pan is piping hot*, add your steak, in a single layer. Let it sit there for 2 minutes before messing with it. Check to make sure it isn't burning, but you want it nice and golden before stirring it up. Once it has browned nicely, stir it up for another 1-2 minutes. Until it is cooked through.  Remove from heat and set aside.
    In the same pan on MED-HIGH heat, heat 1 T. oil and add your vegetables. Cook  for 3-4 minutes (stirring constantly) or until the broccoli is slightly tender.
    Combine your sauce ingredients, mix well to incorporate the corn starch. Add sauce and meat back into your vegetable pan and remove from heat. Stir well. Since the pan is super hot, the sauce should thicken very quickly.
    Serve over steamed rice.
    broccoli and asparagus over steak stir fry

    For more homemade Chinese dishes, scroll to the bottom of the post. I hope your family enjoys these as much as ours does!*The key to stir fry is keeping your pan HOT, giving it time to heat up before adding your meat and veggies, and cooking quickly. This keeps your meat tender and juicy inside and seared on the outside without getting tough. It also keep your veggies crisp and colorful vs. soggy.

    red plate with stir fry and chopsticks on bamboo placemat


    Easy Cakes For Kids To Make

    March 12, 2012 By Brandy 26 Comments

    Hedgehog cake, ballerina cake, hamburger cake, chicken cake, minion cupcakes, camping cake, basketball cake, buterfly cupcake, pizza cookie, puppy cupcakes, Mac and cheese cake and pigicorn cake.

    Here is a collection of easy cakes for kids.  From a classic hamburger cake to a darling chicken cake, if you are looking for a fun afternoon activity for your child or an idea for the next Blue & Gold Banquet, you've come to the right place!

    You might also like my easy Christmas sugar cookie decorating tutorials or my recipe for easy bubblegum ice cream!

    Collage of kids cakes.

    I had a lot of fun strolling down memory lane to put this collection of over a dozen easy cakes for kids. Each one is simple enough for little hands to help with. Perfect for birthdays or any occasion.

    What Makes These Cakes Easy To Make

    • Boxed cake mix. Most of these cakes require a boxed cake mix. This gives kids confidence as it minimizes the amount of measuring they need to do as they are getting the hang of baking.
    • Creative decorations. Many kids struggle with piping using frosting tips. These cakes use creative decorations like fondant that they can roll like play dough or candy that they can mold into different shapes. The puppy paw cupcakes use Oreos and Junior Mints!
    • Simple shapes. Round cakes and cupcakes are the base of most of these cake ideas. If they do need to be cut, the cuts are simple to make.

    What Others Are Saying

    I made the hamburger cake this week for my 9 yr olds first day back at school after the summer holiday. It turned out so well! I wish I could ad a pic on here because I'm so proud of how great it looked and it tasted amazing, especially the 'patty' Thanks for such a great recipe!—- Claire

    Made the hamburger cake today and it was amazing! I used brownie mix for the“meat” and it looked more realistic. Made a whole pickle instead of the slices. I love the instructions. Thank you!—-Stephanie

    [feast_advanced_jump_to]

    If you don't see instructions listed below for the cake you want to make, just click the link in the description, and it will take you to that post!

    Simple Hedgehog Cake

    Little hedgehog cake frosted in chocolate and peanut butter buttercream.

    This simple hedgehog cake is a small round cake. My son was in his hedgehog phase and requested a hedgehog birthay cake. The frosting is applied using a "grass" frosting tip! The eyes are candy eyes, and the nose is a black jelly bean. Here is how I made it:

    • Step 1: Bake 3 small round cakes. Frost with chocolate frosting.
    • Step 2: Outline the face with beige frosting then fill in and smooth with a spatula.
    • Step 3: Place the candy eyes and nose onto the cake.
    • Step 4: Use a grass tip and a variety of brown shades of frosting to pipe the spikes onto the cake!

    Pigicorn Cake

    Pink pigicorn cake on cake platter.

    Not exactly a classic cake, but hilarious and fun, still the same. My daughter loves pigs, so we made a pink pigicorn cake for her birthday a few years ago. Here is how we made this cake:

    • Step 1: Bake and stack 3 round cakes.
    • Step 2: Frost the cakes with pink icing.
    • Step 3: Add sprinkles around the base.
    • Step 4: Decorate cake with foam flowers, a unicorn horn and eyes.
    • Step 5: Don't forget a plastic snout.

    We found everything we needed on Amazon.

    Easy Hamburger Cake

    Checkerboard cake platter with hamburger themed cake.

    This hamburger cake is a classic childhood cake. My son and I made it to bring to his first Cub Scout Blue and Gold banquet when he was 8. There are so many ways to get creative with the toppings on the cake. Here is what we did:

    • Step 1: Bake 3 round cakes: 2 yellow and 1 devil's food. There is no need to frost them since they already look like a bun and a burger patty.
    • Step 2: Start with the bottom bun and add frosting in the center to hold the cakes together. We used a leaf tip for the lettuce---squirt and pull, squirt and pull.
    • Step 3: Make pickles and cheese from marshmallow fondant (but you can buy store-bought fondant), and ketchup and sesame seeds using a round frosting tip.
    child with finished hamburger cake

    Such a fun and easy cake! I especially loved that we didn't need to frost the outside of the cake!

    Macaroni and Cheese Cake

    red checkered cake board with mac and cheese themed cake

    This cake is truly original and fun. My son wanted to make a macaroni and cheese cake. We had nothing to go by so we made it up as we went. Here is how we made this cake:

    • Step 1: Baked 1 cake mix in the Pampered Chef batter bowl @ 325 degrees for 1 hour and 15 minutes to create the bowl.
    • Step 2: Scooped out the top 2" to make an area for the macaroni to fit inside.
    • Step 3: Use orange fondant to create ropes and then cut the ropes into little sections with a butter knife and curve them to create the macaroni.
    • Step 4: Cover the cake with a light coat of buttercream frosting and then add the fondant.

    Note: You can also skip the fondant on the cake and cover the bowl with buttercream, too. A star tip is easy for kids to use and would quickly cover the surface.

    Child with finished macaroni and cheese cake.

    Yep, HE did the fondant! I rolled it out for him, and he draped it and pressed it around the edges. It didn't need to be perfect, but I think it turned out perfect.

    Vintage Bunny Cake

    Bunny cake cutting diagram and girl with frosted bunny cake.

    My mom made this classic Easter bunny cake for my first birthday and I had fun recreating the cake with my own girls! Such a simple cake to make using only 2 round cakes. No special cake pan required. Here is how we made our bunny cakes:

    • Step 1: Bake 2 round cakes.
    • Step 2: Cut the cakes according to the diagram to form the ears and bow tie.
    • Step 3: Frost the cake with whatever kind of frosting you'd like.
    • Step 4: Use candies and sprinkles to decorate the bunny cake.

    Adorable Minion Cupcakes

    Minion cupcakes on a blue platter.

    EASY. FUN. HILARIOUS! Every family needs to make a batch of these easy minion cupcakes. We made these just for fun. They are pretty straightforward. Here is how we made them:

    • Step 1: Bake a batch of cupcakes. Frost with blue frosting
    • Step 2: Cut a Twinkie to size and place a Twinkie on top of each cupcake.
    • Step 3: Use Smarties for the eyes, and frosting to make all of the details!

    Princess Pull Apart Cake

    Cupcakes arranged in the shape of a dress and frosted with pink frosting.

    This princess pull-apart cake was incredibly easy to put together for my daughter's birthday one year. Here is how we did it:

    • Step 1: Bake a batch of cupcakes.
    • Step 2: Arrange the cupcakes into the shape of a dress.
    • Step 3: Frost the cupcakes with a rosette frosting tip.
    • Step 4: Add candy pearls for the necklace and waist on the dress.

    Pepperoni Pizza Cake

    Sugar cookie decorated to look like pizza.

    In all honesty, this is a giant sugar cookie, but it would be a fun "cake" for kids to enjoy on their birthday. It's fun for kids to make too! Here is how we made our giant sugar cookie pizza:

    • Step 1: Bake a 14" round sugar cookie on a pizza pan. Poke holes into the dough before baking to prevent it from puffing up too much. Bake at 400 degrees for 15 minutes.
    • Step 2: Spread red frosting across the cooled cookie for the sauce, and use white frosting for the cheese.
    • Step 3: Cut fruit roll-ups into circles and place on top for the "pepperoni".

    Tip for making the cheese: I used Ziploc baggies and filled 2 of them with white icing. Then I trimmed off one corner from each baggie. 1 corner was a VERY tiny hole, and the other was a little bigger. That way, it would look like shredded cheese in different stages of being melted. I drizzled and dropped the icing all over the place randomly.

    Puppy Paw Cupcakes

    3 cupcakes decorated like puppy paws.

    An Oreo and Junior Mints. It doesn't get simpler for these puppy paw cupcakes! Ruby made these for Kaylee's 7th birthday.

    Little Chicken Cake

    chicken cake on white cake platter

    No special cake decorating tools required here! This little mound of a cake turned out pretty cute and is just covered in coconut. Here is how I made this chicken birthday cake:

    • Step 1: Stack 3 small round cakes. Trim to round the top off. Frost with white frosting.
    • Step 2: Cover the entire cake in coconut.
    • Step 3: Use starburst candies for the beak, feet, and comb. Use jelly beans for the eyes.
    • Step 4: Add toasted coconut around the base for straw.

    Butterfly Cupcakes

    Hand holding a butterfly cupcake frosted with yellow frosting.

    These easy butterfly cupcakes couldn't be simpler to make! The perfect baking project for kids.

    • Step 1: Make a batch of cupcakes and frost them with whatever kind and color of frosting you'd like.
    • Step 2: Add jelly candies for the wings.
    • Step 3: Add mini gummy worms for the center of the butterfly.

    Camping Birthday Cake

    Camping themed birthday cake.

    A fun and easy cake to make for any outdoor enthusiast! Here is how we made it:

    • Step 1: Bake 2 round cakes, one large and one small. Frost with chocolate frosting.
    • Step 2: Cover the edge with chocolate rocks.
    • Step 3: Create a lake using blue frosting, goldfish crackers and candy rocks as a border.
    • Step 4: Create trees using Bugle corn chips covered with frosting.
    Collage of camping cake photos. Close up of candy rocks, frosting lake with goldfish crackers, trees made out of frosting and bugles chips.

    Cupcake Flower Cake

    9 cupcakes and one round cake decorated like a flower.

    Kaylee made this cupcake flower cake for a tea party she hosted for a bunch of her little friends. It was incredibly easy to make. Here is how we did it:

    • Step 1: Bake one small round cake and 10 cupcakes.
    • Step 2: Frost the cake with a spatula, then frost the cupcakes with a rosette frosting tip.
    • Step 3: Add sprinkles.

    Classic Teddy Bear Birthday Cake

    Children decorating teddy bear-shaped cake.

    My mom made me a classic teddy bear cake for one of my birthdays as a child. My kids made one for me decades later! We had fun putting this German chocolate teddy bear cake together. Here is how we made it:

    • Step 1: Bake 2 (8") round cakes and 6 cupcakes.
    • Step 2: Arrange cakes and cupcakes into a teddy bear shape.
    • Step 3: Frost with coconut frosting.
    • Step 4: Add candy details.

    Basketball Pull Apart Cupcake Cake

    Basketball cupcake cake on platter.

    A fun basketball cupcake cake for any basketball player! Pull-apart cakes are fun because each piece of cake is actually a cupcake. Here is how I made it:

    • Step 1: Bake a batch of cupcakes.
    • Step 2: Arrange cupcakes in a large round shape.
    • Step 3: Frost cupcakes with orange frosting.
    • Step 4: Decorate cupcakes with Reese's Pieces candies to look like basketball details.

    Neighborhood Scavenger Hunt!

    March 8, 2012 By Brandy 6 Comments

    Neighborhood Scavenger Hunt
    laminated scavenger hunt with dry erase pen
    The kids and I had a lot of fun recently when we went exploring in our neighborhood! With such a mild winter we've been able to spend a lot more time outside this year than we normally would!   It's been a couple of weeks since we made these scavenger hunt sheets and they have used them a couple of times since!
    Our printer was out of commission at the time so I wasn't able to just print out a bunch of clip art images. I cut up a little preschool workbook that we didn't need anymore and glued the images to a sheet of copy paper and then laminated it so that we could use a dry erase marker with it.
    child marking off items on scavenger hunt
    They LOVED this activity. They would check off items as we found them and even after they found everything off of the list, they'd keep checking them off. Some had 5 or 6 check marks next to it. Those were easy things like fire hydrants, trees, etc. The hardest item to find was a cat, but we went out on a dreary day. Any sane cat would have been inside.
    boy marking off items on scavenger hunt
    I made 3 sheets different sheets, one for each child. Each time we go out, they swap sheets so that they have new things to find. Sometimes the simplest activities are the best.
    You can find a printable version of a similar activity here.

    Pin It

    Clean-Up Jar

    March 6, 2012 By Brandy 17 Comments

    glass jar with jelly beans

    glass jar with jelly beans
    This is our family clean up jar. When the kids pick up something around the house that is "above and beyond" what they are required to clean up, they get a jelly belly. Things like their shoes, backpack and jacket don't count. They need to be doing that anyways, but something extra to help out Mom or baby sister, etc. will earn them a bean.
    The system was working out perfectly. Our house was super clutter free and the kids were getting tiny treats in return. Not only were they picking up their every day items, but they'd seek out others like maybe a diaper on the floor, or Ruby's baby toys, the newspaper, etc. Win-win.  That is until they got smart on me.
    Our kids get a long great, but the other morning they were getting along even better. Patting each other on the back, laughing and playing. They were practically giddy. What were they doing to be so happy? Well, instead of picking up their toys and shoes that they are expected to do anyway, they were having their siblings do it FOR THEM and earning candy that way. Everyone was picking up the normal every day items, but since they were doing it for EACH OTHER they considered that worth of a jelly belly. Kaylee put Dallin's shoes away and treated herself to a bean, Dallin picked up Kaylee's jacket, and Aaron picked up Dallin's books, etc....
    It was hilarious. So I had to adjust it a bit. ONLY after their regular every day items are picked up (by themselves) can they start to work on extra bonus chores to earn candy. It is working out great and our house hasn't been this clutter-free (without me doing it) before. I actually walked into the living room the other night and did a double take. It was clean and I didn't clean it. How on earth?!?!?
    It was great.

    The Wasp Bag in 3 Sizes

    March 5, 2012 By Brandy 3 Comments

    I made another wasp bag (I did not create this pattern). Two, actually. By now it is pretty obvious that this is my favorite handbag pattern. I've used it here and here. All different sizes, and they've each turned out perfect for what I needed it for.
    wasp bag in 3 sizes and prints
    The first bag was this beautiful Amy Butler print that I made earlier in the spring. It is the perfect size for a diaper bag. LOVE this bag!
    large wasp handbag with floral fabric
    The second bag I made was a mini one for my mom's birthday. This one holds a wallet, phone, keys, and a few other small items.
    large and small handbags on door knob
    small handbag with purple floral fabric

    This time I made a medium sized bag, and I have to say, it's my favorite sized one of them all. I still need a larger bag for myself since Ruby joined us and I have to keep diapers, extra changes of clothes, etc. in my bag, but I still love the size for an average every day purse.

    green and black floral fabric handbag
    inside handbag showing lining and pockets
    straps on handbag

    I made this new one for my mother in law. It isn't easy going fabric shopping for someone else. I did the best I could and really hope that she likes what I chose for her. I liked it so much that I used the scrap lining fabric and made one for myself.

    black and white handbag
    I always appreciate when I do such thoughtful things like this for myself :p
    handbag in 3 sizes and fabric patterns
    If you print the wasp bag pattern to scale you will get the larger bag. If you print it without scaling it at all, you will get the medium sized one. If you take an inch or so off the height and width of the medium printout, you'll get a mini bag. The pattern is easily adaptable.
    The only thing I haven't figured out in the pattern is the inside pocket. The first time I tried it according to the pattern, but it didn't turn out for me. So I just create my own and sew it into the lining before putting the purse together.
    I also add a loop for an antibacterial holder from Bath & Body Works. I found a matching one for my mother-in-law and a couple of little bottles of antibacterial gel and sent them on their merry way to Alaska with her new hand bag.

    Pin It

    • « Previous Page
    • 1
    • …
    • 146
    • 147
    • 148
    • 149
    • 150
    • …
    • 157
    • Next Page »

    Welcome!

    I'm Brandy! I love to create and share my ideas through easy-to-follow recipes and tutorials.

    More about me

    As an Amazon Associate, I make a small commission on qualifying purchases.

    sew with me kids sewing book
    My Book

    Spring Posts

    • Blue panoramic sugar egg frosted with flowers.
      How To Make Panoramic Sugar Eggs for Easter
    • Pop Tart bunny house on white plate with candy and coconut grass.
      Pop Tart Bunny House for Easter
    • Two fleece bunnies placed against a pillow.
      10 Minute Fleece Bunny Tutorial
    • Yellow peeps bunny sugar cookie.
      Peeps Bunny Sugar Cookies with Buttercream Frosting
    See more Easter →

    Latest Posts

    • Chocolate cake coated in ganache and mini chocolate chips.
      Best Chocolate Pudding Bundt Cake
    • Corned beef, cabbage, carrots, potatoes and roll in serving dish.
      Corned Beef and Cabbage (Stovetop, Slow Cooker or Instant Pot)
    • Hand holding yellow chick sugar cookie.
      Chubby Chick Sugar Cookies (No Cookie Cutter Needed)
    • Bunny sugar cookie with buttercream carrot.
      Chubby Bunny Sugar Cookies (No Cookie Cutter Needed)

    Footer

    ↑ Back to Top

    About

    • Privacy Policy
    • Accessibility Policy

    Newsletter

    • Sign Up! for emails and updates

    Contact

    • Contact

    As an Amazon Associate, I earn from qualifying purchases.

    Copyright © 2025 Gluesticks Blog