Gluesticks Blog

menu icon
go to homepage
  • Recipes
  • DIY
  • About Me
  • Subscribe
    • Facebook
    • Instagram
    • Pinterest
  • subscribe
    search icon
    Homepage link
    • Recipes
    • DIY
    • About Me
    • Subscribe
    • Facebook
    • Instagram
    • Pinterest
  • ×
    Home

    Stuffed Bacon & Cheddar Burgers

    April 16, 2015 By Brandy 1 Comment

    disclosure

    #KetchupsNewMustard #CollectiveBias

    Stuffed Bacon & Cheddar Burgers
    It's April which means that BBQ season has been here for a couple of months in California. Don't hate. The kids asked if we could eat outside on Saturday and it was just too nice outside not to. And miracle of miracles, it was a gorgeous night without mosquitos. I have no idea where they were because they are usually all over me! We made stuffed bacon and cheddar burgers, classic potato salad, and enjoyed fresh pineapple too. All on paper plates and diner baskets for easy clean up. My favorite kind of dinner!

    Stuffed Bacon and Cheddar Burgers

    Have you made stuffed burgers before? There are a couple of ways to make them and they are fun to customize. We kept them simple with cheddar and bacon, but you could totally add in green chiles, onions, bell pepper, mushrooms, cubed cheeses, the possibilities are endless!

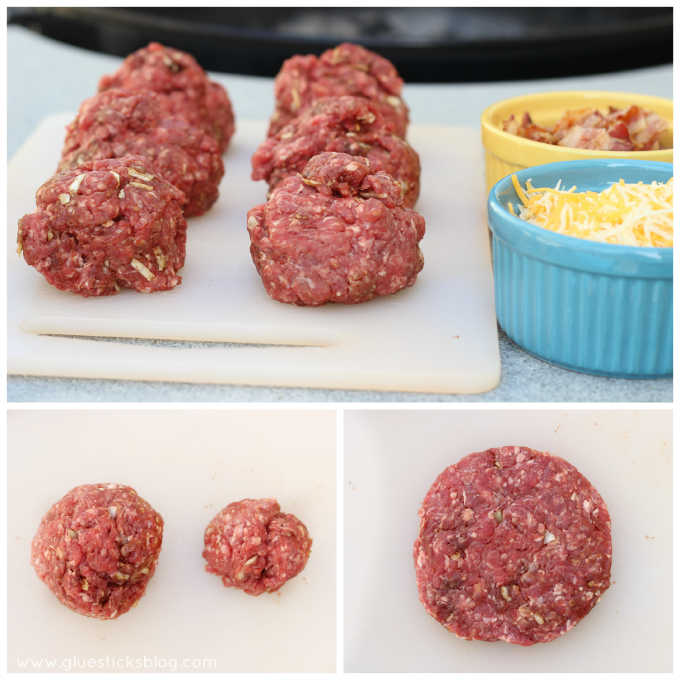
    Our basic burger patties start out with 2 lbs. of LEAN ground beef and 1 packet of dry onion soup mix. The onion soup mix gives such a nice flavor.

    Separate the ground beef into 6 portions. Break off ⅓ of each ball and set aside. You will end up with 6 bigger portions and 6 smaller ones. Form the bigger portions into flat patties.


    Stuffed Bacon and Cheddar Burgers

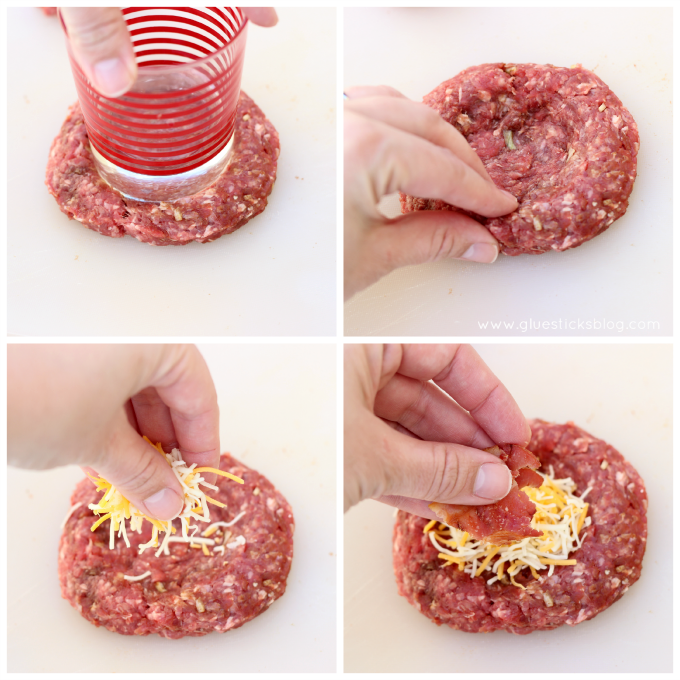
    Use your hand (or the back of a cup) to make an indentation.

    Press with your fingers to deepen the indentation and fill with your favorite add-ins.


    Stuffed Bacon and Cheddar Burgers

    Use the smaller portion of ground beef that your broke off and fill in the gap, covering in your add-ins.

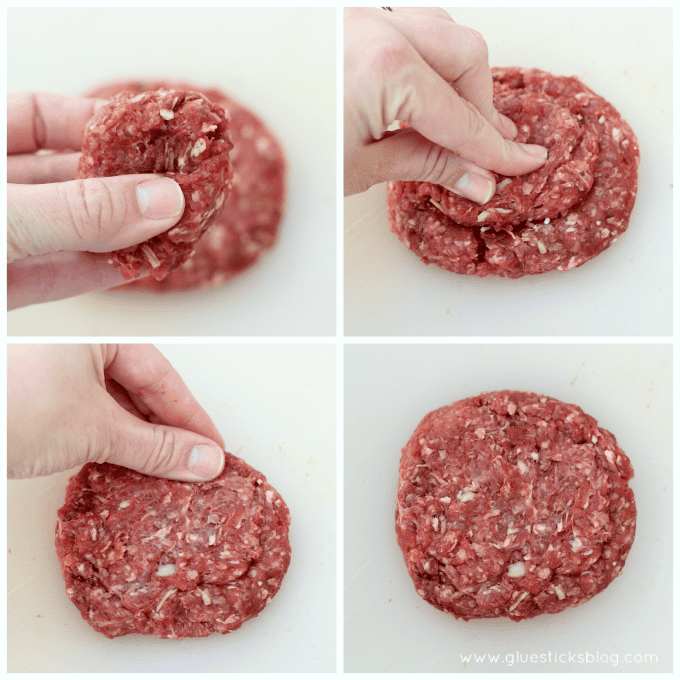
    Press around and seal all edges.

    That's one way to make a stuffed burger. Here's another!

    Stuffed Bacon and Cheddar Burgers

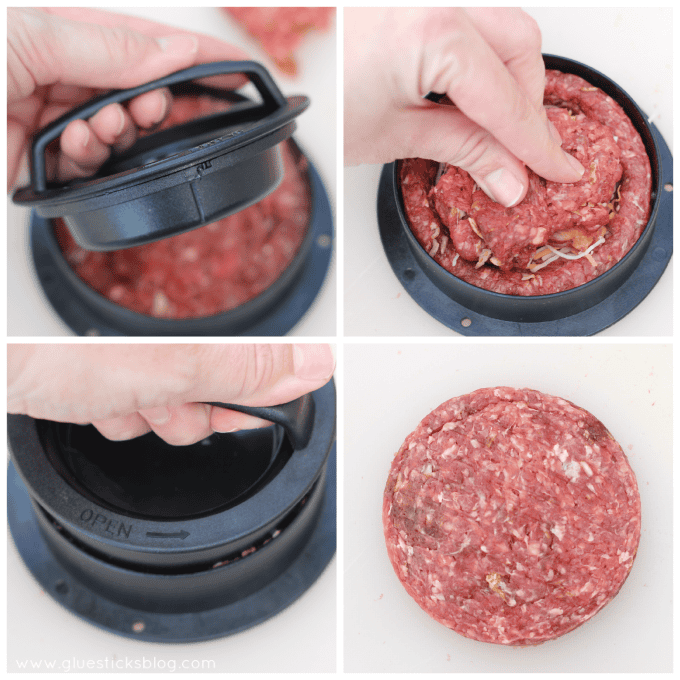
    Use a stuffed burger press! I love mine because it makes uniform patties every time. Regular or stuffed and it also makes small sliders!

    Stuffed Bacon and Cheddar Burgers

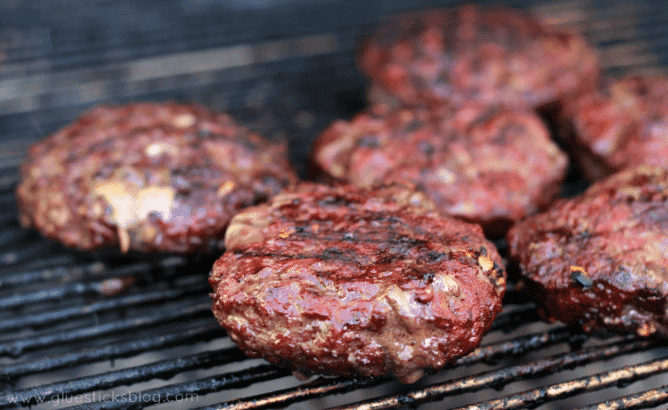
    Grill those bad boys up to perfection! What I like about stuffed burgers vs. just mixing the bacon and cheese into the meat and grilling it all together is that you get less burn off. The cheese will come out slightly, but the bacon stays inside and is perfectly tender and juicy inside the burger.

    Classic Potato Salad

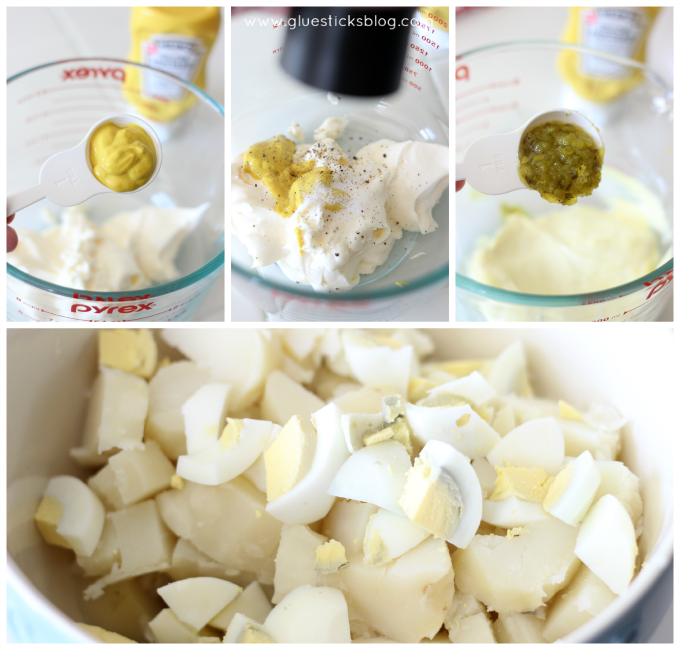
    What is your favorite side dish to serve with burgers? Mine is classic potato salad. I brought this to a potluck one time and my friend said, "You brought 'White Trash' Potato Salad, My FAVORITE!". Hmm...a compliment and an insult all in one, ha! She called it that because it was the basic condiment, nothing fancy kind of potato salad. Just mustard, mayo, and relish!

    The dressing comes tougher super quick.

    1 ½ c. mayo

    1 T. New Heinz® Yellow Mustard

    1 T. relish

    salt and pepper to taste

    Mix dressing into a bowl with 3 sliced hardboiled eggs, ½ c. chopped onion, and 6 potatoes that have been peeled, boiled, then cubed.


    Classic Potato Salad


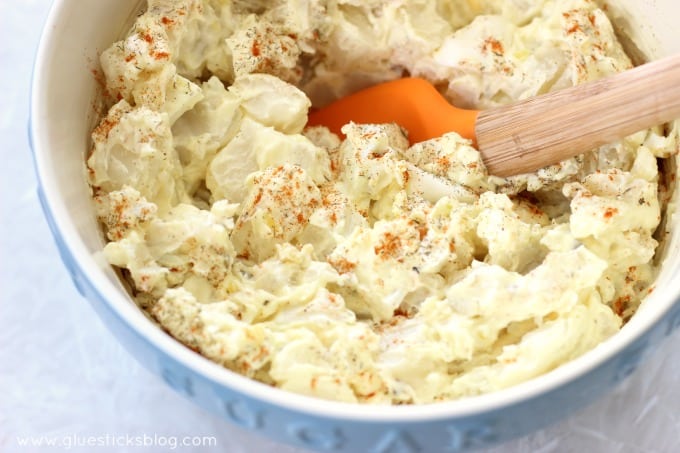
    If you want to take it up a notch, sprinkle with dill weed and paprika. Refrigerate until ready to serve!


    Stuffed Bacon and Cheddar Burgers

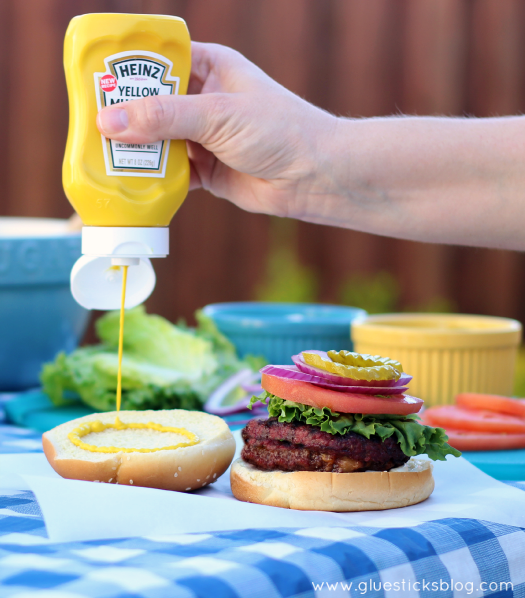
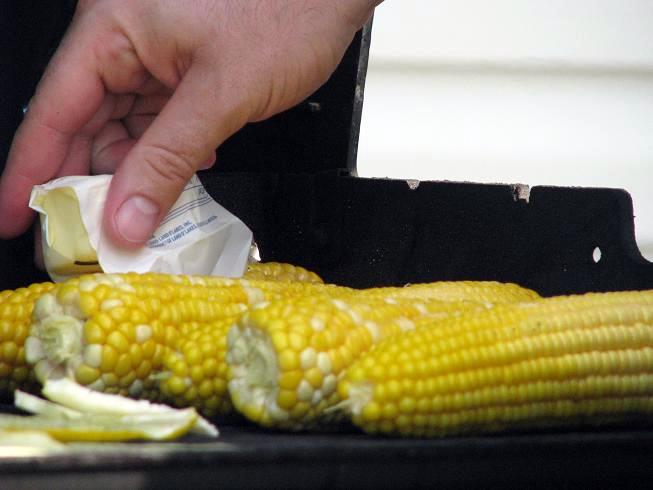
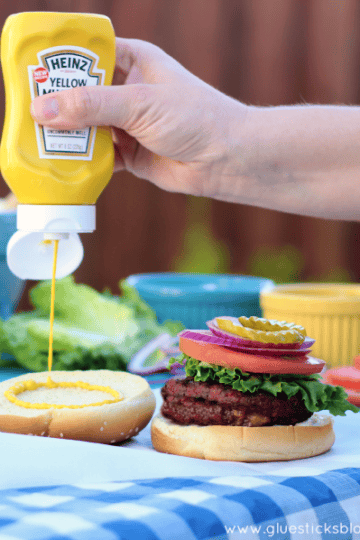
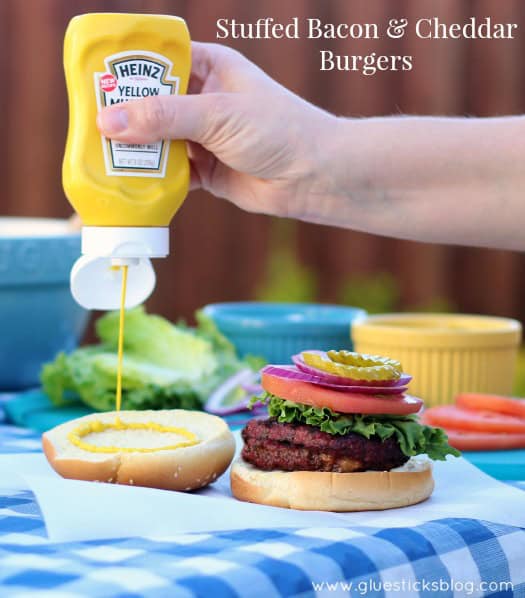
    The only thing that I really need on my burgers is mustard. Everything else is just a bonus. I love the tang that it adds and add it to all my sandwiches, hot dogs, and corn dogs!

    Stuffed Bacon and Cheddar Burgers

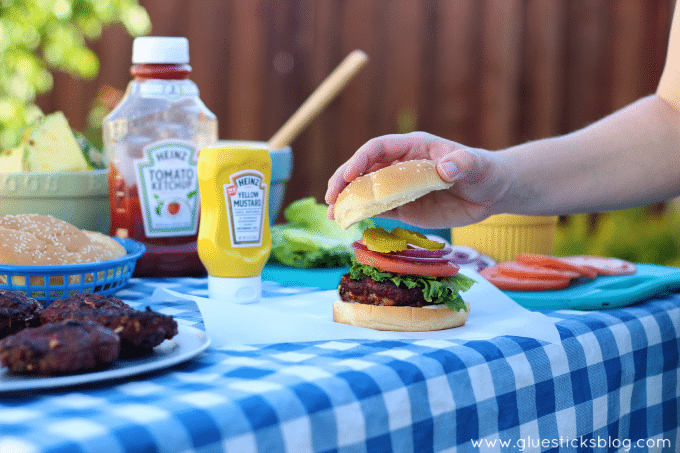
    Sadly, I am the only one in my family who likes mustard. Crazy, right? This is why that big ol' bottle of ketchup is almost empty and my small Heinz Yellow Mustard is a smaller size, but I go through it pretty quickly considering! Does anyone else refuse to buy mustard that isn't in the "top-down" squeeze bottle? Nothing ruins a sandwich quicker than a big squirt of mustard water.


    Stuffed Bacon and Cheddar Burgers

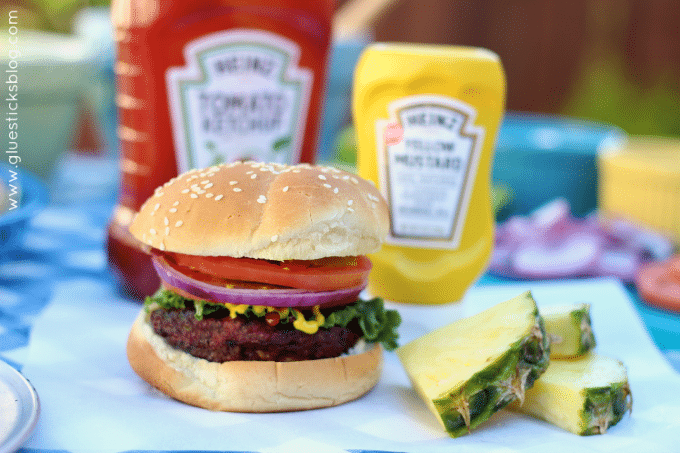
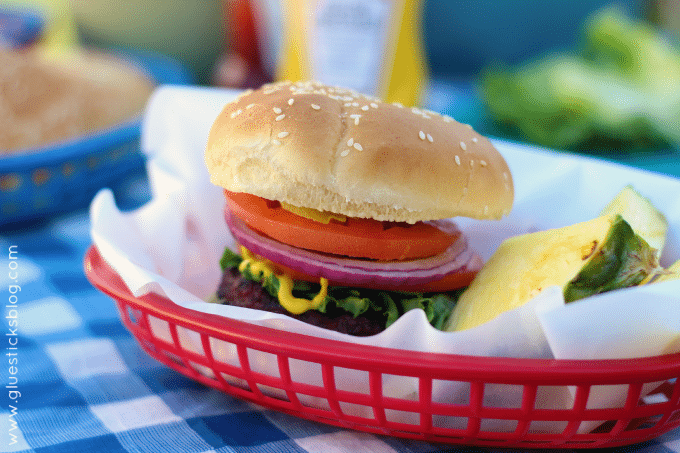
    Mayo, stuffed bacon and cheddar patty, Heinz Ketchup, lettuce, red onion, tomatoes, pickles, and a big ol' squirt of Heinz Yellow Mustard and it was just perfect! The kids like helping with dinner prep, so they had a great time customizing their burgers. The burgers were so delicious and filling, but Dallin, who can now out eat both of us, came back for a second burger.

    Classic Potato Salad

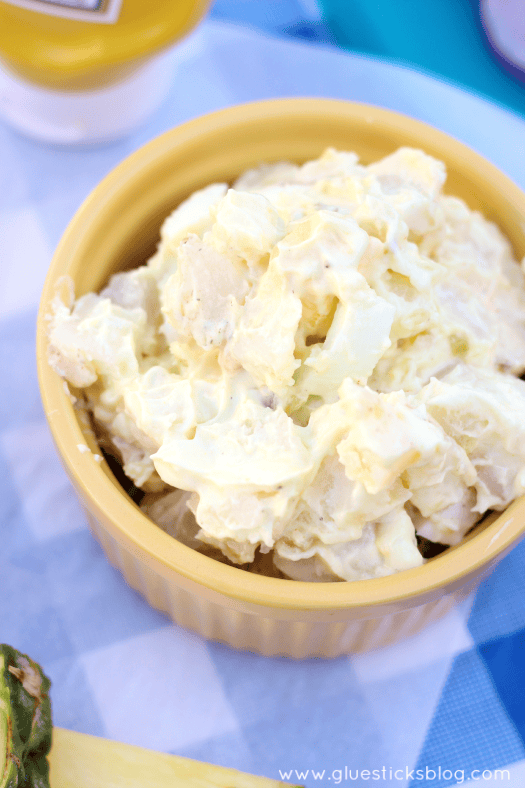
    I made sure to save room for my "White Trash" potato salad. Seriously, I hate that phrase, but I can't make this potato salad without remembering that!

    Stuffed Bacon and Cheddar Burgers


    Stuffed Bacon and Cheddar Burgers

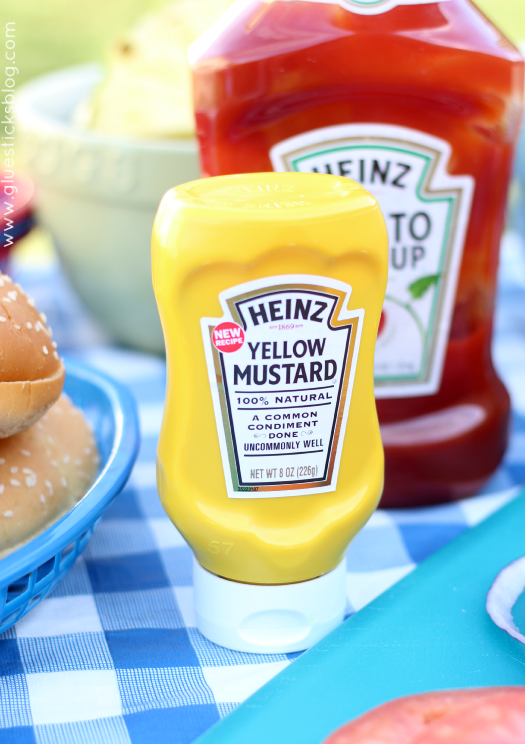
    Heinz Yellow Mustard just launched in February at Walmart and is now being sold at other grocery stores too.

    Stuffed Bacon and Cheddar Burgers

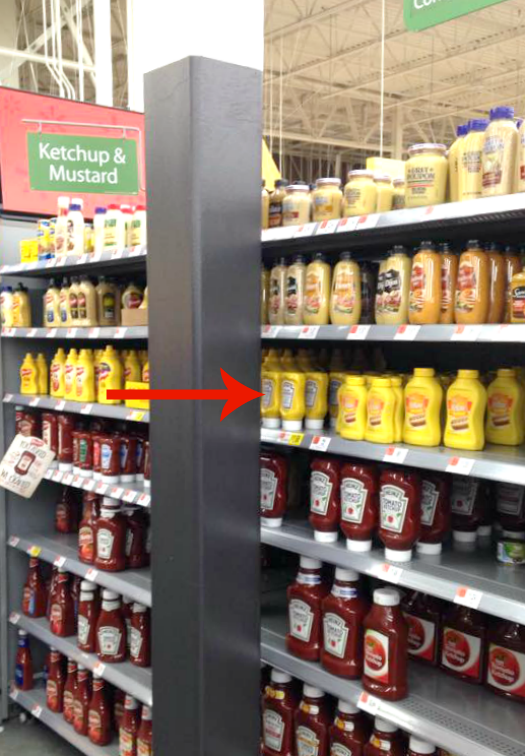
    Now Heinz Ketchup isn't alone on the shelf, it's tangier cousin is right next to it! (And possibly behind a pole like it was at my Walmart). A secret blend of spices and vinegar, made from 100% natural ingredients, combine for the perfect balance of flavor and tang! And the best part? Heinz Yellow Mustard is a thicker mustard that sits on top of the bread which helps avoid soggy sandwiches. Yes.

    Ketchup has a new mustard and you can read find great sandwich and grilling recipes at KetchupsNewMustard.com

    You might also like...

    IMG_0020

    Grilled Corn on the Cob

    Dishwasher Safe Frosted Glass

    April 14, 2015 By Brandy 3 Comments

    disclosure

    dishwasher safe frosted glass

    Ruby and I picked up a pretty bouquet of tulips the other day and had fun dispersing them throughout the house. Is there anything better than fresh flowers? I decided to do a little frosting action on this $1 milk bottle and turn it into a vase. I remember frosting mirrors in my high school art class with acid etching cream and painstakingly cutting out every detail with a craft knife. I even remember that I etched a very pretty rose onto my mirror. I've noticed a trend in a lot of DIY vases lately...they aren't dishwasher safe and sometimes they aren't even waterproof! I saw one on pinterest last week that was absolutely gorgeous. It was a glitter vase and after the directions showed how to make it they gave the disclaimer, "Do not use real flowers or water in this vase. To prevent the glitter from scratching off use a toilet paper roll inside and put your flowers inside that." Deal breaker! No matter how pretty it was it just wasn't functional for me. I've painted vases in the past with mixed results---the paint eventually scratches off unless you use glass paint and bake it on to cure. There are several ways to frost glass. You can use frosted vinyl or contact paper to decorate your project, you can spray frosted paint on it, or you can acid etch it. The only durable method is acid etching it. I am going to show you how to frost glass in a matter of minutes and have a vase that will last forever.

    diy frosted glass

    DIY Frosted Glass Vase

    For this project you will need:

    Glass vase

    Clear Contact Paper

    Acid Etching Cream (found at your local craft store)

    Paint Brush

    Scissors

    Pencil

    Penny

    diy acid etching

    Begin by tracing your design on a sheet of clear contact paper. Cut out with scissors. Make sure your glass is clean and dry. Peel off the backing of the contact paper and adhere to your vase in whatever design/pattern you'd like!

    Apply a THICK coat of etching cream with your paint brush.

    polka dot acid etched vase

    Seriously, glob it on there. Let sit for 10-20 minutes (follow the specified time on the bottle).

    My bottle of acid etching cream is 5 years old. This stuff lasts forever and you can brush off the excess and put it back in your bottle  to make it last even longer!

    Brush excess cream back into your acid etching cream container, if desired. Rinse thoroughly in the sink.

    Do not panic if it looks clear! The frosted effect will show up after you dry the outside of the bottle.

    Remove contact paper designs.


    easy acid etched milk bottle tutorial

    And that is it! It is fun to customize jars and vases like these. I made personalized jars for the kids' teachers one year. They were a hit! Go ahead and etch your name to your casserole dishes or monogram a cookie jar while you're at it.

    finish max in one tablets

    And the best part? When you need to wash your vase don't worry about hand washing it. Just throw  place it in the dishwasher with a Finish®  Max in 1™ capsule and you are set!

    I've used Finish® capsules for quite some time to really clean my dishes, especially my glassware. When we first moved into our house the dishwasher didn't seem to work well. It was brand new and we thought it was defective. It didn't dry the dishes well and it didn't seem to wash them that great either. The warranty technician came out to take a look and said that the dishwasher was fine, but there were a few things I could do to help it run better.

    1. The type of detergent you use makes a big difference, to make sure to use a rinse aid (or a detergent with a rinse aid) to help with drying.

    2. DON'T over crowd the dishwasher (GUILTY!!!!)

    3. Run hot water into your sink before turning your dishwasher on. This is easy to do since I rinse my dishes with hot water before putting them in the dishwasher.

    All of these tips helped and our dishwasher began to work like a charm! My glasses started coming out clear again and were DRY (or very close to it).

    Oversized Floor Pillow

    April 8, 2015 By Brandy 1 Comment

    A reading nook, a movie pillow, a mattress, a dog bed...These easy-to-make oversized floor pillows are THE PERFECT hang out for kids! Adults will want one too. 

    Jumbo Floor Pillows

    Look at this pillow. I mean, LOOK at this pillow!

    Big Floor Pillows

    It is the perfect place to jump, sleep, lounge, and read books. An enormous hang out area for any child. Truth be told, I want one for myself! Never in the history of sewing projects in the Nelson home has a project caused so many fights! Serious cat fights. The girls both want to be on the pillow ALL OF THE TIME and have had issues sharing it. At first I thought that I should make another one so that they would each have one and then I decided against that. They need to learn how to share it. So it is a fun fluffy pillow and a learning tool all in one 🙂

    Floor Pillows

    It's even received use from the "big" kids. Aaron is 8 and fits snugly on it.

    Oversized Floor Pillows

    And it's a great place to get tickled.

    Giant Floor Pillows

    I filled it with 4 standard pillows,  and when it needs to be washed I can simply open the velcro closure and pull them out.  I used plastic grocery bags in each corner to puff the pillow out a bit. Worked like a charm!

    Since I used 4 big, fluffy, standard bed pillows, it folds over on itself to put away in corner. It can also easily slide under a bed.

    I had a yard of this fun chevron print left over from a project and it was the perfect size for the top! 36"x45". I cut another rectangle the same sized for the bottom.

    The sides are 8" tall and the width of the rectangle. (2) 36"x8" pieces and (2) 45" x 8" pieces.

    Then I assembled it how you would any cushion and added a velcro flap for closure.

    For a tutorial, you can check out the photo that I used for inspiration, using this link. I saw it online and immediately knew I had to make one for my kids! My dimensions are slightly different since I didn't follow her tutorial, but it's pretty much the same cushion.

    Make an Easter Bunny Cake With 2 Round Cakes

    April 2, 2015 By Brandy Leave a Comment

    Have the kids make dessert for Easter dinner this year! A quick and easy Easter bunny cake that is fun to decorate for an Easter dessert or a spring birthday. This post contains affiliate links.

    Looking for another easy treat for kids to make? How about these recipes!  Chicken cake (so adorable), our Minion cupcakes, or our hamburger cake!

    frosted and unfrosted bunny cakes

    old photo of baby in high chair and bunny cake

    Easter Bunny Cake

    Did any of you have a bunny birthday cake growing up? This photo is of me on my 1st birthday. My mom and I share a birthday so there were usually two cakes every year. This was a photo from our double birthday party in 1983. I also remember a similar cake for my 6th birthday in the shape of a teddy bear. I love simple cakes like this that use basic cake pans, a single cake layer, and frosting. No tips, fondant, or excessive time involved.

    frosted and unfrosted cakes shaped like a bunny

    How To Make an Easy Rabbit Cake

    I thought my girls would have fun making their own Easter bunny cake to decorate so I got out my mini round cake pans and made 4 small round cakes, enough for 2 mini bunny cakes! You can also use 2  8" round pans to make a larger cake.

    You can also use 2  8" round pans to make a cake. I used a cake mix and the listed ingredients (oil, eggs, and water) to make the cakes.

    Bake cakes then remove from oven and allow to cool in pan for a few minutes before transferring to a cooling rack.

    Cool cake completely then cut each cake according to the diagram below using a serrated knife.

    cakes cut into bunny shapes

    Cake Assembly Instructions

    1. Assembly is pretty straightforward. Place cut cake pieces on a platter or cutting board covered in foil.
    2. Spread buttercream frosting, with a spatula or butter knife, along the bottom of the bunny face cake to attach the bow tie.
    3. Spread frosting on the bottom of each ear to attach the ears to the bunny's head.
    4. Cover the entire cake in the frosting.

    And now for the fun part, decorating it!

     little girl decorating bunny cake

    We pulled out all of our Christmas and Valentine's day candies and they had fun snacking and decorating their cakes.

    decorating ideas:

    • Shredded coconut flakes to look like bunny fur.
    • Light pink frosting for the pinks inside of the ears instead of candy.
    • Licorice for whiskers.
    • Use jelly beans for the eyes, large candy eyes, or pipe on the frosting.
    • We made a white vanilla cake, but a carrot cake with cream cheese frosting would be so fun for Easter.
    • You can also tint a cup of coconut with green food coloring to look like Easter grass and sprinkle it wound the edge of the cake.

    two little girls with decorated bunny cake

    In the end, the kitchen was a mess, sprinkles covered the floor, fingers were sticky, and they each had a cute Easter cake to share with dinner. These cakes can be covered with a layer of plastic wrap and stored at room temperature.

    two decorated bunny cakes


    Ballerina Birthday Brunch

    April 1, 2015 By Brandy 3 Comments

    Ballerina Birthday Brunch

    My Kaylee girl is 6 years old! What a beautiful young lady she is, inside and out. She loves to dance so a ballerina birthday party seemed fitting. I really wasn't up to planning an entire party with games and activities (last year it rained during her swim party and we had 18 kids (EVERYONE we invited showed up) in our house going CRAZY....shudder), but I recently won a "dance birthday party" at a church auction which meant I only had to plan the food! My friend, Monique, came and taught the girls ballet. Let me show you the easiest birthday party ever. It was flawless start to finish and the girls had a wonderful time!

    Tablescape

    I purchased all of my party supplies at Party City. It is my favorite store and never disappoints. Coordinating napkins, plates, cups and even a new table cloth for a bargain.

    My cute centerpiece was a mug I scored for $3.97 at Walmart and I added fresh daisies.

    ballerina food brunch

    Kaylee invited 7 of her closest friends (plus Ruby) over for a "Ballerina Brunch". The brunch began at 10am with mini bagels and cream cheese, mini donuts, grapes, apples, cheese, applesauce pouches, and pink lemonade.

    IMG_4116

    ballerina cake

    Then we had cake.  Just tiered cupcakes in the shape of a dress. I used edible pearls for the details and some sparkle sugar to add some shine.

    ballerina birthday

    The girls played for awhile and then Kaylee opened presents.  Miss Monique came at 11:00 am to teach the girls some ballet positions and an easy routine.

    ballerinas

    They had a great time and it was just the sweetest thing to watch them gracefully move around the room. Monique taught them a cute routine to perform when their parents picked them up.

    IMG_4165

    12:00 came and the parents arrived for the show. The girls were darling, everything was just perfect. After the applause, Kaylee gave each friend a "My Little Pony" charm bracelet that we picked up on clearance at Claire's. Her friends were very excited to each have a present to open at the party.

    Then everyone went home, I tossed the paper plates and cups in the trash, and we were done! One more birthday has come and gone, and my baby is that much closer to being grown. I am so happy to be able to spend these years together. She is such a ray of sunshine in our home.

    You might also enjoy...

    Pixie Hollow Fairy Garden

    Pixie Hollow Fairy Garden

    Fairy-Dust-Necklaces-gluesticks

    Fairy Dust Necklaces

    Princess Aprons 8 in 1 Tutorial

    8 in 1 Princess Aprons

    Ruby10

    Easy Princess Cake/Cupcake

    Easy Pinwheel Baby Quilt

    March 31, 2015 By Brandy 2 Comments

    Easy Pinwheel Quilt

    Easy Pinwheel Quilt

    I made this quilt for my brother and sister in law who just welcomed a darling baby girl into their family! I wanted to make something that matched the nursery perfectly and so I asked my sister in law to let me know what colors she was going to use. She sent me back 4 colors. Aqua, coral, purple, and lime.

    Easy Pinwheel Quilt

    I searched for fabrics that coordinated with patterns, but without much luck. That's when I decided to use solid fabric in a fun and busy design. Pinwheels!

    Easy Pinwheel Quilt

    This was my first time making pinwheels and it was so easy to do. I am already planning a larger quilt for Dallin using pinwheels too. Basic, quick, and classic.

    Easy Pinwheel Quilt

    The back is a print that I found that coordinated in colors perfectly!  Feminine and floral.

    Easy Pinwheel Quilt

    I used this tutorial for the pinwheels. I couldn't believe how simple it was. Perfect for a beginner like me!


    You might also like...

    Quilted Sweetheart Pillow Tutorial

    Sweetheart Quilted Pillows

    rubys hexagon quilt

    Easy Hexagon Quilt

    Autumn Woods Baby Quilt

    Autumn Woods Baby Quilt

    Microwave Cheez-It Snack Mix

    March 30, 2015 By Brandy 1 Comment

    microwave cheese it garlic snack mix

    "There are really only two plays: Romeo and Juliet, and put the darn ball in the basket."

    ---Abe Lemons

    College basketball season is here. Are you ready? Have you filled in your brackets? Everyone knows that the most important part of the game is the food! Finger foods, cheesy, crispy, salty ones. This Microwave Cheez-It Snack Mix comes together in just minutes and is the perfect game time snack.

    Garlic Cheez It Mix

    What are your favorite Cheez-It products? Do you stick with the classic flavors or like branching out and trying the new ones? I picked out 3 varieties at Target and had fun mixing them up.

    Microwave Cheez-It Snack Mix

    9 cups Cheez-It products (I used Cheez-It Crunch'd, Cheez-It Snack Mix, and Cheez-It Grooves)

    5 T. butter or margarine, melted

    1 tsp. garlic powder

    1 T. Worcestershire sauce

    ¼ tsp. seasoning salt

    Cheer It Grooves Mix

    Decide what ratio of Cheez-It products you'd like. I used a bit more of the Cheez-It snack mix than the other two so that I could take advantage of some of the extra add ins like pretzels, etc.

    cheer it garlic mix

    Combine butter and seasonings and pour over dry mix. Stir. Microwave on high for 2 minutes. Stir. Microwave for 2 more minutes. Stir.

    easy cheez it mix

    Pour onto a parchment lined baking sheet and let cool.

    microwave cheez it mix

    Here are more appetizer recipes that might be great with your game time menu!

    Dry Erase Activity Binders For Kids {from old Magazines}

    March 27, 2015 By Brandy Leave a Comment

    Dry Erase Magazine Binders

    Ruby's preschool teacher has binders of laminated magazine pages for the kids to look through. She's taken old issues of the Highlights magazine and the kids love looking through the hidden picture pages. I thought it was a great idea and decided to do the same thing for my own children.

    I have lots of FRIEND magazines with easy-reader stories, hidden pictures and mazes! By laminating the pages, they instantly become dry-erase and the kids can use them over and over for church, General Conference, road trips, etc. I had enough issues to fill 2 (½") binders for the kids to share.

    Hidden Pictures

    Hidden picture pages...

    laminated coloring pages

    Coloring pages...

    dry erase magazine pages

    Easy Reading Stories...

    dry erase binder pages

    And blank pages for coloring with dry erase crayons and dry erase markers! I just laminated a sheet of copy paper. Instant white board!


    Magazine Binders

    I tore out some of my favorite quotes for the binder covers as well. This whole project was so easy to do. I wish I had thought of doing this years ago!


    You might also like...

    quiet+book

    Quiet Book Layout Ideas

    IMG_9693

    Cardstock Busy Book

    Kids' Choice Sherbet Floats

    March 26, 2015 By Brandy 3 Comments

    kids choice sherbet floats

    One of my favorite drinks is a sherbet float. What is a sherbet float? Juice, lemon-lime soda, and two scoops of sherbet. So flavorful and refreshing! My favorite is raspberry, but my kids like lemon and orange. These are fun for kids to customize and would be great to serve at a party! We picked up enough supplies to make them while we watch the Kids' Choice Awards this weekend!

    kids choice floats

    Start with 1 scoop of sherbet. This will also determine the color your float will end up being.

    Kids' Choice Sherbet Floats

    Cut open a pouch of Capri Sun Roarin' Waters and pour over the scoop of sherbet.

    Kids' Choice Sherbet Floats

     You can use other types of juice drinks too, but I like the Capri Sun Roarin' Waters varieties because they are clear and don't change the color of the float.

    easy lime float

     Top off with lemon-lime soda to add some fizz.

    kids award float

     Add one more scoop of sherbet and a straw!

    Kids' Choice Sherbet Floats

     Aren't they fun? Such a refreshing treat!

    Kids' Choice Sherbet Floats


    disclosure

    #KidsChoiceDrink #CollectiveBias


    • « Previous Page
    • 1
    • …
    • 125
    • 126
    • 127
    • 128
    • 129
    • …
    • 157
    • Next Page »

    Welcome!

    I'm Brandy! I love to create and share my ideas through easy-to-follow recipes and tutorials.

    More about me

    As an Amazon Associate, I make a small commission on qualifying purchases.

    sew with me kids sewing book
    My Book

    Latest Posts

    • To Die For Blueberry Muffins
    • mini s'mores pie on white plate
      Mini S'Mores Pies
    • slab pie on white plate
      Peach Slab Pie
    • baba bar on spatula
      Frosted Banana Nut Bars

    Seasonal

    • M&M Cookies piled on top of each other
      Soft M&M Cookies (Soft and Thick) + Video
    • red, white and blue shortbread cookies
      Patriotic Shortbread Cookies (Video)
    • star shaped cookie with frosting and fruit
      Red White & Blue Mini Fruit Pizzas (Video)
    • Simple and Inexpensive Patriotic Wreath Tutorial

    Footer

    ↑ Back to Top

    About

    • Privacy Policy
    • Accessibility Policy

    Newsletter

    • Sign Up! for emails and updates

    Contact

    • Contact

    As an Amazon Associate, I earn from qualifying purchases.

    Copyright © 2025 Gluesticks Blog