Gluesticks Blog

menu icon
go to homepage
  • Summer
  • DIY
  • Recipes
  • About Me
  • Subscribe
    • Facebook
    • Instagram
    • Pinterest
  • subscribe
    search icon
    Homepage link
    • Summer
    • DIY
    • Recipes
    • About Me
    • Subscribe
    • Facebook
    • Instagram
    • Pinterest
  • ×
    Home

    Teacher Appreciation Memo Cubes

    April 28, 2011 By Brandy 7 Comments

    white memo cubes colored on by children
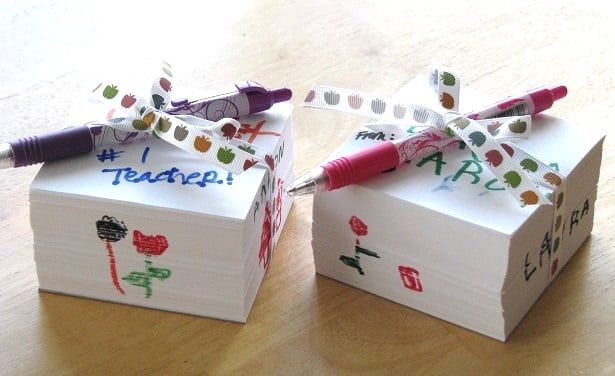
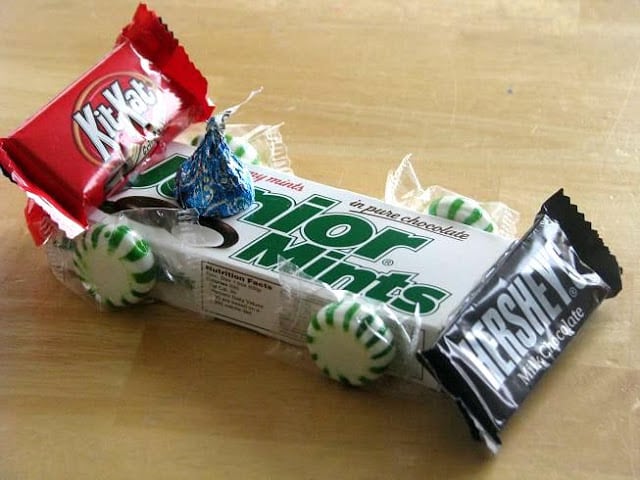
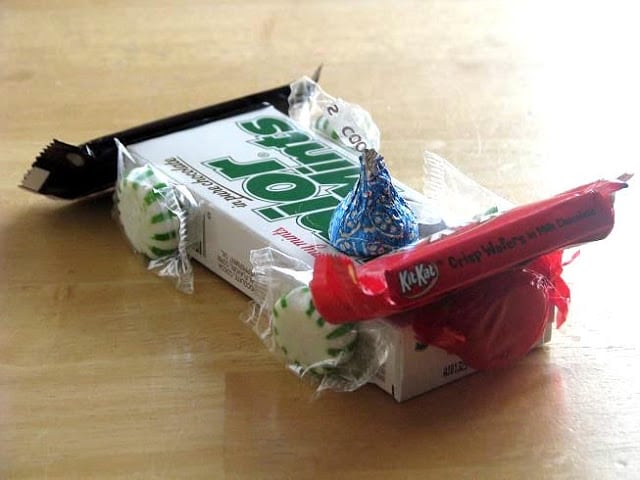
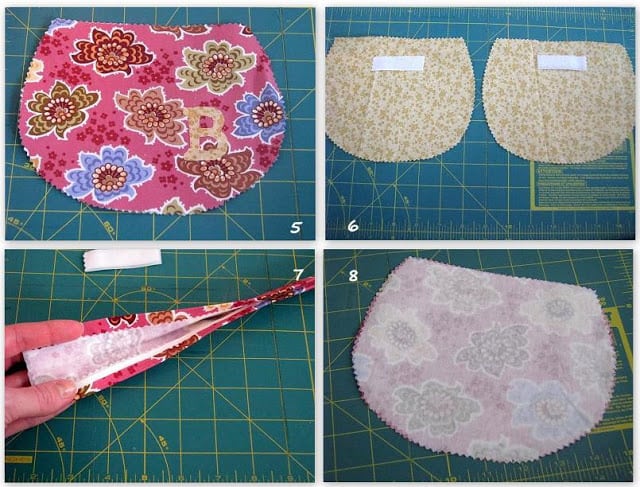
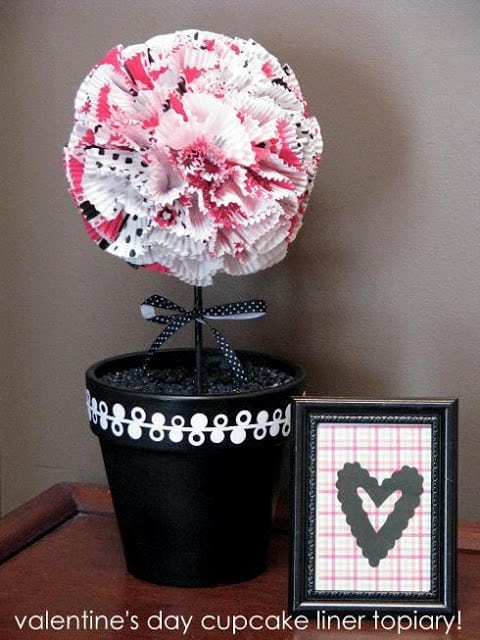
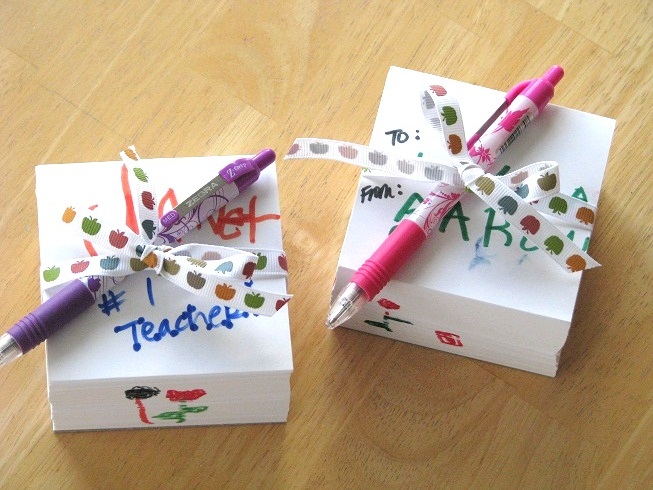
     Last year for "Teacher's Appreciation Week", we made chocolate covered strawberries. We'll probably still do strawberries for the teachers this year, but also made these little custom memo cubes. I saw the idea here and ran with it! I went to Office Max with a pack of 500 sheets of copy paper and they made 6 memo pads for me with the sides glued (1 side on each). decorated white memo note pad cube
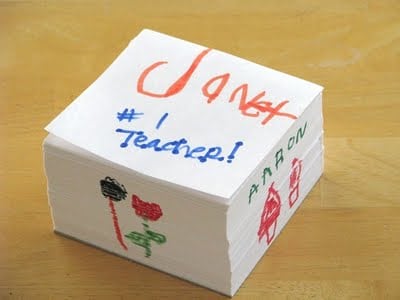
     Here are the ones that Aaron made for his preschool teacher. Everything looks cuter when a preschooler does it. We sure love our teachers and have been blessed with absolutely wonderful ones this year!
    two decorated memo cubes for teacher gift

    Minion Cupcakes Made With Twinkies!

    April 27, 2011 By Brandy 55 Comments

    Twinkie minion cupcakes on blue plate
    Does it get any more hilarious than this? These minion cupcakes are made out of Twinkies. They are such a fun treat to make with kids and are easy to customize! Use Smarties candies and frosting to add eyes, a mouth, and glasses!

    collage of minion Twinkie cupcakes
    Aren't these little minion cupcakes great?!?! We had no occasion to make them for, but who needs an occasion for cupcakes? We found them online and knew we had to make a batch for the family (link to inspiration below).

    Minion Cupcakes Made With Twinkies!

    kids separating Smarties candies
    FYI: Finding white smarties takes A LOT of little packages of smarties. Most of them are pink and purple, but that was even better for the kids because they liked snacking on the extras.
    child frosting cupcake with blue frosting
     Frosting the cupcakes in blue to match the minion's over-alls.
    child cutting Twinkie in half
    Each minion is made from a half of a twinkie, two smarties, and colored icing for the eyes and glasses. Aaron couldn't wait to finish frosting the cupcakes so that he could lick the knife. You can see the evidence on his face 🙂
    child putting half of a Twinkie onto cupcake
    After adding the smarties he decided that he was done with frosting and putting the minions together. So I took over with the eye details.
    child adding Smarties candies to cupcake for eyes
    And here they are! Be sure to check out the link for more Despicable Me party ideas! She did a fantastic job!
    platter of Twinkie minion cupcakes
    You might also like...
    3 kids each holding a minion handbag
    Minion Tote Bag

    Make a DIY Minion Tote Bag that is perfect for trips to the pool, a library tote, or even a preschool book bag. The kids drew pictures of their favorite Minion characters and I thought it would be fun to transform those guys into fun summer tote bags!<

    butterfly cupcakes
    Butterfly Cupcakes
    Making your own beautiful butterfly cupcakes is as easy as 1-2-3! Frost, add a gummy worm, then add two gummy candies for wings! A fun springtime activity to make with kids. This could also be a fun “Lifecycle of a Butterfly†activity and snack for a preschool or kindergarten class!

    Pinewood Derby Days!

    March 30, 2011 By Brandy 16 Comments

    cars made out of candy and chocolate bars
    junior mints boxes decorated like derby cars
     Our oldest isn't old enough for Cub Scouts, but Derrick is the Cub Master, so we still hear all about scouts and sometimes help participate in it.
    candy car
     Derrick and I came up with these fun candy "trophies" to give to each scout during the Pinewood Derby. They each received one along with a certificate. They were so simple to make and would be great for birthday parties as well!
    candy car made from junior mints and chocolate bars
     I think the photos are pretty self explanatory, just a bit of hot glue and the candy was easily attached.

    Toddler Purse Tutorial Just Like Mommy's

    March 25, 2011 By Brandy 18 Comments

    little girl holding tiny fabric purse
    Does your little gal like rummaging around in your purse? Make her one of her own! This quick and easy toddler purse tutorial will walk you step by step through the process. A great project for beginners.

    little girl holding homemade floral purse
    Kaylee is my little shadow. I just love this little lady to bits and pieces! She enjoys rummaging around in my purse and carrying it over her shoulder. It was time for her to have her own. One that is just her size! It turned out so cute that I made a couple more toddler purses to give as gifts and snapped a few pictures to create a tutorial for you!

    small floral purse on table

    tiny floral purse with pink lining

    Toddler Purse Tutorial

    For this project you will need:
    • fabric (scraps are perfect for this)
    • fusible interfacing
    • Velcro or snaps
    • thread
    • scissors
    • pins
    • sewing machine
    • paper/pen to make a pattern
    purse pattern piece and fabric pieces cut out
    Step 1: Make a pattern.
    • Fold a piece of 8 ½ x11" copy paper in half.
    • For the top part measure out 3". Mark it with a pen. Then go down 4" and measure (from the fold) a 3 ½" width and mark that. Then, starting at your top mark, fill in the distance between the dots by rounding it off like the pattern above. Also round off from the bottom mark to the fold at the bottom of the pattern.

    Note:

    You can make it bigger or smaller. But if you are following mine for a tiny purse, follow my measurements. I forgot to snap a photo of the two marks before I rounded them off, but hopefully you get the idea.

    Step 2: Open pattern.
    • If it looks like an appropriate shape, sort through your fabrics and pick 2. One for the outer, and one for the lining. You'll also need some fusible interfacing in the same size.
    Step 3: Cut fabric and interfacing.
    • Cut two pieces from each fabric and another two pieces from the interfacing, for a total of 6.
    Step 4: Cut strap pieces.
    • For the strap, cut a piece of fabric that is 2 ½" x 20" and a section of interfacing the same size.
    fabric inner and outer pieces and strap
    Step 5: Optional monogram.
    • I added a little monogram to my purse. This is of course, optional, but such an easy embellishment to do. I used some "wonder under" (iron on adhesive) to the back of my fabric, cut out the B and ironed it onto a piece of the outer fabric.
    Step 6: Velcro
    •   Cut 1 ½" of Velcro and sew it to the right sides of the lining fabric 1" from the top and centered in width.
    Step 7:  Make the strap.
    • For the strap: Iron on the interfacing to the wrong side of the fabric. Press the length sides ¼" on each side (top and bottom as well). Then fold the strap in half ad press. This will make it look neat and tidy and you will not have to turn it right side out after sewing.
    Step 8:  Iron the interfacing to the wrong sides of the outer fabric.
    purse outer pieces and lining stitched and velcro added
    Step 9:  Using a ⅜" seam, sew the outer and lining sections on the sides and bottom, leaving the top open. Trim seams and clip curves. Using a ¼" seam, sew the strap side section.
    Step 10:  The outer fabric should be inside out. The lining fabric should be right side out. Place the lining section inside the outer section. You should only see the wrong sides of the fabric. The right sides will be touching inside. Pin around the top and stitch around, leaving a 3" gap to turn the purse right side out.
    Step 11: Turn right side out. It will look like this.
    Step 12:  Gently push the lining down into the purse and tuck the opening down just a bit. Press and pin. Then top stitch around the top of the purse, catching the opening in the seam. This will close off the opening and finish up the bottom section of the purse!
    hand holding strap to pin inside purse
     Step 13: Position one side of the strap INSIDE the purse 1" from the top and centered with the side seam. Attach to the purse by sewing in a box shape. Do this to the other side as well.
    small floral purse on table
    If you liked this toddler purse tutorial you might also like simple sewing projects...
    stuffed animal sleeping bag with teddy bear inside
    10 Minute Sleeping Bag for Teddy
    child holding paper pocket fan
    DIY Pocket Fan

    Cub Scout Blue & Gold Banquet Cake!

    February 25, 2011 By Brandy 30 Comments

    Cub Scout shirt themed cake
    cake shaped like a blue collared shirt
     Derrick is the Cub Master at our church and asked me to make a cake for the Blue & Gold Banquet.
    Cub Scout themed cake on silver baking sheet
     I used this photo as my guide and pretty much copied it. It was a great resource. Everything is edible except for the blue and white cub scout badge.
    blue cub scout shirt themed cake
     It most definitely isn't perfect  (the fondant and I had a little battle...it won), but I love how it turned out in the end, and think the boys will like it tomorrow night too!
    The "Get Your Brag On" Link Party is open until Saturday night, so join in!!

    A Girl's Survival Kit

    February 7, 2011 By Brandy 17 Comments

    plastic container filled with candy
    The ladies at church were putting a gift basket together for a friend who has been going through a rough time. I decided to make a "Girl's Survival Kit" too add and filled it with all of her favorite things!
    plastic tote wrapped in ribbon
    I bought this box at the hardware store and filled it up. I know she likes Take 5s, so I put some of those in there, along with more candy, gum, lip gloss, a notebook, nail polish, and some homemade earrings.
    plastic organizer container filled with candy
    I think it turned out cute!

    Simple Valentine's Day Topiary

    January 21, 2011 By Brandy 51 Comments

    valentine topiary on console table
    valentine topiary on console table
    I had a lot of fun putting this topiary together. I first saw the cupcake liner idea on here, and decided to make a topiary instead of a wreath. I found these cute liners at IKEA last year and forgot about them...until today!
    pink cupcake wrappers
    I know that everyone uses styrofoam balls, but I didn't have any. So I balled up some newspaper and secured it with packing tape. Perfect...and free!
    two balls of newspaper
     Then I began hot gluing the liners to the newspaper ball. Simple as that. The other ball will be used in another project that I will share another day.
     I had some flower pots in the shed, so I grabbed one and painted it black, then sprayed it with a clear coat and added black beans to hold the dowel in place.
    black pot with black beans and topiary on dowel
     Added a ribbon and some contact paper trim to the pot (cut with my cricut), and I was done!
    console table with valentine decor
    Thanks for looking!

    Matching Handbag and Wallet Tutorials

    January 19, 2011 By Brandy 57 Comments

    open wallet on table
    Can't find the perfect handbag or wallet? Make your own! An easy to follow handbag tutorial with plenty of room to hold everything you might need AND a wallet tutorial too! Make both in coordinating fabrics for a matching set.

    I did not come up with these amazing tutorials, but did link to the creators below. I am grateful for talented ladies like these who take the time to create easy to follow sewing tutorials!

    floral handbag and wallet

    Handbag tutorial and wallet tutorial are listed at the bottom of the post.
    I have always been in denial as to how large of a bag/purse that I really need. I always go smaller and end up stuffing things in to make them fit...and then I can't find anything! Even after adjusting the pattern for my last purse to make it larger, I still had that issue. So I've come to terms with being a mother of 3, one still in diapers, and made myself a bag to fit. Smaller than my diaper bag, but large enough to fit everything and some extra space. Perfect.
    grey and floral handbag
     I purchase a yard of Amy Butler's morning glory fabric on etsy. A quick trivia fact...Amy Butler
    lives in the next town over from me. Her studio is 15 minutes away from me, yet she remains closed to the public. Was it too much to hope for an Amy Butler fabric outlet to be connected to her studio for locals like myself? Maybe...until she comes around, I'll order online.
    I had a heck of a time finding a fabric to coordinate with this one at any shops in town. Then I decided to go through my closet. Sure enough...a pair of greenish/greyish/brownish (I have no idea what color it is) cords that I got at a thrift store for $3, matched PERFECTLY. And I never wore them anymore.
    inside lining of purse
    A polka dot print for the lining, and magnetic closures to secure it shut. I will never use any other fastener again. EVER. I had no idea how simple these were to add to a bag or wallet. And inexpensive.
    wallet on table
    After I finished my bag, I went on to working on a matching wallet.

    open wallet on table

    A pocket for receipts...
    open fabric wallet with floral fabric
     6 card slots, another pocket for bills, and...
    credit card slots in wallet
    a large zipper section for coins, etc.
    coin zipper pouch in wallet
    wallet and handbag on table
    WASP BAG TUTRIAL from Machen/ Machen
    **Update 11/17/2011**
    The Wallet Tutorial that I used is no longer available online. It looks as though her blog went private. Here is the link in case it comes back open to the public again.
    Here is another one that I have made and the tutorial is fantastic. Wallet Pattern
    You might also like...
    fabric wallet with blue floral fabric
    Zipper Wallet
    3 kids holding fabric minion totes
    Minion Summer Tote Tutorial

    Easy Snowman Ornament: Quick and Easy Preschool Craft

    December 24, 2010 By Brandy 2 Comments

    3 snowman ornaments with white background
    A quick and easy holiday craft for kids! This shredded paper snowman ornament comes together in under 5 minutes.
    3 shredded paper snowmen ornaments
    I found a pack of clear ornaments that I bought a few years ago in one of our Christmas boxes. I bought them to make snowman ornaments with the kids and then forgot...until this year! We made these cute ornaments to hang on the tree then used them to decorate the house in January. I love the faces that the kids drew on all by themselves. Those little carrot noses, though! We have a "no ornament left behind" policy in our home and string EVERY ornament onto the tree EVERY year. With several kiddos, this means that we have a lot of glittery, hand drawn, pasta dyed ornaments on the tree and I wouldn't have it any other way. Each represents a moment in time, a year, and a memory.

    I debated whether or not I should post a tutorial for these little ornaments because they are pretty self-explanatory, but I figured, why not? Someone might find this useful! If not, just scroll down to the bottom of the post where I share some other wintry/Christmas related crafts for kids that require a bit more instruction.

    Shredded Paper Snowman Ornament

    Step 1:

    Shred a bunch of white copy paper (we used scrap paper).

    Step 2:

    Fill the ornament with the paper shreds and replace the hanger.

    Step 3:

    Use Sharpies to draw on a snowman face.

    More winter craft ideas for kids!

    sock snowman

    Sock Snowman

    A quick and easy sock snowman for kids to make. No sewing involved! Fill with rice or pillow stuffing for a darling stuffed toy!

    snowball soap

    Snowball Soap

    No melting, pouring or measuring. This is the easiest DIY kids soap to make! Hide a small toy inside for this fun snowball surprise soap!

    mason jar lid ornament

    Reindeer Ornament

    Capture your child’s darling little thumbprint in this cute and easy reindeer ornament! A quick, low-mess, activity for toddlers and preschoolers.

    Last, but not least, here are 30 more snowman crafts to make with kids!


    • « Previous Page
    • 1
    • …
    • 152
    • 153
    • 154
    • 155
    • 156
    • 157
    • Next Page »

    Welcome!

    I'm Brandy! I love to create and share my ideas through easy-to-follow recipes and tutorials.

    More about me

    As an Amazon Associate, I make a small commission on qualifying purchases.

    sew with me kids sewing book
    My Book

    Summer Posts

    • Cherry pie on prep mat.
      Best Cherry Pie Recipe
    • Bandanna Picnic Blanket Tutorial
    • diy tiki torch planter on black plant stand
      DIY Tiki Torch Planter (Table or Stand) + Video
    • slab pie on white plate
      Peach Slab Pie
    • toddler playing with dinosaur garden
      Dinosaur Garden For Kids (Fairy Garden) (Video)
    • water bottle sewing tutorial
      Color Block Fabric Water Bottle Holder Tutorial
    • strawberry pie with whipped cream on top.
      Fresh Strawberry Pie Recipe (Video)
    • slice of ice cream cake on spatula
      Oreo Ice Cream Sandwich Cake
    See more Summer →

    Latest Posts

    • 3 walnut brownies stacked.
      Katharine Hepburn's Brownie Recipe
    • Arms with stacks of bandana bracelets on them.
      Easy DIY Bandana Bracelets
    • Stack of colorful bandana hair bows.
      How To Make Easy Bandana Hair Bows (No-Sew)
    • White candles decorated with wax candle pens.
      How to Decorate Candles with Wax Candle Pens
    • Slice of Chessmen banana pudding on a metal spatula.
      Chessmen Cookie Banana Pudding (Easy No Bake Recipe)
    • Chocolate cake coated in ganache and mini chocolate chips.
      Best Chocolate Pudding Bundt Cake

    Footer

    ↑ Back to Top

    About

    • Privacy Policy
    • Accessibility Policy

    Newsletter

    • Sign Up! for emails and updates

    Contact

    • Contact

    As an Amazon Associate, I earn from qualifying purchases.

    Copyright © 2025 Gluesticks Blog