Gluesticks Blog

menu icon
go to homepage
  • Summer
  • DIY
  • Recipes
  • About Me
  • Subscribe
    • Facebook
    • Instagram
    • Pinterest
  • subscribe
    search icon
    Homepage link
    • Summer
    • DIY
    • Recipes
    • About Me
    • Subscribe
    • Facebook
    • Instagram
    • Pinterest
  • ×
    Home

    Mini Key Lime Pies (Made With Lime Yogurt!)

    May 7, 2024 By Brandy Leave a Comment

    mini key lime pies

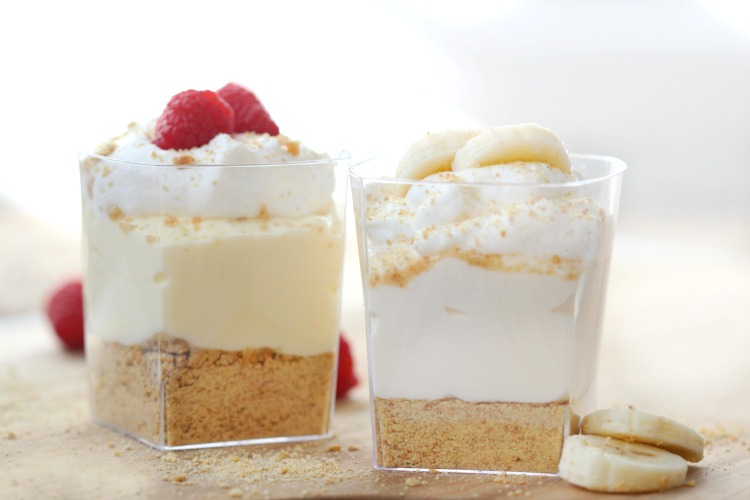
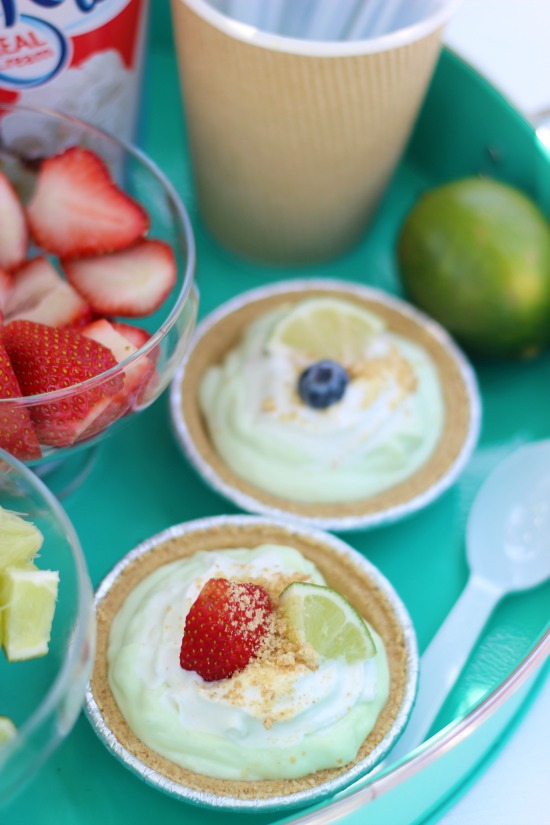
    When it comes to making pie, it doesn't get any more effortless than these mini key lime pies. Seasonal berries, lime yogurt, and whipped cream layered in mini graham cracker pie crusts! 

    You might also like our lemonade pie or fresh strawberry pie!
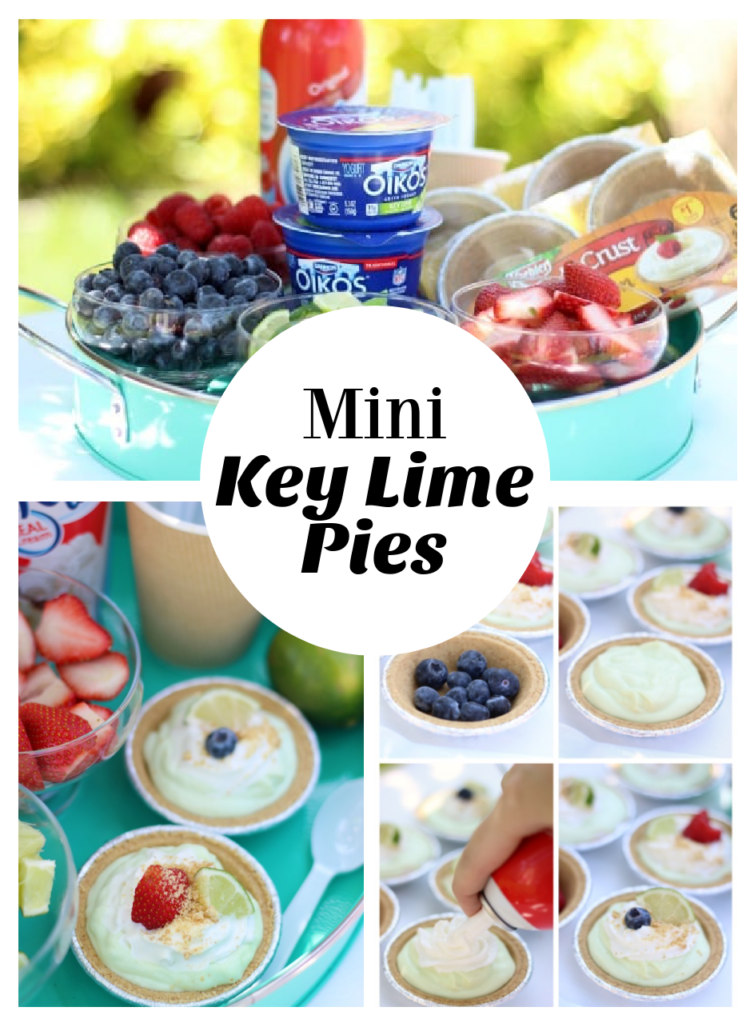
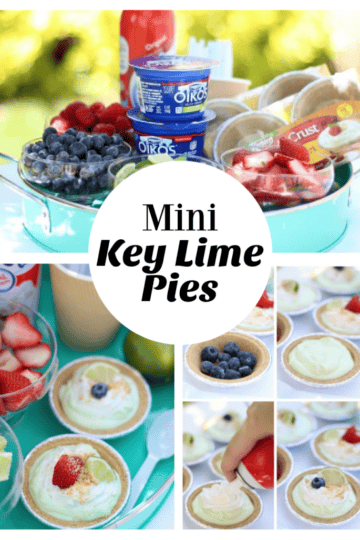
    mini key lime pies

    Mini Key Lime Pies

    These mini pies are fun to customize--- and the best part? They are no-bake and perfect for summer entertaining!

    small bowls of chopped fruit, can of whipped cream, containers of lime yogurt and mini pie crusts in a serving platter
    The summer temps have already made their appearance here in Northern California. It also coincided with the week that our air conditioning stopped working! It was just as warm indoors as it was outdoors so we took advantage of the shade in the backyard for a deliciously refreshing pie bar. You could easily make these ahead of time and keep them in the freezer until it is time to serve, but my kids LOVED customizing their own. Dessert bars are just fun!

    two mini pies


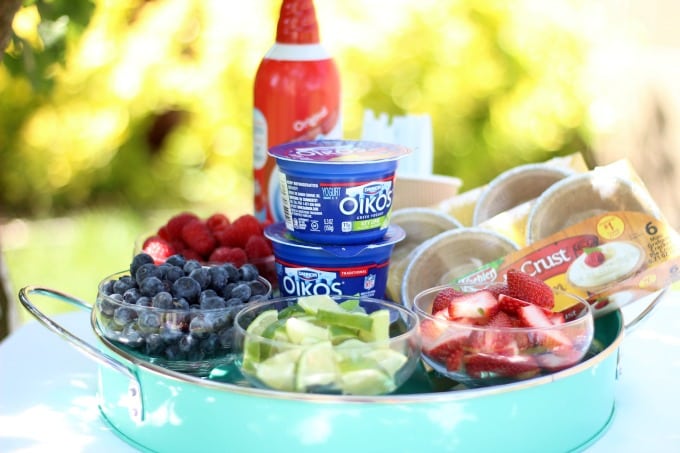
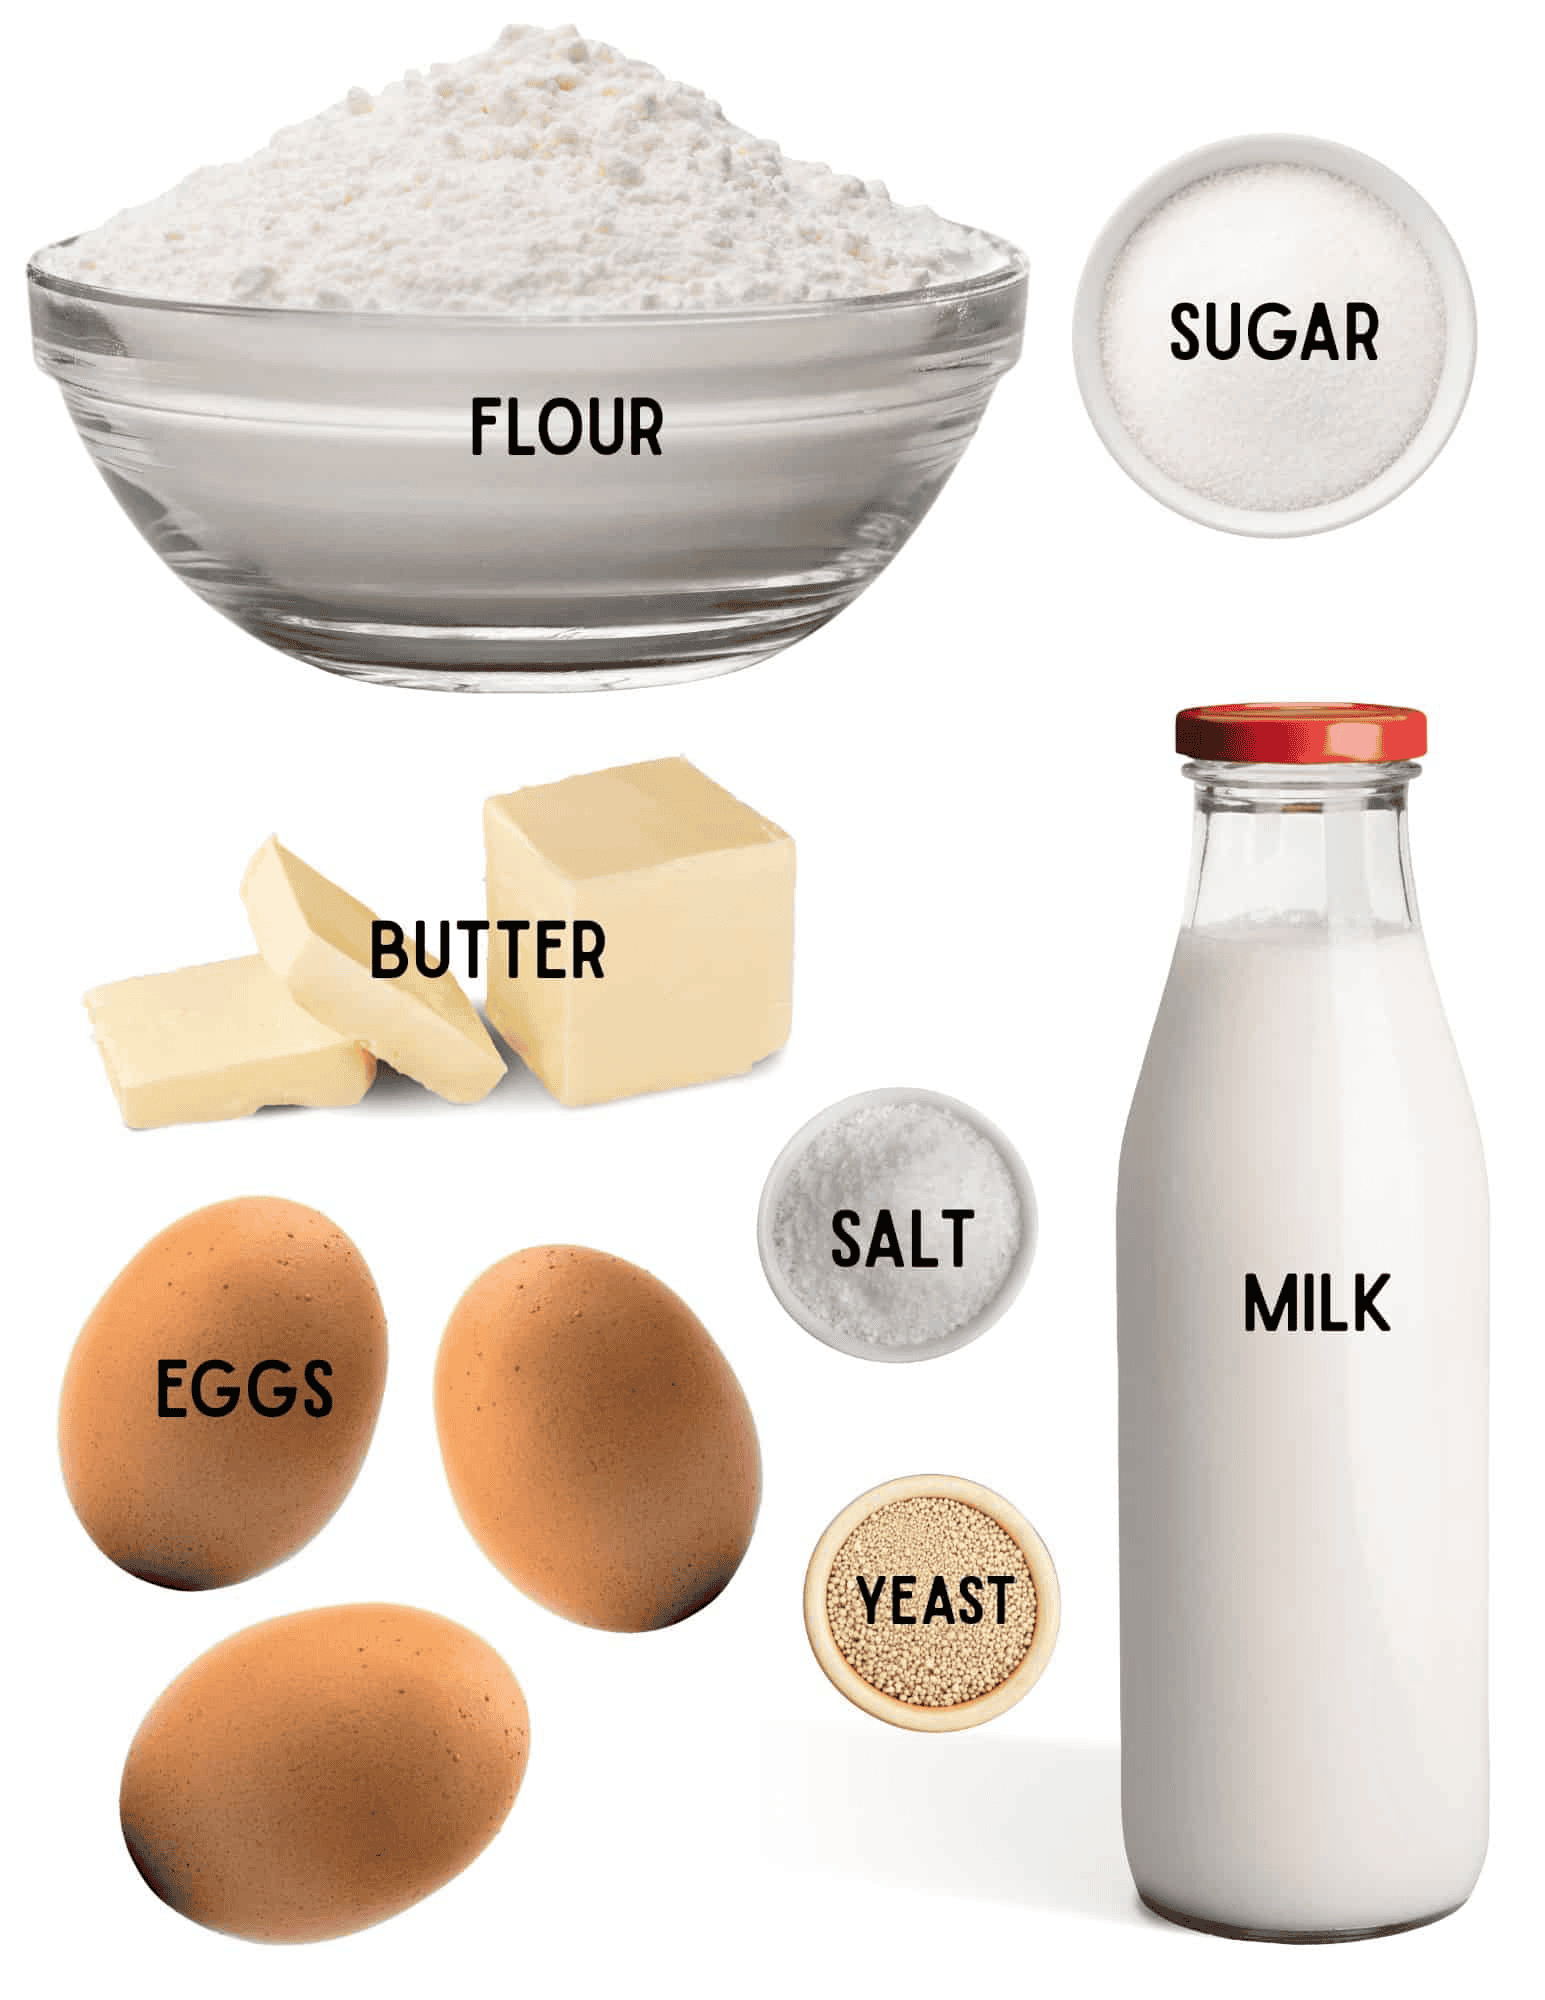
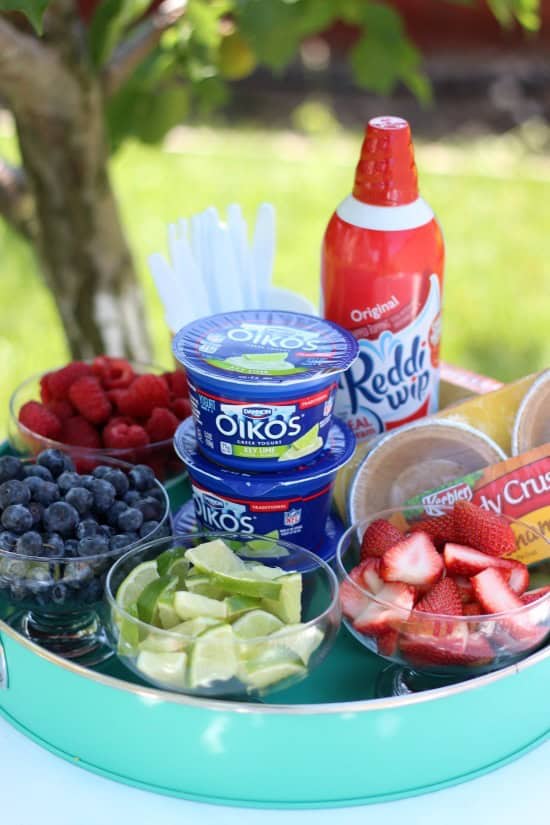
    Mini Key Lime Pie Ingredients

    • Whipped Cream: Cool Whip, canned whipped cream, or homemade whipped cream.
    • Yogurt: any kind of lime yogurt will work. Yogurt is a great time saver and such a great way to make mini-cream pies!
    • Fruit: a variety of fresh fruits to add to the pies. This is optional, but I love the added texture and flavor. Especially raspberries.
    • Mini pie crusts: I buy the premade graham cracker crusts from the grocery store, but you can make your own if you'd like.

    platter with limes, fruit, yogurt and mini pie crusts
    I filled a platter with seasonal berries, several containers of lime yogurt (1 container is enough for 2 mini pies), mini graham cracker pie crusts, and a can of whipped cream. The sweetness from the crusts and whipped cream balanced out the tart yogurt and berries perfectly. You could use any yogurt, but I LOVE key lime so that was an obvious choice for me!

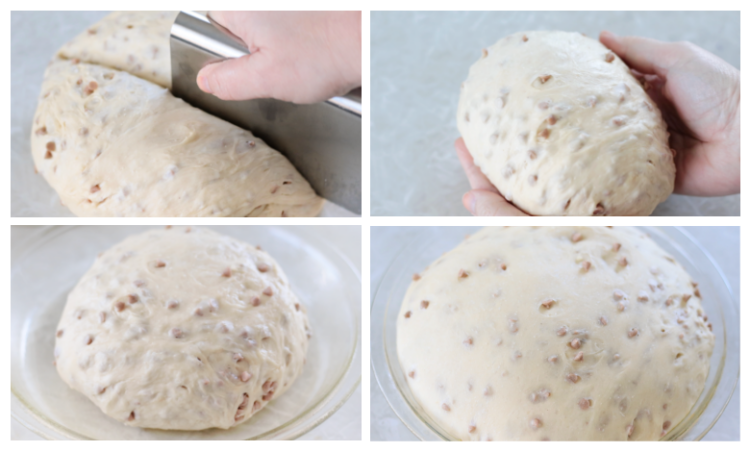
    How To Make Mini Key Lime Yogurt Pies

    mini pie crusts full of fruit and lime yogurt

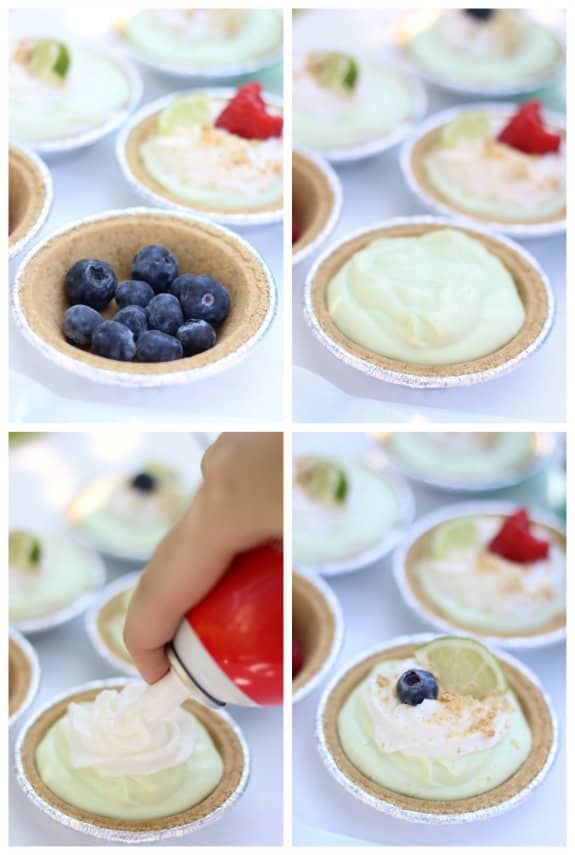
    1. Fill each mini pie crust with a layer of fresh fruit.
    2. Spoon yogurt over the fruit.
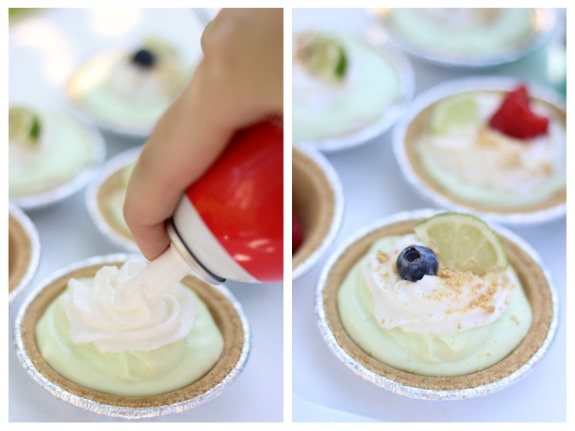
    3. Add a swirl of whipped cream, then garnish with fresh fruit and graham cracker crumbs (optional).

    two mini key lime pies
    We had Key Lime Blueberry, Key Lime Mixed Berry, Key Lime Raspberry, and Key Lime Strawberry pies!

    These pies store well in the refrigerator or freezer for a few days (it just depends on how you like eating them---soft or frozen).

    Mini M&M Cookies (They are Itty Bitty!)

    May 6, 2024 By Brandy 3 Comments

    ceramic container of mini M&M cookies

    Mini M&M cookies because everything in miniature is better! Loaded with mini M&Ms these are so fun to eat! One batch makes over 12 dozen.

    You might also like our mini chocolate chip cookies, our mini pumpkin cookies, or our scotcheroo bites!

    mini M&M cookies

    Watch our step-by-step video!

    Mini M&M cookies are fun to eat and fun to make. You’d need 4-6 of these babies to equal one regular-sized cookie! They bake up quickly (6-8 minutes) and are so fun to pop right into your mouth. These always go so fast and are a hit with kids. The perfect size for little hands.

    mini cookies in container

    MINI M&M COOKIE INGREDIENTS

    • Butter: I always use salted butter (room temp or slightly softened), but you can use unsalted butter if you prefer.
    • Sugars: You’ll need brown and white sugar for the perfect ratio of sweetness and texture.
    • Eggs: Room-temperature eggs give the cookies structure.
    • Vanilla extract: for flavor.
    • All-purpose flour: bleached flour, unbleached flour, bread flour. Any of these will work.
    • Baking Soda, Baking Powder, and Salt: for leavening, texture, and flavor.
    • Mini M&Ms: I use some in the dough and then tip each cookie dough ball in more M&Ms before baking.
    • Mini Chocolate Chips: I like using a mixture of mini chocolate chips and candies to break up some of the crunch.

    hand holding 4 cookies

    HOW TO MAKE MINI M&M Chocolate Chip COOKIES

    PREP

    Preheat the oven to 375 degrees and line a few baking sheets with parchment paper. The more cookie sheets you have the better---that way you can prep a bunch of the cookies while the cookies bake.

    DOUGH

    Cream butter and sugars together. Mix in eggs and vanilla. Add dry ingredients and mix until soft dough forms.

    Stir in mini chocolate chips and mini M&Ms.

    SCOOPING

    Use a teaspoon to form the first cookie dough ball (a heaping teaspoon of dough). Then I just eyeball the rest. Pick up a large portion of dough and simply break off teaspoon-sized balls of cookie dough. Dip each cookie dough ball in the remaining mini M&MS before placing them onto a baking sheet (24 cookies to a sheet).

    hand holding tiny piece of cookie dough dipped in candies

    I don’t roll them into balls, I just break the dough into pieces. Remember, we’re making over 12 dozen cookies—skipping the step of rolling them into balls will save you time.

    tiny cookie dough balls on baking sheet

    BAKING

    Bake the cookies for 6-8 minutes, or until the bottoms are light brown. Cool on baking sheets for a few minutes and then transfer to wire cooling racks.


    baking sheet with mini M&M cookies

    HOW MANY COOKIES WILL THIS RECIPE MAKE?

    Normally a recipe like this would make about 3 dozen regular-sized cookies. This one makes over 12 dozen itty-bitty cookies! This exact batch made 160 cookies.

    bowl of mini M&M cookies

    CAN I USE REGULAR M&M Candies?

    Because these cookies are SO tiny, I wouldn't use regular-sized candies. Mini M&Ms distribute throughout the cookie dough perfectly.

    HOW TO STORE M&M COOKIES

    Store cookies in an airtight container and they’ll stay fresh for at least 3 days.

    ceramic container of mini M&M cookies

    CAN THIS RECIPE BE HALVED?

    Yes. The ingredients should easily enough be able to be divided in half to make 6 dozen mini cookies, but I highly recommend making a full batch. They’ll go quickly and are super tiny.

    TIPS FOR MAKING CHOCOLATE CHIP COOKIES

    • Use room temperature ingredients. Butter can be slightly chilled, but should be soft when your thumb is pressed into it.
    • Use an electric mixer. A stand mixer or electric hand mixer works great. You can make cookies by hand, but an electric mixer is best for creaming the butter and sugar together.
    • Bake on light cookie sheets. All of my recipes are aimed at baking with light metal cookie sheets. That’s all I bake with. If you use dark sheets you’ll need to keep an eye on the cookies and adjust the baking times, if necessary.

    mini cookies in container

    Mini M&M Cookies Recipe

    ceramic container of mini M&M cookies
    Print Pin
    5 from 4 votes

    Mini M&M Cookies (Itty Bitty!)

    Mini M&M cookies because everything in miniature is better! Loaded with mini M&M candies these are so fun to eat!
    Course Dessert
    Cuisine American
    Prep Time 10 minutes minutes
    Cook Time 7 minutes minutes
    Total Time 17 minutes minutes
    Servings 160 cookies
    Calories 30kcal
    Author Brandy Nelson

    Ingredients

    • 1 cup butter room temperature
    • 1 ¼ cup light brown sugar
    • ½ cup granulated sugar
    • 2 large eggs
    • 2 teaspoons vanilla extract
    • 3 ¼ cups all purpose flour
    • 1 teaspoon baking powder
    • 1 teaspoon baking soda
    • ½ teaspoon kosher salt
    • 1 cup mini chocolate chips
    • 16.9 ounce bag mini M&Ms divided

    Instructions

    • Preheat oven to 375 degrees. Line a couple of baking sheets with parchment paper or a nonstick baking mat, if desired. The more baking sheets that you can use the better, because we're making a lot of itty bitty cookies.
    • Cream butter and sugars together until very fluffy. Add eggs, one at a time, mixing well after each addition. Stir in the vanilla. Stir in flour, baking soda, baking powder, and salt until just combined. Mix in chocolate chips and 1 cup of mini M&M candies.
      Pour the remaining M&M candies into a small bowl and set aside.
    • Break dough into tiny teaspoon-sized balls. Press each cookie ball into the remaining mini M&M candies (about 3-5 candies per cookie) then place onto a baking sheet (24 cookie dough balls per sheet).
    • Bake cookies for 6-8 minutes, or until bottoms are slightly golden. Allow cookies to cool on baking sheets for a few minutes before transferring to wire cooking racks.

    Video

    Notes

    Store in airtight container or cookie jar for up to 3 days on the counter. Can also store in freezer for a few months.

    Nutrition

    Calories: 30kcal


    20 Lemon Dessert Recipes (Cookies, Pastries and More!)

    April 26, 2024 By Brandy Leave a Comment

    collage of 20 lemon dessert recipes

    20 tangy lemon dessert recipes to make. From rice krispies treats to cookies and scones to cheesecake, you'll love these treats!

    You might also like our collection of famous chocolate chip cookie recipes or our collection of 30+ bake sale treat recipes!

    collage of 20 lemon dessert recipes

    You're obviously here because you love the tart, tangy, and fresh flavor of lemons as much as I do. I decided it was time to collect all of the lemon recipes from the site and have them in one spot. So without further adieu, here are 20 delicious lemon dessert recipes for your family!

    Lemon Dessert Recipes

    (click on the title of each dessert to open a new window with the recipe!)

    lemon Rice Krispies treats cut into squares

    Lemon Rice Krispies Treats

    Sweet and tangy lemon Rice Krispies treats are a fun twist on a classic treat. They are loaded with lemon cookies and lots of mini marshmallows.

    yellow lemon butter mints on parchment paper

    Lemon Butter Mints

    Lemon butter mints are the perfect combination of sweet and tangy. Made with simple ingredients they are easy to make and fun to eat!

    5 turnovers next to a bowl of fresh lemons

    Lemon Raspberry Turnovers

    Sweet, tart, flaky, and buttery. These lemon raspberry turnovers filled with homemade tangy lemon curd are to die for!

    lemon sugar cookies on cooling rack

    Lemon Sugar Cookies

    Lemon sugar cookies with creamy lemon frosting and an added boost of tang from the tiniest slice of lemon on top of each cookie. These are literally the BEST lemon sugar cookies. A delicious twist on our tried and true bakery-style sugar cookie recipe.

    Lemonade Cupcakes

    Bright and colorful summer-themed cupcakes with a tangy twist! These lemonade cupcakes with DIY popsicle lollipop toppers are what summers are made of!

    lemon cooler cookies on parchment paper

    Lemon Cooler Cookies

    Lemon cooler cookies are buttery, light, and loaded with lemon flavor. Covered in powdered sugar they are sweet and tangy cookies!

    glazed lemon cookies on parchment paper

    Glazed Lemon Cookies

    If you like lemon, you will LOVE these glazed lemon cookies! A soft lemon sugar cookie brushed with a delicious lemon glaze and topped with a lemon slice.

    lemon curd in jar

    Homemade Lemon Curd

    Lemon curd might sound fancy, but it’s actually SUPER easy to make. Try our homemade lemon curd recipe, it’s delicious!  You’ll find yourself finding more and more ways to enjoy this yummy treat!

    hand holding lemon bar cookie

    Lemon Bar Cookies

    These lemon bar cookies are made with a buttery cookie base, lemon curd, and sprinkled with powdered sugar. The ultimate lemon cookie loaded with lemon flavor!

    lemonade pie with fresh lemons near the pie

    Lemonade Pie

    Sweet, tangy, and creamy. Lemonade pie is so EASY to make and perfect for summer! Make your own graham cracker crust or grab one from the store!

    Lemon Cheesecakes

    This homemade lemon curd cheesecake recipe has a sweet NILLA Wafers crust and a creamy cheesecake filling. Topped with homemade lemon curd, and whipped cream. The perfect combination of sweet and tangy, they are small in size but huge in flavor!

    pan of sugar cookie bars with one missing

    Lemon Sugar Cookie Bars

    Strawberry lemon sugar cookie bars are what summer is made of. Fresh, sweet, and tangy and made from the BEST sugar cookie dough. These are best served immediately or made ahead of time and adding the diced strawberries RIGHT before serving.

    cup of hot honey lemonade

    Hot Honey Lemonade

    Hot honey lemonade is perfect to sip while sick or on a cold day. This is my grandma’s recipe and she would make it for me when I was little. Many sore throats were soothed with this hot lemonade.

    Lemon Sweet Rolls

    Quick and easy lemon sweet rolls made from start to finish in under 90 minutes! Make these your new weekend breakfast tradition. So sweet and tangy!

    two mini cream pies in plastic cups

    Mini Lemon Cream Pies

    A mini cream pie in a cup that comes together in just minutes! A layer of graham crackers, a layer of Greek yogurt and whipped cream! Perfect for parties.

    serving of blueberry cobbler with a scoop of vanilla ice cream on top

    Lemon Blueberry Cobbler

    Sweet and tangy, this blueberry lemon cobbler is simply the BEST. So simple to make with fresh or frozen blueberries and delicious served with whipped cream or vanilla ice cream.

    slices of easy lemon loaf cake on platter

    Lemon Loaf

    The easiest lemon loaf recipe! Made with the ease of a cake mix and homemade lemon icing, it is absolutely delicious. You’ll love this cake!

    Lemon Hand Pies

    Delicious homemade lemon curd sandwiched between flaky pie crust. These lemon curd hand pies are the perfect combination of sweet and tangy!

    3 blueberry scones on cutting board

    Blueberry Lemon Scones

    Blueberries, freshly squeezed lemons, and cold butter are the key ingredients to this deliciously light and fluffy blueberry scones recipe. You’ll love the sweet and tangy flavor combination. Perfect for a weekend breakfast or brunch!


    Copycat Subway White Chocolate Macadamia Nut Cookies

    April 9, 2024 By Brandy 6 Comments

    white chocolate macadamia nut cookies on parchment paper

    These white chocolate macadamia nut cookies are soft and chewy. They look and taste just like Subway white chocolate macadamia nut cookies---actually, they are better!

    Do you like copycat recipes? I have an ENTIRE COLLECTION of famous copycat chocolate chip cookies! From Levain to Chick-fil-A--- you can find all of the recipes here! 

    copycat white chocolate macadamia nut cookies

    Watch our step by step video!

    Perfectly chewy and golden white chocolate chip cookies that rival any sold at your local Subway store. Make your own copycat version with this recipe! These cookies soften as they sit and are even better on day 2!

    COPYCAT SUBWAY White CHOCOLATE Macadamia Nut COOKIES

    I’ve been on a chocolate chip cookie kick for the past couple of years. Making my own versions of popular recipes or making the recipes that popular companies have graciously shared with the masses (Double Tree, Disney, etc.). One of my favorite copycat recipes that I came up with was for the classic chocolate chip cookies from Subway.

    3 types of copycat subway cookies

    I have copycat versions of Subway's double chocolate chip cookies, and their double chocolate chip cookies and today I'm sharing a recipe for their white chocolate macadamia nut cookies. They are incredibly soft, chewy and delicious.

    copycat subway white chocolate cookies on parchment paper

    Most restaurant chains that sell cookies get them from a larger manufacturer like Otis Spunkmeyer. They are shipped in frozen cookie dough balls and baked on-site for a fresh-baked taste. Unfortunately, they don’t share their exact recipe, but through a bit of trial and error I was able to come up with a version that I think is “chef’s kiss”. I did a side-by-side taste test with a cookie that I bought from Subway and honestly, I think they are BETTER. Just as soft and chewy, but with a better depth of flavor---and they are HOMEMADE.

    three subway copycat cookies in wrapper

    CHEWIEST White CHOCOLATE CHIP COOKIES

    I know that I am going to get comments on using corn syrup, but if you want a super chewy cookie, a tiny amount of corn syrup will give that to you. This recipe calls for 3 Tablespoons, which is hardly any.  Another technique that I use to create a chewy cookie is to slam the baking sheet against the counter during and after baking. This causes the cookies to deflate, slightly, creating a soft center.

    The cookies will start out with crisp bottoms, but as they sit they’ll soften up considerably —even more so on day 2.

    white chocolate macadamia nut cookies on parchment paper

    COPYCAT SUBWAY COOKIE INGREDIENTS

    • Butter: I always bake with salted butter, but you can use unsalted butter if you’d like.
    • Oil: I used vegetable oil, but canola can be used as well.
    • Sugar: I used a combination of light brown sugar and white granulated sugar.
    • Eggs: for richness and texture.
    • Vanilla extract: Have you tried making your own vanilla extract? It’s easy to do and delicious to add to baked goods.
    • Molasses: Just a little for a boost of flavor, but you can omit it if you'd like.
    • Corn Syrup: Creates a chewier cookie.
    • Salt and Baking Soda: For leavening.
    • Flour: I used all-purpose flour. You can also use bread flour if you’d like.
    • White Chocolate Chips: The Subway cookie nutritional info says that they use semisweet chocolate chips so that is what I used. You can use milk chocolate chips or dark chocolate chips if you’d like.
    • Macadamia Nuts: chopped.

    hand holding copycat subway cookie

    HOW TO MAKE SUBWAY White CHOCOLATE Macadamia Nut COOKIES

    (scroll down for printable version)

    • Cream butter and sugars together using a stand mixer or with an electric hand mixer.  Add oil and mix thoroughly.
    • Beat in eggs, vanilla extract, molasses, and corn syrup.
    • Add salt and baking soda. Mix in flour until dough forms.
    • Mix in white chocolate chips and chopped macadamia nuts.
    • Cover the bowl of cookie dough with plastic and chill in the refrigerator for 1-2 hours.
    • Preheat the oven to 350 degrees. Line a baking sheet with parchment paper.
    • Scoop dough using a medium (2 Tablespoon size) cookie scoop or roll into balls, 6-8 cookies per sheet.
    • Bake cookies for 6 minutes then remove them from the oven (cookies will look raw) and bang the baking sheet against the counter 3 times. Bake for an additional 4-5 minutes, until the tops are golden.
    • Remove the cookies from the oven and bang the baking sheet against the counter 1 more time. Note: cookies will bake for a total of 10 minutes (6 minutes then an additional 4-5 minutes).
    • Allow cookies to cool on the baking sheet for 5-10 minutes before transferring to a wire cooling rack. Cookies will soften as they cool, even more so on day two.

    These white chocolate macadamia nut cookies are soft and chewy. They are just like Subway white chocolate cookies---actually, they are better!

    copycat subway white chocolate cookie on parchment paper.

    TIPS AND TRICKS

    • Leave the un-scooped cookie dough in the refrigerator while the other cookies bake. Pull the bowl out of the refrigerator when ready to bake up another baking sheet of cookies so the cookie dough doesn’t warm up again.
    • Cookies will start out crispy around the edges, but soften significantly as they sit.
    • Bake on light-colored baking sheets for best results. If you use dark metal sheets you’ll need to watch closely to make sure that the cookies don’t brown too quickly.
    • Allow the cookies to cool completely then wrap them in plastic or store them in an airtight container to keep them soft. 
    • Cookies will stay soft and chewy for days, but if you’d like to warm them up you can do that for a few seconds in the microwave.

    hand holding white chocolate cookie

    Copycat Subway White Chocolate Macadamia Nut Cookies Recipe

    white chocolate macadamia nut cookies on parchment paper
    Print Pin
    4.75 from 4 votes

    Copycat Subway White Chocolate Macadamia Nut Cookies

    These white chocolate macadamia nut cookies are soft and chewy. They are just like Subway white chocolate cookies---actually, they are better!
    Course Dessert
    Cuisine American
    Prep Time 10 minutes minutes
    Cook Time 9 minutes minutes
    chill 1 hour hour
    Total Time 1 hour hour 19 minutes minutes
    Servings 30 cookies
    Calories 160kcal
    Author Brandy Nelson

    Ingredients

    • ½ cup butter room temperature
    • ⅓ cup oil canola oil or vegetable oil
    • 1 cup brown sugar
    • ½ cup white sugar
    • 2 teaspoons vanilla extract
    • 2 large eggs
    • 1 teaspoon molasses optional
    • ¼ cup corn syrup
    • ½ teaspoon salt
    • 1 teaspoon baking soda
    • 3 cups all-purpose flour
    • 1 ½ cups white chocolate chips
    • ½ cup macadamia nuts chopped

    Instructions

    • Cream butter and sugars together until mixed. Add oil and mix thoroughly.
    • Beat in eggs, vanilla extract, molasses, and corn syrup.
    • Add salt and baking soda.
    • Mix in flour until dough forms.
    • Mix in white chocolate chips and nuts.
    • Cover bowl and chill for 1 hour.
    • Preheat the oven to 350 degrees. Line a baking sheet with parchment paper.
      Scoop dough using a medium (2 Tablespoon size) cookie scoop or roll into balls, 6-8 cookies per sheet.
    • Bake cookies for 6 minutes then remove them from the oven (cookies will look raw) and bang the baking sheet against the counter 3-4 times. Bake for an additional 4-5 minutes, until the tops are lightly golden.
      Remove the cookies from the oven and bang the baking sheet against the counter 2-3 more times.
    • Allow cookies to cool on the baking sheet for 5-10 minutes before transferring to a wire cooling rack. Cookies will soften as they cool, even more so on day two.

    Video

    Notes

    • Leave the un-scooped cookie dough in the refrigerator while the other cookies bake. Pull the bowl out of the refrigerator when ready to bake up another baking sheet of cookies so the cookie dough doesn't warm up again.
    • Cookies will start out crispy around the edges, but soften significantly as they sit (even more so on day 2).
    • If you don't bang the cookie sheets the cookies will be puffier and not flatten as much.
    • Molasses is optional but adds a great depth of flavor. 1-2 teaspoons is plenty since a little goes a long way.
    • Corn syrup is what gives the cookie a soft and fudgy texture similar to Subway and other restaurant cookies. You can omit it, but it will change the consistency to that of a regular chocolate chip cookie. 
    • Store cookies in an airtight container or wrap them individually in plastic. Cookies will stay soft and fresh 3-5 days.

    Nutrition

    Calories: 160kcal

    Famous Copycat Chocolate Chip Cookie Recipes

    March 28, 2024 By Brandy 2 Comments

    Various famous chocolate chip cookie recipe collage.

    From Chick-fil-a to Subway and Levain to Double Tree, here are the most famous copycat chocolate chip cookie recipes!

    You might also like our bakery-style peanut butter cookies (better than Grandma's brand peanut butter cookies!) or my Copycat Otis Spunkmeyer oatmeal raisin cookies!

    Various famous chocolate chip cookie recipe collage.

    Two years ago, I made a list of famous chocolate chip cookie recipes that I wanted to either make and share or create a copycat version of. It was a tough job, but someone had to do it! I started with 5 recipes and kept adding to the collection.  This week, I crossed off the last cookie on my list and am excited to share the results with all of you! If a company graciously shared its recipe, I noted it in the description and linked back to the original source. If the recipe states it is a copycat, it is one I created and perfected through numerous test batches.

    [feast_advanced_jump_to]

    To view the full recipe, click the links in the description or the cookie recipe title; they will open the recipe in a new window.

    levain cookies on baking sheet

    Tips for Making The Best Cookies

    Here are a few things that I did the same for all of the recipes below.

    1. Use an Electric Mixer: I go back and forth between my kitchenmaid stand mixer and my handheld electric mixer. Both work great. When making cookies you need an electric mixer to really cream the sugar and butter.
    2. Light Baking Sheets: I bake with LIGHT colored baking sheets. I prefer light baking sheets to dark because they bake more evenly and the bottoms of the cookies don’t brown as quickly.
    3. Cookie Scoops/Scale: For uniform cookies, use a cookie scoop or scale to weigh out dough balls.
    4. Wrap jumbo cookies individually: I find that wrapping each cookie in plastic keeps them fresh longer than storing them in a cookie jar or container. I do this for any jumbo-sized cookie (3 Tbsp. or larger).

    The Best Copycat Chocolate Chip Cookies

    1. Copycat Chick-fil-A Chocolate Chip Cookies

    tray of copycat chick-fil-a chocolate chunk cookies

    These are the best chocolate chip cookies ever!! ---Paige

    These copycat Chick-fil-a chocolate chunk cookies are the first on the list for a reason. Large, thick cookies, loaded with chocolate chunks, milk chocolate chips, and a small amount of oats (I wouldn't consider them to be oatmeal cookies). Serve warm with a glass of cold milk! This is a copycat version, not the actual recipe (which they've never released).

    2. Jacques Torres Chocolate Chip Cookies

    side by side of the front and back of the jaques torres cookies

    The best chocolate chip cookie recipe I’ve ever made. This is the second batch of these I’ve made& they come out bakery beautiful every time!---Olivia

    Jacques Torres chocolate chip cookies are made with chocolate chunks and have a coating of chocolate on the bottom of the cookie. Originally shared in the New York Times, this recipe has received thousands of 5-star reviews for good reason! This is his actual recipe and these cookies are delicious with or without the chocolate coating on the bottom. I'd skip the chocolate for everyday snacking, but if you want to make gourmet cookies, spread a bit of melted chocolate on each cookie!

    3. Copycat Subway Chocolate Chip Cookies 

    copycat subway chocolate chip cookie

    I love this recipe!---Ali

    These Subway chocolate chip cookies are soft and chewy. They look and taste just like Subway chocolate chip cookies! If you like Otis Spunkmeyer chocolate chip cookies you'll like these ones too. This is a copycat version, not the actual recipe (which they've never released). Looking for Subway's white chocolate chip macadamia nut cookies? I've got a copycat recipe for those too (they are A-MAZING).

    4. Mrs. Fields' Blue Ribbon Chocolate Chip Cookies

    batch of blue ribbon chocolate chip cookies on cooling rack

    I've made these now in both normal and bakery-sized versions, and both were delicious. Still recommend baking at the higher temp, but it's personal preference.---Brandy

    Mrs. Fields Blue Ribbon Chocolate Chip Cookies are a classic, decades-old recipe for bakery-style cookies that are soft, gooey, and loaded with chocolate chips! Even better than the ones sold in the Mall shops today.

    Looking for the Mrs. Fields $250 cookie recipe with ground oats and a Hershey bar? I've got those too!

    5. Snoop Dogg's Rolls Royce Cookies

    chocolate chip peanut butter cookies on baking sheet with parchment paper

    I used 50/50 Butter and Butter flavored Crisco and the texture and flavor were great, crisp outside and moist inside. My grandson loved them!!---Tim

    Snoop Dogg's Rolls Royce cookies are a must-try! Delicate, buttery soft chocolate chip peanut butter cookies that are rich and delicious!

    6. Mama Kelce's Chocolate Chip Cookies

    cookies on parchment paper

    Love this recipe and have made the adjustments of less butter. I also incorporate corn startch too to prevent over spreading. I always get rave reviews about these cookies.---Julia

    Loaded with white chocolate chips, milk chocolate chips, nuts, and a hint of cinnamon, Mama Kelce’s chocolate chip cookies are amazing! Crispy on the outside and chewy in the center. They have the best flavor and are high on my list for that reason. If I were to make these again I might make a couple of changes to the recipe and I listed those changes in the post. This is the actual recipe that Mama Kelce (Travis Kelce's mother) shared.

    7. Double Tree Chocolate Chip Cookies

    oatmeal chocolate chips cookies on parchment paper

    I came across the recipe a few yrs before Hilton released it for publication but that recipe calls for pulsing the oats in a food processor.---Cindy

    This is the actual recipe for the famous DoubleTree chocolate chip cookies that Hilton shared. The oatmeal chocolate chip cookies are loaded with walnuts and have a hint of cinnamon, and you can now make the signature cookie at home!

    8. Copycat Trader Joe's Chocolate Chip Cookie Dunkers

    cup of cookie dunkers

    They came out the perfect shape and so crispy! My new staple recipe for sure, definitely recommend!---Scilla

    Crispy chocolate chip cookie dunkers, perfect for dipping in milk! These chocolate chip cookie sticks are delicious, easy to make, and fun to eat. This is a copycat version of the cookie dunkers that are sold at Trader Joe's. Theirs have a hint of coconut flavoring. If you'd like yours to have that, you can use unrefined coconut oil instead of butter.

    9. Copycat Panera Kitchen Sink Cookies

    Great cookie. I added Reeses pieces and just decreased some of the other mix ins.---Julie

    Kitchen sink cookies combine milk chocolate, semisweet chocolate, caramel, and pretzels. Even better than Panera’s version because these are homemade and fresh from the oven! This is a copycat version, not the actual recipe (which they've never released).

    10. Laura Bush Cowboy Cookies

    two cowboy cookies on parchment paper

    I make thee all the time. I add everything to them and they are still awesome. Cranberries, raisins, nuts, coconut, chocolate chips,and 1 cup rice crispies, and double the batch. I cook them longer until they are light brown and then they are crispy cookies.---Dale

    Soft and gooey cookies with loads of chocolate chips, chopped pecans, oats, and coconut. These jumbo-sized cowboy cookies are the BEST! I share my version in this post and also link to Laura Bush's actual recipe.

    11. Copycat Levain Chocolate Chip Cookies

    baking sheet with cookies

    Have made these a few times, always yummy, and I like adding even more walnuts. ---Christy on FB.

    Giant, gooey cookies loaded with walnuts and chocolate chips. Inspired by the famous bakery, our copycat Levain chocolate chip cookies are decadent and delicious. This is a copycat version, not the actual recipe (which they've never released).

    12. See's Chocolate Chip Cookies

    jar of chocolate chip cookies

    Nailed it! ---Anne

    See’s chocolate chip cookies are soft, buttery, and chocolatey. Based on the recipe from the back of the See’s chocolate chips bag. Did you know that See’s Candies sells chocolate chips? They do! And they are delicious. This is their actual recipe.

    13. Disney's Grand Floridian Chocolate Chip Cookies

    chocolate chip cookie with chocolate chips on parchment paper

    Thank you for sharing this recipe! These cookies are the perfect texture—crispy on the outside and moist and chewy inside.---Cindy

    Chef Eric’s recipe for making the famous Disney’s Grand Floridian Chocolate Chip Cookies! Crispy edges and a chewy center. A classic treat that stays soft and delicious for days. This is the actual recipe shared by Disney.

    14. $250 Cookies (Neiman Marcus Cookies)

    chocolate chip cookies on parchment paper

    Been a favorite in the family for decades. So yummy. ---Gladys on FB

    The famous Neiman Marcus chocolate chip cookies have made their rounds on the internet for decades, and for good reason! They are delicious and have an entertaining urban legend backstory!

    15. Copycat Gideon's Bakehouse Chocolate Chip Cookies

    baking sheet with cookies

    I made these this weekend! They were a HUGE hit!! I just added some extra vanilla, vanilla paste and mixed light and dark brown sugars together. Everyone absolutely loved them!---Heather on Pinterest

    Gideon’s Bakehouse cookies are decadent and delicious. Gooey and loaded with chocolate chips they look like inside-out cookies! This is a copycat version, not the actual recipe (which they've never released). I made mine a little smaller than the ones sold in the bakery.

    16. Copycat Crumbl Mom's Cookies

    2 crumbl mom's cookies

    This has become our go-to recipe for get-togethers. My 13 year old has made and shared them several times. They are easy to make, but have such a unique flavor combo!---Brandy

    Inspired by Crumbl, Mom’s cookies are loaded with chocolate chips, peanut butter chips, toffee, oats, and cinnamon. Each cookie is a warm hug. My husband loves these cookies and even asked me to make a batch to share with his coworkers. I don't blame him, the combination of flavors is INCREDIBLE, and they are one of the best cookies I've ever had! This is my copycat version, which uses my Chick-fil-a cookie dough as a base.

    17. Copycat Famous Amos Chocolate Chip Cookies

    baking sheet with parchment paper and batch of copycat famous amos chocolate chip cookies

    Absolutely perfect. Our entire family's favorite "dunker".
    Thank you!---Michelle

    If you like small and crispy cookies, you'll love these copycat Famous Amos chocolate chip cookies! Perfectly tiny and perfectly crispy!—just as good as mini Chips Ahoy or Famous Amos cookies!

    18. Disney's Riviera Resort Chocolate Chip Cookies

    cookies on parchment lined baking sheet

    Disney’s Riviera Signature Cookies are loaded with chocolate, walnuts, pistachios, and dried cherries. The same ones served at the resort! This is the exact recipe shared by Disney. These were delicious, but I don’t typically have dried cherries and pistachios and found them to be a bit spendy for a chocolate chip cookie. They are very unique and are a great combination of flavors!

    19. Martha Stewart Fired Me Cookies

    chocolate chip cookie broken in half on parchment paper

    By far the best chocolate chip cookies I’ve ever made! I followed the recipe except I didn’t have any flakey salt. They were the best texture cookie I’ve ever made. I know they would be even better with the flakey salt. Thanks for the recipe!---Shelby

    Martha-Stewart-Fired-Me cookies are absolute perfection. Crisp edges, chewy center, flaky sea salt, and lots of chocolate chips.

    Disney's Riviera Signature Cookies

    March 26, 2024 By Brandy 1 Comment

    Disney's riviera Resor cookies on parchment paper

    Disney's Riviera Signature Cookies are loaded with chocolate, walnuts, pistachios, and dried cherries. The same ones served at the resort!

    You might also like the famous Jacques Torres chocolate chip cookies, our copycat Subway chocolate chip cookies, Disney's Grand Floridian chocolate chip cookies or our copycat Gideon's Bakehouse cookies.

    Disney's riviera resort cookies

    Watch our step by step video!

    I've been on a mission to make a variety of famous chocolate chip cookies. From copycat Levain cookies to Mama Kelce's cookie recipe---if the recipe exists, I've made it. If it doesn't exist, I've come up with a copycat version. The Disney Grand Floridian cookies are very popular, but have you ever tried the Disney Riviera Signature Cookie? They are completely different with a combination of unique ingredients. If you like Double Tree hotel chocolate chip cookies, you might find these to be similar. They both contain ground oats and lots of nuts.

    Disney's riviera Resor cookies on parchment paper

    Disney's Riviera Signature Cookies

    The unique combination of ingredients truly sets these cookies apart. Ground oats, ground chocolate, molasses, dried cherries, PISTACHIOS, walnuts---these aren't your typical chocolate chip cookie or a basic oatmeal cookie. If you don't like those ingredients you can totally omit or swap them out, but if you want to make the same cookies that are found inside Prima Piatto at Disney's Riviera Resort---these are it!

    hand holding Disney cookie

    What Sets These Signature Cookies Apart

    Ground Oats: Have you ever made cookies with ground oats? Like Double Tree cookies, these call for the oats to be ground (blended) before adding them to the dough. You get the flavor and nutrients of oats with a smoother texture in the cookie.

    Ground Chocolate: This was a first for me. The recipe calls for ¾ cup ground (blended) mini chocolate chips. It's easy to do and spreads the chocolate throughout every bite.

    Pistachios and Walnuts: I've never had a cookie with pistachios in them before. They are very flavorful and not as subtle as walnuts. I used lightly salted pistachios. If you do the same you can omit the salt called for in the cookie dough (but still add some flaked sea salt on top of the cookies---it gives them great flavor).

    Dried Cherries: I'm not a big raisin fan so I wasn't sure if I'd like cookies with dried cherries, but cherries are much more tart and I liked the flavor! You can, of course, use raising or omit them altogether if you prefer. I used a 5-ounce bag of dried cherries, slightly less than what the recipe calls for, but I didn't think that it was worth buying two bags.

    Molasses: This recipe calls for a tablespoon of molasses which gives the cookies rich flavor. You can smell the molasses as you mix the dough!

    disney signature cookie broken in half

    Riviera Resort Signature Cookie Ingredients

    (Here is the original recipe source)

    • 2 cups all-purpose flour
    • 1 teaspoon coarse salt (omit or decrease to ½ teaspoon if using salted butter and salted pistachios)
    • ¾ teaspoon baking soda
    • ½ teaspoon baking powder
    • 2 ¼ cup oats, ground
    • ¾ cup mini semi-sweet chocolate chips, ground
    • 1 cup unsalted butter, at room temperature
    • 1 ¼ cups brown sugar, packed
    • 1 cup sugar
    • 1 tablespoon molasses
    • 2 eggs
    • 1 teaspoon vanilla extract
    • 1 cup walnuts, finely chopped
    • 1 ¼ cup pistachios, finely chopped
    • 1 ¼ cup dried cherries, finely chopped (I used a 5 oz. bag)
    • 1 ¼ cup mini semi-sweet chocolate chips
    • Sea salt flakes, to taste

    chocolate chip cookies on parchment paper

    How To Make Disney's Riviera Resort Cookies

    Preheat oven to 350°F. Line a baking sheet with parchment paper; set aside.

    Blend oats in a blender or food processor. Set aside. Blend chocolate chips in a blender or food processor. Set aside.

    Sift flour, salt, baking soda, and baking powder in a large mixing bowl. Stir in ground oats and ground chocolate chips.

    mini chocolate chips in blender

    In a separate bowl, cream butter, both sugars and molasses with an electric mixer until fluffy.

    Add eggs, one at a time, and beat on low speed until fully incorporated. Add vanilla and beat, scraping the bowl as needed, for 1 minute.

    Add ⅓ of the flour mixture and beat on low speed until just mixed. Continue with the remaining flour. Mix in walnuts, pistachios, dried cherries, and mini
    chocolate chips.

    cookie dough mounds on parchment lined baking sheet

    Place six (¼ cup) balls of dough on a baking sheet. Flatten slightly and top with the desired amount of sea salt flakes.

    Bake for 12 minutes. Cool for 3-5 minutes before moving to wire racks. Repeat with the remaining dough.

    two Disney riviera cookies

    The cookies taste best after sitting for an hour or so. It gives them a chance to cool, set up, and let the flavors meld with the sea salt.

    Disney's Riviera Signature Cookies Recipe

    (printable version)

    Disney's riviera Resor cookies on parchment paper
    Print Pin
    5 from 1 vote

    Disney's Riviera Signature Cookies

    Disney's Riviera Signature Cookies are loaded with chocolate, walnuts, pistachios and dried cherries. The same ones served at the resort!
    Course Dessert
    Cuisine American
    Prep Time 15 minutes minutes
    Cook Time 12 minutes minutes
    cooling time 2 minutes minutes
    Total Time 29 minutes minutes
    Servings 22
    Calories 275kcal
    Author Brandy Nelson

    Ingredients

    • 2 cups all-purpose flour
    • 1 teaspoon coarse salt
    • ¾ teaspoon baking soda
    • ½ teaspoon baking powder
    • 2 ¼ cup oats ground
    • ¾ cup mini semi-sweet chocolate chips ground
    • 1 cup unsalted butter softened (I used salted)
    • 1 ¼ cups brown sugar packed
    • 1 cup sugar
    • 1 tablespoon molasses
    • 2 eggs
    • 1 teaspoon vanilla extract
    • 1 cup walnuts finely chopped
    • 1 ¼ cup pistachios finely chopped
    • 1 ¼ cup dried cherries finely chopped (5 oz. bag)
    • 1 ¼ cup mini semi-sweet chocolate chips
    • sea salt flakes to taste

    Instructions

    • Preheat oven to 350°F. Line a baking sheet with parchment paper.
    • Combine flour, salt, baking soda, and baking powder in a large mixing bowl
    • Stir in ground oats and ground chocolate chips; set aside.
    • Cream butter, both sugars, and molasses in with an electric mixer until fluffy.
    • Add eggs, one at a time, and beat on low speed until fully incorporated.
    • Add vanilla and beat, scraping the bowl as needed, for 1 minute.
    • Add ⅓ of the flour mixture and beat on low speed until just mixed. Continue with the remaining flour.
    • Mix in walnuts, pistachios, dried cherries, and mini chocolate chips.
    • Place six (¼ cup) balls of dough on a baking sheet. Flatten slightly and top with sea salt flakes.
    • Bake for 12 minutes. Cool for 2 minutes before moving to wire racks. Repeat with the rest of the cookie dough.

    Video

    Notes

    Disney's Note: For a thinner, crispier cookie, preheat the oven to 375°F and bake for 7 minutes. Reduce heat to 350° and bake for 3 additional minutes.
    Brandy's Notes: I used salted butter and lightly salted pistachios. I used a 5-ounce bag of dried cherries, slightly less than what the recipe calls for, but I didn't think that it was worth buying two bags. I found that the cookies tasted best after sitting for an hour or so. It gave them a chance to cool, set up, and let the flavors meld with the sea salt.
    Wrap cookies individually in plastic to keep them fresh or store them in an airtight container for 2-3 days. Cookies can be reheated in the microwave for a few seconds to soften and warm on day 2.

    Nutrition

    Calories: 275kcal

    Great Harvest Cinnamon Chip Bread Copycat Recipe

    March 20, 2024 By Brandy 11 Comments

    Loaf of great harvest bread in pie pan.

    My copycat Great Harvest cinnamon chip bread is delicious with bursts of cinnamon in every bite. This recipe makes two loaves. You can bake round loaves in a pie pan or regular loaves in bread pans.

    You might also like our cinnamon swirl bread, our egg bread, or our pull-apart apple bread.

    Loaf of cinnamon chip bread in pie pan.

    I've never been fortunate enough to live next to a Great Harvest Bread store, so I pick up a couple of loaves whenever I'm in Utah. My absolute favorite is their cinnamon chip bread (also called cinnamon burst bread). It is unbelievably delicious with little bursts of cinnamon in every bite. My copycat version makes 2 loaves of perfectly soft cinnamon chip bread.

    Why I Like This Recipe

    • Flavorful. Every bite is loaded with a burst of cinnamon. The cinnamon chips that I use for this bread are different than Hershey's cinnamon baking chips. I've made cinnamon chip bread with Hershey's cinnamon chips; however, they don't melt the same way as the ones used by Great Harvest, leaving streaks of melted cinnamon chips (like melted chocolate chips) rather than pockets of cinnamon in every bite.
    • Tried and true bread dough recipe. The base dough for this recipe is the same one that I use for making egg bread. Egg bread uses milk instead of water, butter instead of oil, and adds 3 eggs. The egg yolks give the bread a slightly yellow color and add moisture and richness. You can brush the tops of the loaves with melted butter or an egg wash right out of the oven. I like using melted butter because it adds great flavor. It is the perfect base for cinnamon bread!
    • Makes two loaves at a time. If you are going to take the time and effort to make one loaf, you might as well make two. You can easily bake them together in the oven, so I included measurements for making two loaves.

    What Others Are Saying

    Thank you for sharing your recipe, Brandy. I just made this and it tasted really good 🙂---Blaz

    Great Harvest closed its stores here several years ago and I have missed their Cinnamon Chip Bread a lot. So glad I found this recipe and recommendation for the Gygi Cinnamon Chips. The chips with postage are a bit pricey, but well worth the expense. I actually halved the recipe to make only one loaf to see if it was good since there were a couple other recipes online. I will look no further; this recipe is absolutely delicious and definitely a winner in my book! This bread makes the very best French Toast, too.---Janice

    [feast_advanced_jump_to]
    Bag of cinnamon chips from orson gygi.

    Tips and Tricks

    • Best cinnamon chips. I wanted to find cinnamon chips that were closer to what Great Harvest uses, and I finally did! You can order bags of cinnamon chips (that are LEGIT) from Orson Gygi. The only catch is that shipping is ridiculous unless you spend $75. The cinnamon chips are a great price (cheaper than the brand sold on Amazon), so it's worth going in with a few friends and ordering a bunch of 5-pound bags. They sell other types of chocolate chips as well as baking supplies and home decor, so it's easy to meet the shipping quota. You can also use Hershey's cinnamon chips, but keep in mind that they won't be as close to a copycat version as Orson Gygi's cinnamon chips.
    • Dough rising hack. Use a shower cap to cover your bowl. They come in a pack of 10 on Amazon or at Walmart for a couple of bucks and can be reused over and over!
    • Room temperature rise. Normally, I recommend allowing bread dough to rise in a warm place, like an oven preheated for 60 seconds, but for this recipe, the best place is the counter at room temperature. The cinnamon chips are teeny tiny, and we want to avoid them melting into the dough before baking. They'll soften as the dough rises, and that's ok, but it's easier to shape the loaves if they aren't melted and smearing onto your workspace. The goal is for the chips to melt in the oven, not during the rise.
    • Allow bread to cool completely. Nothing beats a warm slice of homemade bread, but the loaf is much easier to slice when it is cool.

    Ingredients

    Bowls of flour, sugar, butter, salt, yeast, bottle of milk, and 3 eggs.
    • Milk: You can use milk or water. Milk adds flavor, richness, and texture to bread, giving it a golden crust and a tender crumb, but the bread is delicious when made with water as well. If using milk, follow the recipe as directed. If using water, use warm tap water and melted butter.
    • Butter: I prefer butter to any other fat for most baked goods, as it adds richness and flavor. However, oil can also be used.
    • Sugar: Great Harvest uses honey in its bread. If you'd like to use honey instead of sugar, you can absolutely do that. Use 2-3 tablespoons of honey instead of the ¼ cup of sugar that is called for in my recipe.
    • Flour: Both all-purpose flour and bread flour work well. I do not have a preference between the two. You'll need 6 ½ cups to 7 ½ cups of flour. The dough is soft and slightly sticky, but you should be able to work with it easily. Start with 6 ½ cups of flour and add more if necessary.
    • Yeast: Use either dry active yeast or instant yeast, both of which work well.
    • Salt
    • Eggs: The eggs are what really set these loaves apart from other white bread recipes. Eggs give richness to the bread and a beautiful yellow color.
    • Butter: I like brushing the hot loaves with butter when they come out of the oven. It gives them a shiny crust and delicious flavor.
    • Cinnamon chips: See my notes in the Tips and Tricks section for the best cinnamon chips to use.

    See the recipe card for full information on ingredients and quantities.

    How To Make Copycat Great Harvest Cinnamon Chip Bread

    cinnamon chip bread dough cut in half and shaped into a ball.

    Step 1: Microwave milk, sugar, and butter in a microwave-safe bowl (or heat over the stove) until the butter begins to melt. This should take around 90 seconds. Stir. The milk should be around 115-120 degrees (if it is hotter, it will need to cool before use). Note: If using water, use warm tap water and melted butter. No need to heat the water on the stove.

    Step 2: In a large bowl, combine 3 cups of the flour, yeast, and salt. Pour the milk mixture into the dry ingredients. Add eggs and mix well. Add the remaining flour and mix until a soft dough forms. Mix in cinnamon chips. The dough is soft and slightly sticky, but you should be able to work with it easily. Start with 6 ½ cups of flour and add more if necessary.

    Step 3. Turn the dough out on a lightly floured surface and knead until smooth and elastic. Place the dough in an oiled bowl and cover it with a damp cloth or plastic. Let rise at room temperature for 60-90 minutes.

    Step 4: Punch the dough down and divide it into 2 portions. Shape each portion into a round loaf and place in greased pie pans (pie plates). Let rise for 30 minutes.

    Note: You can bake round loaves in a pie pan or regular loaves in bread pans. Baking time and temp are the same.

    loaf of cinnamon chip bread in pie pan

    Step 5: Preheat the oven to 350 degrees and bake the loaves for 30 minutes.

    loaf of copycat great harvest cinnamon chip bread on a wire cooling rack

    Step 6: Allow bread to cool for 5-10 minutes before transferring to a wire cooling rack. Cool completely before slicing.

    Storage: Allow bread to cool completely, then wrap in plastic or store in an airtight container to keep fresh for up to 3 days.

    Cinnamon Chip Bread FAQs

    What kind of cinnamon chips are best for copycat Great Harvest bread?

    Mini cinnamon chips from Orson Gygi are the best if you want a nearly identical version of Great Harvest's cinnamon chip loaf. You can use Hershey's cinnamon baking chips, and the bread will be delicious, but it won't be the same. Hershey baking chips are waxier and melt like chocolate chips throughout the bread, while those from Orson Gygi leave bursts of cinnamon flavor.

    What kind of bread pan do you use for copycat Great Harvest bread?

    For round loaves, bake in glass or metal pie pans. For traditional loaves, bake in metal loaf pans.

    How do you store cinnamon chip bread?

    Allow bread to cool completely, then wrap in plastic or store in an airtight container to keep fresh for up to 3 days.

    two slices of cinnamon chip bread with a butter dish

    More Bread Recipes To Make

    • Apple fritter bread with glaze drizzled over top.
      Apple Fritter Bread Recipe
    • Two loaves of French bread on cutting board.
      Amazing French Bread Recipe Makes 2 Loaves
    • english muffin toast with butter
      English Muffin Bread Recipe (Video)
    • Amish white board sliced on cutting board.
      Homemade Amish White Bread Recipe

    MADE THIS RECIPE AND LOVED IT? 💛 Please leave a STAR rating and COMMENT below! Post it to Facebook or Pinterest to easily share with friends!

    Loaf of great harvest bread in pie pan.
    Print Pin
    5 from 3 votes

    Great Harvest Cinnamon Chip Bread Copycat Recipe

    My copycat Great Harvest cinnamon chip bread is delicious with bursts of cinnamon in every bite. This recipe makes two loaves.
    Course Breakfast, Snack
    Cuisine American
    Prep Time 20 minutes minutes
    Cook Time 30 minutes minutes
    rise 1 hour hour 35 minutes minutes
    Total Time 2 hours hours 25 minutes minutes
    Servings 2 loaves
    Calories 2948kcal
    Author Brandy Nelson

    Ingredients

    • 2 cups milk or warm water
    • ¼ cup butter softened
    • ¼ cup sugar
    • 6 ½- 7 ½ cups all-purpose flour or bread flour, divided
    • 2 pkgs. yeast 4 ½ teaspoons
    • 1 ½ teaspoons salt
    • 3 eggs
    • 2 cups cinnamon chips
    • butter for brushing onto loaves

    Instructions

    • Heat milk, sugar, and butter in a microwave-safe bowl (or heat over the stove) for 90 seconds or until the butter begins to melt. Stir. The milk should be around 115-120 degrees.
      Note: If using water, use warm tap water and melted butter. No need to heat on the stove.
    • In a large mixing bowl, combine 3 cups of flour, yeast, and salt. Pour the milk mixture into the dry ingredients. Add eggs and mix well. Add the remaining flour and mix until a soft dough forms. Stir in the cinnamon chips. The dough will be soft and slightly stickier than other yeast breads.
    • Turn the dough out on a lightly floured surface and knead until smooth and elastic. Place the dough in an oiled bowl and cover it with a damp cloth or plastic wrap. Let rise at room temperature for 1 hour.
    • Punch dough down and divide into 2 portions.
    • Shape each portion into a loaf shape and place loaves in greased pie pans (pie plates).
      Note: You can bake round loaves in a pie pan or regular loaves in bread pans. Baking time and temp are the same.
    • Cover pans with a damp cloth and allow to rise for 35 minutes.
    • Preheat the oven to 350 degrees.
    • Bake loaves for 30 minutes. Brush with butter. Let loaves sit in pans for 5 minutes before transferring to wire cooling racks.
      Cool completely before slicing.

    Video

    Notes

    Wrap bread in plastic and store it at room temperature for up to 3 days. Bread freezes well and can also be stored in the freezer to thaw at a later date.

    Nutrition

    Calories: 2948kcal | Carbohydrates: 417g | Protein: 66g | Fat: 110g | Saturated Fat: 61g | Polyunsaturated Fat: 6g | Monounsaturated Fat: 31g | Trans Fat: 1g | Cholesterol: 347mg | Sodium: 2139mg | Potassium: 1887mg | Fiber: 25g | Sugar: 104g | Vitamin A: 1551IU | Calcium: 513mg | Iron: 30mg


    Mama Kelce's Cookie Recipe

    March 15, 2024 By Brandy 8 Comments

    Mama kelce cookies on parchment paper

    Loaded with white chocolate chips, milk chocolate chips, nuts, and a hint of cinnamon, Mama Kelce's cookie recipe is amazing! Crispy on the outside and chewy in the center. Here is my review of the viral recipe!

    You might also like the famous Jacques Torres chocolate chip cookies, copycat Subway chocolate chip cookies, or copycat Gideon's Bakehouse chocolate chip cookies. I even have a copy of the Martha Stewart Fired Me Cookies!

    Mama Kelce cookies on parchment paper

    Right before Super Bowl 57, on opening night, Donna Kelce met her sons Travis and Jason on stage and presented them with a container of her famous cookies. Mama Kelce has been known to share them with TV hosts and even donated her recipe to be made and sold for fundraisers.

    About sharing her recipe Donna said, “In this season of giving, it means so much to raise money for two great charities through an old-fashioned bake sale. My chocolate chip cookies have been a staple in our house for a long time, so it’s very special to share the recipe that my sons love with fans during the holidays."

    When the recipe was shared in People magazine, I bookmarked it and knew that I had to try it! I'm not typically a big fan of white chocolate chips, but the combination of milk chocolate, white chocolate, nuts, and a hint of cinnamon might just be my new favorite now.

    Many of you know that I've been on a quest for the past two years to make all of the most famous chocolate chip recipes. Today, I'm excited to add to my famous chocolate chip cookie recipe collection with the addition of Mama Kelce's chocolate chip cookies.

    Why I Like This Recipe

    1. Incredible flavor combination. These are, quite possibly, one of the BEST flavored chocolate chip cookies that I've ever had, and I don't say that lightly. These are the most unique chocolate chip cookie recipe and the extra steps are totally worth it. I’m going to share the exact recipe and then share what I’d change if I made them again.
    2. Uses Melted Butter: this recipe calls for melted butter that has been cooled to room temperature. When combined with brown sugar it creates a caramel flavor throughout the cookie (see my notes at the end).
    3. Cinnamon Flavor: Double Tree uses a small amount of cinnamon to set their cookies apart. Mama Kelce's cookies call for a teaspoon and it gives such a unique touch to the cookies.
    4. Chills 3-24 Hours: I typically shy away from chilling dough unless absolutely necessary. Because of the melted butter, it is necessary to chill the dough and it's worth the effort! Not only does it allow the dough to set up, it intensifies the flavor. It is recommended to chill the dough for 3-24 hours.
    5. Milk Chocolate and White Chocolate: most recipes call for semisweet chips, but the milk chocolate and white chocolate play really well together in these cookies.
    6. Crispy and Chewy: I was worried that the cookies would be too crispy because they bake up thin, but they were perfect! Crispy on the outside and soft in the center---even on day 2.

    What Others Are Saying

     I did use just a cup of salted butter and reduced the amount of salt to 1 tsp. I chilled it overnight, and I proportioned the cookie dough already, as always, and so much easier. All in all, this is a very good recipe. I brought it to work today for my co-workers to enjoy🐸🤗 ---Cristina

    Love this recipe and have made the adjustments of less butter. I also incorporate corn starch to prevent over-spreading. I always get rave reviews about these cookies.---Julia

    [feast_advanced_jump_to]
    Hand holding a Mama Kelce cookie.

    🍪Tips and Tricks

    • Make them as directed the first time. I wanted to try Mama Kelce's exact recipe before tweaking it at all. However, after making them, I decided that if I were to make these again, I’d probably reduce the amount of butter to 2 sticks or increase the flour. Reducing the butter would yield cookies that aren’t quite as flat and don’t need to be re-shaped after baking. I feel like the flavor would be very similar. Still, I absolutely loved these cookies and will be making them again-with those adjustments. They stayed soft for 3 days!
    • How to reshape cookies. These cookies bake up flatter than many of my recipes. Some came out perfectly round, and others looked a little wonky in shape (which, according to images others have shared, is normal). To fix this, I re-shaped the hot cookies with a spatula. It's easy to do and creates perfectly round cookies.
    • How to make jumbo or regular-sized cookies. For regular cookies (about 2 Tablespoons of cookie dough), bake for 10 minutes, or until lightly golden around the edges. For larger cookies (3 Tablespoons), bake for 13 to 15 minutes.

    🥣 Recipe Ingredients

    Stick of butter, bowls of sugar, cinnamon pecans, salt, baking powder, baking soda, flour, chocolate chips, white chocolate chips, bottle vanilla and two eggs.
    • Butter: I always use salted butter, but you can use unsalted
    • Light brown sugar and white sugar: This recipe calls for a combination of both.
    • Eggs: 1 egg and 1 egg yolk for richness.
    • Baking Soda and Hot Water: you mix these together and add it to the cookie dough mixture.
    • All All-purpose flour AND Cake (Pastry) Flour: a combination of both for great texture.
    • Ground cinnamon: Not typical in most chocolate chip cookie recipes, but it adds such a unique flavor when mixed with the white chocolate chips and milk chocolate chips.
    • Milk Chocolate Chips AND White Chocolate Chips: the combination really sets the cookies apart.
    • Chopped Pecans (optional): I used walnuts.

    See the recipe card for full information on ingredients and quantities.

    👩‍🍳How To Make Donna Kelce's Chocolate Chip Cookies

    Glass bowl of melted butter.

    Step 1: Melt butter in the microwave in 20-second increments until melted. Pour into a mixing bowl or stand mixer. Let cool for 15 to 20 minutes.

    Electric mixer beating sugar, eggs and butter in glass mixing bowl.

    Step 2: Add brown and white sugar to the butter mixture and beat with a mixer for a few minutes. Add egg and egg yolk and mix. Add vanilla and mix for 30 seconds.

    Small white bowl of water and teaspoon of baking soda.

    Step 3: In a small bowl mix hot water and baking soda together. Add this to the cookie dough and mix.

    Bowl of flour, cinnamon and baking powder.

    Step 4: In a separate bowl, add all-purpose flour, cake flour, baking powder, cinnamon, and salt. Mix to combine. Slowly add this mixture to the wet ingredients and mix.

    Bowl of cookie dough with milk chocolate chips, white chocolate chips and walnuts.

    Step 5: Stir in all chocolate chips and nuts with a rubber spatula or wooden spoon. Chill for 3-24 hours (I chilled mine for 3 hours).

    Two scoops of cookie dough on baking sheet.

    Step 6: Preheat oven to 350°. Allow cookie dough to come to room temperature. Line baking sheets with parchment paper and scoop cookie dough (or drop with a spoon) onto baking sheets.

    Mama Kelce's cookies on baking sheet

    Step 7: For regular cookies (about 2 Tablespoons of cookie dough), bake for 10 minutes, or until lightly golden around the edges. For larger cookies (3 Tablespoons), bake for 13 to 15 minutes.

    spatula reshaping cookies

    Step 8: These cookies bake up flatter than many of my recipes. Some came out perfectly round, and others looked a little wonky in shape (which, according to images others have shared, is normal). To fix this, I re-shaped the hot cookies with a spatula. It's easy to do and creates perfectly round cookies.

    Mama Kelce's Cookies FAQs

    How do you store Mama Kelce chocolate chip cookies?

    Allow cookies to cool on a baking sheet for 3-5 minutes then transfer to a wire cooling rack. Store cooled cookies in an airtight container. They'll stay soft for several days!

    Why are my cookies flat?

    These cookies bake up flatter than many of my recipes. To fix any wonky-shaped cookies, re-shape the hot cookies with a spatula. It's easy to do and creates perfectly round cookies.

    Do you need to use cake flour in Mama Kelce cookies?

    The recipe calls for a combination of all-purpose flour and cake flour. If you don't have cake flour on hand, you can make some by using a combination of all-purpose flour and corn starch. Remove 2 tablespoons of flour from the measuring cup and replace it with cornstarch. Voila! Cake flour. You can use 100% all-purpose flour, but the combination using cake flour creates a softer cookie.

    stack of Mama Kelce's cookies

    More Famous Cookie Recipes To Make

    • Mrs. Fields chocolate chip cookies on cooling rack.
      Mrs Fields Chocolate Chip Cookie Recipe (Blue Ribbon)
    • baking sheet with parchment paper and batch of copycat famous amos chocolate chip cookies
      Copycat Famous Amos Chocolate Chip Cookies (Crispy!)
    • two jumbo chocolate chip cookies
      Disney's Grand Floridian Chocolate Chip Cookies
    • Snoop Dogg cookies on parchment paper.
      Snoop Dogg's Rolls Royce Cookies

    MADE THIS RECIPE AND LOVED IT? 💛 Please leave a STAR rating and COMMENT below! Post it to Facebook or Pinterest to easily share with friends!

    Mama kelce cookies on parchment paper
    Print Pin
    5 from 5 votes

    Mama Kelce's Chocolate Chip Cookie Recipe

    Loaded with white chocolate chips, milk chocolate chips, nuts, and a hint of cinnamon, Mama Kelce's chocolate chip cookies are famous for a reason!
    Course Dessert
    Cuisine American
    Prep Time 10 minutes minutes
    Cook Time 14 minutes minutes
    chill 3 hours hours
    Total Time 3 hours hours 24 minutes minutes
    Servings 48 cookies
    Calories 179kcal
    Author Brandy Nelson

    Ingredients

    • 1½ cups sweet cream butter 3 sticks
    • 1½ cups packed light brown sugar
    • 1 cup white sugar
    • 1 large egg + 1 egg yolk
    • 1 Tbsp. vanilla extract
    • 1 tsp. baking soda dissolved in 2 Tbsp. of hot water to activate; microwave water first then stir in baking soda to dissolve
    • 2 cups all purpose flour
    • 1 cup cake or pastry flour
    • 1 tsp. baking powder
    • 1 tsp. cinnamon
    • 1½ tsp. salt
    • 1 cup white chocolate chips
    • 1 cup milk chocolate chips
    • 1 cup chopped pecans optional

    Instructions

    • Melt butter in the microwave in 20-second increments until melted.
      Pour into a mixing bowl or stand mixer. Let cool for 15 to 20 minutes.
    • Add brown and white sugar to the butter mixture and beat with a mixer for a few minutes.
      Add egg and egg yolk and mix.
      Add vanilla and mix for 30 seconds.
    • In a small bowl mix 2 Tablespoons of hot water and baking soda together. Add this to the cookie dough and mix.
      In a separate bowl, add all-purpose flour, cake flour, baking powder, cinnamon, and salt. Mix to combine. Slowly add this mixture to the wet ingredients and mix.
      Stir in all chocolate chips and nuts with a rubber spatula or wooden spoon.
    • Cover the bowl with plastic and chill for 3-24 hours.
    • Preheat oven to 350°.
      Allow cookie dough to come to room temperature. Line baking sheets with parchment paper and drop cookie dough onto baking sheets. These cookies spread considerably so bake 4-6 cookies at a time.
    • For regular cookies (about 2 Tablespoons of cookie dough), bake for 10 minutes, or until lightly golden around the edges. For larger cookies (3 Tablespoons), bake for 13 to 15 minutes.
      Brandy's Note: these cookies bake up flatter than many of my recipes. Some came out perfectly round, and others looked a little wonky in shape (which, according to images others have shared is normal). To fix this I re-shaped the hot cookies with a spatula. It's easy to do and creates perfectly round cookies. You can see how I did that in my video. The result is perfectly round cookies with great thickness and texture.
    • Allow cookies to cool on a baking sheet for 3-5 minutes then transfer to a wire cooling rack.

    Video

    Notes

    • Store cooled cookies in an airtight container.
    • This recipe makes 3-4 dozen small cookies and 2 dozen large ones. I made mine 3 Tablespoon-sized and baked them for 14 minutes. I ended up with 2 dozen cookies. 
    • The measurements in this recipe are exactly the same as the original, but I re-wrote the directions. Original recipe credit.

    Nutrition

    Calories: 179kcal | Carbohydrates: 22g | Protein: 1g | Fat: 10g | Saturated Fat: 5g | Polyunsaturated Fat: 1g | Monounsaturated Fat: 3g | Trans Fat: 0.2g | Cholesterol: 19mg | Sodium: 151mg | Potassium: 52mg | Fiber: 0.5g | Sugar: 15g | Vitamin A: 185IU | Vitamin C: 0.05mg | Calcium: 28mg | Iron: 0.4mg

    How To Make Panoramic Sugar Eggs for Easter

    March 4, 2024 By Brandy 4 Comments

    Blue panoramic sugar egg frosted with flowers.

    Make nostalgic panoramic sugar eggs for Easter with this tutorial! Sugar eggs last for years on display and are loaded with cuteness.

    You might also like our peeps bunny sugar cookies, pop tart bunny house, or our bunny butt sugar cookies!

    Blue vintage panoramic sugar egg.

    My Grandma had a beautiful egg on display in her china cabinet. It was made of sugar, and when you looked inside, you could see all sorts of flowers and decorations made of icing. The outside was decorated too. I knew it was a work of art, but silently wanted to eat it (as I'm sure most kids would). That sugar egg stayed on display for over 15 years. I'm not sure what happened to the beautiful egg when she moved out of her home, but I decided this year that it was time to learn how to make them with my kids. Our vintage-inspired sugar eggs are less intricate but a lot of fun to make and easy to assemble, and they give the same nostalgic feel.

    Why I Like This Craft

    • Simple decorations. Many of the eggs that you see are made with 100% handmade icing flowers and intricate characters. We used pre-made icing decorations to make assembly easier, and I love how they turned out. We even have a dinosaur version, which definitely sets that one apart.
    • Step-by-step video. I've now made 6+ eggs using this technique with great success! I highly recommend watching the step-by-step video that I made (it plays under the first image in this post) as well as in the instruction card at the end of the post.
    • The sugar can be reused! That's right. If your egg crumbles, mash the sugar up and use it again. After you hollow out the eggs you can reuse the sugar that you removed to make more sugar eggs.

    What Others Are Saying

    This recipe and instructions have worked wonderfully for me. Just made my second egg in two days.---B on Pinterest

    I made one using a large plastic egg from Walmart!---Christina on FB

    These are so nostalgic from my childhood.---Stacy on FB

    [feast_advanced_jump_to]
    Two decorated sugar egg halves.

    Tips and Tricks

    • Vertical panoramic eggs vs. horizontal. Panoramic sugar eggs can be made vertically or horizontally. I prefer the look of vertical eggs, so my eggs are standing tall. You can make whatever you'd like; you'll just need to adjust the location of the look-through hole. If making a horizontal egg, you'll cut off the tip of each molded sugar egg to create a hole to peer through. With vertical eggs, you'll create a hole in the front of each egg with a cookie cutter.
    • Baking vs. air drying. I tried several techniques to make the molded sugar eggs. My first attempt was from a tutorial that I found on Taste of Home. It took HOURS to dry, and my eggs immediately crumbled, probably because it was a rainy day and they couldn't dry completely due to the humidity. Then I went over to YouTube and watched probably a dozen videos with varying techniques and measurements. The trick is to bake the eggs in the oven for a few minutes instead of air-drying. Once I did that, it was smooth sailing.
    • Different-sized molds require different amounts of sugar. My 5.5" egg mold uses 3 cups of sugar and 2 tablespoons of water. If the mold that you use is bigger or smaller you'll need to adjust.
    • When you bake the egg, you are ONLY drying out the outside of the egg. DO NOT bake longer than my recommended time because you want the inside of the egg to still be slightly soft, making it easy to scoop the excess sugar out.
    • Use royal icing to assemble the egg. Do not use store-bought frosting in a tub (buttercream). Royal icing sets up like cement and can stand the test of time.
    • Humidity and climate can affect drying times for the molded sugar eggs. This is why I recommend baking the eggs instead of allowing them to air dry. It's quicker and yields better results for me.

    Supplies

    Two sugar egg halves next to tubes of frosting and bowls of sugar decorations.

    Sugar Egg

    • egg mold: I found this egg mold on Amazon and it worked great. It comes with two cavities, but I found it easier to just fill one side of the mold at a time, transferring the egg half to a piece of cardboard and then making the other half of the egg.
    • water: a small amount of water mixed with the sugar creates a sand-like texture for molding the eggs.
    • food coloring: this is optional, but if you'd like a pretty pastel egg you'll need about 6 drops of food coloring added to your water.
    • sugar: white granulated sugar works great for sugar eggs. Some recipes call for caster sugar or pulsing the granulated sugar in a food processor. This isn't necessary. Plain white sugar works great.
    • cookie cutter: you'll need some sort of cookie cutter to create the opening for the panoramic egg. I used a small oval (egg-shaped) cutter that I already had.
    • cardboard: you'll need a couple of pieces of cardboard that are slightly larger than your mold (just cut off the flaps from an Amazon box). You'll place the molded eggs onto the cardboard to bake in the oven. Don't worry, the oven temp is low and won't burn the cardboard.
    panoramic sugar egg supplies on cutting board

    Royal Icing

    • powdered sugar (confectioners' sugar)
    • meringue powder: when I make my pop tart houses I simply use powdered sugar and water to make my royal icing and it works great. For sugar eggs you want an extremely sturdy icing that you can pipe so I added meringue powder. You can also use a royal icing recipe that calls for egg whites.
    • warm water: room temperature water or warm water works best when mixed with meringue powder.
    • food coloring: we only colored the royal icing that we used for the grass, but you can divide the icing and make a variety of colors.
    bowl of icing decorations, sprinkles and mini jelly beans

    Decorations

    • jelly beans: Mini jelly beans worked perfectly as Easter eggs and dinosaur eggs.
    • icing decorations: you can find these on Amazon or at Target, Walmart, or Michaels. The dinosaur ones are from Walmart.
    • icing tip for grass: you can use a star tip if you don't have a grass tip to create a grassy patch of frosting.
    • icing tip (Wilton #32 star): this tip is used for hiding the seam on the egg with icing.
    • sprinkles: optional, but Easter sprinkles are fun to add. My kids added a few to the white shell border on the outside of their eggs.
    • disposable icing bags: these disposable icing bags make cleanup a breeze. I recommend double bagging the royal icing.

    See the how-to card at the end of the post for full information on supplies and quantities.

    Green dinosaur sugar egg.

    How To Make Panoramic Sugar Eggs

    hand pressing wet sugar into the egg mold.

    Step 1: Combine water and food coloring together in a small bowl. The color will fade when mixed with sugar so use a little more food coloring than you think you'll need. Pour the colored water over 3 cups of white sugar in a mixing bowl. Mix with a whisk or wooden spoon until evenly distributed. The mixture should look and feel like wet sand.

    Step 2: Pack the sugar into the egg mold. Fill all the way to the top, packing tight.

    Step 3: Smooth the top of the mold with a spatula, scraping off excess sugar.

    hand gently pressing cookie cutter into the sugar to create the window on the sugar eggs

    Step 4: Lay cardboard over the top of the mold, press down with one hand while holding the mold with the other, and flip. Gently remove mold. If the egg crumbles when you remove the mold, simply pack it again even tighter and try again.

    Step 5: Gently press a small cookie cutter ⅛" - ¼" into the top of one of the egg halves. Remove the cookie cutter. This will be where the window will be. Note: you are not cutting all the way through, just making an indentation that will fall out later.

    Step 6: Carefully slice a small piece off of the bottom of each egg so that the egg has a flat place to stand once put together.

    Step 7: Discard the excess sugar back into the bowl.

    Step 8: You should now have two egg halves on pieces of cardboard. You can place them both onto a baking sheet or simply bake the cardboard directly on the oven rack (it will not burn). Bake the eggs at 200 degrees for 10 minutes. Cool for 10 minutes.

    spoon scooping sugar out from each egg half.

    Step 9: Hollow out each egg half using a spoon, discarding excess sugar back into the bowl (you can reuse this to make more eggs by adding a little water to rehydrate it).

    Step 10: Continue to carefully scoop until you have a shell with a ⅜"-½" rim.

    Step 11: When you get to the shell with the window, gently tap against it with your spoon and it should fall right out as you dig around it.

    Step 12: Smooth out the opening with the spoon. Place the eggs back into the oven and bake for an additional 5 minutes. Let cool for 5 minutes.

    adding icing decorations to the inside of the egg

    Step 13: Beat meringue powder and warm water in a stand mixer until mixed. Add powdered sugar, and beat on low until it comes together. Increase speed to medium speed for 5-8 minutes. Note: According to YummyArts it should have stiff peaks and make a "flapping noise" as it hits the side of the bowl.

    Step 14: Tint the royal icing, if desired, then transfer to disposable icing bags that have been fitted with icing tips.

    Tip: if you notice that the icing tips are getting clogged from the royal icing (which dries out quickly), fill a cup of water ½" with water and keep the frosting bags in the cup with the tips barely submerged. This will keep the icing soft and it won't harden in the icing tips.

    Step 15: Decorate your eggs from the back to the front, meaning: work on the back half of the egg first then work your way to the front half of the egg. Use the royal icing to adhere the decorations to the sugar eggs. Add jelly beans, etc. Let dry for 5-10 minutes.

    Step 16: Pipe a line of icing around the rim of one of the eggs.

    using royal icing to add details on the outside of the sugar egg

    Step 17: Press the other egg half on top and hold it in place, smoothing the edges and making sure that the flat spots on the bottom of the egg halves line up.

    Step 18: Cover the side seam with royal icing. I did a shell border, but you can do stars or any design you'd like.

    Step 19: Cover the opening edge with royal icing as well.

    Step 20: Add any finishing touches and let dry!

    Vintage Panoramic Sugar Eggs FAQs

    How long do vintage sugar Easter eggs last?

    Panoramic sugar eggs will last indefinitely if kept in a dry place. The royal icing decorations and the sugar will not mold or spoil.

    What is the best sugar egg mold for creating panoramic eggs?

    A plastic mold works well. You can find large plastic eggs at Dollar Tree or Walmart or purchase a two sided egg mold on Amazon.

    Should panoramic eggs be baked or air-dried?

    I tried several techniques to make the molded sugar eggs. The trick is to bake the eggs in the oven for a few minutes instead of air-drying. The sugar hardens quickly, but the center stays soft enough to scoop out.

    Can I make a horizontal sugar egg for Easter?

    Panoramic sugar eggs can be made vertically or horizontally. I prefer the look of vertical eggs, so my eggs are standing tall. You can make whatever you'd like; you'll just need to adjust the location of the look-through hole. If making a horizontal egg, you'll cut off the tip of each molded sugar egg to create a hole to peer through. With vertical eggs, you'll create a hole in the front of each egg with a cookie cutter.

    Can you reuse the extra sugar from panoramic sugar eggs?

    The sugar can be reused! If your egg crumbles, mash the sugar up and use it again. After you hollow out the eggs, you can reuse the sugar that you removed to make more sugar eggs.

    Are panoramic sugar eggs edible?

    Technically, yes. Everything I used is edible, but I can't imagine eating straight granulated sugar or the stale icing decorations. However, if your child takes a lick or a bite, they'll be just fine.

    Vertical panoramic sugar egg on easter grass

    More Easter Crafts To Make

    • Two felt Easter baskets filled with eggs and toys.
      DIY Fabric Easter Basket (Easy Sewing Tutorial with Video)
    • Two fleece bunnies placed against a pillow.
      10 Minute Fleece Bunny Tutorial
    • two bunny ear scrunchies
      Easy Bunny Ear Scrunchie Tutorial (+ Video)
    • Yellow peeps bunny sugar cookie.
      Peeps Bunny Sugar Cookies with Buttercream Frosting

    MADE THIS CRAFT AND LOVED IT? 💛 Please leave a STAR rating and COMMENT below! Post it to Facebook or Pinterest to easily share with friends!

    pale blue sugar egg on green edible easter grass
    Print Pin
    5 from 1 vote

    Nostalgic Sugar Eggs

    Make nostalgic panoramic sugar eggs for Easter with this tutorial! Sugar eggs last for years on display and are loaded with cuteness.
    Prep Time 10 minutes minutes
    Cook Time 30 minutes minutes
    drying 15 minutes minutes
    Total Time 55 minutes minutes
    Servings 1 egg
    Author Brandy Nelson
    Cost $3-$5

    Equipment

    • baking sheet
    • 5" egg mold
    • small cookie cutter for the egg opening

    Ingredients

    Eggs

    • 3 cups sugar
    • 2 Tbsp. water
    • food coloring
    • cardboard

    Royal Icing

    • ¼ cup meringue powder
    • ⅓ cup warm water
    • 1 pound powdered sugar
    • food coloring

    Decoration Items

    • grass frosting tip
    • star frosting tip
    • frosting bags
    • icing decorations
    • Easter sprinkles
    • mini jelly beans

    Instructions

    • Before starting this project make sure to watch my step-by-step videos as well as the youtube videos that I embedded within the post.
    • FILL THE EGG MOLDS
      Combine water and food coloring together in a small bowl. The color will fade when mixed with sugar so use a little more food coloring than you think you'll need.
      Pour the colored water over 3 cups of white sugar in a mixing bowl. Mix with a whisk or wooden spoon until evenly distributed. The mixture should look and feel like wet sand.
      Pack the sugar into the egg mold. Fill all the way to the top, packing tight.
      Smooth the top of the mold with a spatula, scraping off excess sugar.
      Lay cardboard over the top of the mold, press down with one hand while holding the mold with the other, and flip. Gently remove mold. If the egg crumbles when you remove the mold, simply pack it again even tighter and try again.
    • Gently press a small cookie cutter ⅛" - ¼" into the top of one of the egg halves. You are not cutting all the way through, just making an indentation that will pop out later.
      Remove the cookie cutter. This will be where the window will be.
      Carefully slice a small piece off of the bottom of each egg so that the egg has a flat place to stand once put together. 
      Discard the excess sugar back into the bowl.
      BAKE THE EGGS
      You should now have two egg halves on pieces of cardboard. You can place them both onto a baking sheet or simply bake the cardboard directly on the oven rack (it will not burn).
      Bake the eggs at 200 degrees for 10 minutes. Cool for 10 minutes.
    • Hollow out each egg half using a spoon, discarding excess sugar back into the bowl (you can reuse this to make more eggs by adding a little water to rehydrate it). 
      Continue to carefully scoop until you have a shell with a ⅜"-½" rim.
      When you get to the egg half with the window, gently tap against it with your spoon and it should fall right out. 
      Smooth out the opening with the spoon.
      Place the eggs back into the oven and bake for an additional 5 minutes. Let cool for 5 minutes.
    • MAKE THE ROYAL ICING
      Beat meringue powder and warm water in a stand mixer until mixed. Add powdered sugar, and beat on low until it comes together. Increase speed to medium speed for 5-8 minutes. It should have stiff peaks and make a "flapping noise" as it hits the side of the bowl. 
      DECORATE THE EGGS
      Tint the royal icing, if desired, then transfer to disposable icing bags that have been fitted with icing tips. 
      Decorate your eggs from the back to the front, meaning: work on the back half of the egg first then work your way to the front half of the egg. Use the royal icing to adhere the decorations to the sugar eggs. Add jelly beans, etc. Let dry for 5-10 minutes.
      Pipe a line of icing around the rim of one of the eggs.
    • FINISHING TOUCHES
      Press the other egg half on top and hold it in place, smoothing the edges and making sure that the flat spots on the bottom of the egg halves line up.
      Cover the side seam with royal icing. I did a shell border, but you can do stars or any design you'd like.
      Cover the opening edge with royal icing as well.
      Add any finishing touches and let dry!

    Video

    Notes

    Panoramic sugar eggs will last indefinitely if kept in a dry place. Enjoy this nostalgic decoration for years!


    • « Previous Page
    • 1
    • …
    • 14
    • 15
    • 16
    • 17
    • 18
    • …
    • 158
    • Next Page »

    Welcome!

    I'm Brandy! I love to create and share my ideas through easy-to-follow recipes and tutorials.

    More about me

    As an Amazon Associate, I make a small commission on qualifying purchases.

    sew with me kids sewing book
    My Book

    Love my family recipes and DIY projects? Add Gluesticks Blog as a Preferred Google Source, so you'll see more of my content in Google News and Search.

    Summer Posts

    • Cherry pie on prep mat.
      Best Cherry Pie Recipe
    • Bandanna Picnic Blanket Tutorial
    • diy tiki torch planter on black plant stand
      DIY Tiki Torch Planter (Table or Stand) + Video
    • slab pie on white plate
      Peach Slab Pie
    • toddler playing with dinosaur garden
      Dinosaur Garden For Kids (Fairy Garden) (Video)
    • water bottle sewing tutorial
      Color Block Fabric Water Bottle Holder Tutorial
    • strawberry pie with whipped cream on top.
      Fresh Strawberry Pie Recipe (Video)
    • slice of ice cream cake on spatula
      Oreo Ice Cream Sandwich Cake
    See more Summer →

    Latest Posts

    • Marshmallow scotcheroos on a plate.
      Marshmallow Scotcheroos
    • White plate with a slice of mixed berry pie.
      Mixed Berry Slab Pie (Raspberry, Blackberry & Blueberry)
    • Slice of strawberry rhubarb pie on plate with scoop of vanilla ice cream.
      Strawberry Rhubarb Slab Pie
    • Dot cakes in dessert cups.
      How To Make Viral Dot Cakes Using Cupcakes
    • Two bandana tote bags.
      DIY Bandana Tote Bag Tutorial (Easy Sewing Project)
    • 3 walnut brownies stacked.
      Katharine Hepburn's Brownie Recipe

    Footer

    ↑ Back to Top

    About

    • Privacy Policy
    • Accessibility Policy

    Newsletter

    • Sign Up! for emails and updates

    Contact

    • Contact

    As an Amazon Associate, I earn from qualifying purchases.

    Copyright © 2025 Gluesticks Blog

    Rate This Recipe

    Your vote:


    A rating is required
    A name is required
    An email is required